![How to Install Ansible on Ubuntu 20.04 | 7 Steps [+ Configuration]](/v3/img/containers/blog_main/ansible.jpg/3590efc3b1889a5e68ad2e6eb1dc9d91.jpg)
Ansible streamlines workflows and ensures consistency, saving developer time by automating repetitive infrastructure tasks. This tutorial will explain how to install Ansible on Ubuntu 20.04 to utilize its powerful features. We include what Ansible is and how it works, how to install Ansible on Ubuntu, configure and start using it, as well as how to use custom Ansible modules.
Prerequisites
To follow this Ansible installation guide, you will need at least two machines – a control node and a managed node – both with SSH access. For presentation purposes we are going to use three managed nodes instead of one. We suppose that you have an SSH key installed on your control node.
What is Ansible?
First, let’s go through what Ansible is and how it works. If you wish to proceed with the installation directly, skip to how to install Ansible on Ubuntu part of the tutorial. Ansible is the most straightforward software provisioning, configuration management, and application deployment system built for developers, system engineers, and network administrators, developed by the open-source community and sponsored by Red Hat.
What is Ansible used for?
Ansible is used for managing infrastructure and automating application workflows. Ansible is based on some clever design principles that make it unique:
- Easy to use. Ansible has an extremely simple setup process and a minimal learning curve. You describe your infrastructure in a language that is both machine and human friendly. Configuration directives are stored in YAML files that can later be put on a version control system for increased reliability.
- Push-based topology. You store a complete model of the entire system architecture on the central control node from which Ansible pushes configuration commands in parallel to its managed nodes.
- Agentless. Ansible avoids custom-agents and additional open ports by leveraging the existing SSH (Linux/Unix) or WinRM & PowerShell (Windows) daemons. In some systems, like Cisco routers, this may be the only way to make configuration changes.
Run your deployments in a scalable and cost-effective open cloud infrastructure. Cherry Servers' secure virtual private servers offer automatic scaling, flexible pricing, and 24/7 technical support. Our pre-defined Ansible module helps you automate the installation and configuration.
How does Ansible work?
The way Ansible works is that it uses simple YAML playbooks that push idempotent modules to defined systems over SSH. Before we continue, you must understand a few basic concepts of Ansible and how Ansible works. Here are some of the basic Ansible concepts:
Control node – a machine where Ansible is installed and configured to push specific commands to remote nodes.
Managed node – any device that is being managed by the control node. Managed nodes can be anything from powerful servers to IOT devices to routers. The only prerequisite for a managed node is that it needs to have an SSH access.
Inventory – a configuration file stored at /etc/ansible/hosts that defines hosts against which commands, modules, and Playbook tasks are executed.
Module – a standalone script that performs a particular common task on a managed node in a separate process. There are a variety of Ansible modules that can do various jobs for you, like create a VLAN subnet, point a server to an SQL database, upload SSH key and many others.
Playbook – Ansible playbook the main piece of Ansible code that consists of tasks and resides in a YAML file. It stores variables, managed hosts, and tasks that are executed in same order that you have written them, whether synchronously or asynchronously.
Role – a collection of tasks that are grouped under a common name. It is an independent Ansible component that makes the code in Playbooks reusable by putting common configuration steps into generalized “libraries” that can then be re-used inside of Playbooks.
Task – a single unit of action in Ansible.
Plugin – a piece of code that augments the default functionality of Ansible that executes on a control node within the Ansible process. You may use plugins to implement a cache layer, lookup external data sources, make Ansible respond to events and do many other things.
How to install Ansible on Ubuntu: Step-by-step process
Let’s dive right in. The below seven steps will show you how to install Ansible on Ubuntu. On top of the installation, we include steps to add managed nodes to the Ansible inventory, start using Ansible, escalate privileges, and write and execute your first Ansible playbook, including using custom Ansible modules.
Step 1: Configure Ansible Managed Hosts
Even though you may use the root user to access and manage your nodes, it is not advisable for security and debugging reasons. Instead, you should create a new user named ansible and grant it superuser privileges.
Let’s login to your managed host with root privileges and create this new user by using the -m option to create a default home directory /home/ansible for it:
useradd -m ansible
Create a password for this new user.
passwd ansible
You should also configure sudo escalation rights for the ansible user since root privileges are often required when executing Ansible tasks. Create a new file named ansible in the /etc/sudoers.d/ directory and add a single configuration line to it:
echo "ansible ALL=(ALL) NOPASSWD: ALL" >> /etc/sudoers.d/ansible
Ansible can work with a simple user/password credentials, however using an SSH key to login to your managed node is a more secure option that also happens to be easier to scale.
If you have generated an SSH public/private keypair on your control node and have an ssh-agent daemon running, you may install SSH public key on your managed node by using the ssh-copy-id command:
ssh-copy-id ansible@[your_ip_address]
This command will copy your public SSH key into the /home/ansible/.ssh/authorized_keys file, so you could connect to your managed host from the control node by using your private SSH key. You may be asked for the password of ansible user that you created before.
You may now test SSH connection to your managed host:
ssh ansible@185.150.117.222
Here I’m connecting to my remote Cherry Servers host that is located at 185.150.117.222 using ansible user that we’ve just created.
And that’s it! Since Ansible is based on an agentless architecture, your managed host is ready and there’s no need to install any agent whatsoever.
You should repeat this process for as many managed hosts as you have. Alternatively, you may create a playbook and automate this workflow as soon as you have learned to use Ansible.
Step 2: Install Ansible on Control Node
The first step that we need to do is to add an official Ansible repository to our Ubuntu package manager to make sure you are installing from an up-to-date repository.
sudo apt-add-repository ppa:ansible/ansible
Now update your package lists and install Ansible:
sudo apt update
And install Ansible
sudo apt install -y ansible
And it’s done! Now it’s time for some more configuration fun.
Step 3: Add Managed Nodes to Ansible Inventory
After Ansible is installed on a control node, it is time to add managed nodes to the Ansible inventory. Let’s now edit the hosts file.
sudo vim /etc/ansible/hosts
By quickly skimming through the file, we can find examples of how to describe distinct hosts, host groups and host ranges to Ansible inventory.
In this guide we are going to use three managed hosts with configured SSH authentication:
- Ubuntu 20.04 available through 185.150.117.222
- Debian 11 available through 185.150.119.120
- CentOS 8 available through 185.150.119.119
Since we have two Debian-based machines and one Redhat-based machine, let’s put them into different host groups by appending the file with the following lines:
# Debian-based managed hosts
[deb_based]
ubuntu ansible_host=185.150.117.222
debian ansible_host=185.150.119.120

# Redhat-based managed hosts
[rhel_based]
centos ansible_host=185.150.119.119

# Global variables
[all:vars]
ansible_python_interpreter=/usr/bin/python3
ansible_user=ansible
Here we define two host groups – [deb_based] and [rhel_based] – so we could target them separately. We also assign individual aliases to our managed hosts – ubuntu, debian, centos – and use ansible_host variable to setup their public IP addresses.
We also setup global variables under the [all:vars] section. Here we point to the python3 executable that is stored at /usr/bin/python3 when using Ubuntu 20.04 as our control node. As we have created a new user named ansible on each of our managed nodes, we also setup it under the ansible_user variable.
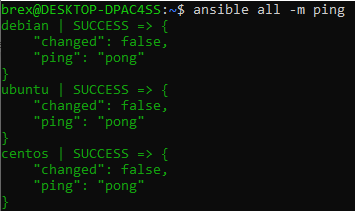
To make sure our inventory list syntax is correct, and our managed nodes are added successfully we use ansible-inventory command with the -y flag to format our output in YAML:
ansible-inventory --list -y
After reviewing the output configuration tree, we can make sure that everything is as planned.
Step 4: Start Using Ansible
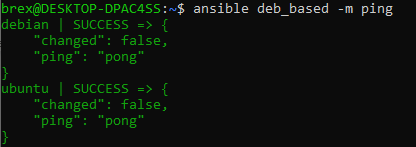
At this point we have everything ready to start working with Ansible. It’s always a good idea to test connection to our managed nodes first, so let’s do that. We use ansible command that targets all managed hosts with -m option that tells Ansible to use a module and ping for the module name:
ansible all -m ping
Ansible ping module connects to the host using SSH, verifies whether there is a usable python installation and returns a pong response. As you may see, we were able to successfully connect to all managed hosts.
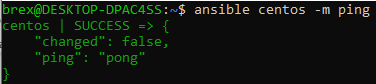
We may also target distinct host groups if we want. Instead of using all we should use the name of a host group, for instance:
ansible deb_based -m ping
Likewise, we may target a specific alias by using the alias name:
Ansible is great in a way that it can pass through shell commands to the managed node. We accomplish this by using the -a parameter to pass arguments directly to the shell of the managed nodes.
Let’s identify our host machines by using the following command:
ansible all -a "uname -a"

As you can see, Ansible successfully logged-in to all your managed hosts, ran the uname -a command three times and returned the output for us.
Step 5: Escalate Privileges
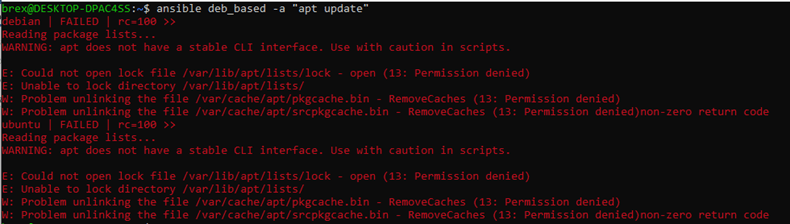
As you may know, many commands require root privileges to be executed. For instance, if we try to update our repository lists for Debian-based machines, the command will fail:
ansible deb_based -a "apt update"
As we have added the file for the user ansible in the /etc/sudoers.d/ directory when configuring our managed hosts, we can now leverage root privileges. In order to do so, add the -b (--become) parameter to your command:
ansible deb_based -ba "apt update"
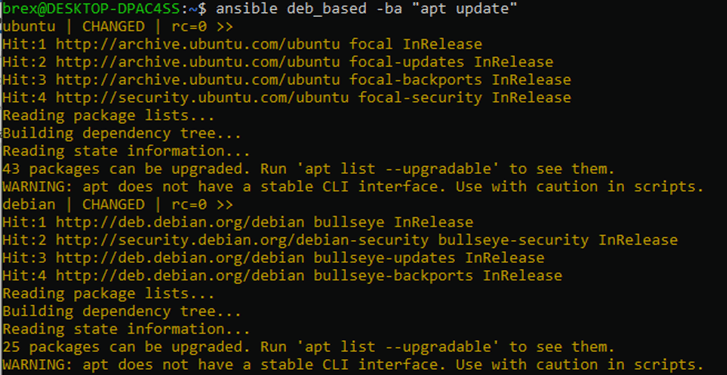
This way your shell command will be executed under root privileges, and you will receive the expected output to your terminal.
Bear in mind that we do not get any prompts, nor are able to answer them while using Ansible. Due to this reason all your commands must be unidirectional. For instance, if we wish to upgrade our packages, we should run:
ansible deb_based -ba “apt upgrade -y”
Instead of:
ansible deb_based -ba “apt upgrade”
The -y option forces to answer “yes” to all the prompts that pop up when running apt upgrade.
Discover how Tempesta, an open-source application delivery controller (ADC), leveraged Cherry Servers' bare metal cloud to complete tests and validation of their ADC successfully, benefiting from 99.97% uptime, server customization, and 24/7 technical support.
Step 6: Write and Execute Your First Ansible Playbook
As you already know, a playbook is a list of tasks to be performed on the managed host in a specific order. If you need to execute a task with Ansible more than once, that task should be put into a playbook and kept under source control.
Ansible itself is a simple tool, so all the tasks in a playbook must be described in detail.
A playbook consists of one or more plays. Each play executes part of the overall goal of the playbook by running one or more tasks. Each task calls an Ansible module.
Suppose we want to install sl script on our Debian-based hosts that makes a train go through your terminal every time you misspell the ls command. Let’s create our first playbook by creating a new YAML and describing some tasks for Ansible:
vim install-sl.yaml
# '---' specifies the beginning of a YAML file
---
# this is a name of our play
- name: Update packages and install sl
	# Target managed hosts. We use deb_based host group here, but you can also use all, or a server alias
  hosts: deb_based
  become: true

  tasks:
  # This task runs a given shell command on your manged hosts
  - name: Update package lists
    command: apt update

  # Make sure there is the latest sl version installed on the managed host
  - name: Check for the latest sl version
    apt:
      name: sl
      state: latest
As you can see, we are targeting deb_based host group with root privileges and are executing two tasks: updating the package repositories and making sure we have the latest version of sl program.
Save the file and run your Ansible playbook for the first time:
ansible-playbook install-sl.yaml
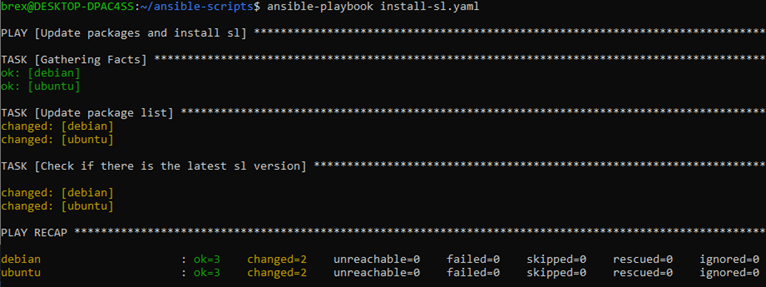
Here we can see that we are running a play named “Update packages and install sl”. First, Ansible runs a default “Gathering Facts” task to get basic information about the managed nodes. Then, it makes two changes: updates apt package list and installs sl.
As you can see, a total of 3 tasks were executed against each managed node, but only two tasks found a mismatch in the desired state and performed actions to change it.
If you were to run the playbook again, you would get the following output:
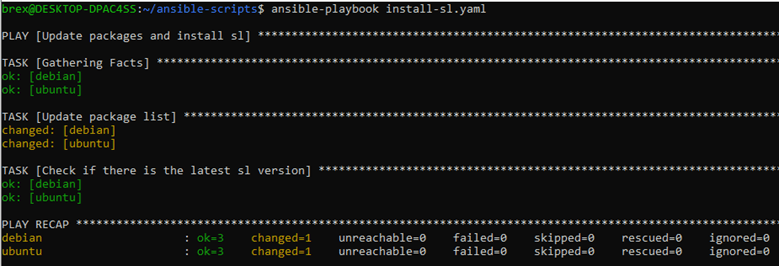
This time only a single change was made - apt package list was updated. Ansible didn’t do anything to install the latest version of sl, since it was already there. No unnecessary changes were made.
The most beautiful thing about Ansible is that you only need to describe the desired state of your managed nodes in a playbook, and Ansible makes sure that everything is as required. Playbooks are easy to use and read by human beings. Please keep them that way and don’t make a shell script out of a playbook.
Oh, by the way, here’s sl in action:
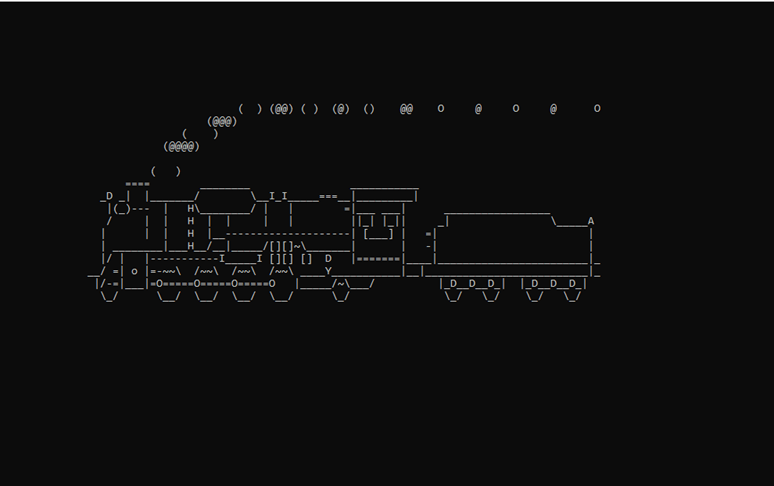
It is now more fun to misstype the ls command :)
Step 7: Use Custom Ansible Modules
There is a wide variety of pre-built Ansible modules available. When you need to accomplish some configuration management tasks, chances are you will find a relevant Ansible module that has already been built for you. There are over 750 official Ansible modules neatly categorized in the official documentation.
Along with pre-built Ansible modules you can find custom modules that have been built for some specific use cases. For instance, you may use Cherry Servers Ansible module to deploy and manage cloud servers.
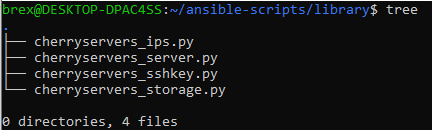
To order a cloud server, you need to install cherry-python package, export CHERRY_AUTH_TOKEN and download required Python scripts (Ansble local modules) to the library/ directory in your project:
It is now time to create a new Ansible playbook and deploy your first cloud server:
vim deploy-cherry-server.yaml
---
- name: Cherry Servers API module
  # Use local connector and localhost as your target host, since you want to query local modules with their code stored in your downloaded Python files
  connection: local
  hosts: localhost
  tasks:
  	- name: Deploy new server
      # The module name
      cherryservers_server:
      	hostname:
          - the-coolest-machine
        # ID 161 stands for E5-1620v4 server plan
        plan_id: '161'
        # Copy the project ID from your Client Portal
        project_id: '79617'
        image: 'Ubuntu 20.04 64bit'
        region: 'EU-East-1'
        state: present
        count: 1
Save your playbook and run it:
ansible-playbook deploy-cherry-server.yaml
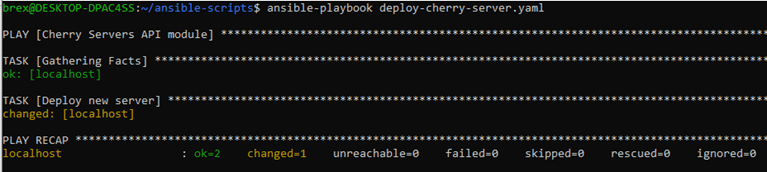
You will receive an output right after the server has been ordered. Cloud server deployment process has been initiated successfully, as there are no failed tasks in the console output.
To Wrap up
After completing this guide, you should have a basic understanding of how Ansible works and how to install Ansible on Ubuntu 20.04. From now on you can start experimenting, develop your own Ansible playbooks, and even implement them in production environment.
Ansible has a myriad of pre-built playbooks, modules, and plugins that you can use – each with its own capabilities and limitations. You may find an in-depth Ansible documentation on the official Ansible website at: https://docs.ansible.com/

