How to Create and Use Ansible Playbooks


One of the core components of Ansible is a playbook file. Ansible uses playbook files to define complex tasks that are executed against managed nodes with limited user involvement.
In this guide, you will learn how to create and use Ansible playbook files to execute tasks on managed nodes.
#What is Ansible Playbook?
A playbook is essentially a YAML file that comprises one or multiple plays. A play is a set of ordered tasks to be executed against managed hosts that are specified in the /etc/ansible/hosts file. Each play in a playbook represents a unique task with environment-specific parameters for the target hosts.
Playbooks are quite flexible and can be reused indefinitely with multiple servers to perform the same tasks. Ansible playbooks are often used for server configuration, network device management and application deployment tasks.
#Prerequisites
To follow this guide, you should have:
- A control node with Ubuntu 20.04 operating system and Ansible installed. If you haven’t installed Ansible before, follow our guide on How to Install and Configure Ansible on Ubuntu 20.04.
- A single managed node configured in the control node’s hosts file that will be used to run the playbook tasks.
Run your deployments in a scalable and cost-effective open cloud infrastructure. Cherry Servers' secure virtual private servers offer automatic scaling, flexible pricing, and 24/7 technical support. Our pre-defined Ansible module helps you automate the installation and configuration.
#Create Ansible Playbook
Let’s start by making and running our first Ansible playbook. On the control node create a simple YAML file in the /etc/ansible/ directory as follows:
sudo vim /etc/ansible/playbook-01.yml
Now populate the playbook file with the following code:
---
- name: A simple playbook file
  hosts: all
  tasks:
  	- name: Print a sample message
      debug:
      	msg: Hello World. Welcome to Ansible playbooks!
The --- marks the start of the YAML file.
The first instance of the name directive specifies the name of the play. The second instance specifies the name of the task.
The hosts directive specifies the target hosts on which the playbook will be executed. In this example, the playbook will run on all the hosts specified in the inventory file. To target a specific host, provide the host’s IP address or domain name.
The tasks directive is a list of tasks to be executed on the target host. In this playbook, we have one task which prints a statement to stdout.
The debug keyword is a built-in module that comes with Ansible and prints statements during Playbook runtime. In addition, it comes in handy when debugging statements and variables without halting a playbook. The debug module comes with some options such as msg and var. The msg option specifies the string to the printed to stdout.
#Execute Ansible Playbook
To run the playbook, use the ansible-playbook command as shown below:
ansible-playbook /path/to/playbook_file
In our example, you should run the following command:
ansible-playbook /etc/ansible/playbook-01.yml
During playbook execution, you should see the following output:
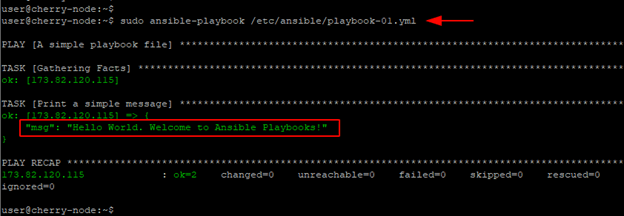
Notice that two tasks were carried out, even though we defined only one in the Playbook file.
The first task gathers facts about the managed node. Ansible facts refer to host-specific system data that is presented in JSON format such as BIOS information, system date and time, OS type and version and IP address. It also includes hardware data such as the block devices, CPU, RAM, and swap space to name a few.
The second task prints a simple message to stdout as specified in the playbook file. The ok=2 indicates that two tasks were successfully executed.
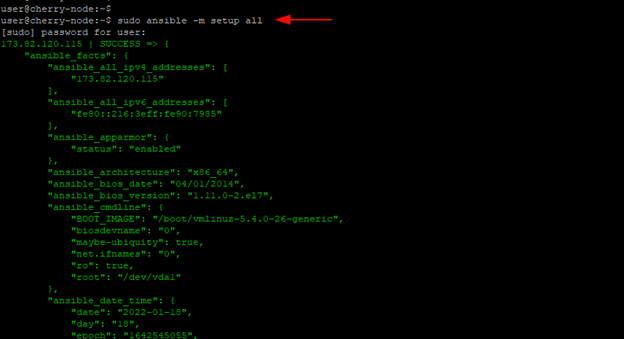
If you are curious to get a list of all the Ansible facts, execute the following command:
ansible -m setup all
Also read: How to Use Ansible Vault in Playbook
#Ansible Playbook Modules
Ansible modules are standalone reusable Python scripts that are referenced in Playbooks to help execute specific tasks on managed nodes. Ansible modules can automate a wide selection of tasks on managed nodes including package management, service management, file management and so much more.
In this section, we will demonstrate how you can accomplish various system administration tasks by incorporating modules in Playbooks.
#Package Management Modules
Managing software packages is an essential system administration task. It specifically deals with installing and removing software packages in Linux servers. Ansible provides built-in package management modules for major Linux distributions as shown.
| Module | Linux Distribution |
|---|---|
| apt | Debian / Ubuntu variants |
| yum / dnf | RHEL variants such as CentOS / Rocky |
| pacman | Arch Linux and Arch variants |
| zypper | OpenSUSE |
The following playbook file installs the Apache webserver on the remote target defined under the webserver sub-group in the inventory file. The apt module provides two options: the name option which specifies the name of the package ( apache2 ) and the state option which instructs Ansible to install the latest version of Apache.
---
- name: install Apache
  hosts: webserver
  tasks:
  	- name: install Apache webserver on Ubuntu
      apt:
      	name: apache2
        state: latest
Upon running the playbook file, you should get similar output to what we have:
ansible-playbook /etc/ansible/playbook-02-install-apache.yml
On RHEL 8 and CentOS 8, the same task can be accomplished using the dnf module. Here, the Apache package for RedHat derivatives is defined by httpd.
#Service Module
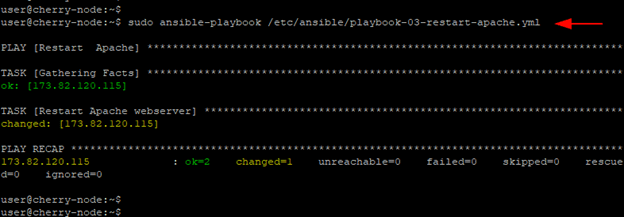
You can also use modules to start, stop and restart running services on managed nodes. For example, to restart the Apache webserver, we will use the service module in the playbook shown.
---
- name: Restart Apache
  hosts: webserver
  tasks:
  	- name: Restart Apachce webserver
      service:
      	name: apache2
        state: restarted
Here is the output of the Playbook execution:
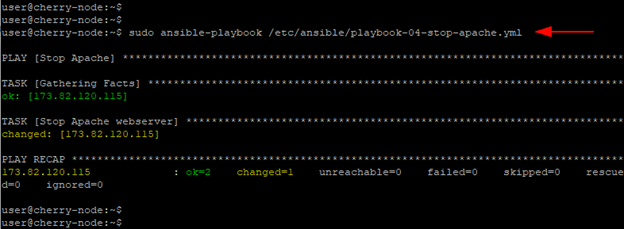
Here’s a playbook showing how you can stop the webserver. Note the change of the state parameter from restarted to stop.
---
- name: Stop Apache
  hosts: webserver
  tasks:
  	- name: Stop Apache webserver
      service:
      	name: apache2
        state: stopped
From the output of the playbook execution, you can see that the task was successful:
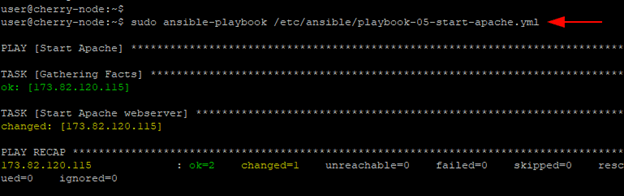
To start the webserver, set the state parameter to started.
---
- name: Start Apache
  hosts: webserver
  tasks:
  	- name: Start Apache webserver
      service:
      	name: apache2
        state: started
Once again, here is the output of the playbook execution:
#Copy Module
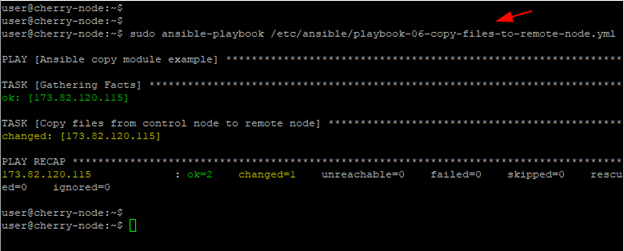
Another useful module is the copy module. As the name suggests, the module is used for copying files from one location to another. You can copy files from the Ansible controller to the remote node or copy files from one location to another within the remote node.
In the Playbook file below, we are copying the sales_report.txt file from the Ansible control node to the remote server in the /tmp/reports/ directory. In addition, we have assigned the owner and group ownership to the cherry user using the owner and group options. The mode option assigns the octal file permissions 0644 to the file.
---
- name: Ansible copy module example
  hosts: webserver
  tasks:
  	- name: Copy files from control node to remote node
      copy:
      	src: /home/user/Documents/sales_report.txt
        dest: /tmp/reports/
        owner: cherry
        group: cherry
        mode 0644
The outcome of the Playbook execution is printed as shown:
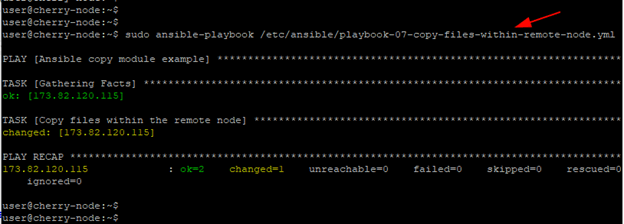
To copy files within the remote node, use the remote_src option and set it to yes. In the example below we are making a backup copy of apache2.conf configuration file on the remote node. Simply put, we are making a copy of the file and renaming it to apache2.conf.back.
---
- name: Ansible copy module example
  hosts: webserver
  tasks:
  	- name: Copy files within the remote node
      copy:
      	src: /etc/apache2/apache2.conf
        dest: /etc/apache2/apache2.conf.bak
        remote_src: yes
The playbook runs successfully as shown:
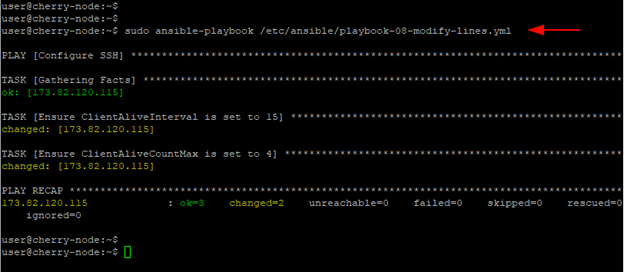
#Lineinfile Module
The lineinfile module is a module that is used for performing a wide selection of tasks on a line such as modifying, replacing, or adding a single line to a file. It can be used in conjunction with regex expressions to match specific lines and make changes.
To demonstrate its functionality, let us take a few examples. The playbook modifies the SSH service configuration on the remote target by changing two parameters. The first task sets the ClientAliveInterval directive to
15 while the second task sets the ClientAliveCountMax directive to 4. The regexp option matches the lines that contain the parameters we are trying to modify.
---
- name: Configure SSH
  hosts: webserver
  tasks:
  	- name: Ensure ClientAliveInterval is set to 15
      lineinfile:
      	path: /etc/ssh/sshd_config
        regexp: "^ClientAliveInterval"
        line: ClientAliveInterval=15
    - name: Ensure ClientAliveCountMax is set to 4
      lineinfile:
      	path: /etc/ssh/sshd_config
        regexp: "^ClientAliveCountMax"
        line: ClientAliveCountMax=4
The playbook executes both tasks in order of appearance - from the first to the last:
💡 Pro Tip: In the example above, we are trying to match a line that starts with ClientAliveInterval string. Some lines in Linux configuration files may be commented out (i.e. # ClientActiveInterval). In such case, the regex won’t match, so the lineinfile module will create a new line with the specified string for you.
To add a line to a file, specify the full path of the file, the line to be added to the file, and set the create option to yes.
The playbook shown adds a new line 173.82.120.115 cherry.localdomain to the /etc/hosts file on the remote node.
---
- name: Add a new line to a file
  hosts: webserver
  tasks:
  	- name: Add a new line to a file
      lineinfile:
      	path: /etc/hosts
        line: 173.82.120.115 cherry.localdomain
        create: yes
Here is the Playbook execution:

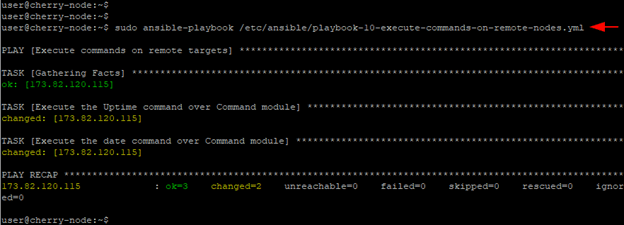
#Command Module
The Command module takes a command name followed by a list of arguments. The command is executed on target nodes, but the output is not displayed to stdout.
The playbook shown runs the "uptime" and "date" commands on the target modes.
---
- name: Execute commands on remote targets
  hosts: webserver
  tasks:
  	- name: Execute the uptime command
      command: "uptime"

    - name: Execute the date command
      command: "date"
The playbook runs successfully, however, no output from the commands is printed out.
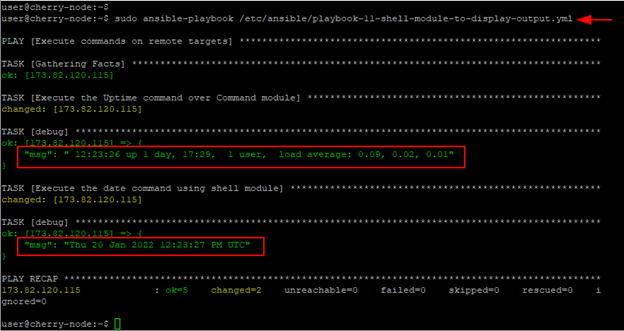
To print the result to stdout, use the shell module. The output of both commands is captured by the register option using our defined uptime_var and date_var variables. These variables are eventually referenced by the msg option, and the values printed to stdout.
---
- name: Execute commands on remote targets
  hosts: webserver
  tasks:
    - name: Execute the uptime command
      shell: "uptime"
      register: uptime_var

    - debug:
      	msg: "{{uptime_var.stdout}}"

    - name: Execute the date command
      shell: "date"
      register: date_var

    - debug:
      	msg: "{{date_var.stdout}}"
In the playbook execution output, you can see the output of both commands printed:
So far, we have demonstrated just a handful of modules. There are hundreds upon hundreds of Ansible modules for performing different tasks. For a more comprehensive list of Ansible modules, visit the Ansible Modules documentation page.
#Ansible Playbook Variables
If you are a developer or a programmer, chances are that you have used variables countless times in your code. Like in many programming languages, variables are used in Playbooks to store values. You can assign a value to a variable and reference it anywhere within the playbook.
Variables can also come from external sources, such as variable files, and then be referenced in a Playbook. Special precedence rules apply when working with variables from multiple sources that bear the same name.
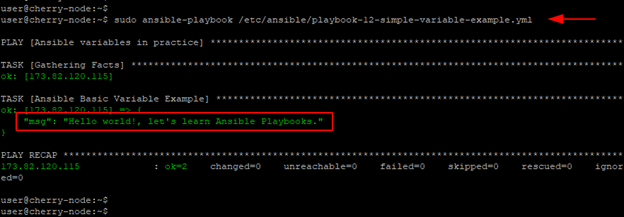
To demonstrate how variables are used in practice, let’s create a playbook file that will print out the value of two variables: greetings and topic.
---
- name: Ansible variables in practice
  hosts: webserver
  vars:
  	greetings: Hello World!
    topic: Ansible Playbooks

  tasks:
  - name: Ansible basic variable example
    debug:
    	msg: "{{ greetings }}, let's learn {{ topic }}."
The vars section defines the list of variables that will be referenced by the debug module in the scope of the play. These variables are accessible to all the tasks and files specified within the playbook file.
In the output, the values assigned to the variables have been printed to stdout in the place of the variable names.
Alternatively, you can have a list of variable items. In the playbook below, let’s define a variable called oceans with a list of five values that represent the five oceans.
---
- name: Ansible list variable example
  hosts: webserver
  vars:
  	oceans:
  	  - Indian
      - Atlantic
      - Pacific
      - Artic
      - Southern Antarctic

  tasks:
    - name: Ansible list variables example
      debug:
      	msg: "The five oceans in the world are {{ oceans }}"
The playbook iterates through the list of values under the vars section and prints them to stdout using the msg option.

In addition, you can access each of the values in the variable using the index [ x ] attribute in the msg directive where x is the value of the item in the list. The first item is denoted by index[0].
#Ansible Playbook Conditionals
Conditional statements are used when you need to execute a set of tasks based on certain criteria. In Ansible Playbooks when is a widely used conditional statement that is used with OR and AND operators.
To better elaborate how conditional statements work, we will have a simple setup with two managed nodes of different OS families:
Server IP: 173.82.120.115 Ubuntu 20.04
Server IP: 173.82.255.207 CentOS 8.3
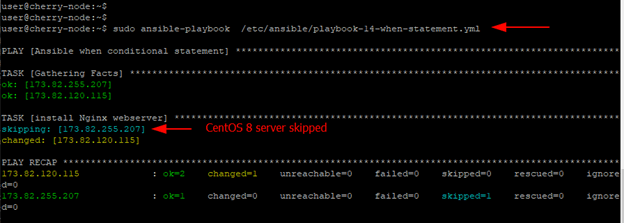
#Using ‘when’ Statement
Consider the Playbook below. The when statement instructs the Playbook to install Nginx webserver on all the servers that belong to the Debian OS family. We are using the ansible_os_family variable here that belongs to the Ansible facts object, so you don’t need to define it in your playbook.
---
- name: Ansible when conditional statement
  hosts: all
  tasks:
  	- name: install nginx webserver
      apt:
      	name: nginx
        state: latest

      when: ansible_os_family == "Debian"
From the output of the playbook execution, we can see that the CentOS host has been excluded since it does not satisfy our condition.
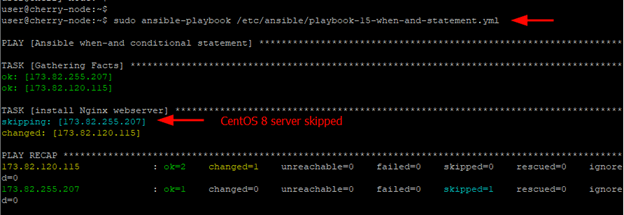
#Using ‘AND’ Operator with ‘when’ Statement
When using the and operator, both conditions MUST be satisfied. In this example, the playbook will run the task successfully if the managed nodes belong to the Debian Linux family and whose release number is 20.04.
---
- name: Ansible when-and conditional statement
  hosts: all
  tasks:
  	- name: install nginx webserver
      apt:
      	name: nginx
        state: latest

      when: ansible_os_family == "Debian" and ansible_distribution_version == "20.04"
Since the Ubuntu node matches the criteria, the playbook will successfully run and install Nginx on it but skip the CentOS 8 server.
#Using ‘OR’ Operator with ‘when’ Statement
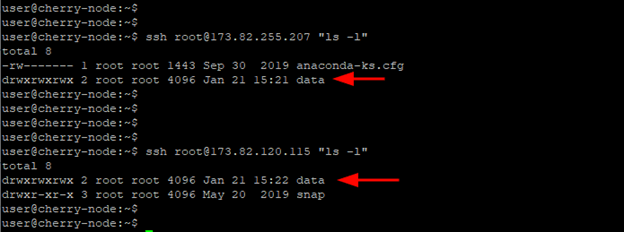
With or operator a task will be executed if either condition is met. In the following Playbook, a new directory called data is created in the home directories of managed nodes that belong to either Debian or RedHat Linux families.
---
- name: Ansible when-or conditional statement
  hosts: all
  tasks:
  	- name: "create a directory if it doesn't exist"
      file:
      	path: $HOME/data
        state: directory
        mode: "0777"

      when: ansible_os_family == "Debian" or ansible_os_family == "RedHat"
Predictably, the directory is created on both managed nodes since both belong to either of the two OS families.
And just to confirm this, we will list the contents of the home directories on both nodes.
ssh root@173.82.255.207 "ls -l"
ssh root@173.82.120.115 "ls -l"
#Ansible Playbook Loops
Occasionally, you will find yourself performing repetitive tasks that require you to write multiple tasks performing the same operation. Take, for example, a playbook that creates new users on a target system as shown.
---
- name: Create new usersr on remote machine
  hosts: 173.82.120.115
  tasks:
  	- name: Create new user Alice
      user:
      	name: alice
        state: present
    - name: Create new user Patric
      user:
      	name: patric
        state: present
    - name: Create new user Tom
      user:
      	name: tom
        state: present
Evidently, there is a lot of duplication here. It can be daunting and time consuming when dealing with multiple tasks of a similar nature. This is where loops come in handy.
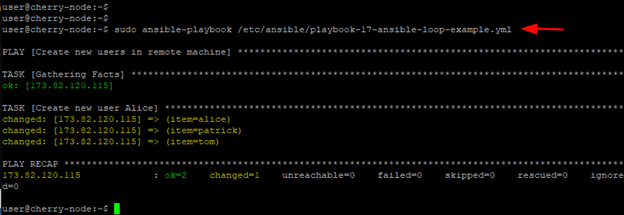
Loops provide a simplified way of executing repetitive tasks with fewer lines of code. They iterate through a list of values specified using the loop or with_* directives.
The loop directive lists the values which are referenced by a variable called item enclosed in double curly braces. During runtime, the playbook iterates through the list of users defined by the loop directive. Each of the users is then passed to the item variable and all the users are created in a simple, yet efficient manner. It’s apparent that the playbook looks neater with fewer lines of code achieving the same goal.
---
- name: Create new users in remote machine
  hosts: 173.82.120.115
  tasks:
  	- name: Create new user Alice
      user:
      	name: '{{ item }}'
        state: present
      loop:
      	- alice
        - patric
        - tom
Here is the output of the Playbook execution to confirm the creation of the users:
#Conclusion
In this guide, you have learned how to create and run Ansible playbooks. You have delved into various Playbook elements such as modules, variables, conditional statements, and loops.
Still, we have barely scratched the surface and there’s a lot you can achieve with Playbooks. For more information about Ansible Playbooks, check out the official Ansible Documentation portal.