How to Install Apache Kafka on Ubuntu 24.04: Step-by-Step


Need Apache Kafka running locally on Ubuntu 24.04? This guide walks you through installing the latest version and setting it up with KRaft (Kafka Raft Metadata mode, which replaces the need for Zookeeper. We will set up Kafka to run as a system service, then prepare the environment for local development.
#Prerequisites
Before you proceed, ensure you have the following:
- An Ubuntu 24.04 instance. You can deploy a cloud VPS here to get started.
- A sudo-enabled user account with SSH access to the instance.
- Minimum 2 GB RAM
Kafka requires a proper environment to run. This section sets up the environment by installing Java, creating a dedicated system user, and properly configuring Kafka. Install Java Apache Kafka requires Java to run. Ubuntu 24.04 conveniently provides several OpenJDK versions in its default repositories, with OpenJDK 21 currently the default version. That means you can install it directly.
Start by updating your package list. This ensures you are working with the latest available versions:
sudo apt update
Next, install OpenJDK 21 by running:
sudo apt install openjdk-21-jdk -y
After the installation, verify that Java is properly installed:
java -version
You should see an output showing that Java 21 is installed, similar to this:
Outputopenjdk version "21.0.6" 2025-01-21
OpenJDK Runtime Environment (build 21.0.6+7-Ubuntu-124.04.1)
OpenJDK 64-Bit Server VM (build 21.0.6+7-Ubuntu-124.04.1, mixed mode, sharing)
Now, Java is installed and ready for use.
#Create Kafka user and directories
We will create a dedicated user to run Kafka to keep our system organized and improve security. We will also set up the directory structure where Kafka will be installed and store its data.
First, create a new system user called kafka without login access:
sudo useradd -r -m -U -d /opt/kafka -s /bin/false kafka
This creates the kafka user and sets its home directory to /opt/kafka. It also prevents this user from logging in directly for security reasons.
Next, create the main Kafka directory where we will install Kafka files:
sudo mkdir -p /opt/kafka
After this, we need to grant the kafka user ownership:
sudo chown -R kafka:kafka /opt/kafka
This gives the kafka user control over the /opt/kafka directory. This way, Kafka will have the access it needs to read, write, and manage everything in this folder during runtime.
Finally, to confirm that the ownership and permissions are correctly set, run:
ls -ld /opt/kafka
You should see a similar output to this:
Outputdrwxr-x--- 2 kafka kafka 4096 Apr 27 14:35 /opt/kafka
With this, we have a dedicated user and directory set up for Kafka.
#Download and extract Kafka
Start by navigating to a temporary directory where you will download and work with the Kafka archive. A good choice is the /tmp directory:
cd /tmp
Now, download the Kafka 4.0.0 binary release using the wget command:
wget https://downloads.apache.org/kafka/4.0.0/kafka_2.13-4.0.0.tgz
After downloading the archive, extract it into /opt/kafka:
sudo tar -xzf kafka_2.13-4.0.0.tgz -C /opt/kafka --strip-components=1
The --strip-components=1 flag skips the top folder, placing the files directly in /opt/kafka.
Next, update the file ownership so the kafka user has full access to everything:
sudo chown -R kafka:kafka /opt/kafka
This ensures Kafka can manage its files without any permission issues.
To confirm that everything was extracted correctly, list the contents of the /opt/kafka directory:
sudo ls -l /opt/kafka
You should see a similar output to the following:
Outputtotal 64
drwxr-xr-x  3 kafka kafka  4096 Mar 14 08:20 bin
drwxr-xr-x  2 kafka kafka  4096 Mar 14 08:20 config
drwxr-xr-x  2 kafka kafka  4096 Apr 28 09:34 libs
-rw-r--r--  1 kafka kafka 14699 Mar 14 08:19 LICENSE
drwxr-xr-x  2 kafka kafka  4096 Mar 14 08:20 licenses
-rw-r--r--  1 kafka kafka 27064 Mar 14 08:19 NOTICE
drwxr-xr-x  2 kafka kafka  4096 Mar 14 08:20 site-docs
Looking at this output, the first folder you will notice is bin. This folder contains the executable scripts for Kafka. You will find scripts here that allow you to start the Kafka server, create topics, produce and consume messages, and perform administrative tasks. Most of your hands-on interaction with Kafka will happen through these scripts.
Next is the config folder. This is where Kafka's configuration files are stored. If you need to adjust how Kafka runs, for example, setting a broker ID, updating listener ports, or changing log options, you will make those changes here.
You will also see the libs folder. This holds all the Java libraries and dependencies that Kafka needs to operate. These libraries handle important tasks like networking, storage, and internal communication across Kafka components.
Below the folders, there are a few files as well. The LICENSE file outlines the terms and conditions under which Kafka is distributed.
Right after that is the licenses directory. Unlike the LICENSE file, it contains licenses for third-party libraries that are bundled with Kafka. It provides transparency about all the external components Kafka uses.
You will also see the NOTICE file, which lists additional legal notices and attributions for third-party software included in Kafka. It complements the information found in the LICENSE file.
Finally, the site-docs folder provides offline documentation for Kafka. Although most Kafka documentation is available online, this folder gives you access to important guides and references without needing an internet connection.
#Configure Kafka
From version 4.0.0, Kafka runs in KRaft mode by default. This means it manages its metadata internally, without Zookeeper.
In this section, we will configure Kafka to run as a standalone server using KRaft mode. We will update the configuration file, generate a Cluster ID, and format the Kafka storage.
Step 1: Update the Kafka configuration
Start by checking that Kafka is set up correctly to run in KRaft mode.
Open the server.properties file:
sudo nano /opt/kafka/config/server.properties
Now, check that the following lines are set correctly:
process.roles=broker,controller
node.id=1
controller.quorum.bootstrap.servers=localhost:9093
listeners=PLAINTEXT://:9092,CONTROLLER://:9093
advertised.listeners=PLAINTEXT://localhost:9092,CONTROLLER://localhost:9093
controller.listener.names=CONTROLLER
listener.security.protocol.map=CONTROLLER:PLAINTEXT,PLAINTEXT:PLAINTEXT,SSL:SSL,SASL_PLAINTEXT:SASL_PLAINTEXT,SASL_SSL:SASL_SSL
These settings tell Kafka to act as both a broker and a controller on the same machine. They also define which ports Kafka will use to talk to clients and manage its internal communication.
Next, add the following setting under the Server Basics section, if it is not already there:
controller.quorum.voters=1@localhost:9093
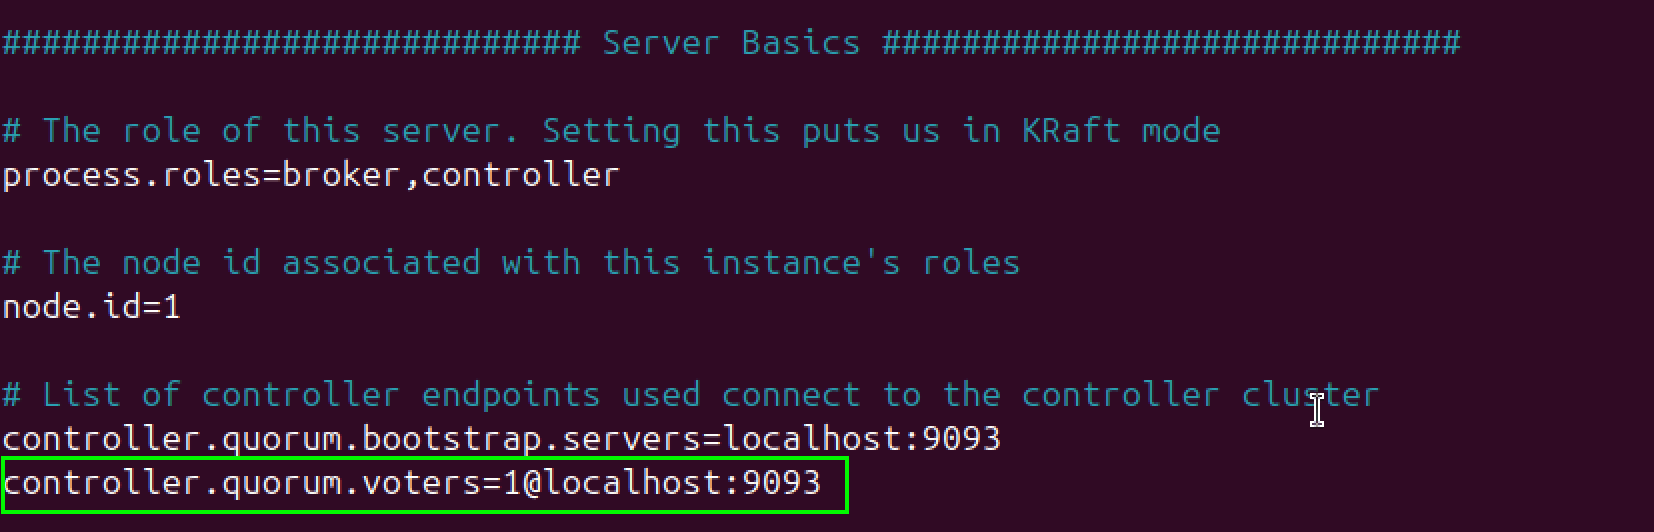 This tells Kafka which node is acting as the controller and how to reach it. Though we are working with just one server, Kafka still expects the full format of
 node-id@host:port to manage internal cluster operations properly.
Note:
controller.quorum.voters=1@localhost:9093 means:
1is the unique node ID of our server.localhost:9093is the address and port where the controller listens.
Without this, Kafka will not be able to initialize its storage correctly.
Finally, locate the log.dirs setting under the Log Basics section and update it from the default /tmp/kraft-combined-logs to a more stable directory:
log.dirs=/opt/kafka/data
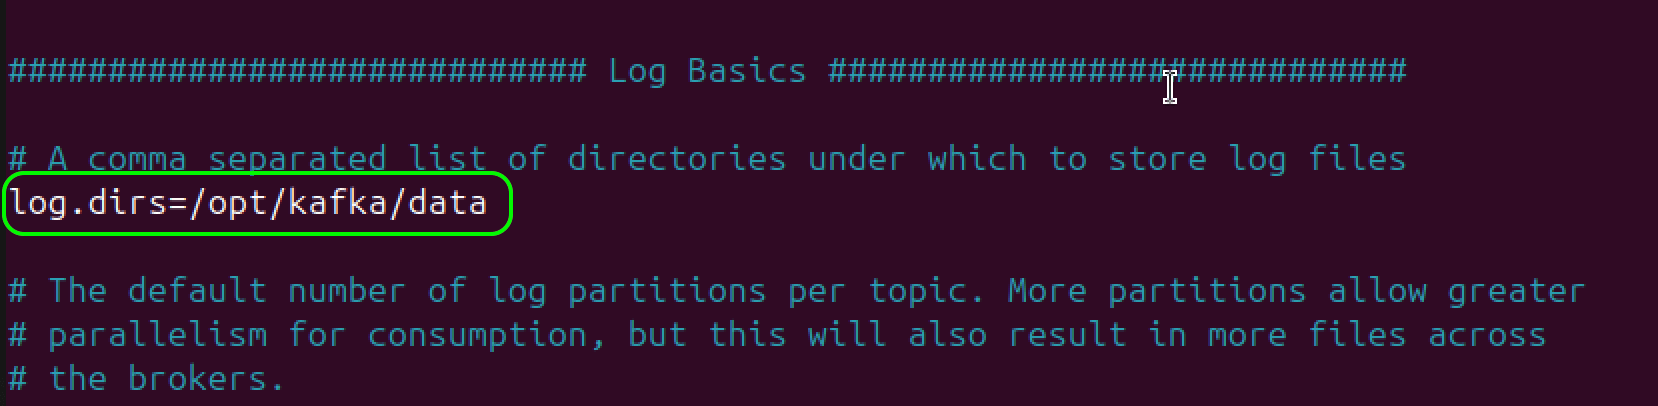 This stores Kafka's data safely under
 /opt/kafka, rather than /tmp, which may be cleared automatically.
Save and close the file by pressing CTRL + 0, then Enter, and CTRL + X to exit.
Step 2: Generate a Cluster ID
Next, we need to create a unique Cluster ID. This ID will tie Kafka's metadata to our server.
Run the following command:
sudo /opt/kafka/bin/kafka-storage.sh random-uuid
The output will be a long random string that looks similar to this:
OutputHnRVGDW9SB-bI_yUGGEK_A
Copy and store this Cluster ID carefully. We will use it to initialize Kafka’s storage.
Step 3: Format the Kafka storage directory
Use the following command to format Kafka’s storage directory. Replace <your-cluster-id> with the actual ID you generated:
sudo /opt/kafka/bin/kafka-storage.sh format -t <your-cluster-id> -c /opt/kafka/config/server.properties
If the command runs successfully, you will see a similar confirmation message:
OutputFormatting metadata directory /opt/kafka/data with metadata.version 4.0-IV3.
Kafka is now set up to run in standalone KRaft mode, and its storage is ready. Next, you will configure it to run as a service and start the server to finish the setup.
#Create a systemd service for Kafka
To manage Kafka like a proper service on Ubuntu, we will set it up under systemd. This will allow us to start, stop, and automatically run Kafka at system boot, just like any standard Linux service.
We will create a service file for Kafka and configure it correctly.
#Step 1: Create the Kafka service file
Start by creating a new service file named kafka.service:
sudo nano /etc/systemd/system/kafka.service
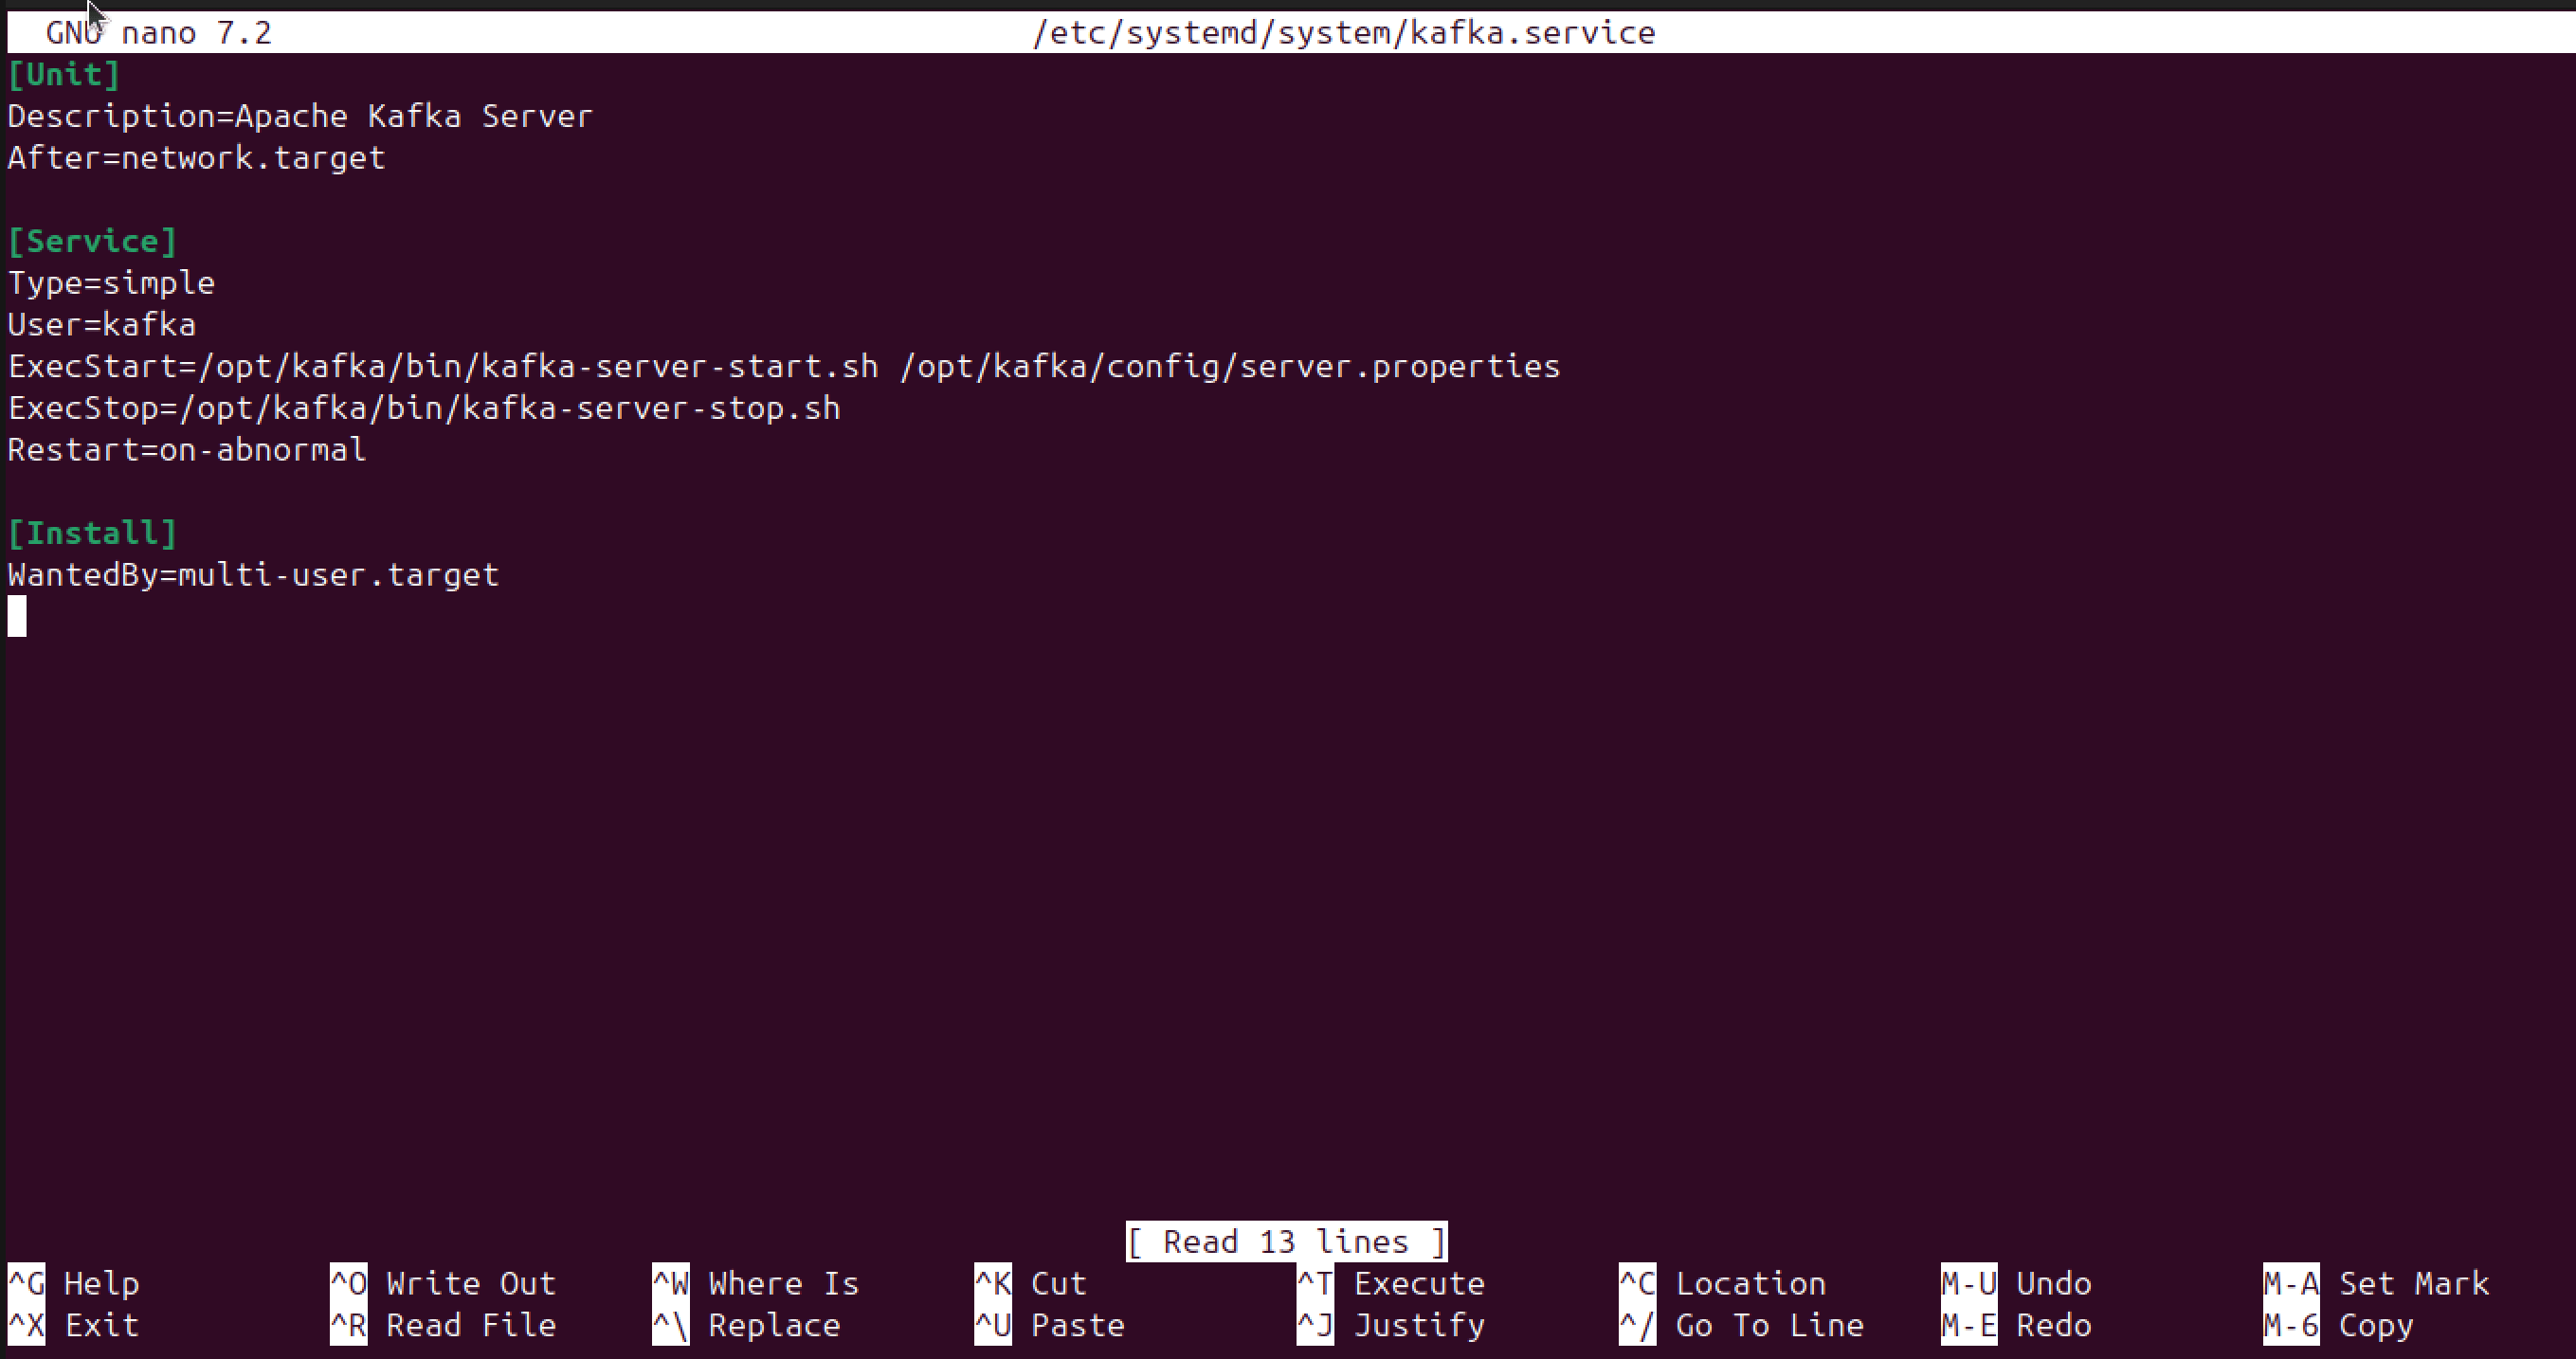
Next, add the following code:
[Unit]
Description=Apache Kafka Server
After=network.target

[Service]
Type=simple
User=kafka
ExecStart=/opt/kafka/bin/kafka-server-start.sh /opt/kafka/config/server.properties
ExecStop=/opt/kafka/bin/kafka-server-stop.sh
Restart=on-abnormal

[Install]
WantedBy=multi-user.target
Each part of the service file tells systemd how to manage Kafka.
The [Unit] section describes when Kafka should start. We want Kafka to wait until the network is ready, because it needs network communication to function properly. Setting After=network.target ensures it will not try to start too early during boot.
Next is the [Service] section, which defines how Kafka will run as a process. We set Type=simple to let systemd know that Kafka will run in the foreground without needing extra handshakes. We also specify User=kafka so that Kafka runs under the non-root user we created earlier, adding a layer of security. The ExecStart line points to the Kafka start script and configuration file, while ExecStop tells systemd how to stop Kafka gracefully when needed. Setting Restart=on-abnormal helps Kafka automatically restart if it crashes for any unexpected reason, keeping it more resilient.
Lastly, the [Install] section. This tells systemd when Kafka should be started. We link it to the multi-user.target, which is the standard system state for servers and multi-user machines. This way, Kafka will start automatically whenever the system boots normally.
After adding the content, save the file and exit.
#Step 2: Prepare the Kafka data directory
Before we start Kafka, we need to ensure that the data directory we configured in server.properties exists.
Create the directory and set the correct ownership:
sudo mkdir -p /opt/kafka/data
sudo chown -R kafka:kafka /opt/kafka/data
This gives Kafka a proper place to store its internal logs and topic data. If this directory is missing, Kafka will fail to start.
#Step 3: Enable and start the Kafka service
Now that the environment is ready, we can tell systemd to recognize the new service:
sudo systemctl daemon-reload
Next, enable Kafka to start automatically at boot:
sudo systemctl enable kafka
Then, restart the Kafka service:
sudo systemctl restart kafka
Lastly, check the status of the Kafka service to verify it is running:
sudo systemctl status kafka
You should see that Kafka is active and running as it should.
Output• kafka.service - Apache Kafka Server
Loaded: loaded (/etc/systemd/system/kafka service; enabled; preset: enabled)
Active: active (running) since Mon 2025-04-28 15:57:38 UTC; 8s ago
Main PID: 12463 (java)
Tasks: 102 (limit: 4542)
Memory: 367.OM (peak: 369.5M)
CPU: 5.6085
CGroup: /system slice/kafka.service
12463 java -Xmx1G -Xms1G -server -XX:+UseG1GC -XX:MaxGCPauseMіllіs=20 -XX:InitіatingHeap0ccupancyPeгcent=З5_ -XX:+Expl¿c¡‡
…
#Test Kafka
With Kafka running as a service, the next step is to confirm that it can handle messages end-to-end. You will create a topic, publish a few messages, and check that a consumer can receive them.
#Step 1: Create a Kafka Topic
Run this command to create a topic:
sudo /opt/kafka/bin/kafka-topics.sh --create --topic test-topic --bootstrap-server localhost:9092 --partitions 1 --replication-factor 1
This creates a new topic named test-topic and connects to the Kafka broker running on your local machine through port 9092. The topic is set up with one partition, which is enough for testing purposes. Since there is only one broker in this setup, the replication factor is also set to one, meaning Kafka will store each message on just that single broker.
If everything works as expected, you will see a similar output to this:
OutputCreated topic test-topic.
#Step 2: Start a Producer
With the topic created, you can start a producer. A producer is a simple program that sends messages to a Kafka topic.
Run the following command:
sudo /opt/kafka/bin/kafka-console-producer.sh --topic test-topic --bootstrap-server localhost:9092
Now, your terminal can accept input. You can now type any message, press Enter, and Kafka will send it to the test-topic topic.
For example, type this message:
OutputHello Kafka!
Testing...
Each line you type will be treated as a new message sent into Kafka.
#Step 3: Start a Consumer
To see if Kafka is delivering the messages correctly, open another terminal window or tab.
In this new terminal, start a Kafka consumer:
sudo /opt/kafka/bin/kafka-console-consumer.sh --topic test-topic --from-beginning --bootstrap-server localhost:9092
This command connects to the same test-topic topic and starts reading messages from the beginning.
As you send messages from the producer, they are streamed directly to the consumer. For example, typing Hello, Kafka! in the producer will immediately output the same line in the consumer:
OutputHello Kafka!
Testing…
This shows that Kafka is working as expected.
Also read: How to install Hadoop on Ubuntu 24.04
#Conclusion
Kafka is now installed and running on your machine using KRaft mode. You have configured it as a proper system service and verified that it can send and receive messages.
With this, you can build simple services. This setup gives you a solid base if you decide to explore more advanced Kafka features later.


