How to Install and Start Using MariaDB on Ubuntu 20.04 | Step-by-Step


This step-by-step MariaDB installation tutorial will demonstrate how to install MariaDB on Ubuntu 20.04 server, including the configuration and how to start using it. Additionally, we will highlight some best practices to ensure optimal performance of your MariaDB database server.
#What is MariaDB?
MariaDB is arguably one of the most widely used open-source relational database systems for newbies learning SQL databases to seasoned developers working on massive IT projects. MariaDB continues to be one of the most preferred Relational Database Management Systems (RDBMS). Developers often interact with the server using the official MariaDB command-line client, or through third-party tools such as the MariaDB GUI client from Devart.
MariaDB is community-developed, and a drop-in replacement for the MySQL database server. It was forked from the popular MySQL database server in 2009 after the acquisition of MySQL by Oracle.
MariaDB delivers better performance, speed, and security when pitted against MySQL. It also outperforms MySQL in replication thanks to its asynchronous Master-slave replication.
MariaDB provides three main editions:
- MariaDB Community Server
- MariaDB Enterprise Server
- MariaDB SkySQL
The MariaDB Community Edition is an opensource version which is completely free to download.
The **MariaDB Enterprise Server Edition ** is a scaled-up Community Edition that provides production-grade and opensource database management solutions at a subscription. It provides additional features such as additional plugins, automatic failover, database firewall, security alerts, technical support, and consultation to mention a few.
The MariaDB SkySQL Edition is a database-as-a-service (DBaaS) solution that ships the full power of the Enterprise Edition to the cloud. It provides powerful and innovative features that are intended to underpin mission-critical and enterprise deployments in the cloud. It supports thousands of databases in production with ease thanks to its efficiency and groundbreaking innovative features that make it a robust and reliable database service.
Check out the official product page for a better comparison among the three MariaDB Editions.
Top companies that leverage MariaDB in their tech stacks include Red Hat, Verizon, Samsung, Google, and ServiceNow to mention a few.
At the time of publishing this guide, here are the latest MariaDB versions.
- MariaDB 11.0 - The latest developmental release
- MariaDB 10.11 - The latest stable LTS release
Key highlights of the latest LTS release include:
- Performance schema
- Information schema
- Enhanced Replication features
- Improvements in Galera clustering
- Storage Engines
- Character Sets
- Security vulnerabilities from previous versions have been addressed
And so much more! Check out all the improvements included in MariaDB 10.6. In this guide, you will learn how to install MariaDB Community Server on Ubuntu 20.04.
#Prerequisites
To follow this MariaDB installation tutorial you need the following set of requirements:
- An instance of Ubuntu 20.04.
- A non-administrative user with sudo privileges configured on the instance.
#How to install MariaDB on Ubuntu 20.40?
Now that we know what MariaDB is, what it is used for, and what prerequisites we need, let’s look at how to install MariaDB on Ubuntu 20.04 server and get you started.
#Step 1: Install MariaDB by logging into your Ubuntu server
To get started, log into your Ubuntu 20.04 server and refresh the local repositories.
sudo apt update
Ubuntu repositories already provide MariaDB packages. The installation is straightforward using the PAT package manager as follows.
sudo apt install mariadb-server mariadb-client -y
However, the version of MariaDB provided by Ubuntu repositories is not the latest one. This installs MariaDB 10.3.24 at the time of penning down this guide. To install the latest version, use the official MariaDB repository.
First, install the prerequisite package.
sudo apt install -y software-properties-common
Next, import the GPG signing key.
sudo apt-key adv --fetch-keys 'https://mariadb.org/mariadb_release_signing_key.asc'
Once the GPG key is in place, add the MariaDB APT repository. The following repository is enabled for the MariaDB version 10.6. You may replace this value with the version that you intend to install.
sudo add-apt-repository 'deb [arch=amd64,arm64,ppc64el] https://mariadb.mirror.liquidtelecom.com/repo/10.6/ubuntu focal main'
Finally, refresh the local repositories and install the MariaDB server and client by using the APT package manager.
sudo apt update && sudo apt install -y mariadb-server mariadb-client
The command installs the specified version of the MariaDB database engine and client, alongside other additional packages and dependencies.
You can confirm the installed version of MariaDB as shown.
mariadb --version

#Step 2: Start And Enable MariaDB
By default, the MariaDB database engine starts automatically upon installation. You can verify this by running the command:
sudo systemctl status mariadb
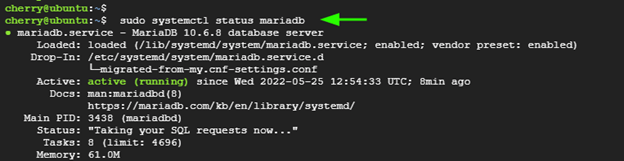
From the above output, you can see that the MariaDB service is running. If for whatever reason, you find that the service is inactive or not running, you can start it as follows.
sudo systemctl start mariadb
Additionally, consider enabling MariaDB to start every time on system startup as shown.
sudo systemctl enable mariadb
The above command ensures that MariaDB starts automatically every time the server is rebooted or powered on.
#Step 3: Configure MariaDB
MariaDB ships with default settings that are considered weak and present loopholes which can potentially be exploited by nefarious parties leading to data breaches.
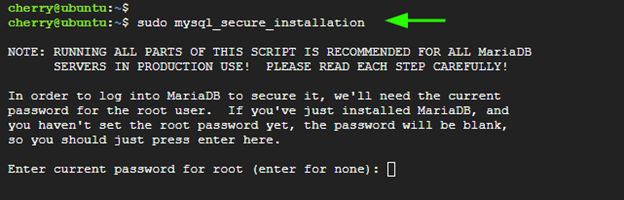
To remediate this issue, you need to go an extra step and harden your MariaDB instance. To improve the security of the MariaDB database engine, you need to run the mysql_secure_installation shell script as shown.
sudo mysql_secure_installation
The script walks you through a series of prompts that will require you to make changes to the security options that involve the MariaDB database engine.
The first prompt asks you to provide the current root password, and since none has been set up yet, simply hit ENTER on your keyboard.
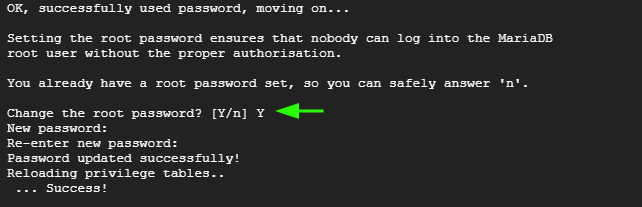
Next, you will be prompted for the database root password. This ensures that no one can log in as the root user without authentication. So, type ‘Y’ and provide the database root password and confirm it.
Then press ‘Y’ for the subsequent prompts in order to configure the database engine according to the best security practices. This does the following:
- Removes anonymous users from the database server
- Disables remote root login. This ensures that the root user can only log in to the database server from “localhost”
- Remove the test database which comes with MariaDB by default.
- Reloads privilege tables for the changes t take effect immediately.
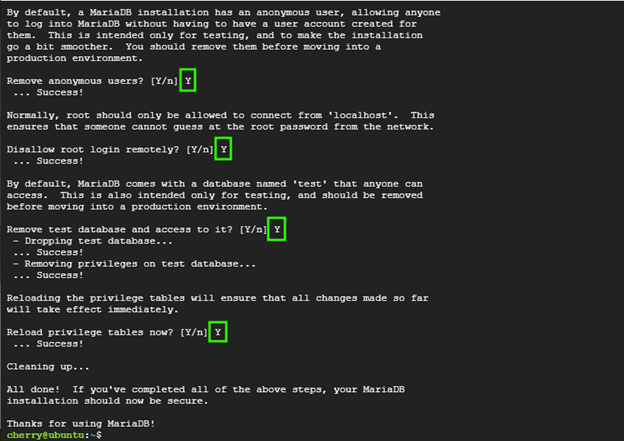
At this point, you have successfully completed the initial security configuration for MariaDB.
#Step 4: Configure A Password-authenticated Administrative User
In this section, you are going to create a new user account in the database server with password authentication and later assign administrative privileges to the user. So, login as the root user as follows:
sudo mariadb -u root -p
Next, create a regular user. Here, we are creating a user called admin_user. Be sure to replace secret_password with your preferred user’s password.
CREATE USER 'admin_user'@'localhost' IDENTIFIED BY 'secret_password';
Output
Query OK, 0 rows affected (0.000 sec)
Next, grant all privileges to admin_user. This effectively assigns all the database root user’s permissions to the user.
GRANT ALL PRIVILEGES ON *.* TO 'admin_user'@'localhost';
The *.* wildcard notation implies that the user has permission to execute any task on any database in the database server.
To apply the changes, flush the privileges.
FLUSH PRIVILEGES;
Finally, exit the database server.
EXIT;
#Step 5: Test MariaDB
With the MariaDB database server configured, you can now log in and run a few queries. Proceed and log in to the database server using the administrative user that you have just created.
sudo mariadb -u admin_user -p
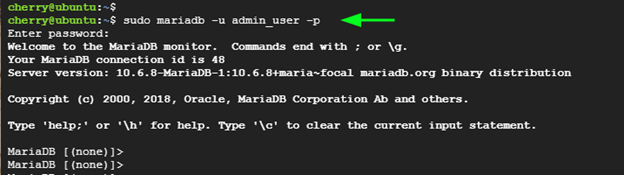
Provide the password for the administrative user and hit ENTER. Just above the MariaDB shell some details about the database server including the connection id, server version, and copyright information will be displayed.
To check the existing databases, run the command:
SHOW DATABASES;
Output
+--------------------+
| Database           |
+--------------------+
| information_schema |
| mysql              |
| performance_schema |
+--------------------+
4 rows in set (0.002 sec)
To create a new database, run the following query. In this example, we are creating a database called test_db.
CREATE DATABASE test_db;
Output
Query OK, 1 row affected (0.000 sec)
To apply all the changes made without restarting or reloading MariaDB run the query:
> FLUSH PRIVILEGES
Output
Query OK, 0 rows affected (0.000 sec)
To list all the existing users in your database engine, run the following query.
SELECT host, user FROM mysql.user;
Output
+-----------+-------------+
| Host      | User        |
+-----------+-------------+
| localhost | admin_user  |
| localhost | mariadb.sys |
| localhost | root        |
+-----------+-------------+
3 rows in set (0.001 sec)
To exit the MariaDB prompt, simply run:
QUIT
Output
Bye
#Step 6: Configure MariaDB For Optimal Performance
The default settings for MariaDB only allow it to work best on desktop systems because of their low resource utilization. However, if you intend to deploy MariaDB to production environment, you need to take some additional steps to configure it to handle huge workloads with optimal performance.
In this section, we explore some of the variables you can configure to get the most out of your database server.
MariaDB is usually configured by editing the /etc/mysql/my.cnf configuration file. This contains a number of variables that determine your database performance.
For optimal performance of the database server, consider the following salient points:
- Specify InnoDB Buffer Pool Size
- Disable Swapiness
- Specify the maximum number of connections
- Disable MariaDB/MySQL DNS lookups
- Specify Query cache size
- Enable slow query logs
- Specify idle connections value
Let’s have a quick brush over each of these.
Specify the InnoDB Buffer Pool Size
InnoDB is the default storage engine for MariaDB since the deprecation of MyISAM in 2010. It can be configured to provide high reliability and performance to the database server.
You can enable caching and indexing in MariaDB by setting the innodb_buffer_pool_size parameter in the /etc/mysql/my.cnf file. The amount of memory assigned to this parameter is dependent on the amount of RAM on your server.
The most commonly-followed practice is to set this value to 70% percent of the available RAM on the system. However, this is not optimal for most systems especially those with a huge RAM size.
Take for instance a system with 128GB RAM. Going by this rule, the buffer pool size would be about 90GB, leaving only 38GB to be used by other processes.
A better approach of getting the recommended buffer pool size value for your database server is by running the following query:
SELECT CEILING(Total_InnoDB_Bytes*1.6/POWER(1024,3)) RIBPS FROM
(SELECT SUM(data_length+index_length) Total_InnoDB_Bytes
FROM information_schema.tables WHERE engine='InnoDB') A;
This provides the Recommended InnoDB Buffer Pool Size ( RIBPS)
Output
+-------+
| RIBPS |
+-------+
|     1 |
+-------+
1 row in set (0.032 sec)
From the above output, the recommended InnoDB Buffer pool size is 1GB. This value might be different in your case.
So, edit the /etc/mysql/my.cnf configuration file and add the following line. Be sure to specify the memory size based on the result you get.
innodb_buffer_pool_size = 1G
Save the changes and restart MariaDB to apply the changes.
sudo systemctl restart mariadb
Disable Swappiness
Swap space is a special area on the hard drive that is used when the RAM is about to get depleted or used up. When swapping occurs, your disk I/O gets utilized and considerably slows down the server. If the right measures are not taken, the server can crash. As such, you need to disable swappiness by running the following command on your terminal.
sudo sysctl -w vm.swappiness=0
Specify the Maximum Number of Connections
The max_connections parameter specifies the number of concurrent connections that are currently initiated on your MariaDB server. Too many connections usually result in high CPU load and memory utilization. For small websites, the number of connections ranges from 300 to 500 connections while high-traffic websites command between 1000 to 1500 connections.
The max_connections value can be set using the following SQL query. In this example, the maximum number of connections has been set to 500 concurrent connections.
mysql> set global max_connections=500;
Disable MariaDB/MySQL DNS Lookups
When a new connection is initiated, MariaDB performs a DNS lookup to resolve the visitor's IP address. It may cause delays when there is an issue with the DNS server or when an invalid DNS configuration is detected.
To disable DNS lookups, simply add the following line in the /etc/mysql/my.cnf configuration file.
skip-name-resolve
Then restart the MariaDB service to apply the changes.
Set Query Cache Size
Another crucial parameter to include is the query_cache_size directive. It is used to cache all repetitive queries bearing the same data. The value for this parameter should not exceed 64MB for small websites. Setting this value to gigabytes even for high traffic sites is unrecommended as it may considerably degrade database performance.
So, once again, edit the /etc/mysql/my.cnf file as follows.
query_cache_size=64M
Save the changes and, again, restart MariaDB service.
Set Idle Connections Value
Idle connections can gobble up resources leading to degraded database performance. These connections enter a 'sleep' state and may stay asleep for prolonged periods. You can probe for idled connections by running the following command.
sudo mysqladmin processlist -u root -p | grep -i "Sleep"
Using the wait_timeout directive, you can close or interrupt the idle connections. By default, this value is 28800 seconds which can be further scaled down to 60 seconds. Therefore, consider adding the following line to the /etc/mysql/my.cnf configuration file.
wait_timeout=60
Enable Slow Query Logs
You can also boost the performance of your database server by logging the queries that take ages to execute. This makes it easier to troubleshoot database problems that are giving rise to this issue.
To enable logs for slow queries, add the following lines to the /etc/mysql/my.cnf configuration file.
slow-query-log = 1
slow-query-log-file = /var/lib/mysql/mysql-slow.log
long_query_time = 1
The first parameter enables the query of slow logs.
The second one notifies the database server of the file that the slow queries will be exported to.
The last parameter specifies the maximum threshold in seconds for a database query beyond which it is considered a slow query.
#Conclusion
In this guide, you’ve learnt how to successfully install MariaDB on Ubuntu 20.04 server. You have successfully installed, started, enabled, and secured the MariaDB database server using the mysql_secure_installation shell script. We also went a step further and looked at some of the best practices you can use to ensure optimal performance of your database server. Check out the official MariaDB documentation for additional information on the database server.


