How to Install and Configure a Private BIND DNS Server on Ubuntu 22.04?


DNS (Domain Name System) is a fundamental network service that every Linux admin and DevOps engineer should be familiar with. DNS is the "phone book of the Internet" that resolves IP addresses like 198.51.100.11 to FQDNs (fully qualified domain names) like cherryservers.com. The BIND (Berkeley Internet Name Domain) DNS suite is the de-facto DNS server implementation for *nix systems. As a result, understanding how to use BIND DNS is an essential tool in a Linux admin's toolbox. BIND can be configured as a public (Internet-facing) or private (within an internal network) DNS server.
To help you get familar with this popular DNS software suite, this article will explain how to install and configure a private BIND DNS server on Ubuntu 22.04.
#What is BIND DNS?
BIND is a full-featured, scalable, and open-source software suite for DNS services. BIND's name comes from the fact it was originally developed at the University of California Berkeley. Today, BIND is maintained by the ISC (Internet Systsems Consortium), and you can download signed copies of BIND 9 from the ISC's download's page.
The current implementation of BIND 9. While there was a BIND 10 project, the ISC stopped development on it in 2014. Today, the BIND 10 project became the Bundy DNS server project, which is currently in hibernation.
The majority of the DNS servers on the internet use BIND 9 and it is a staple in *nix environments. For Linux administrators, BIND 9 is a robust DNS solution for multiple use cases and includes support for TSIG (transaction signature), DNSSEC, and IPv6.
#How to install and configure a private BIND DNS server on Ubuntu 22.04
Now let's dive into configuring a private BIND DNS server on Ubuntu 22.04. For our example, we'll configure a single DNS server and two clients.
For our examples, we'll assume:
- Our LAN subnet of 192.0.2.0/24
- Our DNS server's (
bindserver's) IP address is 192.0.2.2. - Our first client's (
client1's) IP address is 192.0.2.3 - Our second client's (
client2's) IP address is 192.0.2.4 - Our domain is
cherry.example
Change our example values to match your test environment's values.
Note that our configuration is designed for test networks. Properly test and secure any configuration before deploying to production to meet your requirements.
#Prerequisites
Before we begin, you'll need:
- Access to the terminal of three Linux systems on the same LAN (local area network) you can use for testing. We'll use Ubuntu 22.04 LTS.
- Root/sudo privleges
#Install the latest updates
Before we install any packages, we will first update download and install the latest updates with the apt update and apt upgrade commands on all three systems:
apt update -y && apt upgrade -y
Note that the && ensures that apt upgrade only runs if apt update is successful.
#Install BIND 9 on the DNS server
Next, we're going to install three packages on our DNS server:
bind9- The BIND 9 DNS server software.bind9utils- Utilities that make working with BIND 9 easier.bind9-doc- A documentation package for BIND 9.
To install those packages, use this command:
apt install bind9 bind9utils bind9-doc -y
After installation, the BIND 9 service should be running. You can check the status with this command:
systemctl status bind9
You should see output similar to:

#Edit the named.conf.options file
The named.conf file is BIND 9's main configuration file. That main file includes a reference to /etc/bind/named.conf.options where we can specify options we need for our configuration. We'll make four modifications to the /etc/bind/named.conf.options file:
- An
acldirective that defines our local area network (LAN). - An
allow-querydirective that defines what IP addresses can send DNS queries to the server. - A
forwardersdirective that defines what DNS servers this server will forward recursive queries to. - A
recursiondirective that allows recursive DNS queries to the server.
To make those changes, open /etc/bind/named.conf.options in a text editor (e.g., nano or vim) and modify the files to look similar to this:
// allow only LAN traffic from 192.168.2.0-192.168.2.255
acl LAN {
192.168.2.0/24;
};
options {
        directory "/var/cache/bind"; // default directory
        allow-query { localhost; LAN; }; // allow queries from localhost and 192.168.2.0-192.168.2.255
        forwarders { 1.1.1.1; }; // use CloudFlare 1.1.1.1 DNS as a forwarder
        recursion yes;  // allow recursive queries
};
After you make the changes, check the syntax of the file with the named-checkconf command:
named-checkconf /etc/bind/named.conf.options
If the syntax is correct, the command should not return any output, like this:
![]()
If you want to see more verbose output on a successful test, add the -p switch to the command (named-checkconf -p).
#Edit the named.conf.local file
The named.conf.local is typically used to define local DNS zones for a private domain. We will update this file to include our forward and reverse DNS zones.
To make the changes, open /etc/bind/named.conf.local in a text editor (e.g., nano or vim) and add these lines:
zone "cherry.example" IN { \\ define the forward zone
        type master;
        file "/etc/bind/zones/cherry.example";
};
zone "0.116.10.in-addr.arpa" IN { \\ define the reverse zone
        type master;
        file "/etc/bind/zones/cherry.example.rev";
};
After you make the changes, check the syntax of the file with the named-checkconf command:
named-checkconf /etc/bind/named.conf.options
#Create a directory for your zone files
Next, we'll create a directory to store the zone files we specified in the previous step.
mkdir /etc/bind/zones
#Create the forward zone file
Now, we'll create a corresponding zone file /etc/bind/zones/cherry.example. The forward zone file allows the Bind DNS server to resolve names (like bindserver.cherry.example) to IP addresses (like 192.168.2.2).
First, copy the default db.local zone file to /etc/bind/zones/cherry.example:
cp /etc/bind/db.local /etc/bind/zones/cherry.example
Open /etc/bind/zones/cherry.example in a text editor (e.g., nano or vim) and make the changes indicated in the comments below:
$TTL    604800
; SOA record with MNAME and RNAME updated
@       IN      SOA     cherry.example. root.cherry.example. (
                              3         ; Serial Note: increment after each change
                         604800         ; Refresh
                          86400         ; Retry
                        2419200         ; Expire
                         604800 )       ; Negative Cache TTL
; Name server record
@       IN      NS      bindserver.cherry.example.
; A record for name server
bindserver      IN      A       192.168.2.2
; A record for clients
client1      IN      A       192.168.2.3
client2      IN      A       192.168.2.4
Once the changes are complete, use the named-checkzone command to check the configuration:
named-checkzone cherry.example /etc/bind/zones/cherry.example
You should see output similar to:

#Create the reverse zone file
Now, we'll create a corresponding reverse zone file /etc/bind/zones/cherry.example.rev. The reverse zone file allows the Bind DNS server to resolve IP addresses (like 192.168.2.2) to names (like bindserver.cherry.example).
First, copy the default db.local zone file to /etc/bind/zones/cherry.example.rev
cp /etc/bind/db.127 /etc/bind/zones/cherry.example.rev
Open /etc/bind/zones/cherry.example.rev in a text editor (e.g., nano or vim) and make the changes indicated in the comments below:
$TTL    604800
; SOA record with MNAME and RNAME updated
@       IN      SOA     cherry.example. root.cherry.example. (
                              2         ; Serial Note: increment after each change
                         604800         ; Refresh
                          86400         ; Retry
                        2419200         ; Expire
                         604800 )       ; Negative Cache TTL
; Name server record
@       IN      NS      bindserver.cherry.example.
; A record for name server
bindserver      IN      A       10.116.0.2
; PTR record for name server
2   IN      PTR     bindserver.cherry.example
; PTR record for clients
3   IN      PTR     client1.cherry.example
4   IN      PTR     client2.cherry.example
Once the changes are complete, use the named-checkzone command to check the configuration:
named-checkzone cherry.example /etc/bind/zones/cherry.example.rev
You should see output similar to:

#Restart BIND 9
To make the BIND DNS server use the new configuration, restart the BIND 9 service with this command:
systemctl restart bind9
#Configure clients to use the configuration
Once the Private Bind DNS server is configured, we can configure the clients to use it. Follow these steps for both client1 and client2.
First, check which interface is used for LAN connectivity with this command:
ip -brief addr show to 192.168.2.0/24
The interface we need will be the first value displayed. For example, eth1 in the output below:
eth1 UP 10.116.2.0/24
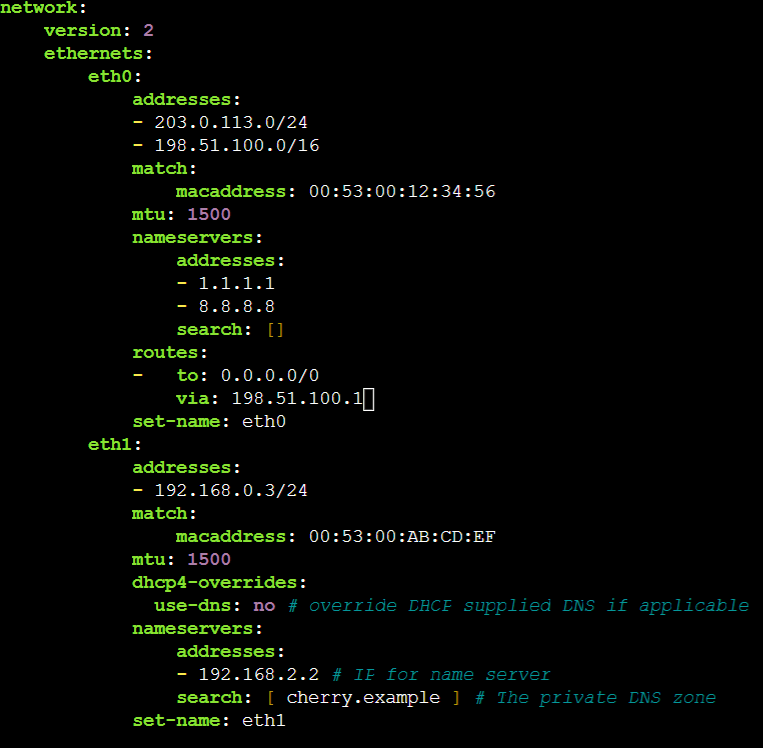
Next, use a text editor (e.g., nano or vi) to edit your netplan YAML file to include a DNS configuration that points to the private Bind DNS server. Typically, netplan configuration files are stored at /etc/netplan. You can also create a new configuration file if you prefer.
The YAML should look similar to:
        eth1:
            addresses:
            - 192.168.0.3/24 # The IP address of client1
            match:
                macaddress: 00:53:00:AB:CD:EF
            mtu: 1500
            dhcp4-overrides:
              use-dns: no # override DHCP supplied DNS if applicable
            nameservers:
                addresses:
                - 192.168.2.2 # IP for name server
                search: [ cherry.example ] # The private DNS zone
            set-name: eth1
Here is an example of a complete netplan YAML file for an Ubuntu client with two network interfaces specified (eth0 and eth1):
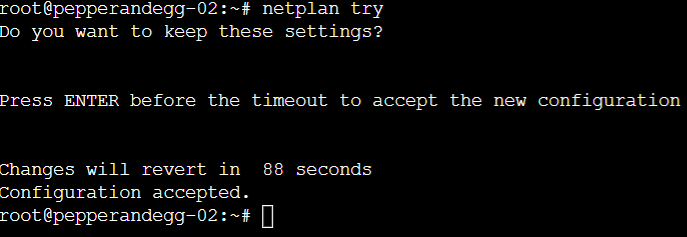
Once you the configuration is complete, test it with this command:
netplan try
Press ENTER to accept the changes:
For more details on how to use netplan, check out the documentation.
#Test the client configuration
Once the configuration is complete, client1 and client2 will use bindserver for name resolution on the LAN.
To verify that the configuration is working properly, use the nslookup command to lookup our domain names on client1 and client2. All 6 of these commands:
nslookup client1nslookup client2nslookup bindservernslookup client1.cherry.examplenslookup client2.cherry.examplenslookup bindserver.cherry.example
Should properly resolve and provide output similar to:
Server:         127.0.0.53
Address:        127.0.0.53#53

Non-authoritative answer:
Name:   client1.cherry.example
Address: 192.168.2.3
Additionally, you can now use names (like client1) and FQDNs (like client1.cherry.example) to communicate between the clients. For example, if both clients respond to ping, you can use their name or FQDN to check connectivity.
#Conclusion
That's it! Now you know the basics of how BIND 9 on Ubuntu 22.04. For a deeper dive into the BIND DNS software suite, we recommend reading the BIND 9 Administrator Reference Manual.


