How to Set up PostgreSQL Database Replication


Database replication is the process of copying data from a central or primary server to multiple servers known as replicas. The primary server accepts read and write operations whereas the replicas serve read-only transactions. The primary server and replicas collectively form a database cluster.
The goal of database replication is to ensure redundancy, consistency, high availability, and accessibility of data, especially in high-traffic, mission-critical applications.
PostgreSQL offers two methods for replications: physical (i.e. streaming) and logical replication. Both are ideal for different use cases, and a user may choose one over the other depending on the end goal.
Let’s have a look at each of these replication methods.
#Physical PostgreSQL Replication
This is the most common type of replication in PostgreSQL. Physical replication maintains a full copy of the entire data of a cluster. It uses exact block addresses and employs byte-by-byte replication. In simpler terms, the entire set of data on the primary server is copied to the replica which acts as a standby node.
Physical replication does not replicate a specific object of the primary database cluster such as a single row of data in a table. Instead, it works on a disk block level and mirrors all data to replica nodes; including all the tables in each database. This replication requires all replicas to be identical.
Run your PostgreSQL deployments in a high-performing and cost-effective open cloud infrastructure. Cherry Servers' bare metal cloud and virtual servers offer automatic scaling, pay-as-you-go pricing, and free 24/7 technical support.
#Use cases:
- It is mostly used for disaster recovery setups and backups since all replicas are identical.
- Recommended when dealing with large volumes of data
#Pros
- It is easy to implement since all the database clusters are identical.
- It ensures data consistency and high availability at any point since all the replicas hold identical copies of data.
- It is Ideal for read-only operations on the replicas.
- It’s very efficient since it does not require any special handling.
#Cons
- It is bandwidth-intensive since the entire data is copied and not just small sections of the primary cluster.
- It does not offer multi-master database replication.
#Logical PostgreSQL Replication
Logical replication was first introduced in PostgreSQL 9.0. It works by replicating data objects and their changes based on a unique identifier such as a primary key. In simpler terms, logical replication copies database objects in a row-based model as opposed to physical replication which sends everything to the replica nodes.
Thus, logical replication offers fine-grained control over data replication as opposed to physical replication and is ideal for tasks like document verification.
#Use cases:
Typical use cases for logical replication include:
- Replicating between different major versions of PostgreSQL.
- Replicating between PostgreSQL instances hosted on different platforms e.g from Linux to Windows.
- Sending incremental changes in a database to replicas as they happen in real-time.
- Granting access to replicated data to various groups of users.
#Pros
- It is Ideal for backing up incremental data.
- Most recommended for high availability clusters thanks to better performance and low data loss.
- Bandwidth optimization since only row changes for committed transactions of data is sent to the replicas instead of the entire block of data.
- Used in multi-master replication which is not possible using physical replication.
- Supports replication across various OS platforms e.g Linux to windows and vice versa.
#Cons
- It cannot stream large volumes of transactions as they happen in real-time.
- The replication process is more complex than physical replication.
- High resource utilization on the replica nodes.
#Setup Physical PostgreSQL Replication on Ubuntu 22.04
To demonstrate the replication process, you need a primary node and a replica node on which the replication will occur. Below is our lab setup and we are going to use Ubuntu 22.04 as the preferred operating system.
Primary node: IP: 194.195.208.82 OS: Ubuntu 22.04 server
Replica node: IP: 139.144.169.79 OS: Ubuntu 22.04 server
#Step 1: Install PostgreSQL Server
The first step is to install PostgreSQL on both Primary and Replica nodes. Take note that you need to install the same version of PostgreSQL on both nodes for logical replication to take place.
At the time of writing this guide, the latest version of PostgreSQL is PostgreSQL 14.
First, log in to your server via SSH and refresh the repositories.
sudo apt update
Next, install the PostgreSQL database server as follows.
sudo apt install postgresql postgresql-contrib -y
By default, the PostgreSQL daemon automatically runs once installed. You can verify this by using the command:
sudo systemctl status postgresql

The output below confirms that the PostgreSQL service is up and running.
In addition, consider enabling the service to start on system startup as follows.
sudo systemctl enable postgresql
#Step 2: Configure Primary Node
Next, log in to the primary node (194.195.208.82) as postgres user which is the default user that is created with every new PostgreSQL installation.
sudo -u postgres psql
You need to create a replication user that will be used to initiate the replication process from the primary node.
Therefore, run the following command to create the replication user and assign replication privileges. In this command, replica_user is the replication user while P@ssword321 is the user’s password. Be sure to provide a strong password unlike the one we have used which is purely for demo purposes.
CREATE ROLE replica_user WITH REPLICATION LOGIN PASSWORD 'P@ssword321';

Then log out from the PostgreSQL prompt
postgres-# \q
Next, you need to make a few tweaks to the main configuration file. Use your preferred text editor to access the following configuration file:
sudo vim /etc/postgresql/14/main/postgresql.conf
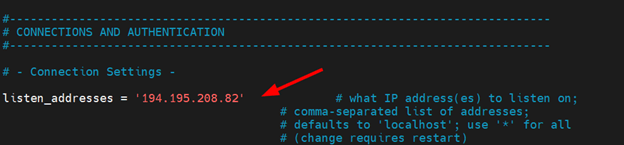
With the file open, scroll down and locate the listen_addresses directive. The directive specifies the host under which the PostgreSQL database server listens for connections.
Uncomment the directive by removing the # symbol and replace localhost with your server’s IP address enclosed in single quotation marks as shown:
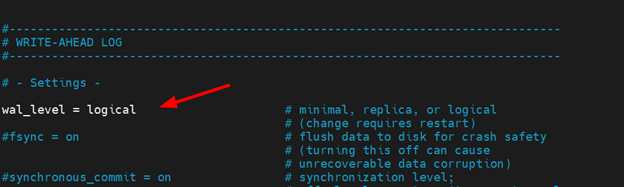
Next, locate the wal_level directive. The setting specifies the amount of information to be written to the Write Ahead Log (WAL) file.
Uncomment the line and set it to logical as shown.
Next, locate the wal_log_hints directive. By default, it is set to off.
When set to on the value allows the PostgreSQL server to write the entire content of each disk page to the WAL file during the first modification of the page.
Uncomment it and set it to on.

That’s all for the changes needed in this configuration file. Save the changes and exit.
Next, access the /etc/postgresql/14/main/pg_hba.conf configuration file.
sudo vim /etc/postgresql/14/main/pg_hba.conf
Append this line at the end of the configuration file. This allows the replica ( 139.144.169.79 ) to connect with the master node using the replica_user.
host replication replica_user 139.144.169.79/24 md5
Save the changes and close the file. The restart PostgreSQL service.
sudo systemctl restart postgresql
#Step 3: Configure Replica Node
Before the replica node can start replicating data from the master node, you need to create a copy of the primary node’s data directory to the replica’s data directory. To achieve this, first, stop the PostgreSQL service on the replica node.
sudo systemctl stop postgresql
Next, remove all files in the replica’s data directory in order to start on a clean slate and make room for the primary node data directory.
sudo rm -rv /var/lib/postgresql/14/main/
Now run the pg_basebackup utility as shown to copy data from the primary node to the replica node.
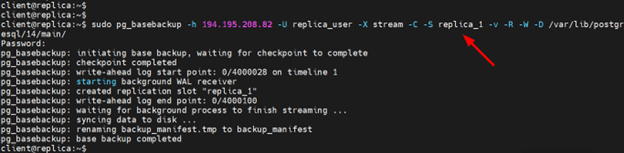
sudo pg_basebackup -h 194.195.208.82 -U replica_user -X stream -C -S replica_1 -v -R -W -D /var/lib/postgresql/14/main/
Let's take a look at the options used in the command:
- -h: This option specifies the host, in this case, the IP address of the master node.
- -U: The option specifies the replication user. This is the user that was configured on the primary node and which will be used by the replica node to connect to it. In our case, the replication user is called
replica_user. - -X: The option along with the stream value instructs the
pg_basebackuputility to stream and include the WAL files in the backup. - -C: The option allows you to create a replication slot before the backup gets underway. The option is used along with the
-Soption to specify the slot name. In this case, our replication slot is calledreplica_1. - -v: This prints out verbose output that indicates the progress of the backup process from the primary node to the replica.
- -R: The option creates two files; an empty recovery configuration file called
standby.signaland a primary node connection settings file calledpostgresql.auto.conf.Thestandby.signalfile contains connection information about the primary node and thepostgresql.auto.conffile informs your replica cluster that it should operate as a standby server. - -W: This prompts you to provide a password for the
replica_userreplication user. - -D: Lastly, the
-Doption allows you to include the directory that you want to export the backup files. In this example, we are placing the data under the/var/lib/postgresql/14/main/directory in the replica node.
Here is the output from running the replication command.
Afterward, execute the following command on the replica to grant ownership of the data directory to the postgres user.
sudo chown postgres -R /var/lib/postgresql/14/main/
Now, start the PostgreSQL server. The replica will now be running in hot standby mode.
sudo systemctl start postgresql
#Step 4: Test The Replication Setup
At this juncture, the primary node’s data directory has successfully been backed up on the replica and the replica started in a hot standby mode.
The remaining part is to test out if the replication is working as intended. If the replica is successfully running in hot standby mode, then it should be connected to the primary database cluster on the primary server.
To verify that the replica is connected to the primary node and that the primary is streaming, log into the primary server and switch to the postgres user.
sudo -u postgres psql
Next, query the pg_stat_replication table which contains vital information about the replication. In this command, we are retrieving information about the replica’s IP address and the state of the primary server.
SELECT client_addr, state
FROM pg_stat_replication;

You should get the following output confirmation that your setup is working.
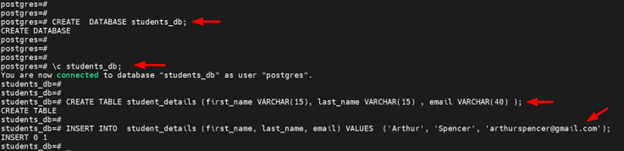
To corroborate this, we are going to create a test database and add a table with a few records and then verify if the database has been replicated on the replica.
we will create a sample database called students.
CREATE DATABASE students_db;
Next, switch to the database.
\c students_db;
Output
You are now connected to database "students_db" as user "postgres".
Once in the database, create a table called student_details with the following schema.
CREATE TABLE student_details (first_name VARCHAR(15), last_name VARCHAR(15) , email VARCHAR(40) );
Then insert the following record into the table.
INSERT INTO  student_details (first_name, last_name, email)
VALUES  ('Arthur', 'Spencer', 'arthurspencer@gmail.com');
You can query the table to confirm the inserted records as shown.
SELECT *
FROM student_details;

Now head over to the replica node and switch to the postgres user.
sudo -u postgres psql
On the shell, verify the existence of the database that was created in the primary node moments ago.
postgres=# \l
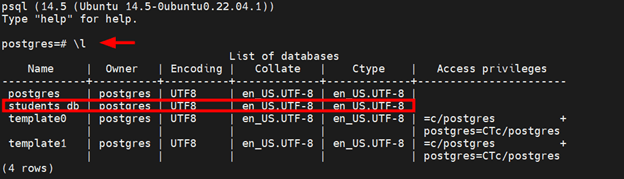
Now, switch to the database.
\c students_db;
Query the table for all the records stored.
SELECT *
FROM student_details;
You should get exactly the same record as you created in the master node as shown below.
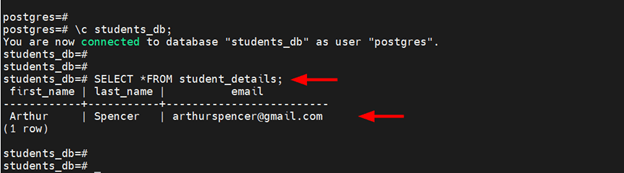
This confirms that replication was successful! You can continue adding more records on the primary server which will then be copied or replicated to the replica node.
#Conclusion
In this tutorial, we have looked at the two replication methods provided by PostgreSQL alongside their pros and cons. We went a step further and created a replication cluster using the PostgreSQL logical model and demonstrated the replication of data from the master to the replica node. Head over to the official documentation for a more comprehensive look at replication in PostgreSQL.


