How to Setup Linux Firewall Using Firewalld


In Linux a firewall is an application or a service that filters or controls network traffic as it passes to and from a Linux server using a predetermined set of rules. A firewall is typically configured to allow desired traffic to pass through while blocking the rest of the external traffic.
Firewalld is a firewall management solution for Linux systems. It is a service daemon that provides a customizable host-based firewall along with a D-Bus interface and a comprehensive set of firewall rules that control the flow of traffic across your network interfaces.
Firewalld uses the concept of zones to manage network traffic. Zones are predefined sets of rules that network interfaces can be assigned. You can configure firewalld to either allow or block services or ports associated with applications.
In this tutorial, we will demonstrate how to set up a Linux firewall using firewalld daemon. We will demonstrate this on a Red Hat Enterprise 9 (RHEL 9) server.
#How To Install and Enable Firewalld
By default, firewalld comes installed in RHEL-based distributions such as RHEL, AlmaLinux, CentOS, Rocky Linux and Fedora. However, if by any chance firewalld is not installed, you can install it as follows.
sudo dnf install firewalld -y
On Ubuntu, and Debian distributions, run the following commands:
sudo apt update

sudo apt install firewalld -y
Once installed, enable it to start on boot.
sudo systemctl enable firewalld
Next, start the firewalld service or daemon.
sudo systemctl start firewalld
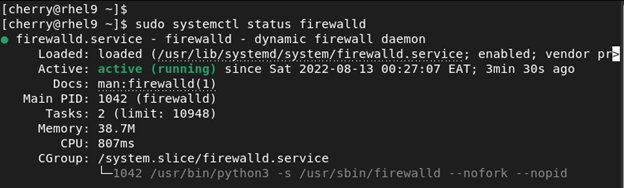
The firewall should now be started complete with the default firewall zones and rules. To verify that the Firewall service is running, execute the command:
sudo systemctl status firewalld
Alternatively, you can run the command:
sudo firewall-cmd --state

The above output confirms that the Firewall is up and running.
#Firewalld Zones
Before you learn how to set up the firewalld firewall, it’s prudent to familiarize yourself with a few concepts associated with the tool.
The firewalld daemon uses zones to manage traffic. Zones are simply a set of predefined rules that dictate what traffic should be allowed based on the level of trust in your network. Let us have a quick overview of the predefined zones.
block - All incoming connections are dropped with an icmp-host-prohibited message. Only network connections initiated from within the system are possible.
**drop **- This is the zone with the lowest level of trust. All incoming connections are dropped with no reply, and only outgoing connections are allowed.
public - This represents untrusted networks. It is implemented when you don't trust other servers on the network. This is recommended when you have a server hosted on the cloud or local network.
external - Used when you want to configure the firewall as a NAT gateway. The external zone is used for NAT masquerading such that your internal network stays private but reachable from external systems.
**internal **- Used for internal networks when you trust other computers or servers on your LAN.
dmz - Used for servers or computers in a DMZ ( Demilitarized Zone ). These will not be accessible to systems on your network and only specific incoming connections are allowed.
work -Used at your place of work where you trust most of the computers and co-workers' PCs.
home - Used in the home environment especially on desktops and laptops on your LAN. The implication is that you trust most of the devices on your home LAN and that some services are allowed.
trusted - All connections are accepted.
You can get a list of all the zones by running the following command on the terminal.
sudo firewall-cmd --get-zones

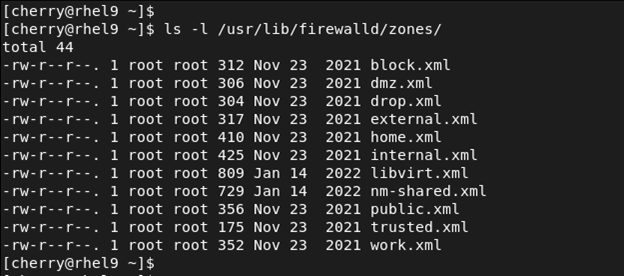
In addition, each zone has its associated .xml file stored within the /usr/lib/firewalld/zones/ directory. You can list the files as follows.
ls -l /usr/lib/firewalld/zones/
To get the default zone that is currently assigned to your network interface, run the command:
firewall-cmd --get-default-zone

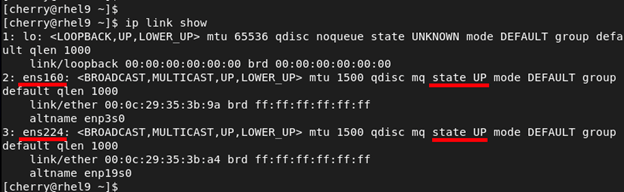
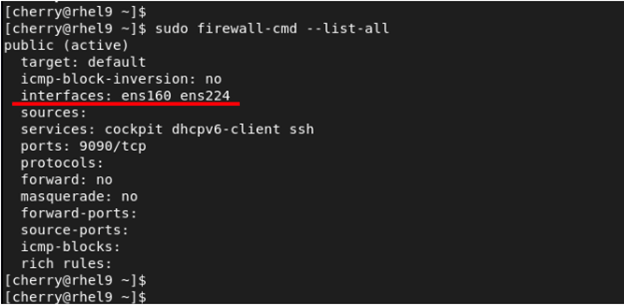
Without making any changes to the firewall, the default zone is the public zone which also happens to be the only active zone out of the box. By default, all the network interfaces are bound to this zone. To illustrate this, we have two active network interfaces attached to our RHEL system - ens160 and ens224.
You can list the network interfaces using the command:
ip link
OR
ip link show
To verify the active zones, run the command:
firewall-cmd --get-active-zones
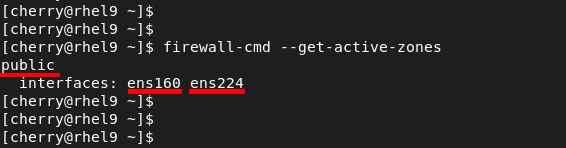
Here, you can see that two interfaces - ens160 and ens224 - are associated and managed by the public zone.
To print out the configuration of the default zone, run the command.
sudo firewall-cmd --list-all
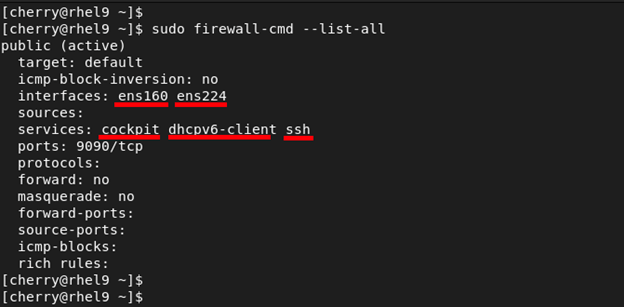
From the output we can see that we have only one active zone called public which is also the default zone associated with both network interfaces.
#Change Zones For Network Interfaces
When a firewall is started, each network interface is bound to the default zone, which also happens to be the only active zone. If desired, you can bind an interface to another zone during a session using the **--zone= flag in combination with the --change-interface= flag.
For example, to move the ens160 interface to the internal zone, execute the command:
sudo firewall-cmd --change-interface=ens160 --zone=internal
To confirm that the interface has been moved, query for the active zones using the following command.
sudo firewall-cmd --get-active-zones
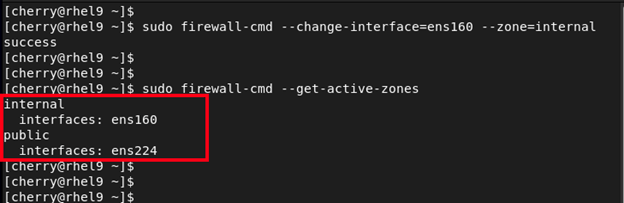
From the output you can see that we now have two active zones: internal and public. The ens160 interface has now been moved to the internal zone.
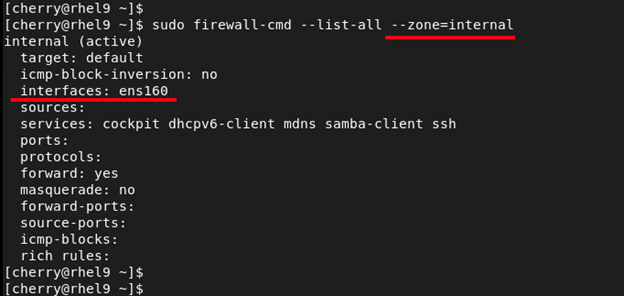
You can explore specific configurations associated with a different zone using the --zone= flag in the --list-all command that we saw earlier. For example to check out the configuration associated with the internal zone, run the command:
sudo firewall-cmd --list-all --zone=internal
You can print out all the zone configurations using the --list-all-zones parameter as shown.
sudo firewall-cmd --list-all-zones
The output displayed is quite large. For easier viewing, you can pipe the output to **less which will allow easier viewing as you scroll through the configurations.
sudo firewall-cmd --list-all-zones | less
NOTE:
When moving an interface to a new zone, caution should be taken because some services associated with one zone may be absent in another zone. For example, moving an interface to the **trusted zone will drop your SSH connection since SSH is not enabled by default in that zone. As a result, you will be logged out of the server.
#Adjust the Default Zone
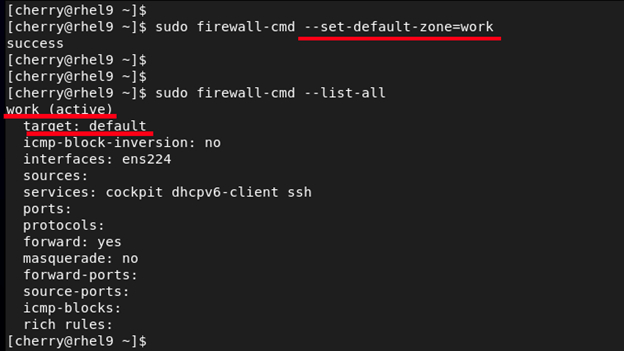
The **--set-default-zone= parameter allows you to change the default zone. In this example, we are setting the default zone to work.
sudo firewall-cmd --set-default-zone=work
To confirm that this is the default zone run the command:
sudo firewall-cmd --list-all
#Firewalld Service Management
Services are simply daemons that run in the background. Each service is associated with a specific port. For example, SSH runs on port 22, HTTP on port 80, and cockpit on port 9090 to mention a few.
To list all the services associated with the active firewall zones, run the command:
sudo firewall-cmd --list-all
To narrow down and list the services bound to a specific zone, use the --zone= flag as shown. The command below lists the services associated with the home firewall zone.
sudo firewall-cmd --list-all --zone=home
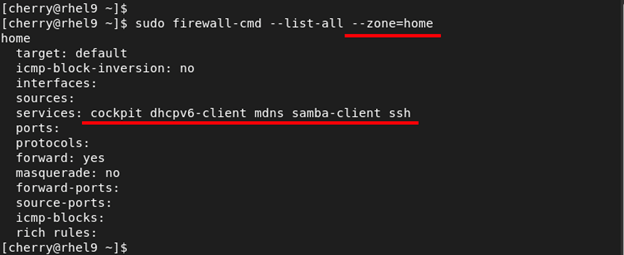
If you are keen enough, you will notice that some services are already allowed by default in some zones. These include cockpit, SSH, and dhcpv6-client.
#How to List Services Supported by Firewalld
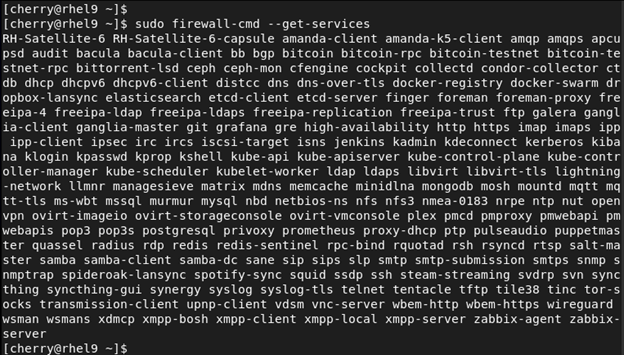
To display all the services supported by Firewalld run the command:
sudo firewall-cmd --get-services
Further, you can narrow your search to a specific service. The following command will highlight the MongoDB service from the services listed.
sudo firewall-cmd --get-services | grep -i mongodb
#How to add/remove Services on Firewalld
When services/ports are added to the firewall, they bind to the default active zone unless explicitly configured to another zone. To enable a service for a zone, use the --add-service= parameter. The zone is specified using the --zone= parameter.
Suppose you are running a web server running the conventional HTTP service. To allow the HTTP service across the firewall on the default – public – zone, run the command.
sudo firewall-cmd --add-service=http --zone=public --permanent
The --permanent option makes the change persistent. For the change made to apply even after a reboot, reload the firewall.
sudo firewall-cmd --reload

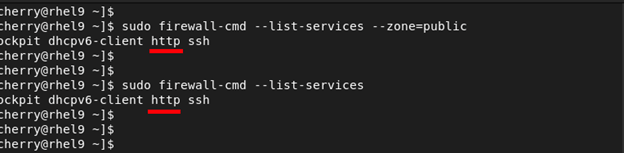
You should get success as the output of each command indicating that all the commands were executed successfully. Your public zone should now allow HTTP service across the firewall, and you can confirm this using the following command.
sudo firewall-cmd --list-services --zone=public
To remove the service from the zone, use the --remove-service flag and reload the firewall.
sudo firewall-cmd --remove-service=http --zone=public --permanent

sudo firewall-cmd --reload
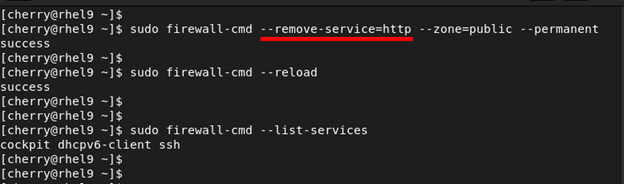
When you check the services allowed on the firewall, this time around, the HTTP service will be missing from the list.
#How to open/block Ports on Firewalld
Firewalld provides services for commonly used applications that you might want to allow access to. In most cases, the services correspond to the ports that the applications are listening to. For example, the corresponding port for HTTP web traffic is port 80, and port 3306 for MySQL service.
In some cases, however, you might not find a service that corresponds to the port that your application is listening to. For example, if your application listens to port 5000, you can open this port using the **--add-port= flag. Ports can either be TCP or UDP.
sudo firewall-cmd --add-port=5000/tcp --zone=public --permanent
To persist the changes even after a reboot, reload the firewall.
sudo firewall-cmd --reload

To verify that the port has been opened in the zone, run the following command.
sudo firewall-cmd --zone=public --list-ports

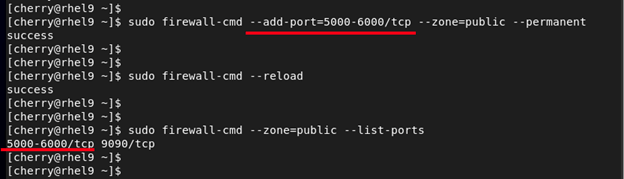
In addition, you can specify a range of ports by separating the beginning and the ending port within the range with a hyphen. For example, to open a range of ports between 5000 and 6000 in the public zone, run the following commands:
sudo firewall-cmd --add-port=5000-6000/tcp --zone=public --permanent

sudo firewall-cmd --reload
Again, you can confirm this by running the command:
sudo firewall-cmd --zone=public --list-ports
To deny or block a port, use the --remove-port= parameter. For example, to block TCP port 5000 on the public zone, run the command:
sudo firewall-cmd --remove-port=5000/tcp --zone=public --permanent
Then reload the firewall to persist the changes.
sudo firewall-cmd --reload
#Conclusion
By now you should have a clear understanding of how to configure firewalld service on your Linux system to manage traffic based on your preferences. The firewall service provides a rich set of rules that can be applied to interfaces and zones giving administrators the flexibility and autonomy to manage network traffic.


