How to Create and Use Kubernetes Secrets | A Complete Guide


Are you trying to deploy an application into a Kubernetes cluster and need to pass it some sensitive information such as a username and password, an API token, or an SSL certificate? Most applications have some sensitive data required to configure them, and thankfully, Kubernetes has a primitive made for managing such information named a Secret. These secrets consist of key-value pairs.
In this guide, we'll look at what Kubernetes secrets are and how they can be created and used in your Kubernetes cluster.
#Prerequisites
This guide will demonstrate various examples. If you’d like to follow along, be sure to have the following:
- A Kubernetes cluster (Minikube is used for this demonstration)
- The Kubernetes Kubectl command-line tool
- Basic knowledge of Kubernetes
#What are Secrets in Kubernetes?
A Secret is an object that contains a small amount of sensitive data, such as a password or token, to be used within a Kubernetes environment. Secrets are used for storing sensitive information like authentication tokens, passwords, ssh keys, and certificates. Secrets are stored in etcd (the datastore for Kubernetes). Secrets are similar to ConfigMaps but are specifically intended to hold confidential data. The data stored using secrets are independent of pods, but pods can reference the secrets as container environment variables or the secrets can be mounted as volumes to the container.
#Importance of Kubernetes Secrets
Secrets can be quite secure when effectively managed. They provide a secure means of managing sensitive data that your applications running in Kubernetes may need. They prevent you from having to hardcode sensitive data directly into configuration files or application codes, as doing that would be insecure, and the data could be accessed or intercepted by just anyone.
#Types of Kubernetes Secret
There are a few different types of secrets, and when creating a secret, you can specify its type.
- Opaque: This is the default type, which is the type that is assumed when a secret type is not specified, and it can store arbitrary user-defined data in key-value pairs. Data is stored as base64-encoded within this secret type.
- Docker-registry: Used to store credentials for authenticating with a private Docker registry.
- TLS: This secret type is designed for storing TLS certificates and their private keys.
- Service Account Token: The service account token secret type is used to store a token that identifies a service account. When using this Secret type, the
kubernetes.io/service-account.nameannotation needs to be set to an existing service account name. - Basic authentication: This is used for storing basic authentication credentials. If you want to use this type, note that it requires that its data field contains the username and password keys.
- SSH authentication: This secret type is for storing data used for SSH authentication. It requires you to add an ssh-privatekey key-value pair in the data as the SSH credential to use.
- Bootstrap token: This type of Secret is designed for tokens used during the node bootstrap process or when adding new nodes to an existing cluster. It stores tokens used to sign well-known ConfigMaps.
These secret types serve a specific purpose, so you can use any of these types depending on the information you want to store.
#How to create Kubernetes Secrets?
There are three main ways of creating a Kubernetes secret. You can either create a Kubernetes secret in the command line using the kubectl create secret command, you can use a configuration file, or use a generator like Kustomize. Below we will demonstrate how to create secrets in each of these three ways in detail.
#1. Create a secret using Kubectl
Using Kubectl is the easiest way to create a Kubernetes secret. You do this using the kubectl create secret command. There are two different options when using this method.
Firstly, you can do from-literal, where you pass the key and value as literal strings in the command. This method doesn't require you to create a file, which is convenient because you likely wouldn't want to store your secrets in a plaintext source file anyway.
The second option is the from-file option, in which you pass a key and then a path to the file containing the key value on your local system. Both of these options handle the base64 encoding for you, so you can pass in your secret without having to encode it first.
Using from-file
Step 1 - Create the secret data file
To create a secret from a file, you can use the from-file option. First, create a file to store the secret data. Here you'd be creating two files; a username.txt file and a password.txt file. These files will contain a value for username and password, respectively. Run the following code to create the files and write the string values in them:
# Store the string 'superuser' in the file 'username.txt'
echo -n 'superuser' > username.txt

# Store the string 'secretpasscode' in the file 'password.txt'
echo -n 'secretpasscode' > password.txt
The -n flag ensures that no newline character is added to the string before writing it to the file.

Step 2 - Using the files
Now run the following command to create a secret using the files:
kubectl create secret generic demo-credentials \
--from-file=username=./username.txt \
--from-file=password=./password.txt

This will create an Opaque Kubernetes secret named demo-credentials using the content of the username.txt and password.txt files as the values for the username key and the password key, respectively, in the demo-credentials secret.
Using from-literal
This option of using kubectl directly in the CLI doesn't require you to create any file. To create a generic secret by passing the key values directly as literal values, execute the following:
kubectl create secret generic demo-credentials2 \
--from-literal=username=rootuser \
--from-literal=password=rootpassword

This command creates a generic Secret Kubernetes secret named demo-credentials2 with the username key set to 'rootuser' and the password key set to 'rootpassword'.
#2. Creating a Secret using a configuration file
You can define a YAML file to create a Kubernetes secret like any other Kubernetes resource. This file will specify that it is of kind Secret, defines the name of the secret within the metadata, and then contain the key and value of the secret within the data portion. Using the data field requires you to encode the secret data, but if you want to use the data as it is, you can use the stringData field instead. To encode your secret data, you can use the base64 command line utility. For this demonstration, you'd be converting the username and password data to base64.
Step 1 - Encode the secret data
To encode the data, run the following commands:
# Encode the string 'adminuser' in base64 format
echo -n 'adminuser' | base64

# Encode the string 'secretpassword' in base64 format
echo -n 'secretpassword' | base64
You should see the converted data in the terminal when you run the commands - you'll use these in the configuration file.

Step 2 - Create the configuration/YAML file
Create a YAML file and add the following configuration to it:
apiVersion: v1
kind: Secret
metadata:
  name: new-secret
type: Opaque
data:
  username: YWRtaW51c2Vy
  password: c2VjcmV0cGFzc3dvcmQ=
Notice that the base64 encoded values are added as the values for username and password in the data field.
Step 3 - Create a Kubernetes secret using the configuration file
To create the secret, you'd then run the command:
# Apply the configuration defined in the 'secrets-config.yaml' file
kubectl apply -f secrets-config.yaml
where secrets-config.yaml is the name of the file. After running the command, you should get an output indicating that the secret has been created.

#3. Create Kubernetes Secrets using a generator (Kustomize)
You can create Kubernetes secrets using a resource generator like Kustomize. It provides more flexibility and automation for secret creation.
Step 1 - Create a kustomization.yaml file
To create a secret with Kustomize, first, create kustomization.yaml file and add the following configuration to it:
secretGenerator:
- name: demo-credentials
  files:
  - username.txt
  - password.txt
The files containing the secret data are referenced in the definition above. With the secretGenerator, you can reference files containing the secret data, the literal values of the secret data, or environment variable files.
Step 2 - Generate the secret
Run the following command to generate the secret:
# Apply the Kubernetes configuration using Kustomize in the current directory
kubectl apply -k .
After running the command, you should see an output saying the secret has been created, like in the image below:

#4. Verifying the secret
You can check if the secrets were successfully created by using the kubectl get secrets command.
kubectl get secrets
You should see the secrets you've created displayed in the terminal:

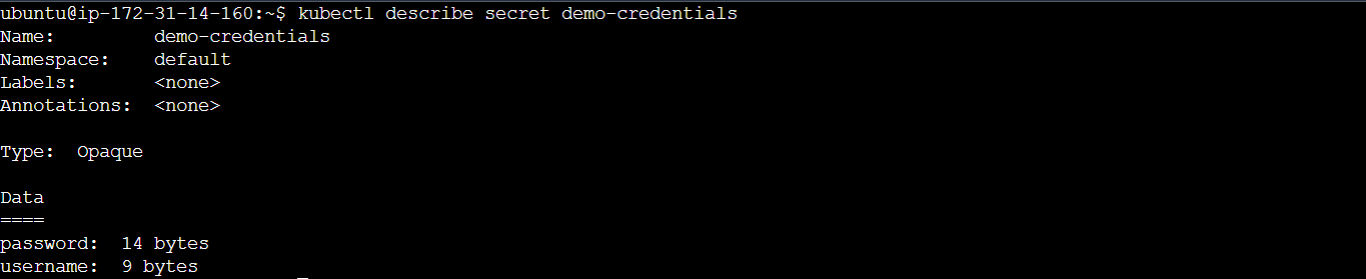
You can display more details about a secret using the kubectl describe secret command, run the following command to display more information about the demo-credentials secret:
kubectl describe secret demo-credentials
If you'd like to display just the data field of a secret, you can do that using the following command:
kubectl get secret demo-credentials -o jsonpath='{.data}'
This will display the base64 encoded format of the demo-credentials secret data.

To display the secret data and decode them so they are shown in a plaintext format, you can use the following:
# Retrieve and decode the value of the 'password' data entry in the 'demo-credentials' Secret
kubectl get secret demo-credentials -o jsonpath='{.data.password}' | base64 --decode

# Retrieve and decode the value of the 'username' data entry in the 'demo-credentials' Secret
kubectl get secret demo-credentials -o jsonpath='{.data.username}' | base64 --decode

Editing Secrets
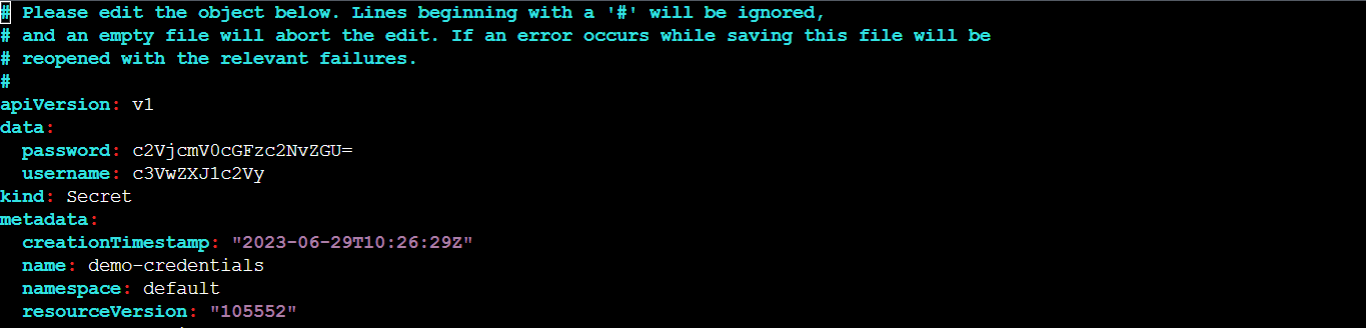
Now you know how to display secrets and their data, what if you discovered you made a mistake in the secret you had previously created? You can do that using the kubectl edit secrets command or by editing the YAML file. Note that you cannot edit a secret that was set to be immutable.
kubectl edit secrets demo-credentials
The command above will open the specified secret in your terminal's default editor allowing you to modify its contents as shown in the image below:
#How to use Kubernetes Secrets?
After creating the secret within Kubernetes, how do you access it within an application? There are three main ways of consuming secrets. The first is to inject it as an environment variable inside the container, the second way to consume a secret is to mount it into a container using a volume and the third is for pulling private images from docker registries. Let's look at how these work.
#1. Kubernetes Secrets as environment variables
When defining the pod spec, you can use the env key and indicate that the value should be pulled from a reference to the secret you created earlier and then it references the key-value pair to extract.
Step 1 - Create the pod definition file
Create a YAML file and include the following configuration in it:
apiVersion: v1
kind: Pod
metadata:
  name: secret-env-pod # Name of the Pod
spec:
  containers:
  - name: redis # Name of the container
    image: redis # Docker image to use for the container
    imagePullPolicy: IfNotPresent # Pull the image if it is not already present on the node
    env:
      - name: SECRET_USERNAME # Name of the environment variable
        valueFrom:
          secretKeyRef:
            name: demo-credentials # Name of the Secret containing the value for the environment variable
            key: username # Key within the Secret that contains the value to assign to the environment variable
      - name: SECRET_PASSWORD # Name of the Secret containing the value for the environment variable
        valueFrom:
          secretKeyRef:
            name: demo-credentials
            key: password # Key within the Secret that contains the value to assign to the environment variable
  restartPolicy: Never # Restart policy for the Pod
This code will create a Pod named secret-env-pod with a Redis container. The container's environment variables, SECRET_USERNAME and SECRET_PASSWORD, will be gotten from a Kubernetes Secret named demo-credentials using the keys "username" and "password" respectively.
Step 2 - Create the pod
Run the following command to create a pod based on the definition in the configuration file:
kubectl create -f secret-env-pod.yaml
Where secret-env-pod.yaml is the configuration file. After running the command, you should get an output confirming the pod creation.

You can confirm that the pod is running using the kubectl get pods command.

To confirm that the environment variables have been injected into the pod, run the following command:
# Execute the 'env' command inside the 'secret-env-pod' Pod
kubectl exec secret-env-pod -- env
Running this command will list the environment variables present within the Pod's container.
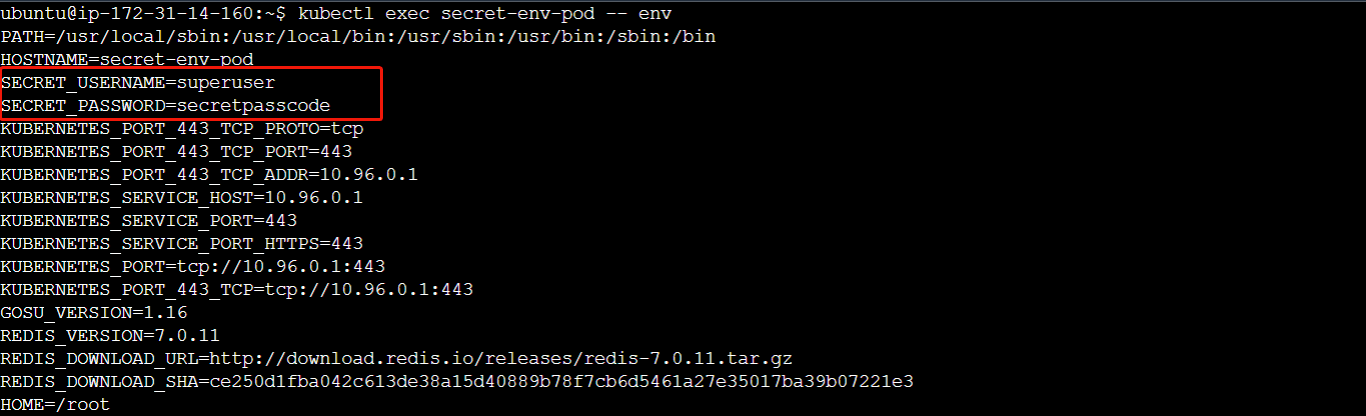
You can see that the secrets have been added as environment variables inside the pod which can be used or accessed by the code or the application which is running.
Also read: How to restart a Kubernetes pod
#2. Kubernetes Secret as a volume
This method works great for applications that are designed to consume sensitive information from configuration files such as Nginx reading an SSL certificate. To do this, you need to configure two things; first, you declare a volume within the pod's specification referencing the secret. Next, you create a volumeMounts within the container specification. The name of the volume in the volume mount must match the name of the volume where it was defined. and the path is where within the container file system the secret will be located. Each key in the secret will become a file containing its corresponding value.
Step 1 - Create a configuration file
Create a YAML file to include the following configuration:
apiVersion: v1
kind: Pod
metadata:
  name: secret-volume-pod # Name of the Pod
spec:
  containers:
  - name: nginx # Name of the container
    image: nginx # Docker image to use for the container
    imagePullPolicy: IfNotPresent # Pull the image if it is not already present on the node
    volumeMounts:
    - name: secret-volume # Name of the volume to mount
      mountPath: /etc/secret # Mount path within the container
  volumes:
  - name: secret-volume # Name of the volume
    secret:
      secretName: demo-credentials # Name of the Secret to be mounted as a volume
This will create a Pod named secret-volume-pod with an nginx container. The container mounts a volume named secret-volume at the path /etc/secret.
Step 2 - Create the pod
Run the command below to create a pod based on the configuration defined.
kubectl apply -f secret-volume-pod.yaml
You should see an output indicating that the pod has been created.

Confirm if the pod is running using kubectl get pods:

To confirm that the pod now has access to the secret data, run the following commands:
# Execute an interactive shell inside the 'secret-volume-pod' Pod
kubectl exec -it secret-volume-pod -- sh

# Change directory to '/etc/secret-volume', the mountPath
cd /etc/secret-volume

# List the files and directories in the current directory
ls
The first command will open an interactive shell session within the running Pod, and the subsequent commands navigate to the /etc/secret-volume directory and list its contents. You should be able to see the secret data files.

With the secret inside the pod, you can have a code that can make use of the secret.
#3. Using Kubernetes Secret to pull images from private Docker registries
Another way you can use Kubernetes secrets is for pulling images from private Docker repositories. In this method, the imagePullSecrets field is used to reference the secret to be used in authenticating the docker registry in the configuration file. The following steps will show you how this can be done.
Step 1 - Create a Docker-registry Secret
In your terminal, run the following code to create a docker-registry secret:
kubectl create secret docker-registry docker-secret \
--docker-server=REGISTRY_SERVER_ADDRESS \
--docker-username=USERNAME \
--docker-password=PASSWORD \
--docker-email=EMAIL
Replace REGISTRY_SERVER_ADDRESS, USERNAME, PASSWORD and EMAIL with the appropriate values specific to your docker registry configuration. This command will create a secret named docker-secret of the type docker-registry. It contains the credentials necessary to authenticate with the specified Docker registry server.

With the docker-registry secret created, it can be used by Kubernetes to pull private Docker images from the registry when deploying pods or other resources using the imagePullSecrets field.
Step 2 - Create a Pod Definition File
Create a YAML file and add the following configuration to it:
apiVersion: v1
kind: Pod
metadata:
  name: private-pod # Name of the pod
spec:
  containers:
  - name: private-registry-container # Name of the container within the pod
    image: goodiec/nodeapp:v1 # Docker image to be pulled and run in the container
    ports:
      - containerPort: 3000
  imagePullSecrets:
  - name: docker-secret # Name of the image pull secret to be used for authentication
Step 3 - Create a Pod
Execute the following command to create the pod using the configuration specified in the YAML file:
kubectl apply -f private-pod.yaml

You can confirm if Kubernetes was able to authenticate and pull the image from the registry using the kubectl get pods command. From the image below, you can see that the pod is running indicating that the action was successful.

You can also use the following command to get detailed information about the pod:
kubectl describe pod private-pod
The "Events" section in the output of the command will provide valuable insights into the history and status of the Pod as seen in the image below:

#Good Practice when Using Kubernetes Secrets
-
Make sure to encrypt etcd and set up RBAC (Role Based Access Control). In the Kubernetes API server, the secret is stored within etcd, the distributed key-value store containing most Kubernetes configurations. When managing your cluster, you want to ensure the data is encrypted and set up role-based access permissions to limit access to that data.
-
Treat YAML or JSON secret configuration files as sensitive. Secrets within a YAML definition file are base64 encoded - this is not encryption and those files should be treated as sensitive, and should not be checked into a version control system.
-
Protect the secret where it is being consumed. You also need to protect the secrets within the applications using them. For example, don't log them out or send them to an untrusted third party.
#Conclusion
Throughout this guide, you've learned about Kubernetes secrets and its various types. You've also seen how to use secrets as environment variables and volumes, as well as fetch private container images from docker registries using Kubernetes secrets.
Secrets in Kubernetes are vital in securing sensitive information within applications running in your Kubernetes clusters. With this newfound knowledge, you can take advantage of what this feature offers while ensuring you follow its good practices.


