How to Install Kubernetes on Ubuntu 22.04 | Step-by-Step


Kubernetes is one of the most innovative technologies that you can use for application deployment, scaling, and management, regardless of the underlying platform. If you are a DevOps engineer or software developer, you will encounter situations where you have to install Kubernetes on various platforms with the required dependencies. This article provides you with step-by-step instructions on how to install Kubernetes on Ubuntu.
#What is Kubernetes?
Kubernetes is an open-source system developed by Google, now overseen by the CNCF. It simplifies container orchestration. Thus, developers can build apps without dealing with infrastructure complexities. This system provides container management and scheduling. Users can dictate application behaviors within a cluster. Kubernetes abstracts the underlying infrastructure, streamlining container tasks and application deployment.
#Benefits of Kubernetes
- Kubernetes is good at managing containers across diverse nodes;
- Kubernetes is compatible with many public and private cloud infrastructures;
- Kubernetes allows you to automatically scale your application when it needs more resources to run successfully;
- Kubernetes self-healing feature automatically restarts failing containers and replaces unhealthy containers.
#Prerequisites
To install Kubernetes on your Ubuntu machine, make sure it meets the following requirements:
- 2 CPUs
- At least 2GB of RAM
- At least 2 GB of Disk Space
- A reliable internet connection
If your machine meets the above requirements, you are ready to follow this tutorial. Let’s start with the step-by-step process on how to install Kubernetes on Ubuntu.
Not using Ubuntu 22.04? Read our guide on how to install Kubernetes on Ubuntu 24.04.
#Install Kubernetes on Ubuntu: Step-by-step process
Installing Kubernetes is not a straightforward task. To create a flexible and high-performing cluster, you will need to follow several steps other than installing Kubernetes components. Also, we have to configure machines in a way they can communicate with each other.
Overall, installing Kubernetes on Ubuntu involves steps such as:
- Disabling swap;
- Setting up hostnames;
- Setting up the IPV4 bridge on all nodes;
- Installing Kubernetes components on all nodes;
- Installing Docker or a suitable containerization tool;
- Initializing the Kubernetes cluster;
- Configuring Kubectl and Calico;
- Adding worker nodes.
#Step 1: Disable swap
You might know about swap space on hard drives, which OS systems try to use as if it were RAM. Operating systems try to move less frequently accessed data to the swap space to free up RAM for more immediate tasks. However, accessing data in swap is much slower than accessing data in RAM because hard drives are slower than RAM.
Kubernetes schedules work based on the understanding of available resources. If workloads start using swap, it can become difficult for Kubernetes to make accurate scheduling decisions. Therefore, it’s recommended to disable swap before installing Kubernetes.
You can do it with the following command. The sudo swapoff - command temporarily disables swap on your system. Then, the sudo sed -i '/ swap / s/^/#/' /etc/fstab command modifies a configuration file to keep the swap remains off even after a system reboot.
![]()
![]()
#Step 2: Set up hostnames
You probably have heard of hostnames, human-readable names that we give to a machine to identify it within a network. When we work with the Kubernetes cluster, we have to give unique hostnames for nodes so that Kubernetes can use these names to identify nodes
Let’s give hostnames for the master node and the worker node.
In your master node (machine or VM instance that you choose to be the master node), run the command sudo hostnamectl set-hostname "master-node" to set the hostname of that node to “master-node.” Run the command exec bash to refresh your current bash session so that it can recognize and use the new hostname immediately.
![]()
![]()
Run the same commands on the other nodes you used in this Kubernetes cluster. However, change the hostname accordingly. For example, I’ll run the sudo hostnamectl set-hostname "worker-node1" command on my worker node.
#Step 3: Update the /etc/hosts File for Hostname Resolution
Setting up host names is not enough. We have to map hostnames to their IP addresses as well. You should update the /etc/hosts file of all nodes(or at least of the master node), as shown below. (Remember that you have to use the IP addresses of your nodes. I have only given holder values.) You can open the host's file for editing with the command sudo nano /etc/hosts
![]()
10.0.0.2 master-node
10.0.0.3 worker-node1
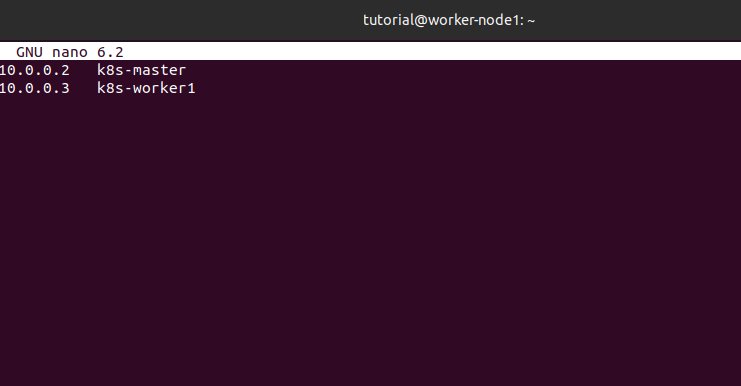
Use the Control and 'X' key combination to save the changes.
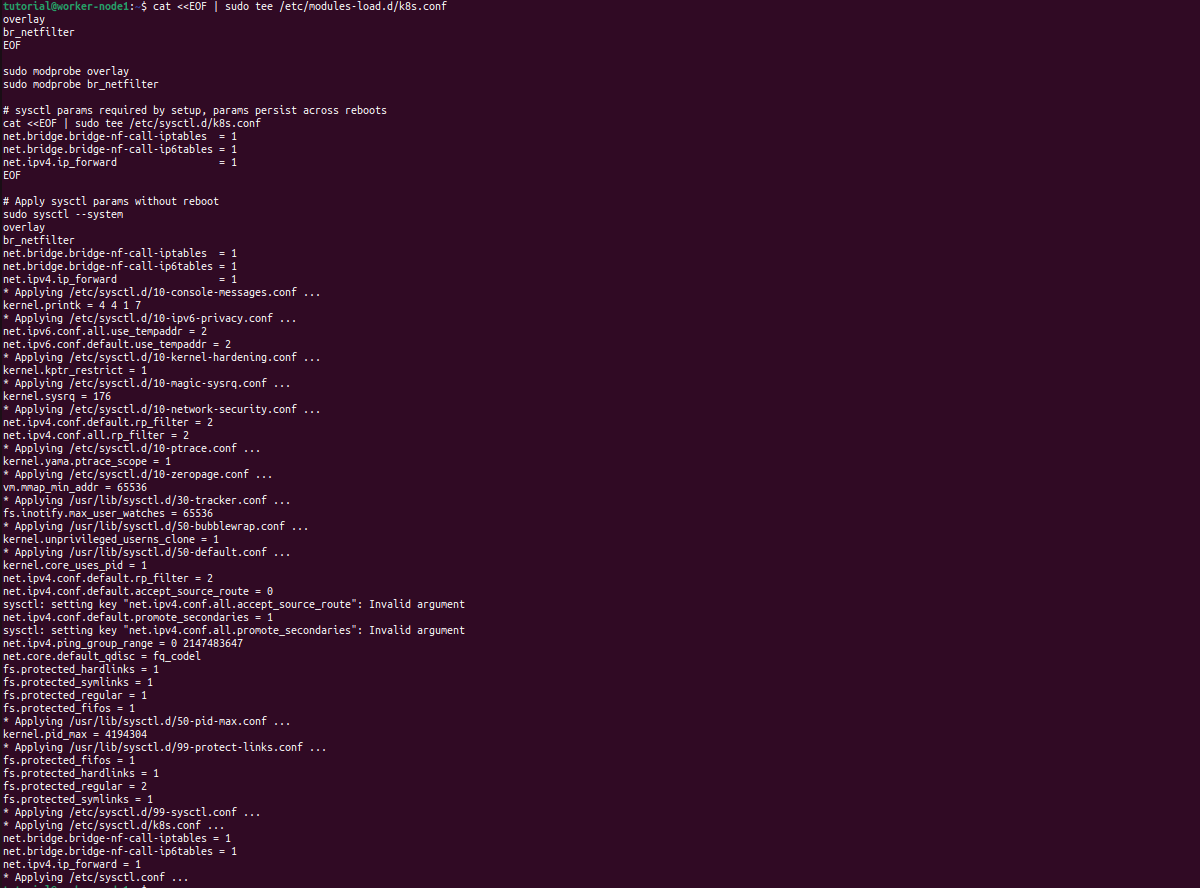
#Step 4: Set up the IPV4 bridge on all nodes
To configure the IPV4 bridge on all nodes, execute the following commands on each node.
cat <<EOF | sudo tee /etc/modules-load.d/k8s.conf
overlay
br_netfilter
EOF

sudo modprobe overlay
sudo modprobe br_netfilter

# sysctl params required by setup, params persist across reboots
cat <<EOF | sudo tee /etc/sysctl.d/k8s.conf
net.bridge.bridge-nf-call-iptables  = 1
net.bridge.bridge-nf-call-ip6tables = 1
net.ipv4.ip_forward                 = 1
EOF

# Apply sysctl params without reboot
sudo sysctl --system
#Step 5: Install kubelet, kubeadm, and kubectl on each node
Let’s install kubelet, kubeadm, and kubectl on each node to create a Kubernetes cluster. They play an important role in managing a Kubernetes cluster.
Kubelet is the node agent that runs on every node and is responsible for ensuring containers are running in a Pod as specified by the Pod's specifications. (Pods are the smallest deployable units in a Kubernetes cluster).
Then we need to install kubeadm, which is used to bootstrap a Kubernetes cluster, including setting up the master node and helping worker nodes join the cluster.
Kubectl is a CLI tool for Kubernetes to run commands to perform various actions such as deploying applications, inspecting resources, and managing cluster operations directly from the terminal.
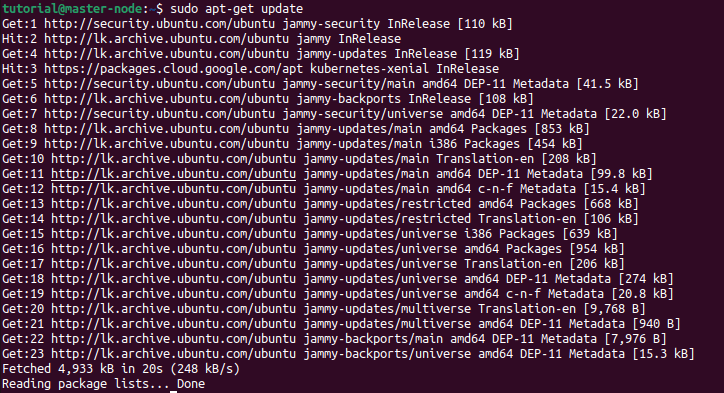
Before installing them, you must update the package index with the sudo apt-get update command.
Next, we have to ensure that we can download and install packages from the internet securely.
sudo apt-get install -y apt-transport-https ca-certificates curl

Next, we have to create a directory where we'll store a special key that verifies the authenticity of Kubernetes packages. It's like checking an ID card before allowing someone into a building.
sudo mkdir /etc/apt/keyrings
![]()
Let’s fetch the public key from Google and store it in the folder we created in the previous step. This key is important to verify that the Kubernetes packages we download are genuine and haven't been tampered with.
curl -fsSL https://packages.cloud.google.com/apt/doc/apt-key.gpg | sudo gpg --dearmor -o /etc/apt/keyrings/kubernetes-archive-keyring.gpg

Next, we need to tell the apt package manager where to find Kubernetes packages for downloading.
echo "deb [signed-by=/etc/apt/keyrings/kubernetes-archive-keyring.gpg] https://apt.kubernetes.io/ kubernetes-xenial main" | sudo tee /etc/apt/sources.list.d/kubernetes.list

Let’s refresh the apt package index to see new items by running the sudo apt-get update command again.

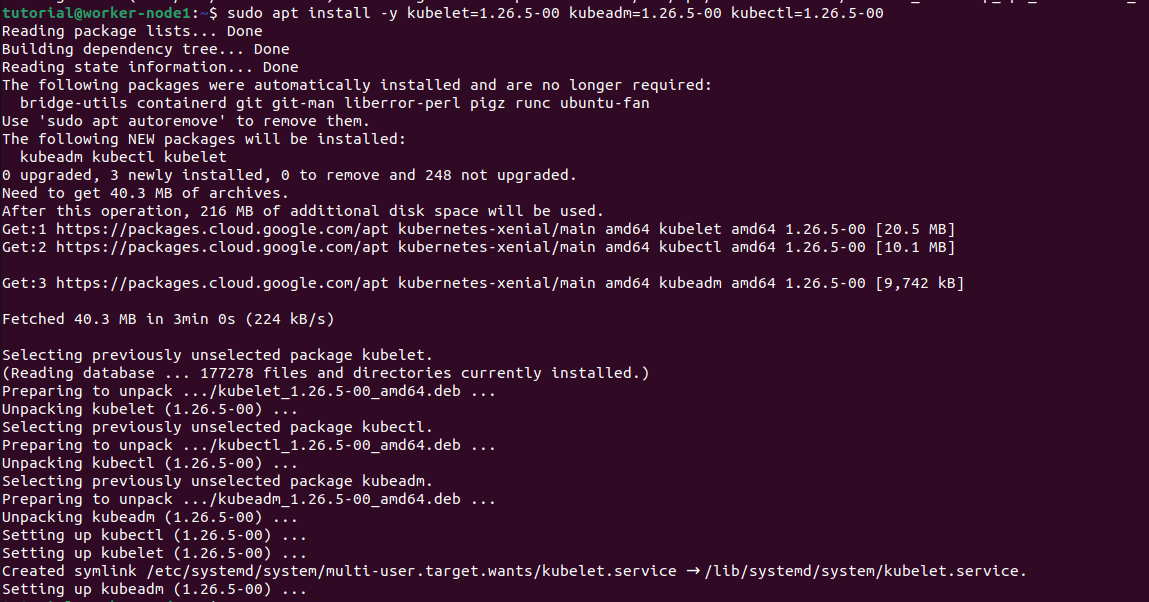
Now we are ready to install kubelet, kubeadm, and kubectl by running the sudo apt install -y kubelet=1.26.5-00 kubeadm=1.26.5-00 kubectl=1.26.5-00 command.
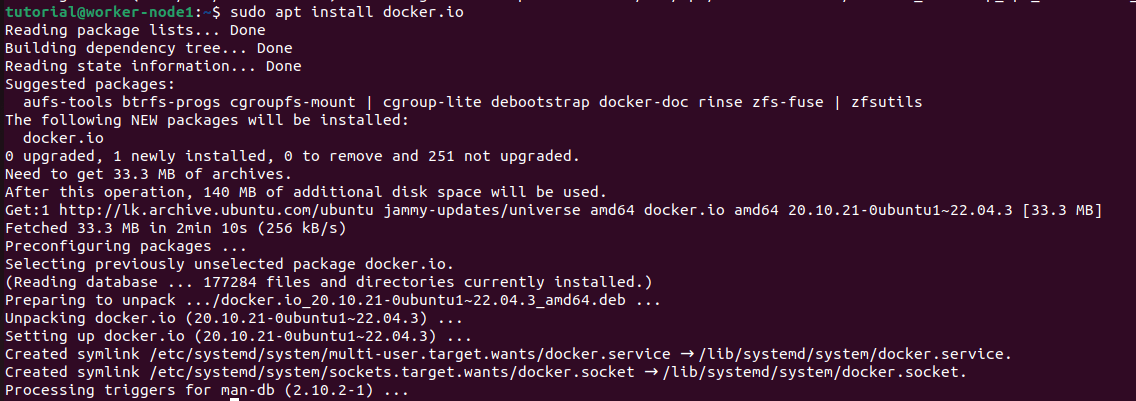
#Step 6: Install Docker
The Docker platform allows you to create, distribute, and run applications within containers. These containers offer a lightweight and portable environment, ensuring consistent performance across various setups. Docker serves as the container runtime, playing a vital role in Kubernetes by facilitating the efficient management and deployment of containerized applications.
Install Docker with the sudo apt install docker.io command
Next, configure containerd on all nodes to ensure its compatibility with Kubernetes. First, create a folder for the configuration file with the sudo mkdir /etc/containerd command.
![]()
Then, create a default configuration file for containerd and save it as config.toml using the sudo sh -c "containerd config default > /etc/containerd/config.toml" command.
![]()
After running these commands, you need to modify the config.toml file to locate the entry that sets "SystemdCgroup" to false and changes its value to true. This is important because Kubernetes requires all its components, and the container runtime uses systemd for cgroups.
sudo sed -i 's/ SystemdCgroup = false/ SystemdCgroup = true/' /etc/containerd/config.toml

Next, restart containerd and kubelet services to apply the changes you made on all nodes.
sudo systemctl restart containerd.service
sudo systemctl restart kubelet.service
![]()
![]()
You will want to start kubelet service whenever the machine boots up, which you can do by running the sudo systemctl enable kubelet.service command.
![]()
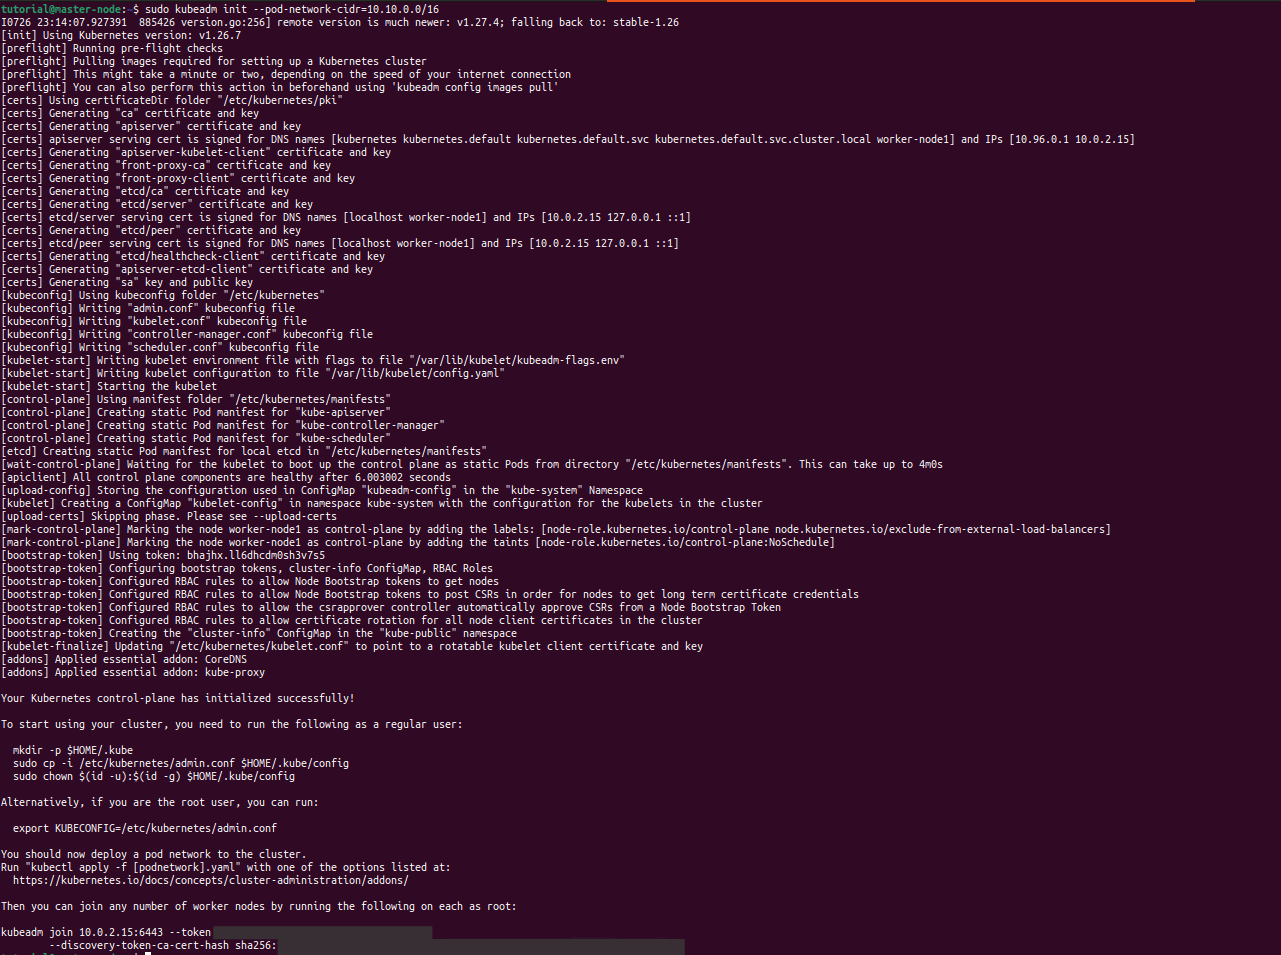
#Step 7: Initialize the Kubernetes cluster on the master node
When you initialize a Kubernetes control plane using kubeadm, several components are deployed to manage and orchestrate the cluster. Some examples of these components are kube-apiserver, kube-controller-manager, kube-scheduler, etcd, kube-proxy. ‘We need to download the images of these components by running the following command.
sudo kubeadm config images pull
 Next, initialize your master node. The --pod-network-cidr flag is setting the IP address range for the pod network.
sudo kubeadm init --pod-network-cidr=10.10.0.0/16
To manage the cluster, you should configure kubectl on the master node. Create the .kube directory in your home folder and copy the cluster's admin configuration to your personal .kube directory. Next, change the ownership of the copied configuration file to give the user the permission to use the configuration file to interact with the cluster.
Here are the commands you need to do this.
mkdir -p $HOME/.kube
sudo cp -i /etc/kubernetes/admin.conf $HOME/.kube/config
sudo chown $(id -u):$(id -g) $HOME/.kube/config
![]()
![]()
![]()
Also read: Benefits of Kubernetes on bare metal
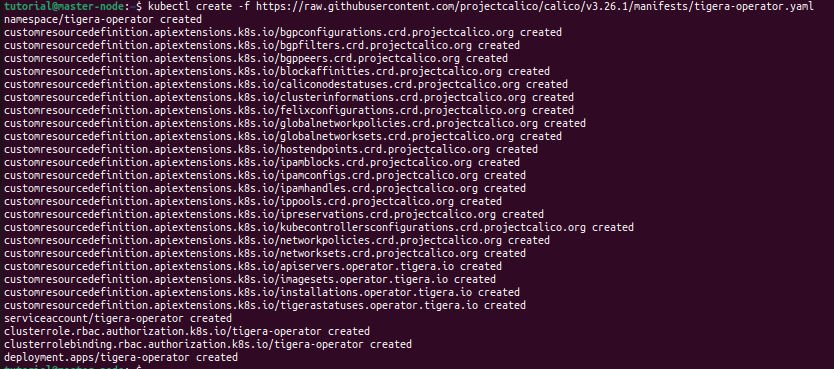
#Step 8: Configure kubectl and Calico
Run the following commands on the master node to deploy the Calico operator.
kubectl create -f https://raw.githubusercontent.com/projectcalico/calico/v3.26.1/manifests/tigera-operator.yaml
Next, download the custom resources file for Calico, which contains definitions of the various resources that Calico will use.
curl https://raw.githubusercontent.com/projectcalico/calico/v3.26.1/manifests/custom-resources.yaml -O

Using the following command, modify the CIDR in the downloaded custom resources to match your pod network. Here, you're using the sed command to change the default CIDR value in the Calico custom resources to match the CIDR you used in the kubeadm init command.
sed -i 's/cidr: 192\.168\.0\.0\/16/cidr: 10.10.0.0\/16/g' custom-resources.yaml

Finally, tell kubectl to create the resources defined in the custom-resources.yaml file.
kubectl create -f custom-resources.yaml

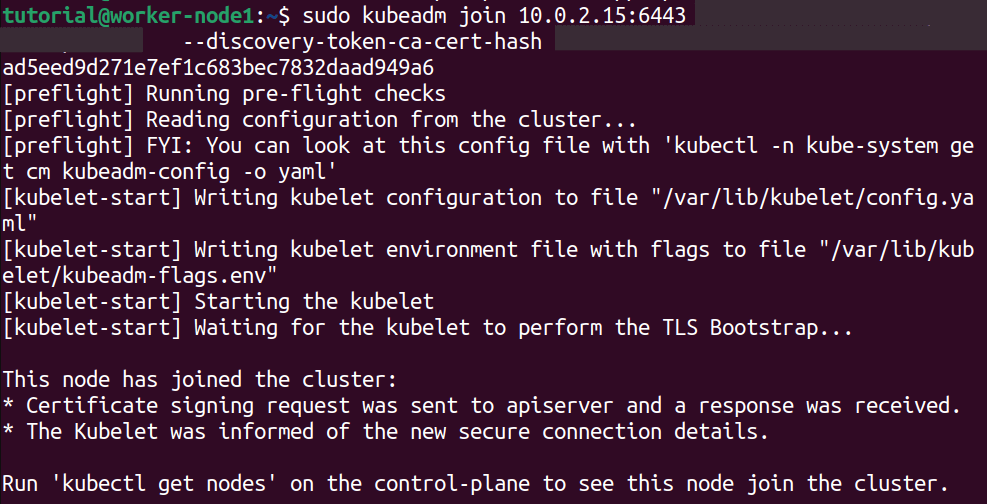
#Step 9: Add worker nodes to the cluster
Once you have configured the master node, you can add worker nodes to the cluster. When initializing Kubeadm on the master node, you will receive a token that you can use to add worker nodes.
To add the worker nodes to the Kubernetes cluster, use the kubeadm join command. (It looks like this below command. You can get the variable values from the above steps)
sudo kubeadm join <MASTER_NODE_IP>:<API_SERVER_PORT> --token <TOKEN> --discovery-token-ca-cert-hash <CERTIFICATE_HASH>
#Step 10: Verify the cluster and test
Finally, we want to verify whether our cluster is successfully created. By running the kubectl get no command, we can list all nodes that are part of the cluster.

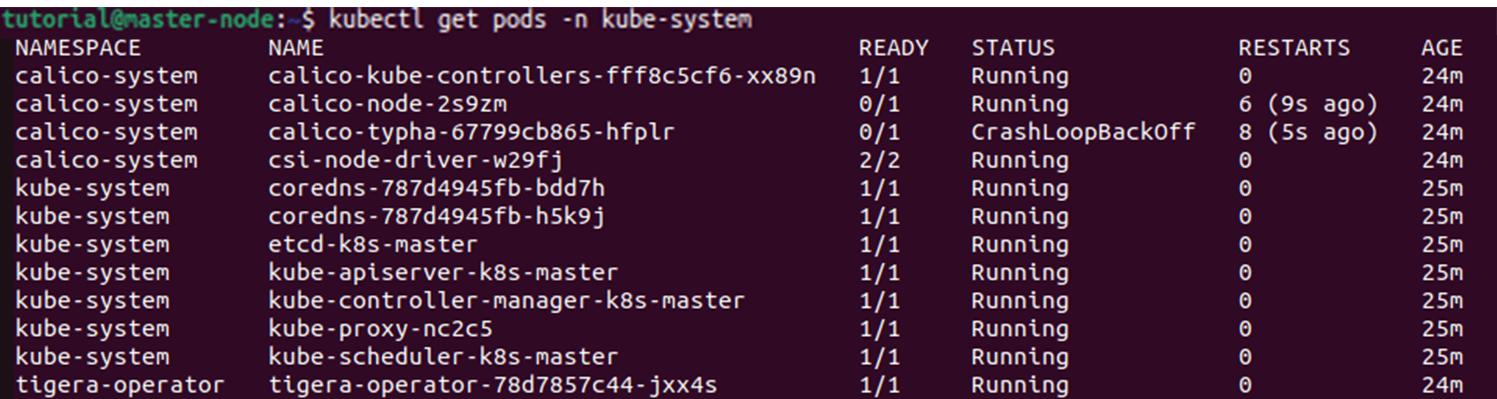
Likewise, by running the kubectl get po -A command, we can list the pods from all namespaces in the cluster.
Build and scale your self-managed Kubernetes clusters effortlessly with powerful Dedicated Servers — ideal for containerized workloads.
#Conclusion
This guide covered how to install Kubernetes on Ubuntu 22.04 and set up a cluster. We reviewed system checks, hostname setups, component installations, cluster initiation, and validation. By following these steps, you can create a reliable cluster. Kubernetes offers a dependable platform for deploying microservice applications, making it essential for competitive businesses.
Found this guide helpful? check out how to create Kubernetes namespaces and how to deploy Kubernetes on bare metal.


