How to Install Redis on Ubuntu 22.04 in 5 Steps [With Examples]

![How to Install Redis on Ubuntu 22.04 in 5 Steps [With Examples]](/v3/img/containers/blog_main/cloud_computing.jpg/5982b1adf933064618994915989c8491/cloud_computing.jpg?id=1739046670)


Redis has become a go-to solution for developers and organizations thanks to its ease of use and speed for applications to access data in real-time scenarios like analytics, caching, and messaging. This step-by-step tutorial will teach you how to install Redis on Ubuntu 22.04, including the configuration.
#What is Redis?
Redis, short form for REmote DIctionary Server, is an open-source NoSQL, in-memory data store primarily used as a key-value database, message broker, and caching solution. As an in-memory database, it stores data in RAM or memory instead of an HDD (hard disk drive)or SSD solid-state drive, which stores data on disk.
#How does Redis work?
Redis delivers unparalleled performance, reliability, and impressive speeds thanks to its unique design, where processed data resides in memory. Redis supports a wide range of native data types, including strings, maps, hashes, sets, bitmaps, HyperLogLogs, geospatial indices, and streams.
#What is Redis used for?
As a popular caching solution, Redis is used in applications that ingest millions of data from external sources whose latency and throughput can cause performance degradation, especially due to traffic spikes.
Let's briefly get an overview of what Redis is used for and some of its prevalent use cases:
- Social media apps: Redis is used to store and manage streams of data from social media apps, such as news feeds, user profiles, etc.
- Online gaming: Gaming apps leverage Redis to store gaming metrics such as game scores, player profiles, and leaderboards and manage the game state. In addition, it allows for a fast and smooth user experience.
- Real-time analytics: Redis stores and processes massive amounts of real-time data, enabling developers to analyze and visualize data easily. This, in turn, helps in making well-informed business decisions.
- E-commerce: Redis enhances the easy processing and storage of massive amounts of data related to e-commerce apps, such as shopping cart contents, product catalogs, wishlists, etc.
Reputable companies that use Redis in their tech stacks include Twitter, Uber, Airbnb, Amazon, StackOverflow, and Snapchat, among many others.
#Prerequisites
To follow along and learn how to install Redis on Ubuntu 22.04, ensure you have the following requirements in place:
- An instance of Ubuntu 22.04 with SSH access;
- A sudo user configured on the server.
Let’s now dive in and continue with Redis installation instructions.
#Install Redis on Ubuntu 22.04: Step-by-step process
The first two steps will show you how to install Redis on Ubuntu 22.04; steps 3-4 will guide you on accessing Redis CLI (Command Line Interface) and configuring the authentication; and step five is optional for configuring Redis for remote connections.
#Step 1: Update the local package index
If you start with a newly deployed server instance of Ubuntu 22.04, I recommend updating the local APT cache.
To do so, run the following command:
sudo apt update
You can now install the Redis server once the local package index is refreshed.
#Step 2: Install Redis on Ubuntu 22.04
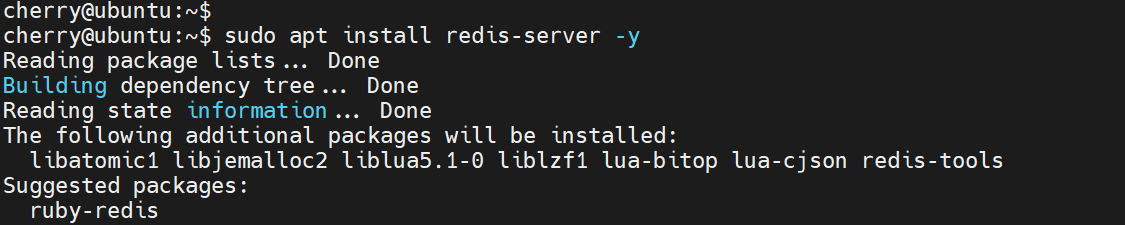
The Redis server package is available from the official Ubuntu repositories. Therefore, we will install it using the APT package manager. At the time of writing this guide, the latest version available from the repository is 6.0.16.
To install Redis, run the following command:
sudo apt install redis-server -y
The command installs the Redis server database alongside other packages and dependencies.
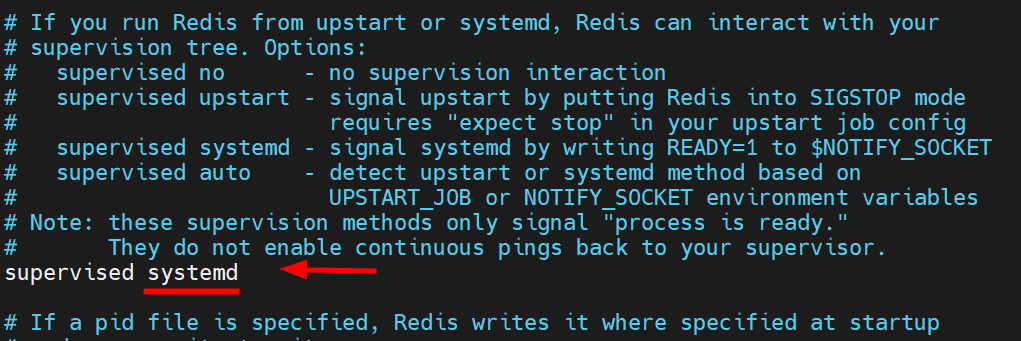
Before using Redis, you must make a crucial configuration change in the default configuration file. So, access the redis.conf configuration file with your preferred text editor.
sudo nano /etc/redis/redis.conf
Scroll down and locate the supervised directive. This directive lets you select your preferred init system to manage Redis as a service. By default, this is set to no. Since you are running Ubuntu 22.04, which uses systemd to manage running services, set this directive to systemd.
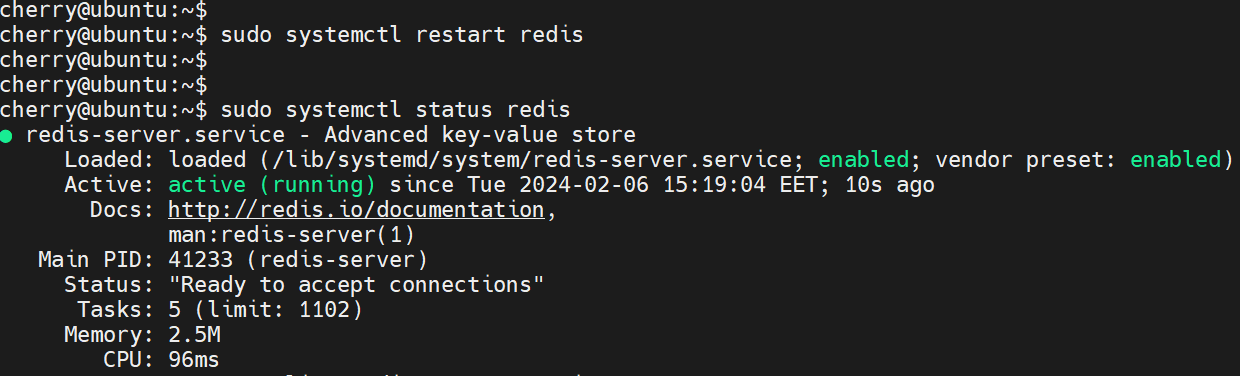
Save the changes and exit the configuration file. Then restart the Redis server for the changes to come into effect.
sudo systemctl restart redis
Also, ensure that the Redis service is running:
sudo systemctl status redis
You can also enable the Redis server to start automatically upon system startup or a reboot, as shown.
sudo systemctl enable --now redis-server

To check the version of Redis installed, run the command:
$ redis-server -v
The following output confirms that we are running Redis server version 6.0.16.

#Step 3: Access Redis CLI ( Command line interface )
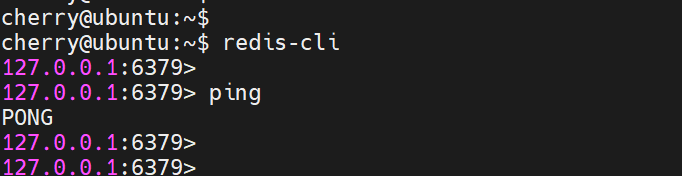
With Redis installed on Ubuntu, the next step is to test it and see whether our server works as intended. To achieve this, connect to the server using the redis-cli command-line tool.
Upon running the command, your prompt will change to 127.0.0.1:6379, signifying that you are now working on the Redis shell.
To test connectivity, run the ping command. The output PONG will be displayed as shown, a confirmation that Redis is functioning as expected.
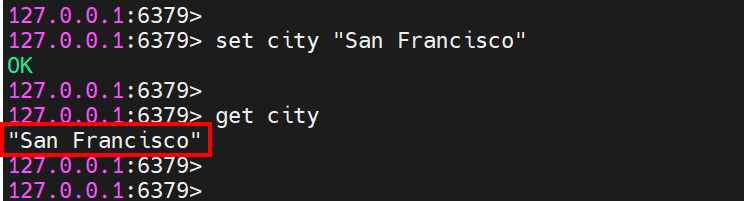
Moving on, let's try to set a key. In this example, we will set a key called city, which will hold San Francisco value.
set city "San Francisco"
The output OK will be displayed on the shell.
Output
OK
To retrieve the value of the key, use the get command as shown.
get city
This prints out the value of the key.
"San Francisco"
#Step 4: Configure authentication for Redis
By default, authentication is not configured, and anyone can easily access stored data without a password. Like in most systems, security is a top priority. Thus, I highly recommend configuring a password that will require clients to authenticate themselves.
To configure authentication, open the redis.conf file with your preferred editor:
sudo nano /etc/redis/redis.conf
In the configuration file, locate and uncomment the requirepass directive. By default, this is set to foobared, which is merely a placeholder. Be sure to change this to a strong password. This is the password that clients will authenticate with using the AUTH command, as we shall see shortly.
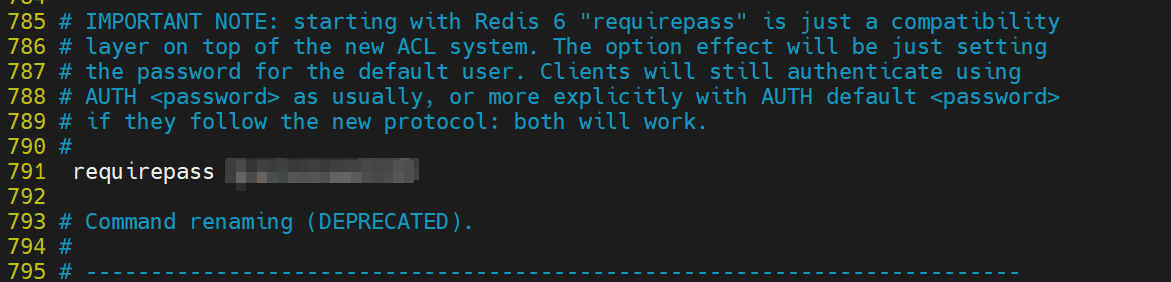
Save the changes and exit the configuration file. For the changes to come into effect, restart the Redis service.
sudo systemctl restart redis.service
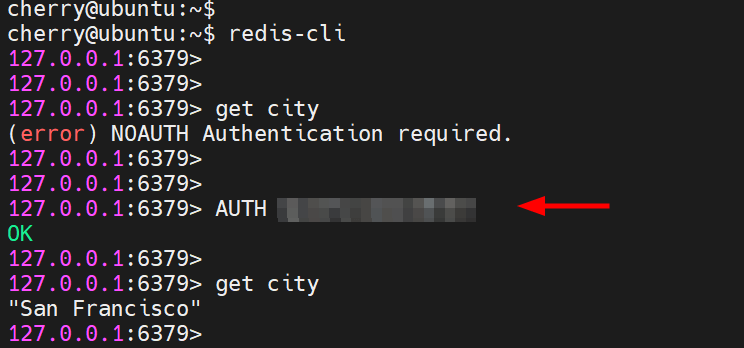
To test if password authentication works, invoke the Redis client.
redis-cli
Next, try to perform any SET or GET operation. For instance, we will try to retrieve the value of the city key we previously created.
get city
This time, Redis will throw an error indicating that we need to authenticate. To proceed, authenticate with the AUTH command followed by the password you specified in the configuration file.
AUTH password
If the password is correct, you will get OK as the output.
Output
OK
Once authenticated, you can now proceed with running your queries. If you try to retrieve the value of the key, the operation will be successful this time.
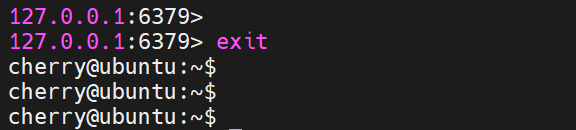
To exit from the Redis shell, simply run the exit command.
exit
#Step 5: Allow remote connections ( Optional )
We have now installed Redis on Ubuntu, accessed Redis CLI, and configured authentication. In this last section, we will configure Redis for remote connections. It is necessary if you intend to access your Redis server remotely.
By default, Redis listens to port 6397 and is only accessible from localhost. However, you can configure it to allow remote connections from anywhere.
To allow remote connections, once again, open the default configuration file.
sudo nano /etc/redis/redis.conf
Set the bind attribute to 0.0.0.0 to allow remote connections from anywhere.

Save the changes and exit the configuration file. To effect the change, restart the Redis service.
sudo systemctl restart redis.service
To confirm that Redis can be accessed remotely, run the ss command, as shown.
sudo ss -an | grep 6379
From the output, 0.0.0.0:6379 shows that Redis is listening on port 6379 from all external sources or IP addresses.

If you have UFW firewall enabled, allow inbound traffic on TCP port 6379 as shown.
sudo ufw allow 6379/tcp
Next, reload the firewall to apply the changes made.
sudo ufw reload
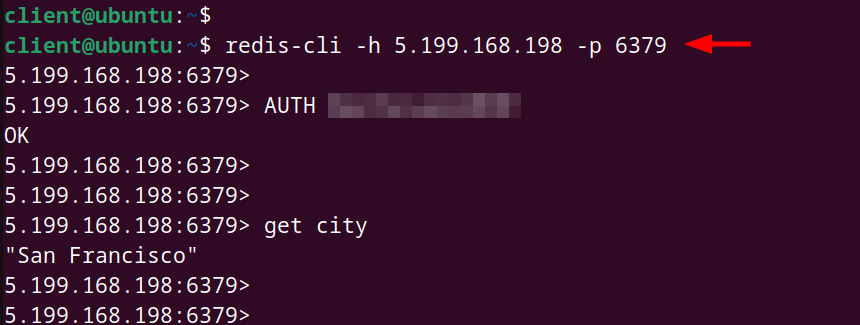
To access the Redis server remotely, use the following syntax:
redis-cli -h host-ip-address -p port
In our case, the command will appear as follows: 5.199.168.198 is the IP of the Redis server host, and 6379 is the port on which the Redis service listens.
redis-cli -h 5.199.168.198 -p 6397
Once connected, authenticate using the AUTH command to start running queries.
#Conclusion
And there you go. In this guide, you’ve learned how to install Redis on Ubuntu, as well as how to configure Redis for remote connections. Check out the Redis documentation for more information about Redis.


