How to Use Ansible with Terraform [With Examples]

![How to Use Ansible with Terraform [With Examples]](/v3/img/containers/blog_main/ansible.jpg/9e26e20856da22a39af58e97f781f468/ansible.jpg?id=1739046670)


It is never a good idea to do things manually that could be automated. For example, logging into several servers one after the other to install an update can be time-consuming work prone to human error. That's where Terraform and Ansible, open-source infrastructure automation tools, come in.
While Terraform first sets up the underlying resources and infrastructure in cloud providers, Ansible automates the deployment and configuration of applications and other components onto that infrastructure. In this tutorial, I'll show you how to use Ansible with Terraform to configure provisioned infrastructure. We'll bring a specific Terraform with Ansible example use case to test both tools in action.
#What is Ansible?
Ansible is an open-source automation tool focused on configuration management and application deployment. Ansible uses declarative language to define configurations, making it easy to understand and use. It is used to carry out tasks (repetitive tasks like updates, backups, creating users, system reboots, assigning groups, assign permissions) on servers, ensuring consistent and repeatable setups. Ansible is agentless, meaning you don't have to install anything on the target system, and it utilizes SSH to connect to the host system.
Run your deployments in a scalable and cost-effective open cloud infrastructure. Cherry Servers' secure virtual private servers offer automatic scaling, flexible pricing, and 24/7 technical support. Our pre-defined Ansible module helps you automate the installation and configuration.
#What is Terraform?
Terraform, also open source, is a provisioning tool designed for creating, managing, and versioning infrastructure as code. It uses a declarative syntax to describe the infrastructure components. Terraform is cloud-agnostic, supports various providers, and offers a unified workflow for managing diverse resources.
Deploy, manage, and orchestrate your cloud infrastructure across one or more cloud providers with Cherry Servers Terraform module.
#Terraform vs Ansible
Terraform and Ansible are automation tools; both are agentless, do not require programming experience, and require access to the cloud environment you want them to manage. The difference between Terraform vs Ansible is that as soon as Terraform has provisioned the infrastructure you want to create, it stops.
While Terraform attempts to automate infrastructure building (server, network, security groups, etc.) safely and predictably, Ansible helps manage the configuration of the already provisioned or existing infrastructure. Ansible automates configuration processes and reduces deployment time, ensuring configuration consistency across all different types of systems, such as virtual machines, network devices, and containers.
#Why Terraform and Ansible?
Using Terraform with Ansible enables complete infrastructure and application deployment automation. While Terraform automates infrastructure building, Ansible manages the configuration. You can also use Terraform for configuration management, but it isn't Terraform's primary goal; hence, it is less effective than Ansible. That's why Terraform and Ansible work so well together.
As soon as Terraform does its job and creates the infrastructure you want created in your cloud environment, Ansible can connect to any of those infrastructure components and further configure them (install patches, deploy applications, manage system packages, configure servers, etc.). This combination simplifies complex tasks, reduces manual intervention, and enhances the overall efficiency of your infrastructure management.
Now, I'll show you an actual Terraform and Ansible example and how these two tools can work well together. Here's what you need to follow the rest of the tutorial.
#Prerequisites
This Terraform with Ansible example tutorial includes a hands-on demonstration. To follow along, ensure you have the following:
#How to use Ansible with Terraform [Terraform and Ansible example use case]
Here, you'll see how to use Ansible with Terraform; we bring an actual example of using Terraform and Ansible in action. We'll first provision a few servers using Terraform and then use Ansible to automatically install Nginx on all of them once they've been created.
#Step 1 - Set up your environment
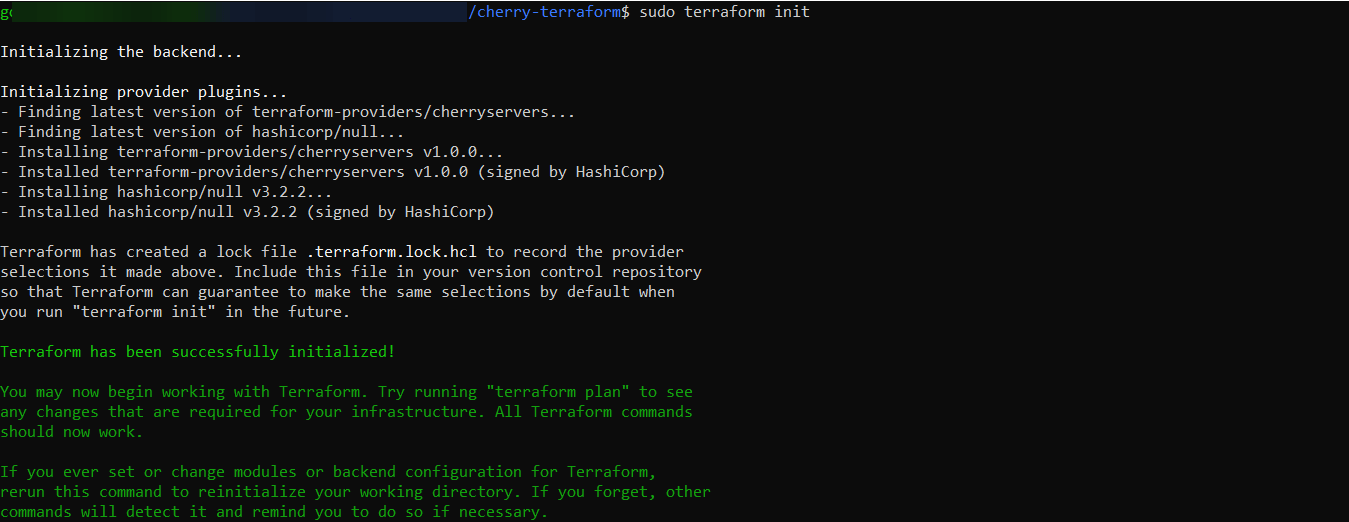
Begin by creating a project directory with the following structure:
root directory/
│
├── terraform/
│ ├── resources.tf # Terraform configuration file for defining resources.
│ ├── variables.tf # Terraform variables definition.
│ ├── provider.tf # Terraform provider configuration.
│ └── outputs.tf # Terraform outputs definition.
│
├── ansible/
│ └── playbook.yml # Ansible playbook for server configuration.
│
└── terraform-provider-cherryservers # Cherry Servers Terraform binary
Don't forget to include the downloaded Cherry Servers Terraform binary (terraform-provider-cherryservers) in the root folder. This file helps Terraform talk to Cherry Servers.
#Step 2 - Generate SSH key pair for authentication
Next, generate a new SSH key pair by executing the following command in your terminal:
ssh-keygen -t rsa -b 2048
You will be prompted to specify a file to save the key. Press Enter to accept the default location (~/.ssh/id_rsa). For added security, you can set a passphrase when prompted.

This SSH key pair is the authentication mechanism for securely accessing your provisioned servers. The private key (id_rsa) will be used by your local machine to authenticate, while the corresponding public key (id_rsa.pub) will be placed on the servers during provisioning. If you already have an existing key pair, you can use that. Locate the private key file (usually id_rsa) and the corresponding public key file (usually id_rsa.pub). These keys will be referenced in your Terraform configuration.
Also read: How to use Terraform modules
#Step 3 - Add the configuration code
Next, you'll define the Terraform and Ansible configurations in the respective files. This configuration sets up Cherry Servers instances and uses Ansible to configure them to serve an Nginx web server.
provider.tf:
terraform {
  required_providers {
    cherryservers = {
      source = "terraform-providers/cherryservers",
    }
  }
}
In the provider.tf file, the required provider for the CherryServers Terraform plugin is specified. This will enable Terraform to understand how to interact with CherryServers.
variables.tf:
variable "project_id" {
  description = "CherryServers Project ID"
  default     = "163449"
}


variable "region" {
  description = "CherryServers Region"
  default     = "EU-Nord-1"
}


variable "image" {
  description = "CherryServers Image"
  default     = "Ubuntu 22.04 64bit"
}


variable "hostname" {
  description = "Hostname for the server"
  default     = "terra-demo"
}


variable "plan_id" {
  description = "CherryServers Plan ID"
  default     = "625"
}


variable "tags" {
  description = "Tags for the server"
  type        = map(string)
  default     = {
    Name        = "Application server"
    Environment = "development"
  }
}
In the variables.tf file, declare input variables that will be used throughout the Terraform configuration.
resources.tf:
# Create an SSH key
resource "cherryservers_ssh" "terra-demo" {
  name       = "terra-demo"
  public_key = file("/Path_to_public_key")
}


# Create servers with identical configurations
resource "cherryservers_server" "demo-servers" {
  count      = 3
  project_id = var.project_id
  region     = var.region
  image      = var.image
  hostname   = "demo-server-${count.index + 1}"
  plan_id    = var.plan_id
  ssh_keys_ids = [cherryservers_ssh.terra-demo.id]
}


# Use null_resource to wait for each server to be ready and run Ansible playbook
resource "null_resource" "run_ansible_playbook" {
  count = length(cherryservers_server.demo-servers)


  provisioner "local-exec" {
    command     = "until nc -zv ${cherryservers_server.demo-servers[count.index].primary_ip} 22; do echo 'Waiting for SSH to be available...'; sleep 5; done"
    working_dir = path.module
  }


  provisioner "local-exec" {
    command     = "ANSIBLE_HOST_KEY_CHECKING=False ansible-playbook -i '${cherryservers_server.demo-servers[count.index].primary_ip},' -u root --private-key //Path_to_private_key ./ansible/playbook.yml"
    working_dir = path.module
  }
}
This file defines the actual resources to be provisioned by Terraform. It creates an SSH key, specifies server configurations, and sets up a null_resource to ensure each server is ready before running the Ansible playbook. Ensure you replace /Path_to_public_key and /Path_to_private_key with the actual paths to your SSH key files.
outputs.tf:
output "server_primary_ip" {
  value = cherryservers_server.demo-servers[*].primary_ip
}


output "server_private_ip" {
  value = cherryservers_server.demo-servers[*].private_ip
}
The outputs.tf file specifies the output values to be displayed after Terraform applies the configuration. In this case, it outputs the provisioned servers' primary and private IP addresses.
playbook.yml:
---
- name: Configure Application Servers
  hosts: all
  become: yes


  tasks:
    - name: Update apt cache
      apt:
        update_cache: yes


    - name: Install Nginx
      apt:
        name: nginx
        state: latest


    - name: Start Nginx Service
      service:
        name: nginx
        state: started
The Ansible playbook is responsible for configuring the servers. It updates the apt cache, installs Nginx, and starts the Nginx service.
#Step 4 - Initialize Terraform
Next, navigate to the project folder in your command prompt and initialize Terraform using the command:
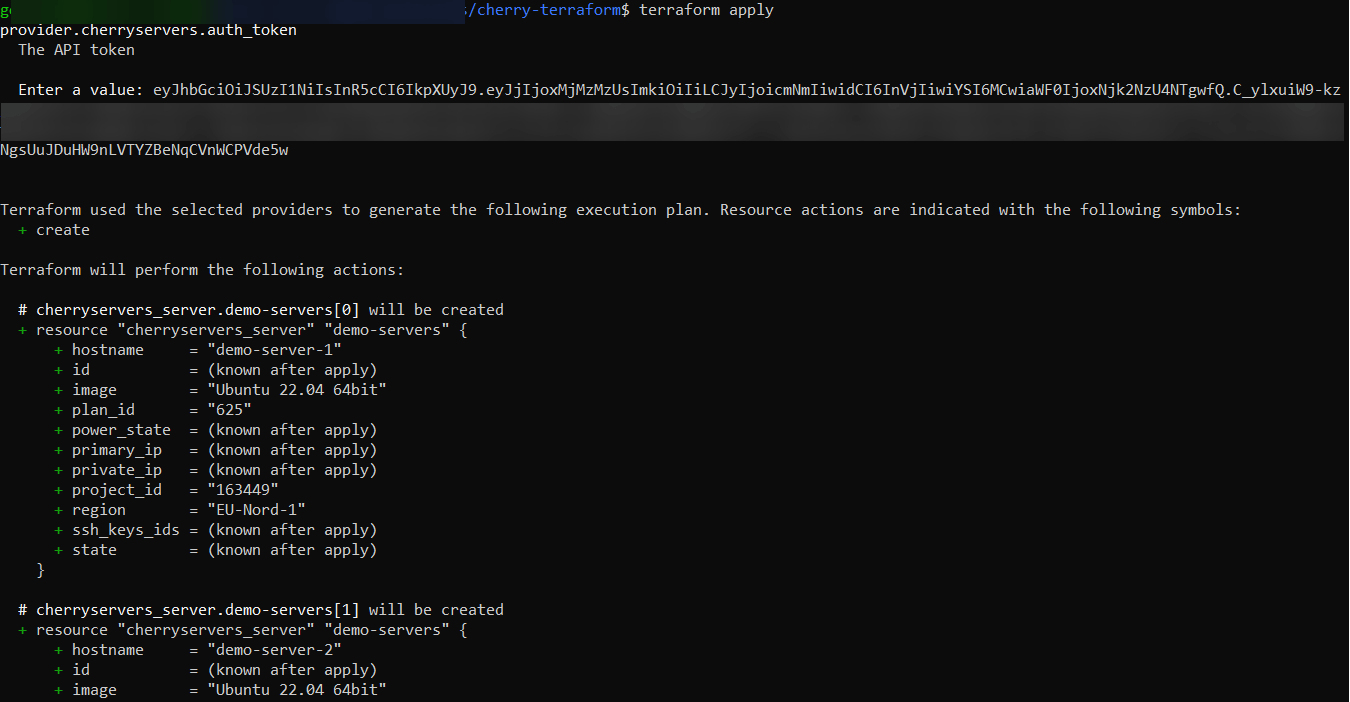
sudo terraform init
This command sets up your Terraform project. It downloads the necessary plugins, initializes the backend for storing your infrastructure state, and prepares your configuration.
#Step 5 - Apply the changes
Once Terraform is initialized, you can apply the changes specified in your configuration files by running:
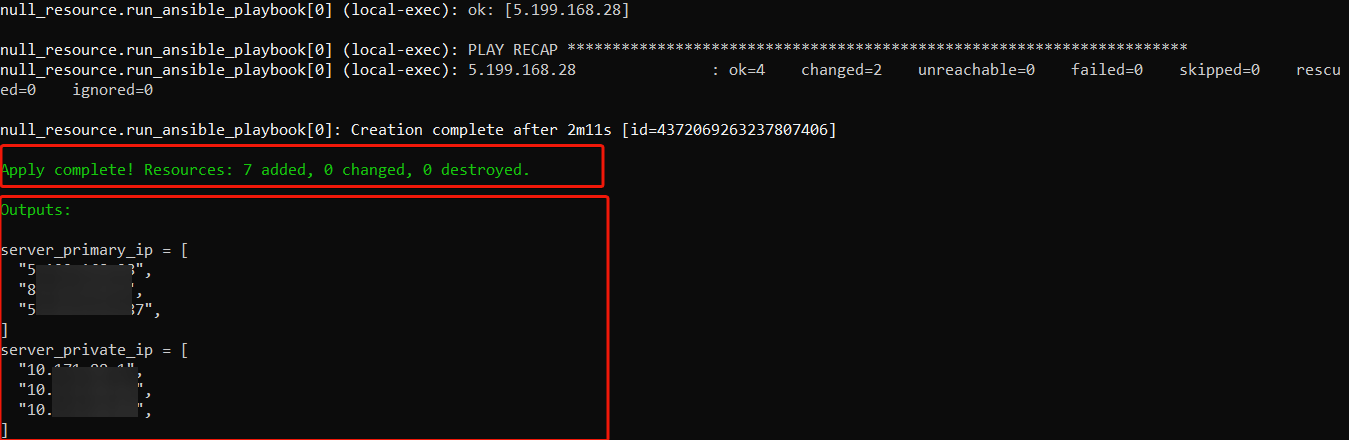
terraform apply
After running this command, you will be prompted to input your Cherry Servers API token. Copy and paste the token into the terminal and press Enter. Upon successful validation, the terminal will display information about the resources that Terraform will create. Confirm your intention to execute the actions by typing "yes" and pressing Enter.
You should see progress indications as the resources are being created.

After creating the servers, the Ansible playbook will configure them (you should see the playbook running in the terminal). If successful, you'll receive an indication of the completed process and see the defined outputs printed in the terminal.
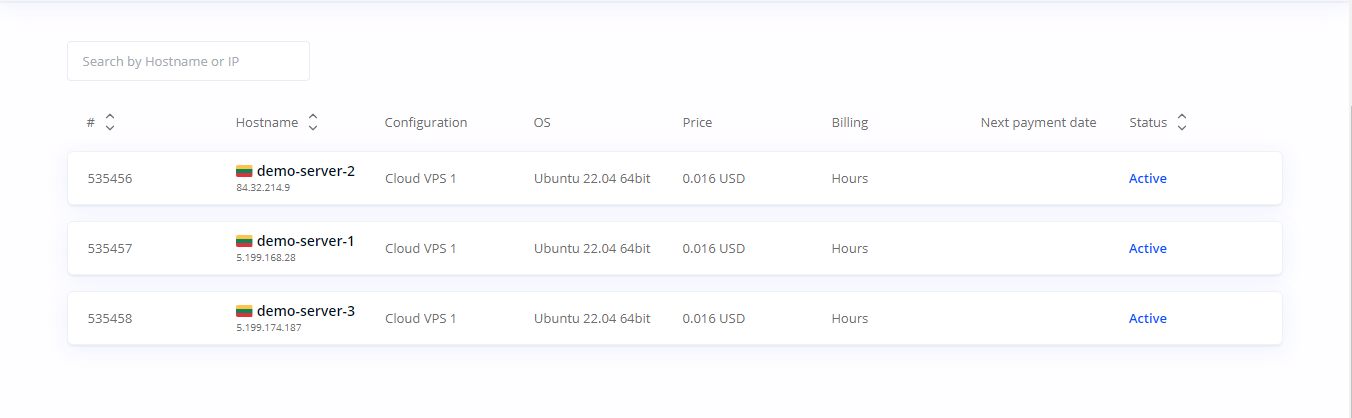
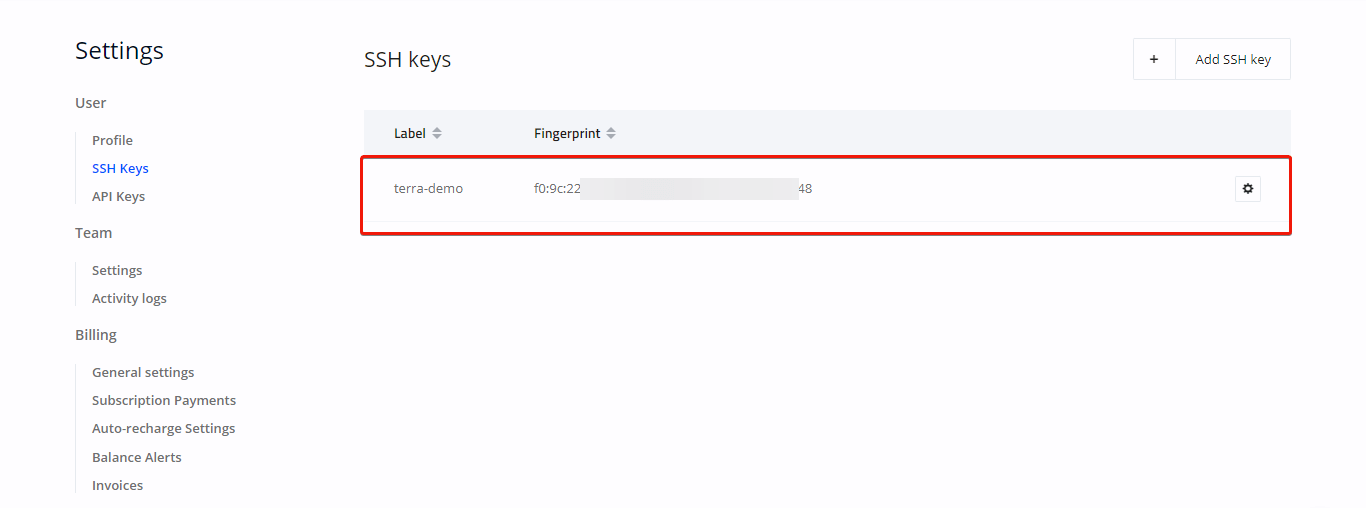
#Step 6 - Verify the changes
To confirm the creation of resources, log in to your Cherry Servers portal. You'll find the servers listed, along with the addition of an SSH key.
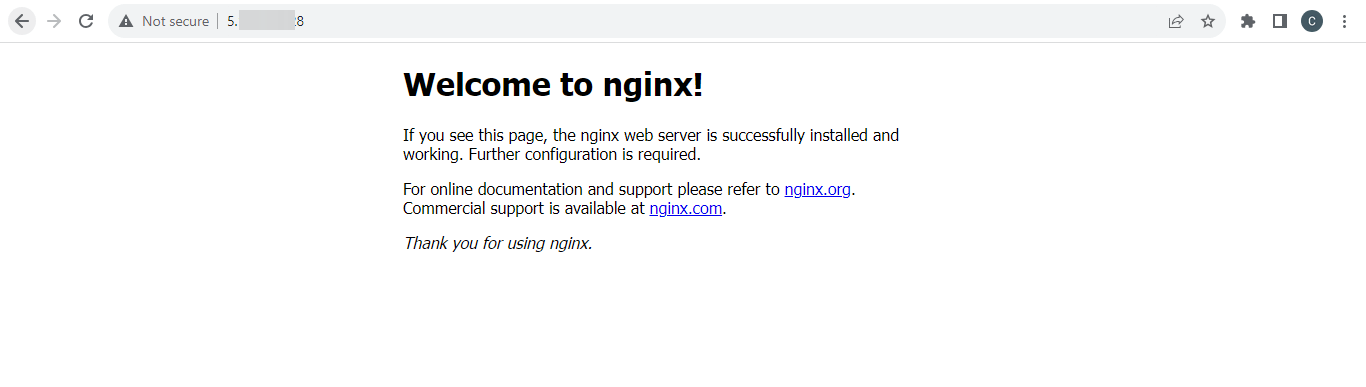
To verify the installation of Nginx, open your web browser and enter the primary IP address of any of the servers. You should then see the Nginx demo page.
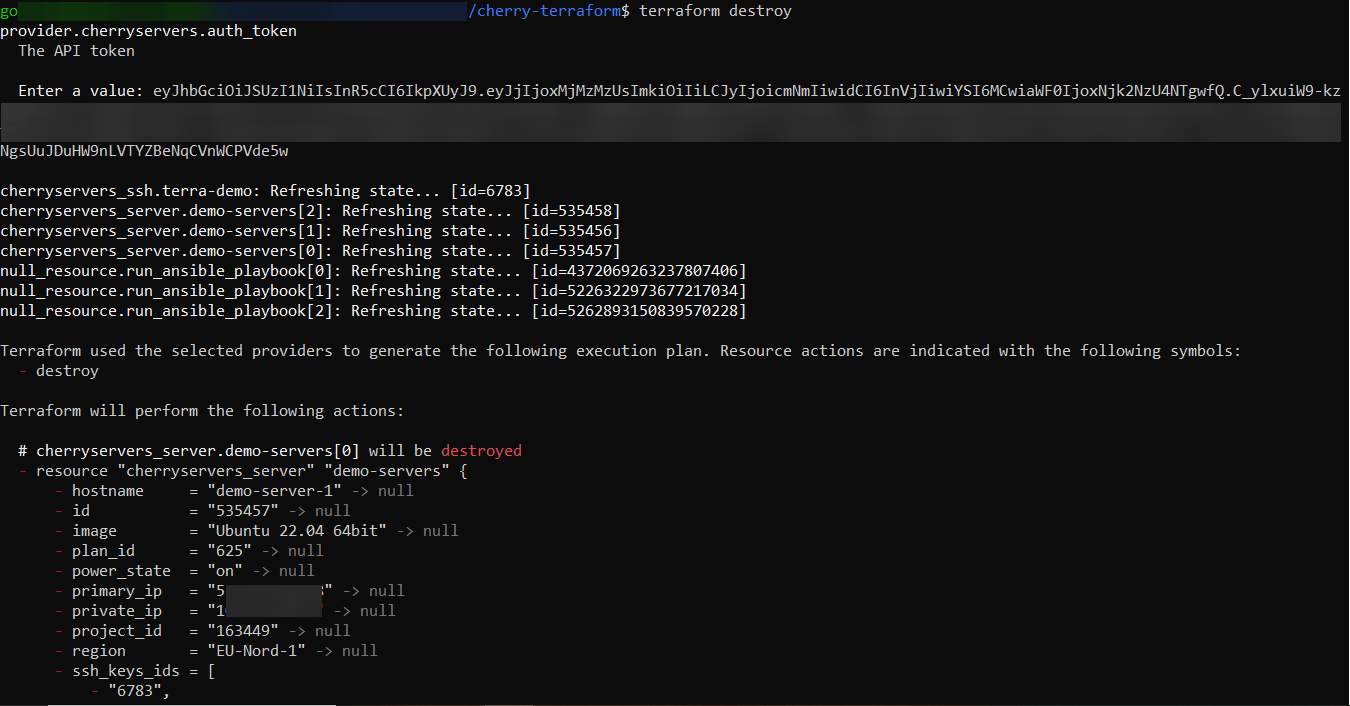
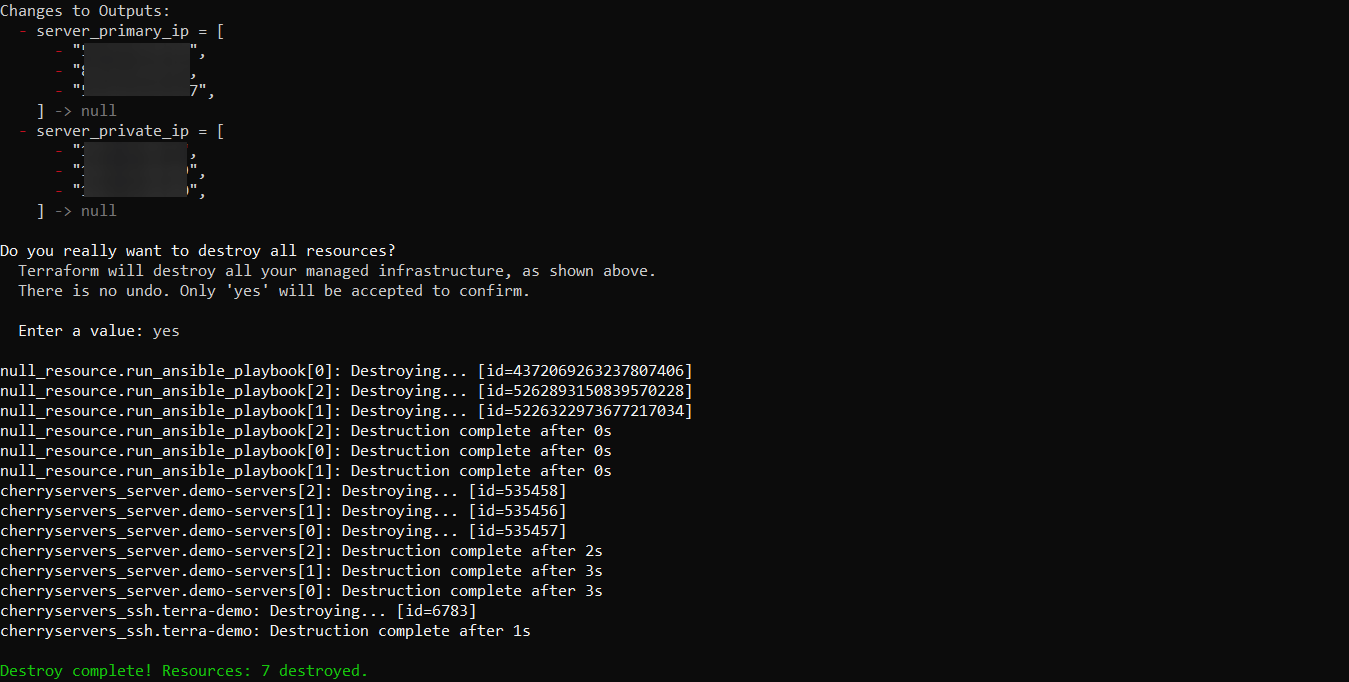
If needed, you can later destroy the resources using:
terraform destroy
#Conclusion
I hope this Terraform with Ansible example helps you understand how to use Ansible with Terraform and what it offers. By integrating Terraform with Ansible, you can efficiently automate the deployment and management of your infrastructure, providing a reproducible way to build and scale your applications. With this knowledge, you can explore further, experiment, and leverage the strengths of Terraform and Ansible to simplify your operations.
If you found this helpful, read the next guide on how to use 'When' condition in Ansible