How to Create a Terraform Configuration: Beginner's Guide

Terraform, in basic terms, is a resource provisioning tool that helps automate your cloud infrastructure. Instead of physically making changes at the UI level, you can simply say what you want in a Terraform file. This type of infrastructure management using code is referred to as infrastructure as code or IaC for short. With this philosophy, it is always clear what the physical environment's status is, making it very simple to reverse back to a stable state should this become necessary.
This article explains how to write your first Terraform configurations. We will work on a configuration of the architecture for Linux implementation on Cherry Servers. You will learn how to manage inputs, update infrastructures, and follow best practices while using Terraform. Prerequisites To follow along with this tutorial, you need to have the following:
- Basic DevOps knowledge
- A verified Cherry Servers account
- Go v1.21 onwards
#Infrastructure as Code (IaC)
IaC is an approach that defines your cloud environment and its setup in code format. The target infrastructure is documented and based on that documentation. IaC tools such as Terraform find a way to provision all the stated infrastructure for you. You can state anything, like provisioning storage, servers, networks, etc. With this setup, you can test your new configurations before applying them in production. This configuration can be written in either YAML, JSON, or HCL (HashiCorp Configuration Language) in the case of Terraform.
#Understanding Terraform basics
Before working with Terraform, we need to know some basic things. In this section, we will learn some of the terminology, file structure, and key Terraform commands.
#Terraform terminologies
Here are some of the terminologies that you will come across while working on your first Terraform configuration:
- Provider: Providers are plugins that enable Terraform to interact with various cloud platforms and services. For this tutorial, we will work with Cherry Servers.
- Resource: A resource represents a specific infrastructure object, such as a virtual machine, database instance, or storage bucket. They are the fundamental building blocks of your infrastructure.
- Module: Modules are reusable sets of Terraform resources that are organized into a single unit. They can be called multiple times within a configuration to create multiple instances of resources.
- State: Terraform uses the state file to monitor the resources it provisions.
- Plan: A Terraform plan is a list of alterations that Terraform is going to make to the client’s infrastructure based on the configuration and state. It allows its users to see what changes will be made before the change occurs or is implemented.
- Backend: This determines how Terraform stores states and operates.
Deploy, manage, and orchestrate your cloud infrastructure across one or more cloud providers with Cherry Servers Terraform module.
#Terraform file structure
When working with Terraform, the configurations typically have the following file structure:
- main.tf: The primary configuration file where you define resources, data sources, and modules.
- variables.tf: A file to define input variables that allow for dynamic configuration of your infrastructure.
- outputs.tf: Contains output values that provide information about your infrastructure after it's created. These outputs can be useful for other modules or as feedback to the user.
- provider.tf: Configures the provider details such as credentials and endpoint, allowing Terraform to interact with the appropriate cloud service.
- terraform.tfvars: A file for defining variable values, making it easy to set environment-specific values like credentials or server configurations.
Here's a quick overview of HCL syntax:
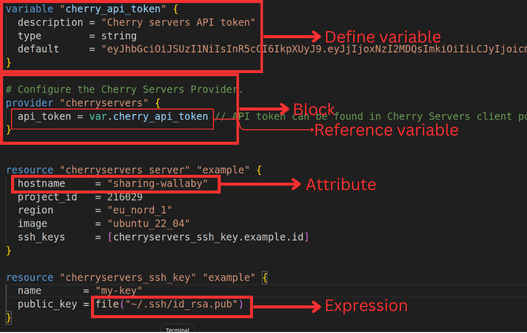
- Blocks: HCL configurations are organized into blocks, which are typically defined by a block type followed by a name and enclosed in curly braces
{}. Examples includeresource,provider, andmoduleblocks. - Attributes: Inside blocks, attributes are defined using key-value pairs. For instance,
server_type = "VDS"sets an attribute calledserver_typetoVDS. - Expressions: HCL allows the use of expressions to compute values dynamically. These can include variable references, resource outputs, and built-in functions.
- Variables: Variables in HCL are defined using the variable block and referenced using the
${}syntax or simply asvar.<variable_name>.
Terraform uses HCL for writing the configuration so it is easily readable to beginners. Here is a sample of what the language looks like. In the image below, you will find an example of each syntax attribute mentioned.
#Key Terraform commands
Here are some of the basic commands you may need. We will use a few in this tutorial.
terraform init: This initializes your Terraform configuration. This is done by downloading the provider plugin stated and setting up the backend needed.terraform apply: This gets the configuration of the original file and applies the changes to the server. If you want to auto-confirm the new changes you can include the --auto-approve with the command.terraform plan: This produces a plan that will then be used to execute the changes that Terraform will make to get to the wanted state of the infrastructure. It is a replication of the configurations that assists you in inspecting the changes before making them mandatory.terraform validate: This will validate syntax and configuration on your Terraform files meaning that when you are undertaking any changes, you are confident that the files are well processed.terraform state: With this command, you can see the status of the file besides changing or deleting the resources in the state file.terraform destroy: This removes all the entities that are controlled by your Terraform configuration. This command is used on occasions when you want to destroy all your infrastructure from the physical environment.
#Setting up your environment
Before you can start working with Terraform, you need to set up your environment. This involves installing Terraform on your operating system. Follow the steps below to install the Terraform on your operating system.
#Installing Terraform
Terraform is available for various operating systems, including Windows, macOS, and Linux. Here are the instructions for installing Terraform on each platform. On Windows
- First, visit the Terraform downloads page and download the Windows binary for the latest version of Terraform. Unzip the downloaded file to a directory of your choice.
- Next, open the Start menu, search for "Environment Variables", select "Edit the system environment variables", then click on "Environment Variables" in the System Properties window.
- Now, in the "System variables" section, find and select the "Path" variable, then click "Edit”, click "New" and add the path to the directory where you extracted the Terraform executable.
- Then, click "OK" to close all dialogs and apply the changes.
If it is set up correctly, you can confirm by running the following command:
terraform version
On macOS If you have Homebrew installed, you can install Terraform by running:
brew tap hashicorp/tap
brew install hashicorp/tap/terraform
Open a terminal and type terraform version to verify the installation. On Linux
1. Visit the Terraform downloads page and download the appropriate binary for your Linux distribution. 2. Now extract the downloaded package
unzip terraform_<version>_linux_amd64.zip
3. Move the Binary to Your PATH:
sudo mv terraform /usr/local/bin/
4. To verify installation, open a terminal and run the command to check version:
terraform version
Also read: How to use Terraform modules
#Creating your first Terraform configuration
With Terraform installed, you can start writing your first configuration to provision infrastructure. The following steps guide you through creating a simple configuration and initializing a new Terraform project.
#Step 1: Create a directory
We will start by creating a directory for your Terraform configuration files. This directory will contain all the necessary files for managing your infrastructure.
mkdir my-terraform-project
cd my-terraform-project
#Step 2: Get the necessary credentials from Cherry Servers
Before going any further, get your project ID and API key from the Cherry Servers dashboard, as we will use them later on.
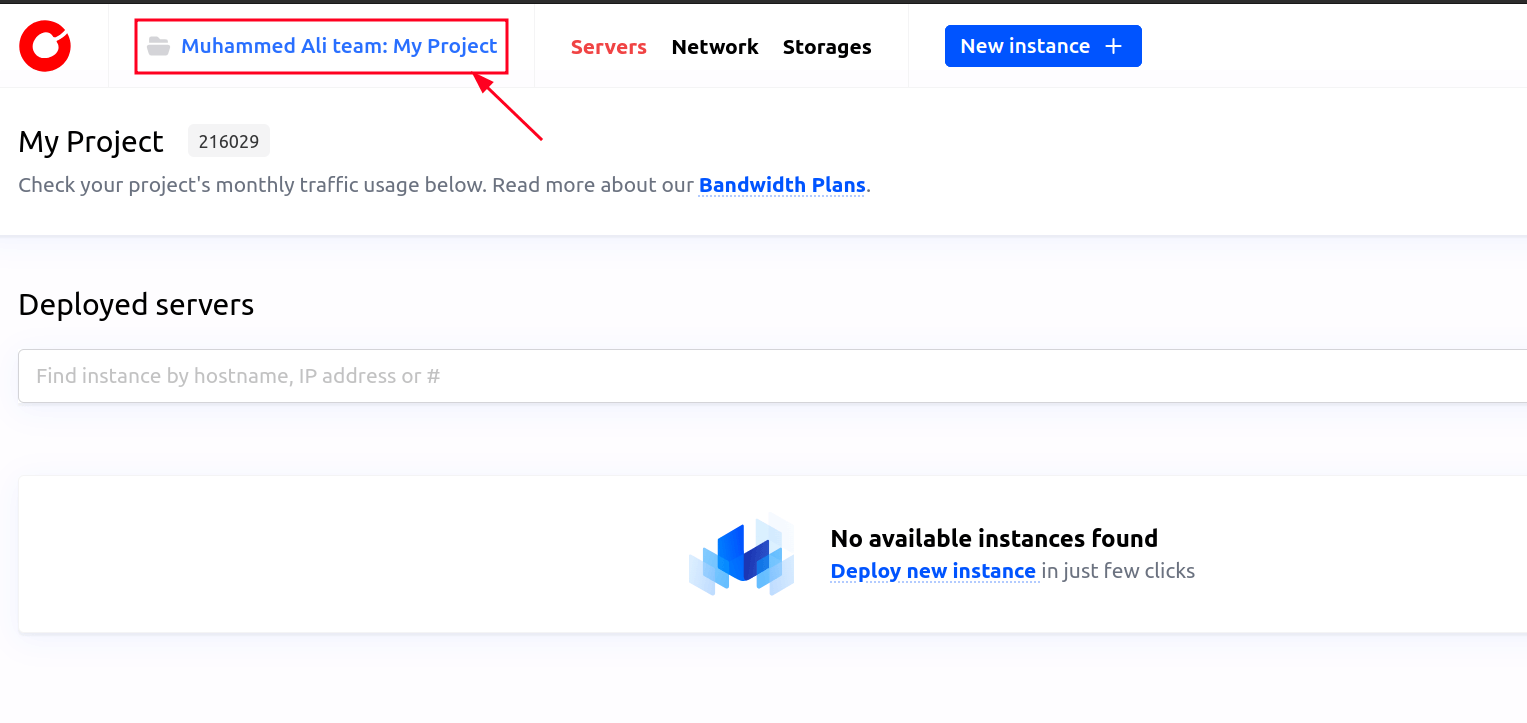
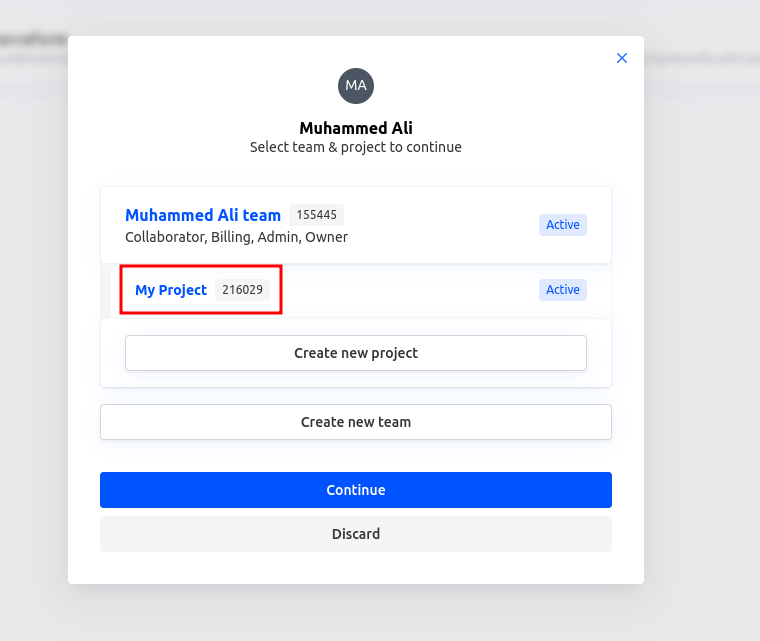
- To get your project ID, go to the Cherry Servers portal, In the top left corner you should see your team name and project name, click on it, and you will see your project ID.

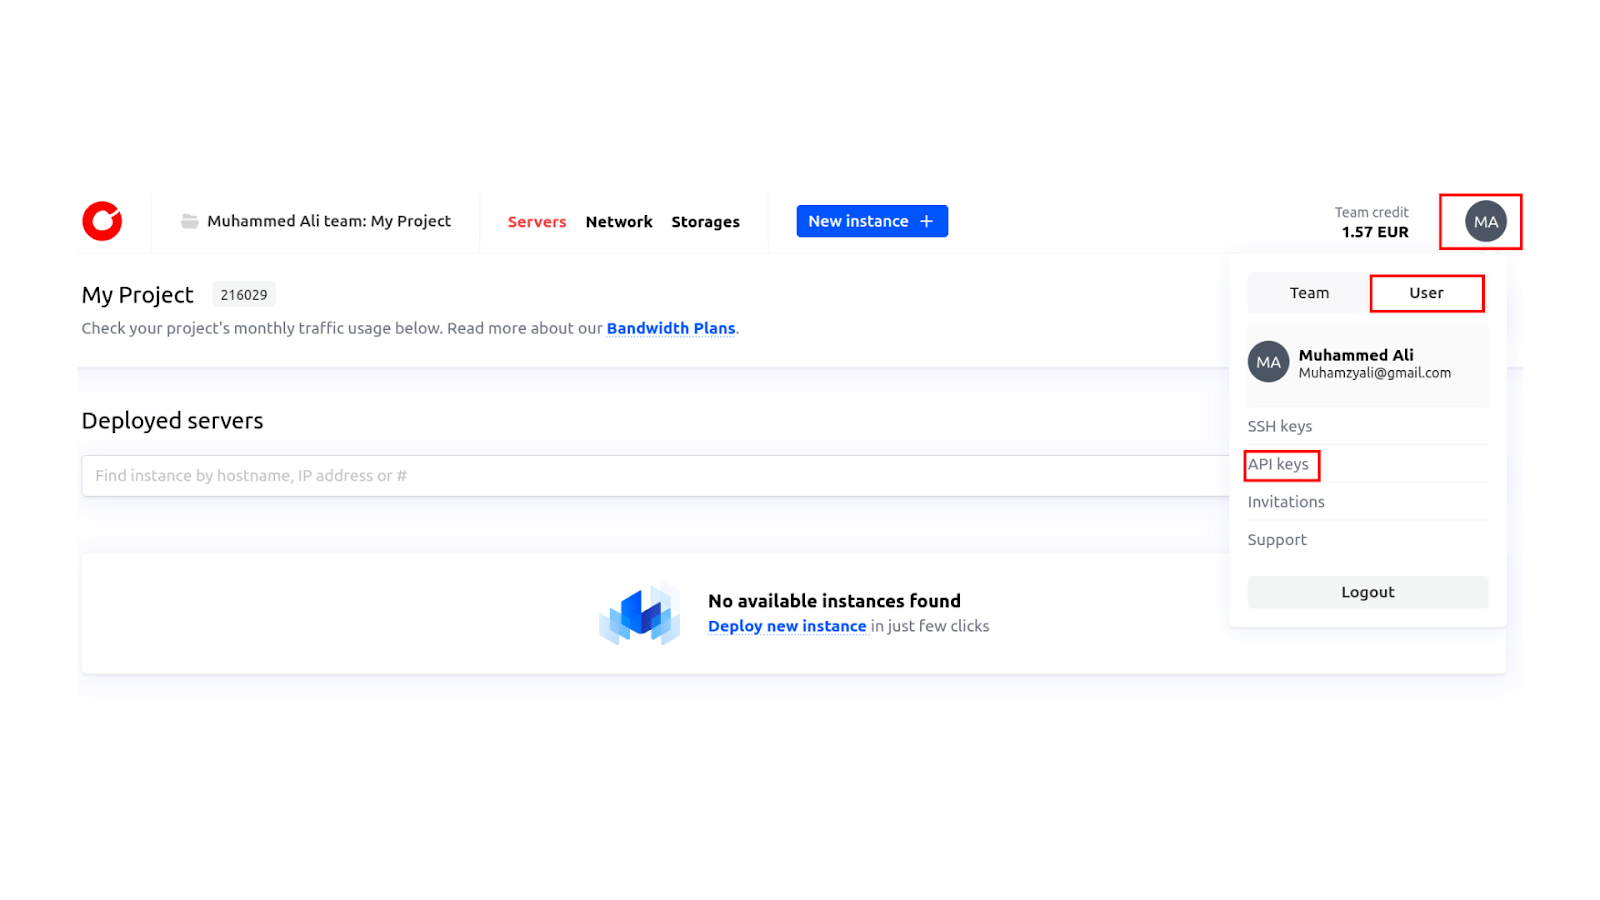
- For the API key, click on your profile icon in the top right corner, then click on the “User” button. You would see an option for “API keys”. There you can create your API key.

#Step 3: Configuration for provisioning
In your working directory, create a new file named main.tf. In this file, define a simple configuration that provisions a server on Cherry Servers.
terraform {
    required_providers {
    cherryservers = {
        source = "cherryservers/cherryservers"
    }
    }
}
# Set the variable value in variables.tf file.
# Or set the CHERRY_AUTH_KEY or CHERRY_AUTH_TOKEN environment variables.
variable "cherry_api_token" {
    description = "Cherry servers API token"
    type        = string
    default     = "eyJhbGciOiJSUzI1NiIsInR5cCI6IkpXUyJ9.eyJjIjoxNzI2MDQsImkiOiIiLCJyIjoicmNmIiwidCI6InVjIiwiYSI6MCwiaWF0IjoxNzI1OTgxMzcwfQ.udS7uzLYQeHc7zL3dlEm9J0-idStFaalcDatMx3NyJmBivO_kAtJi7tExxxxxxxxxxxxxxxxxxxxxxxxxxxxxxxxxxxxxxxxxxxxxxxxxxxxxxxxxxxxxxxxxxxxxxxxxxxxxxxxxxxxxxxxxxxxxxxxxxxxxxxxxxxxxxxxxxxxxxxxxxxxxxxxxxxxxxxxxxxxxxxxxxxxxxxxxxxxxxxxxxxxxxxxxxxxxxxxxxxxxxxxxxxxxxxxxxxxxxx"
}


# Configure the Cherry Servers Provider.
provider "cherryservers" {
    api_token = var.cherry_api_token // API token can be found in Cherry Servers client portal - https://portal.cherryservers.com/settings/api-keys
}
#Create a new server:
resource "cherryservers_server" "server" {
    plan         = "cloud_vps_1"
    hostname     = "sharing-wallaby"
    project_id   = <your-project-id>
    region       = "eu_nord_1"
    image        = "ubuntu_22_04"
    ssh_key_ids  = [cherryservers_ssh_key.my_ssh_key.id]
}
resource "cherryservers_ssh_key" "my_ssh_key" {
    name       = "my-key"
    public_key = file("~/.ssh/id_rsa.pub")
}
NOTE: Be sure to provide the project_id parameter with your actual project id obtained from the previous step.
This Terraform configuration sets up the Cherry Servers provider, specifying the required provider source and handling authentication via an API token. Replace the API token there with your own. It begins with defining the Cherry Servers provider and setting a variable for the API token, which can be defined directly through environment variables (CHERRY_AUTH_KEY or CHERRY_AUTH_TOKEN). The provider configuration block uses this token to authenticate API requests, enabling Terraform to interact with Cherry Servers and manage resources such as servers, SSH keys, and more.
The resource configuration section provisions a new server on Cherry Servers and sets up an SSH key for secure access. The cherryservers_server resource block specifies various server attributes, including the plan (cloud_vps_1), hostname, project ID, region, and the operating system image (ubuntu_22_04). It also links to the SSH key defined in the cherryservers_ssh_key resource, which uploads a specified public key from the local file system for secure access.
#Step 4: Initialize your Terraform project
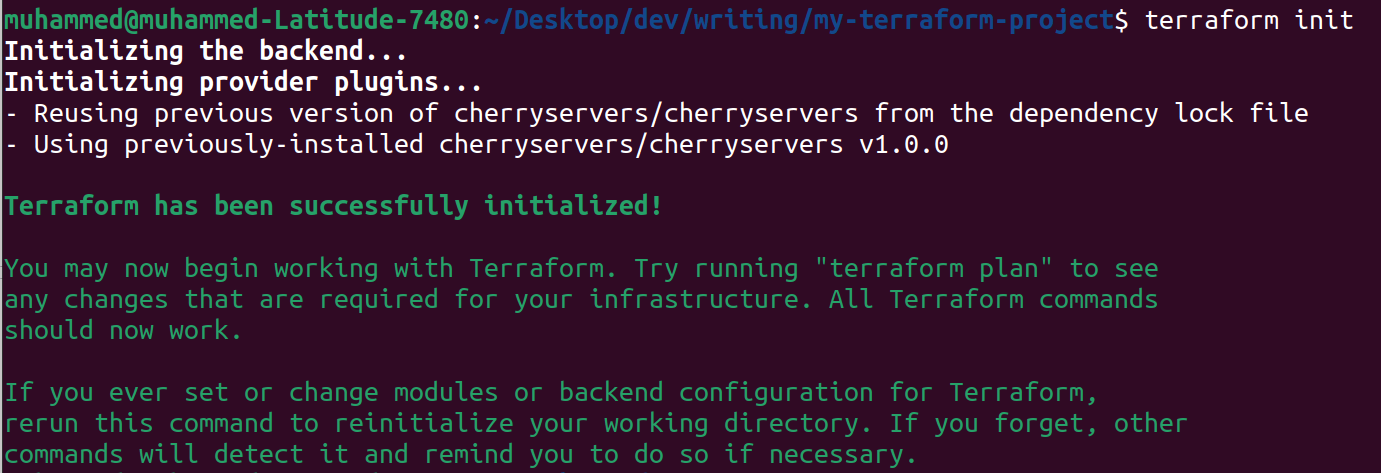
Now, run the terraform init command in your working directory to initialize your Terraform project. This command will download the necessary provider plugins (in this case, the Cherry Servers provider) and prepare your environment for running Terraform commands.
terraform init
If successful, you should see a message indicating that Terraform has been initialized. These steps set up the foundation for working with Terraform and allow you to easily manage infrastructure.
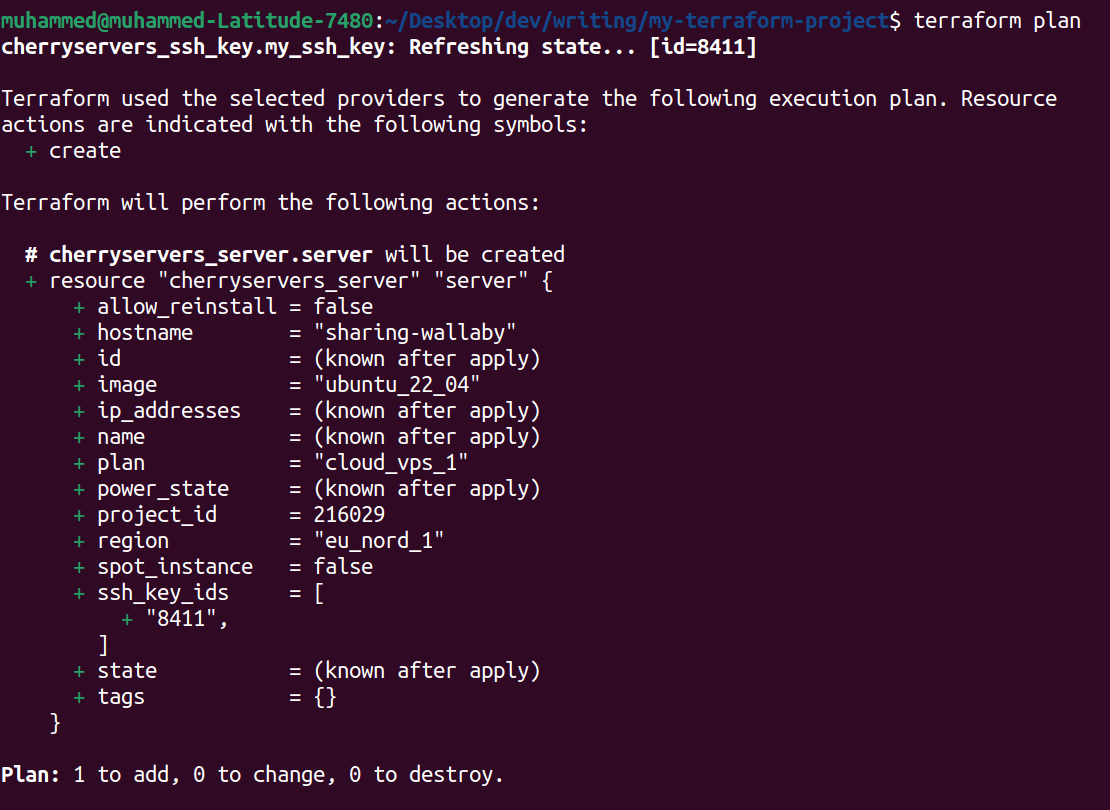
You can run the following code to check the plan for how your server will be created
terraform plan
#Step 5: Install Cherry Servers plugin
To use the Cherry Servers plugin, clone the project and navigate to the repository directory
git clone https://github.com/cherryservers/terraform-provider-cherryservers.git && cd terraform-provider-cherryservers
Now build the provider using the Go install command:
go install
#Step 6: Apply the provision
To provision the server, move up one directory where you have the main.tf file.
cd ..
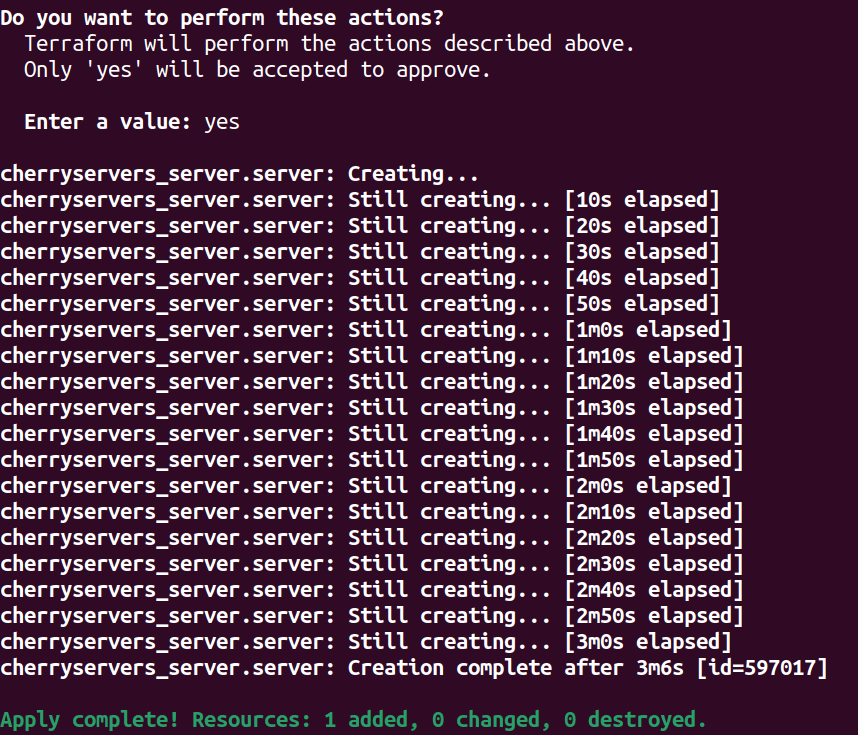
Now apply the configurations to provision your server.
terraform apply
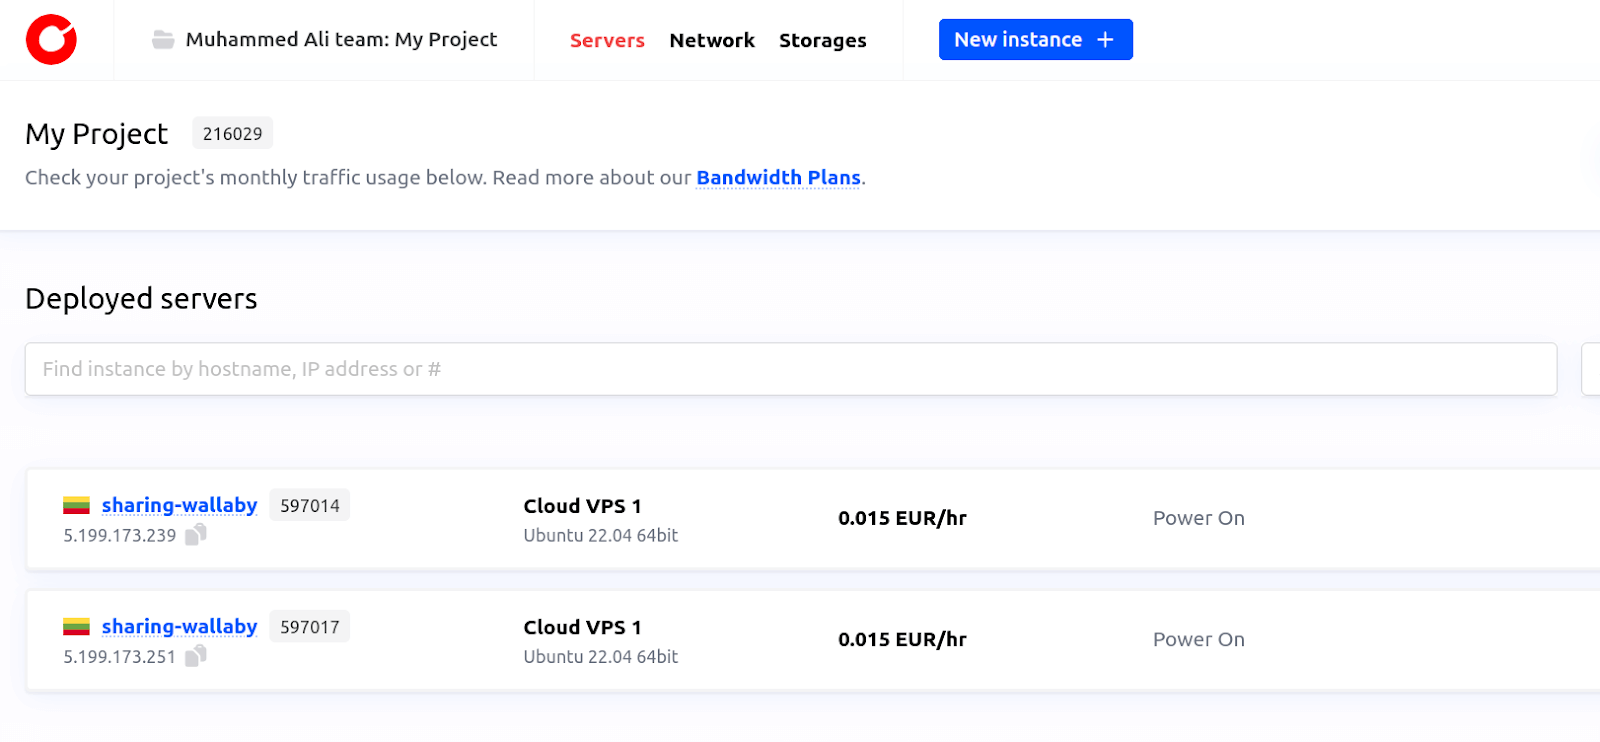
After the apply command is run completely, you can go to your Cherry Servers dashboard or your terminal, and you will see that your server has been created successfully.
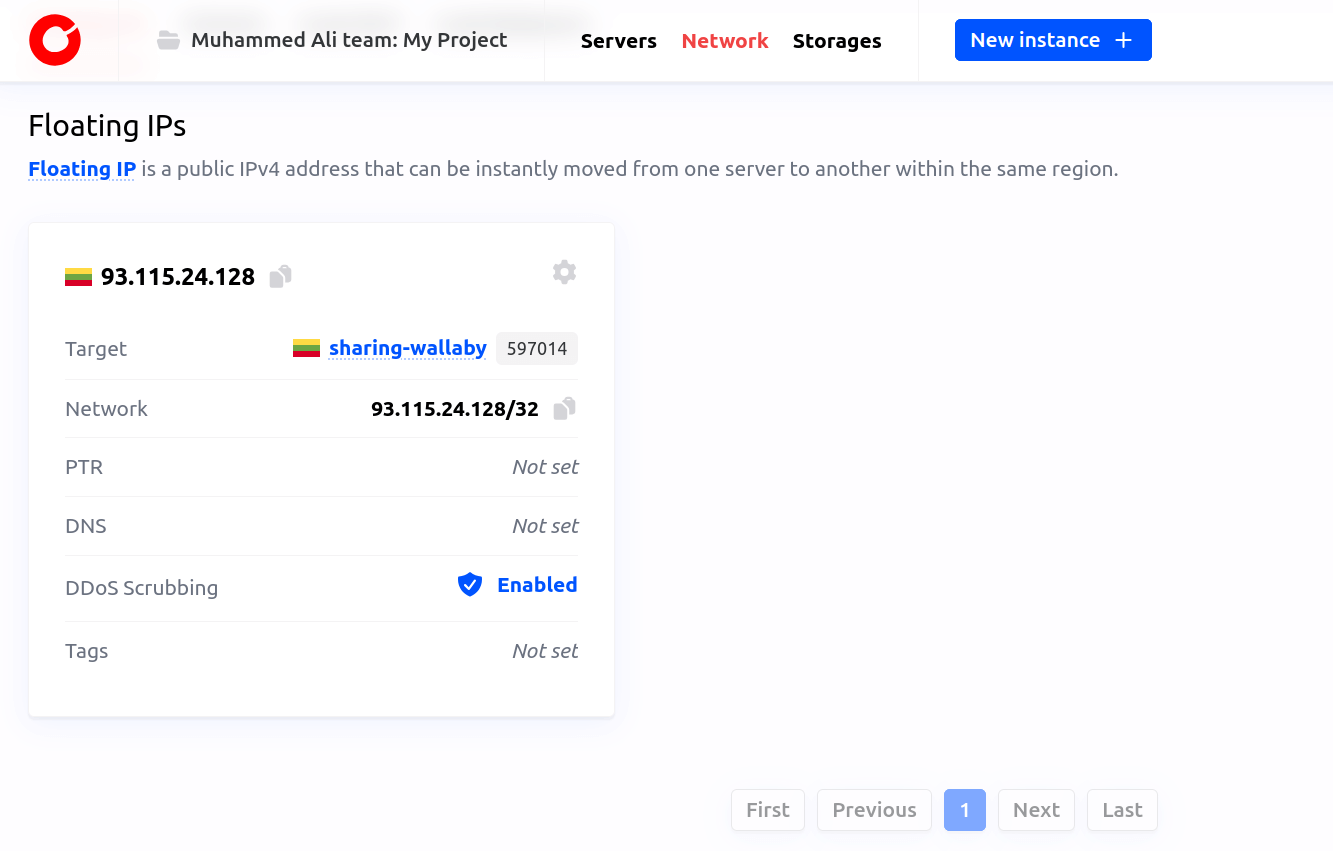
You could also provision a Cherry Servers IP resource, here. Here is an example of how you can provision a floating IP address on Cherry Servers:
# Create a new floating IP address with optional parameters
resource "cherryservers_ip" "floating-1" {
    project_id      = <your-project-id>
    region          = "eu_nord_1"
    target_hostname = "gentle-turtle"
    ddos_scrubbing  = true
}
You can apply this specific resource with the following command:
terraform apply -target=cherryservers_ip.floating-1
#Making changes and destroying resources
Terraform makes it easy to manage and modify your infrastructure as code. Once you have an initial configuration applied, you might need to make changes or even remove resources. This section will guide you through modifying configurations, applying changes incrementally, and destroying resources.
#Modifying your configuration
When you need to change your infrastructure, such as updating a server type or adding a new resource, you modify the existing Terraform configuration files. After editing the .tf files, run the following command to see the proposed changes:
terraform plan
This command provides a detailed preview of what Terraform will do to your infrastructure. It will show you which resources will be added, changed, or destroyed. Reviewing the plan is essential to ensure that the proposed changes match your intentions. Now apply the changes.
terraform apply
#Applying Changes Incrementally
It is also recommended to apply changes gradually so as not to disrupt the configuration too much. Make the changes as gradual but significant improvements instead of performing overall changes at once. This eliminates some of the chances of making mistakes while programming and if there are, then their solution process is simpler. For example, if you are updating multiple server instances, apply changes to one instance at a time. This strategy ensures you can identify issues early without impacting your entire infrastructure.
#Destroying resources
Sometimes, you may need to completely remove resources. Terraform provides a straightforward way to destroy the infrastructure defined in your configuration with the following command. Be cautious when using this command, as it will permanently remove resources, which could include critical infrastructure components.
terraform destroy
Note: Always double-check the output of the terraform plan before running terraform destroy to avoid unintentional deletion of resources.
#Best practices for beginners
As you start working with Terraform, following best practices can help you build a strong foundation and maintain your infrastructure effectively. Below are key recommendations for beginners.
#Using version control (e.g., Git) for your Terraform files
It is critical for handling changes to your Terraform files that is to handle changes to your Terraform files through the use of a version control system. By employing Git, you can track changes, collaborate effectively, and have a history of how your infrastructure code looks like.
#Organizing your Terraform project structure
A well-organized project structure makes your Terraform code more readable and maintainable. A typical structure might include:
- Main configuration files: Place core resources in files like main.tf, variables.tf, and outputs.tf.
- Modules: Use modules to encapsulate resource definitions that can be reused across projects.
- Environment-specific files: Separate configurations for different environments (e.g., dev, staging, prod) using folders or workspaces.
#Implementing proper naming conventions
Adopt a consistent naming convention for your resources, files, and variables. Consistent names make your code easier to understand and reduce the likelihood of errors. Here are some tips:
- Use descriptive names that convey the purpose (e.g., web_server, db_instance).
- Stick to a case format, like snake_case or kebab-case, and apply it consistently.
- Avoid using ambiguous or overly generic names that can confuse the purpose of a resource.
#Securing secret credentials
While using Terraform, there is always a need to manage secret credentials securely to ensure that things like the API Key, SSH Key, Password, and any other sensitive information that is required are well secure. If these secrets are revealed then one can easily breach into the system/network and compromise its security. You can build your knowledge on this tutorial by trying to implement one of the provided security measures to secure your API token. Below is what you can do while using Terraform to ensure that secret credentials are secure enough in your projects.
- Use Environment Variables
- Use Terraform's Sensitive Attribute
- Storing secrets in HashiCorp Vault
#Conclusion
In this tutorial, we learned how to create the configuration for provisioning Ubuntu server infrastructure on Cherry Servers. We also learned how to handle inputs, make updates to your infrastructure, and best practices when working with Terraform. To learn more, you can expand on your configuration, add variables, outputs, and more complex logic to automate your infrastructure management.
Starting at just $3.24 / month, get virtual servers with top-tier performance.

