How to Install Terraform on Ubuntu in 7 Steps [With Examples]

![How to Install Terraform on Ubuntu in 7 Steps [With Examples]](/v3/img/containers/blog_main/linux.jpg/748968b22f1e35f466bfd77a447e6134/linux.jpg?id=1739046670)


With the growing popularity of cloud-based infrastructure, the need to create and maintain complex platforms has also increased. With the DevOps movement, having an Infrastructure as Code (IaC) tool fits seamlessly into the DevOps workflow. Enter Terraform, one of the most popular infrastructures as Code tools. In this tutorial, I will show you how to install Terraform on Ubuntu so you can start using this tool to your advantage.
#What is Terraform?
Terraform is a widely used Infrastructure as Code tool developed by HashiCorp. With Terraform, we can define cloud and on-premises resources in human-readable configuration files. It works with all the major cloud providers like AWS, with specialized cloud services for developers like Cherry Servers, and Docker infrastructure.
Deploy, manage, and orchestrate your cloud infrastructure across one or more cloud providers with Cherry Servers Terraform module.
#What is Terraform used for?
Terraform is used for creating and managing resources on cloud platforms and other services. This is done via providers created by HashiCorp and the Terraform community. Those providers allow us to manage low-level cloud components such as storage and networking resources and high-level components such as DNS.
#Prerequisites
To follow along this tutorial, you will need:
- The latest Ubuntu installed with
sudoprivileges; - Docker installed.
#How to install Terraform on Ubuntu: Step-by-step process
The below steps will cover how to install Terraform on Ubuntu. We will also show how to declare a basic infrastructure by deploying Nginx on Docker using Terraform. We will then proceed to deploy the infrastructure and destroy it.
#Step 1: Configure packages
We will install the pre-build versions of Terraform using apt package manager.
We will first start by downloading and saving the hashicorp PGP keys:
wget -O- https://apt.releases.hashicorp.com/gpg | sudo gpg --dearmor -o /usr/share/keyrings/hashicorp-archive-keyring.gpg
We can now add an entry to the system's list of package providers:
echo "deb [signed-by=/usr/share/keyrings/hashicorp-archive-keyring.gpg] https://apt.releases.hashicorp.com $(lsb_release -cs) main" | sudo tee /etc/apt/sources.list.d/hashicorp.list
#Step 2: Install Terraform
We can now update our package list and install Terraform:
sudo apt update && sudo apt install terraform
Run terraform -version to test if Terraform has been correctly installed. This will show you the Terraform version installed:

Also read: How to create a Terraform configuration
#Step 3: Declare infrastructure
Now that Terraform is installed, we can proceed to declare our first infrastructure.
Let’s first create a folder terraform in our home directory and move to that folder:
cd ~
mkdir terraform
cd terraform
Now, with your favorite text editor Vim, create the file main.cf. We will do it with Vim:
vim main.tf
Copy and paste the below information in the file.
terraform {
  required_providers {
    docker = {
      source = "kreuzwerker/docker"
      version = "~> 3.0.1"
    }
  }
}

provider "docker" {}

resource "docker_image" "nginx" {
  name         = "nginx:latest"
  keep_locally = false
}

resource "docker_container" "nginx" {
  image = docker_image.nginx.image_id
  name  = "Cherry_servers_tutorial"
  ports {
    internal = 80
    external = 8000
  }
}
This will tell Terraform to use the Docker provider and create a resource nginx from the latest nginx docker image. Nginx will then be deployed and accessible on port 80 as indicated with the internal parameter in the ports section.
#Step 4: Validate the configuration
Terraform configurations can quickly get complex and validating them helps maintain a stable infrastructure.
We will now validate our configuration with the following command:
terraform validate
The command should indicate a valid configuration:

Also read: How to use Terraform modules
#Step 5: Initialize the directory
We now need to initialize the configuration directory. The initialization will download and install the providers defined in the configuration.
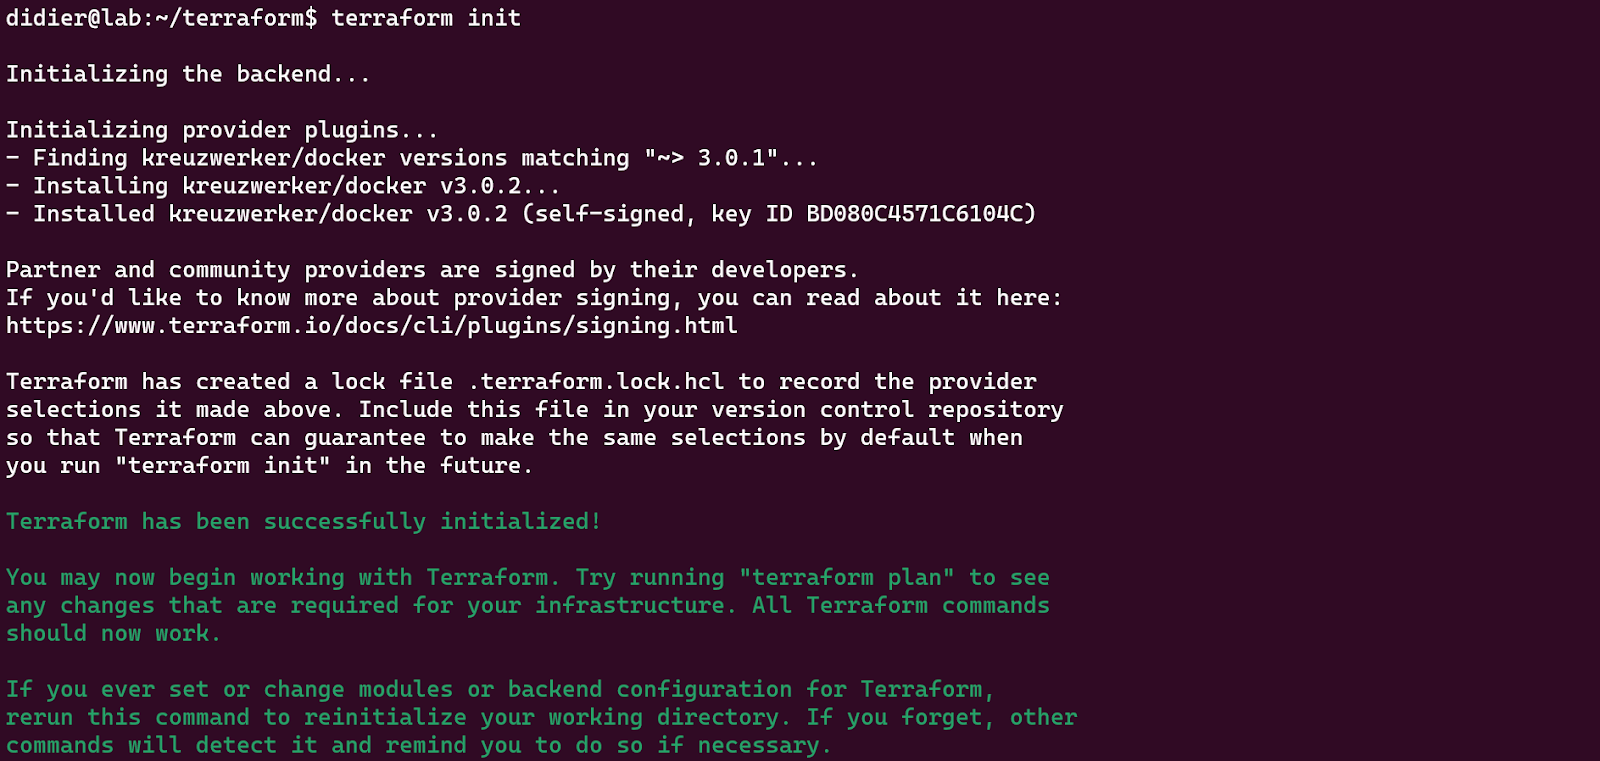
We initialize the Terraform configuration directory with the following command:
terraform init
We should now see a similar output to this:
#Step 6: Build infrastructure
We now apply our configuration to build our infrastructure:
terraform apply
Terraform will ask for a confirmation to perform the actions declared in the configuration file.

Type yes to continue.
Upon confirmation, Terraform will download the Nginx docker image and build the infrastructure:

We can see the container running with the following command:
docker ps |grep Cherry

#Step 7: Destroy infrastructure
We can also destroy the infrastructure. This will delete both the image and the Docker container that has been deployed during the build.
To destroy the infrastructure, use the following command:
terraform destroy
Type yes to continue.

#Conclusion
This tutorial covered how to install Terraform on Ubuntu, what Terraform is, and how it solves the provisioning of infrastructure management problems in the DevOps world. We also covered the basics of Terraform, such as creating and destroying an infrastructure. You can find more about Terraform in the official Terraform documentation.


