How to Host MongoDB on a Dedicated Server


If you're running MongoDB in production, you've likely faced challenges with unpredictable performance, security limitations, and restricted configuration options that can seriously impact your application's reliability and user experience. Running a database on shared hosting may work for small projects, but as your application grows, you'll quickly encounter limitations with slow queries, connection limits, and restricted access.
By the end of this guide, you'll know exactly how to install, configure, secure, and optimize MongoDB on your own dedicated server.
#Prerequisites
To follow this guide, make sure you have:
-
A dedicated server running Ubuntu 24.04 from a server provider
-
Root access or sudo privileges
-
Basic familiarity with the Linux command line
This demonstration uses a dedicated server from Cherry Servers. You can explore their dedicated server plans.
#Why Choose a Dedicated Server for MongoDB?
Before going into setting up MongoDB on the dedicated server, let's first understand the reasons for or benefits of using a dedicated server for MongoDB:
-
Complete resource control: Unlike shared hosting or VPS solutions, a dedicated server provides you with exclusive access to all CPU cores, RAM, and storage. MongoDB loves memory for caching frequently accessed data, and having guaranteed resources means consistent performance.
-
Customizable storage configuration: MongoDB's performance heavily depends on disk I/O patterns. With a dedicated server, you can configure RAID arrays, choose between SSDs and traditional drives, and even separate your data and log files across different storage devices.
-
Network performance: A dedicated server typically offers better network connectivity and lower latency compared to shared environments, which translates to faster response times for your applications.
-
Security Isolation: Your database runs in complete isolation from other users' applications, reducing security risks and giving you full control over firewall rules, user access, and encryption settings.
#How to Host MongoDB on a Dedicated Server
#Step 1: Provision the dedicated server
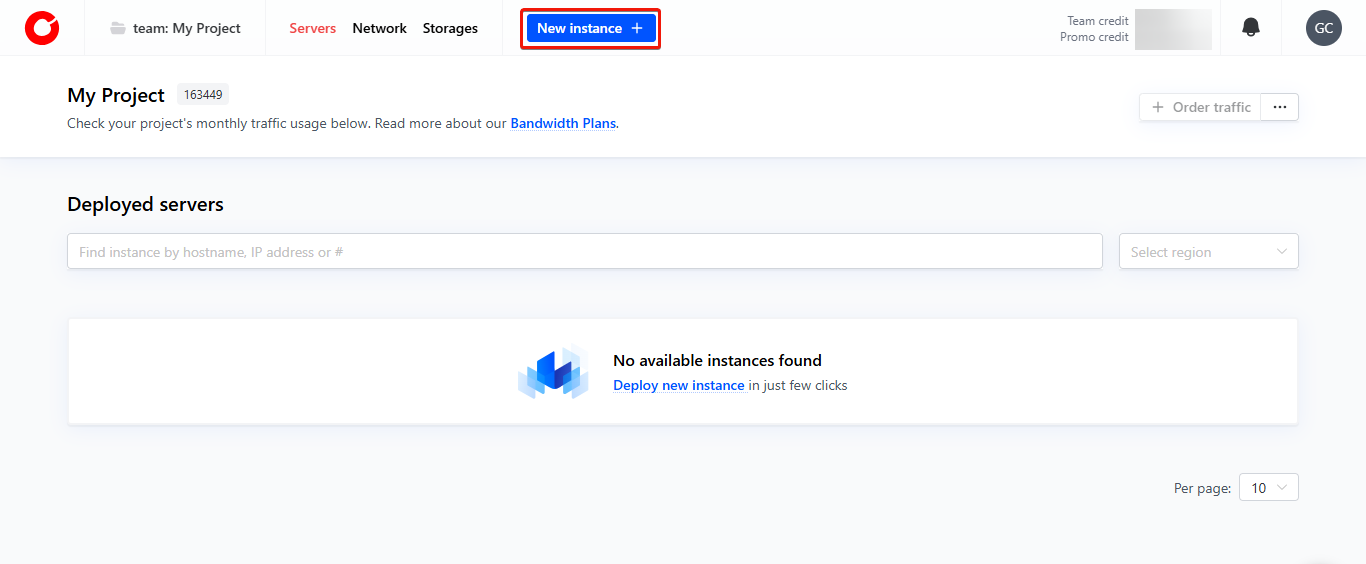
This tutorial demonstrates using Cherry Servers, but you can follow along with any dedicated server provider.
Once signed in, click on New instance on your Cherry Servers user's portal:
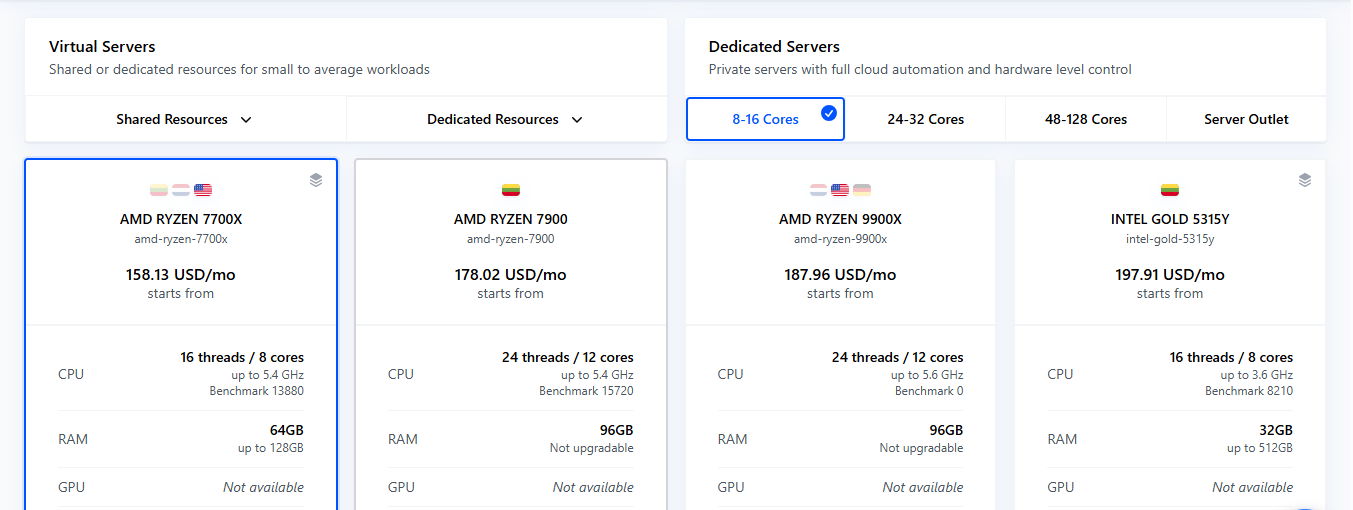
On the next page, select the range of CPU cores you want in the Dedicated Servers section to display the servers with that specification, then select the server you want:
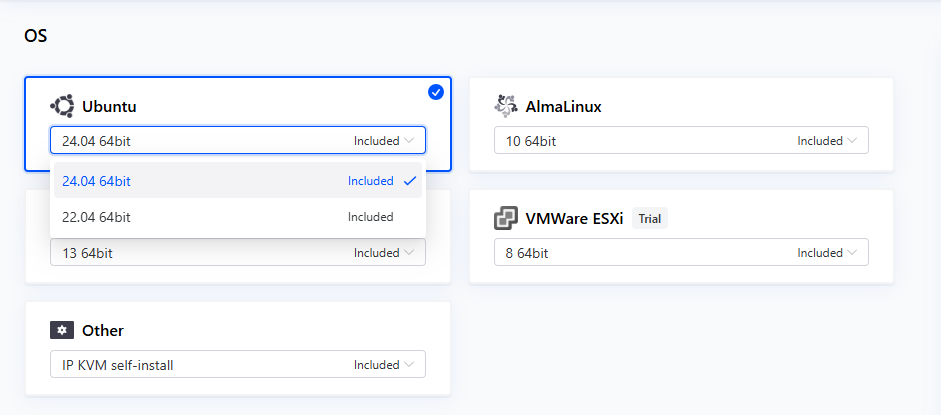
Choose your operating system (Ubuntu 24.04 is used here), configure additional settings as needed, and then deploy the server:
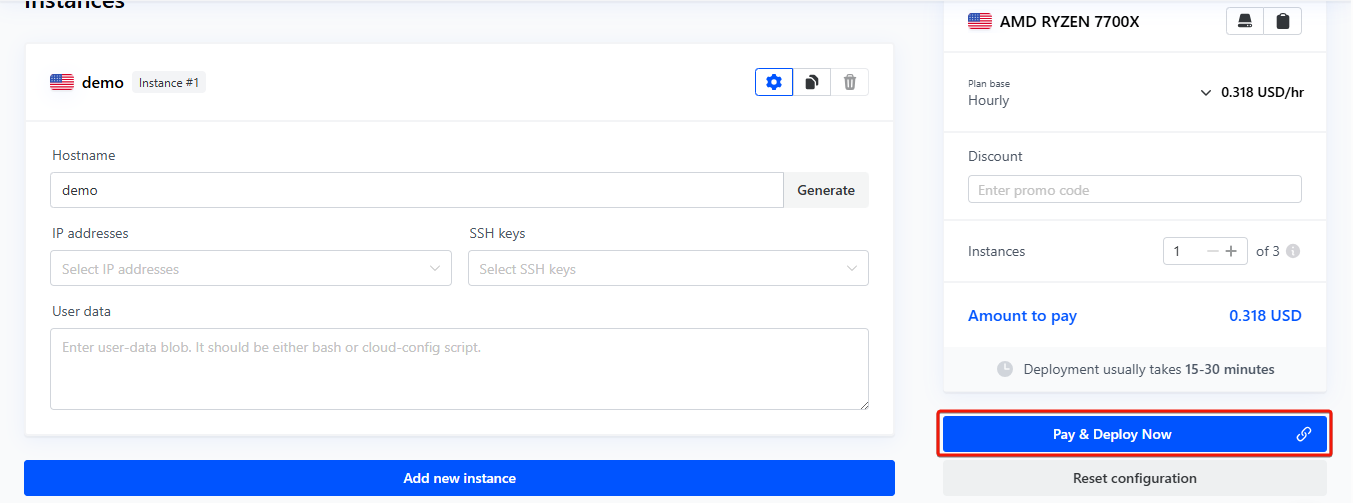
Once your server is ready, you'll be able to see details such as the private and public address, as well as the root password.
#Step 2: Connect to your dedicated server via SSH
Next, connect to the provisioned dedicated server. Open your terminal and connect to the server via SSH using the following command format:
ssh root@<server_ip>
Replace server_ip with the IP address of the server.
OutputThe authenticity of host 'xx.xx.xx.xx (xx.xx.xx.xx)' can't be established.
ED25519 key fingerprint is SHA256:5gbrHnphsoFh8s67cWUV6N3SqmxiC/lvY9/i/GqtH40.
This key is not known by any other names.
Are you sure you want to continue connecting (yes/no/[fingerprint])? yes
Warning: Permanently added 'xx.xx.xx.xx' (ED25519) to the list of known hosts.
root@xx.xx.xx.xx's password:
Welcome to Ubuntu 24.04.2 LTS (GNU/Linux 6.8.0-60-generic x86_64)

 * Documentation:  https://help.ubuntu.com
 * Management:     https://landscape.canonical.com
 * Support:        https://ubuntu.com/pro

 System information as of Fri Aug 29 10:32:50 AM UTC 2025

  System load:  0.12               Temperature:            41.2 C
  Usage of /:   1.2% of 878.54GB   Processes:              250
  Memory usage: 0%                 Users logged in:        0
  Swap usage:   0%                 IPv4 address for bond0: 84.32.70.98


Expanded Security Maintenance for Applications is not enabled.

125 updates can be applied immediately.
75 of these updates are standard security updates.
To see these additional updates run: apt list --upgradable

Enable ESM Apps to receive additional future security updates.
See https://ubuntu.com/esm or run: sudo pro status
#Create a sudo user
If you are logged in as the root user, it is best practice to create a non-root user with sudo privileges.
Run the following command to create a new user:
adduser admin-user
Replace admin-user with your preferred username. You will be prompted to set a password and provide optional user information:
Outputinfo: Adding user `admin-user' ...
info: Selecting UID/GID from range 1000 to 59999 ...
info: Adding new group `admin-user' (1001) ...
info: Adding new user `admin-user' (1001) with group `admin-user' ...
info: Creating home directory `/home/admin-user' ...
info: Copying files from `/etc/skel' ...
New password:
Retype new password:
passwd: password updated successfully
Changing the user information for admin-user
Enter the new value, or press ENTER for the default
        Full Name []:
        Room Number []:
        Work Phone []:
        Home Phone []:
        Other []:
Is the information correct? [Y/n] Y
info: Adding new user `admin-user' to supplemental / extra groups `users' ...
info: Adding user `admin-user' to group `users' ...
Next, add the new user to the sudo group:
usermod -aG sudo admin-user
Now switch to the sudo user you just created:
sudo su - admin-user
#Step 3: Update system packages
Before you install anything, it's a good practice to update your system's package list and upgrade your existing software. In your terminal, run this command:
sudo apt update && sudo apt upgrade -y
OutputHit:1 http://us.archive.ubuntu.com/ubuntu noble InRelease
Hit:2 http://archive.ubuntu.com/ubuntu noble InRelease
Get:3 http://us.archive.ubuntu.com/ubuntu noble-updates InRelease [126 kB]
Get:4 http://archive.ubuntu.com/ubuntu noble-updates InRelease [126 kB]
Get:5 http://us.archive.ubuntu.com/ubuntu noble-security InRelease [126 kB]
Get:6 http://archive.ubuntu.com/ubuntu noble-backports InRelease [126 kB]
Get:7 http://us.archive.ubuntu.com/ubuntu noble-backports InRelease [126 kB]
Get:8 http://us.archive.ubuntu.com/ubuntu noble-updates/universe amd64 Packages [1,906 kB]
Get:9 http://archive.ubuntu.com/ubuntu noble-updates/main amd64 Packages [1,748 kB]
Get:10 http://us.archive.ubuntu.com/ubuntu noble-updates/universe amd64 Components [519 kB]
Get:11 http://us.archive.ubuntu.com/ubuntu noble-updates/universe amd64 c-n-f Metadata [30.5 kB]
Get:12 http://us.archive.ubuntu.com/ubuntu noble-updates/restricted amd64 Components [160 B]
Get:13 http://us.archive.ubuntu.com/ubuntu noble-updates/main amd64 Packages [1,748 kB]
Get:14 http://us.archive.ubuntu.com/ubuntu noble-updates/main amd64 Components [234 kB]
Get:15 http://us.archive.ubuntu.com/ubuntu noble-updates/main amd64 c-n-f Metadata [14.9 kB]
Get:16 http://us.archive.ubuntu.com/ubuntu noble-updates/multiverse amd64 Components [888 B]
Get:17 http://us.archive.ubuntu.com/ubuntu noble-security/universe amd64 Components [65.5 kB]
Get:18 http://us.archive.ubuntu.com/ubuntu noble-security/restricted amd64 Components [156 B]
Get:19 http://us.archive.ubuntu.com/ubuntu noble-security/main amd64 Components [24.8 kB]
Get:20 http://archive.ubuntu.com/ubuntu noble-updates/main amd64 Components [234 kB]
Get:21 http://archive.ubuntu.com/ubuntu noble-updates/main amd64 c-n-f Metadata [14.9 kB]
Get:22 http://archive.ubuntu.com/ubuntu noble-updates/universe amd64 Packages [1,906 kB]
#Step 4: Install MongoDB
You're ready to install MongoDB. The most reliable way is to install from MongoDB's official repository, which provides the latest updates and security patches.
First, you need to add the MongoDB public GPG key:
curl -fsSL https://www.mongodb.org/static/pgp/server-8.0.asc | sudo gpg -o /usr/share/keyrings/mongodb-server-8.0.gpg --dearmor
This key is used to verify the authenticity of the MongoDB packages.
Next, add the MongoDB repository by creating a list file for MongoDB:
echo "deb [ arch=amd64,arm64 signed-by=/usr/share/keyrings/mongodb-server-8.0.gpg ] https://repo.mongodb.org/apt/ubuntu noble/mongodb-org/8.0 multiverse" | sudo tee /etc/apt/sources.list.d/mongodb-org-8.0.list
This command tells your server's package manager (apt) where to find the official MongoDB packages.
Outputdeb [ arch=amd64,arm64 signed-by=/usr/share/keyrings/mongodb-server-8.0.gpg ] https://repo.mongodb.org/apt/ubuntu noble/mongodb-org/8.0 multiverse
Now refresh your local package database to include the new repository:
sudo apt update
OutputHit:1 http://us.archive.ubuntu.com/ubuntu noble InRelease
Hit:2 http://archive.ubuntu.com/ubuntu noble InRelease
Hit:3 http://us.archive.ubuntu.com/ubuntu noble-updates InRelease
Hit:4 http://archive.ubuntu.com/ubuntu noble-updates InRelease
Hit:5 http://us.archive.ubuntu.com/ubuntu noble-security InRelease
Hit:6 http://archive.ubuntu.com/ubuntu noble-backports InRelease
Hit:7 http://us.archive.ubuntu.com/ubuntu noble-backports InRelease
Get:8 https://repo.mongodb.org/apt/ubuntu noble/mongodb-org/8.0 InRelease [3,005 B]
Get:9 https://repo.mongodb.org/apt/ubuntu noble/mongodb-org/8.0/multiverse amd64 Packages [47.3 kB]
Get:10 https://repo.mongodb.org/apt/ubuntu noble/mongodb-org/8.0/multiverse arm64 Packages [47.4 kB]
Hit:11 http://security.ubuntu.com/ubuntu noble-security InRelease
Fetched 97.7 kB in 6s (15.3 kB/s)
Reading package lists... Done
Finally, install the latest MongoDB packages:
sudo apt install -y mongodb-org
This command installs the MongoDB database server and all the essential command-line tools you need to connect to it and manage your data.
OutputReading package lists... Done
Building dependency tree... Done
Reading state information... Done
The following package was automatically installed and is no longer required:
  grub-pc-bin
Use 'sudo apt autoremove' to remove it.
The following additional packages will be installed:
  mongodb-database-tools mongodb-mongosh mongodb-org-database mongodb-org-database-tools-extra
  mongodb-org-mongos mongodb-org-server mongodb-org-shell mongodb-org-tools
The following NEW packages will be installed:
  mongodb-database-tools mongodb-mongosh mongodb-org mongodb-org-database
  mongodb-org-database-tools-extra mongodb-org-mongos mongodb-org-server mongodb-org-shell
  mongodb-org-tools
0 upgraded, 9 newly installed, 0 to remove and 2 not upgraded.
Need to get 191 MB of archives.
After this operation, 677 MB of additional disk space will be used.
Get:1 https://repo.mongodb.org/apt/ubuntu noble/mongodb-org/8.0/multiverse amd64 mongodb-database-tools amd64 100.13.0 [58.9 MB]
Get:2 https://repo.mongodb.org/apt/ubuntu noble/mongodb-org/8.0/multiverse amd64 mongodb-mongosh amd64 2.5.7 [58.0 MB]
Get:3 https://repo.mongodb.org/apt/ubuntu noble/mongodb-org/8.0/multiverse amd64 mongodb-org-shell amd64 8.0.13 [2,598 B]
Get:4 https://repo.mongodb.org/apt/ubuntu noble/mongodb-org/8.0/multiverse amd64 mongodb-org-server amd64 8.0.13 [42.4 MB]
Get:5 https://repo.mongodb.org/apt/ubuntu noble/mongodb-org/8.0/multiverse amd64 mongodb-org-mongos amd64 8.0.13 [31.7 MB]
Get:6 https://repo.mongodb.org/apt/ubuntu noble/mongodb-org/8.0/multiverse amd64 mongodb-org-database-tools-extra amd64 8.0.13 [7,386 B]
Get:7 https://repo.mongodb.org/apt/ubuntu noble/mongodb-org/8.0/multiverse amd64 mongodb-org-database amd64 8.0.13 [3,058 B]
Get:8 https://repo.mongodb.org/apt/ubuntu noble/mongodb-org/8.0/multiverse amd64 mongodb-org-tools amd64 8.0.13 [2,404 B]
Get:9 https://repo.mongodb.org/apt/ubuntu noble/mongodb-org/8.0/multiverse amd64 mongodb-org amd64 8.0.13 [2,432 B]
Fetched 191 MB in 1s (165 MB/s)
Selecting previously unselected package mongodb-database-tools.
(Reading database ... 141209 files and directories currently installed.)
Preparing to unpack .../0-mongodb-database-tools_100.13.0_amd64.deb ...
Unpacking mongodb-database-tools (100.13.0) ...
Selecting previously unselected package mongodb-mongosh.
Preparing to unpack .../1-mongodb-mongosh_2.5.7_amd64.deb ...
Unpacking mongodb-mongosh (2.5.7) ...
Selecting previously unselected package mongodb-org-shell.
Preparing to unpack .../2-mongodb-org-shell_8.0.13_amd64.deb ...
...
Run the following command to confirm that MongoDB is installed correctly:
You can confirm the MongoDB installation by running:
mongod --version
Outputdb version v8.0.13
Build Info: {
    "version": "8.0.13",
    "gitVersion": "8dc5cd2a30c4524132e2d44bb314544dc477e611",
    "openSSLVersion": "OpenSSL 3.0.13 30 Jan 2024",
    "modules": [],
    "allocator": "tcmalloc-google",
    "environment": {
        "distmod": "ubuntu2404",
        "distarch": "x86_64",
        "target_arch": "x86_64"
    }
}
#Step 5: Start and enable the MongoDB service
Once MongoDB is installed, you need to start the service.
To enable the MongoDB service so it starts automatically whenever the server reboots, run:
sudo systemctl enable mongod
OutputCreated symlink /etc/systemd/system/multi-user.target.wants/mongod.service → /usr/lib/systemd/system/mongod.service.
Now start MongoDB:
sudo systemctl start mongod
Check if the MongoDB service is running correctly:
sudo systemctl status mongod
Output● mongod.service - MongoDB Database Server
     Loaded: loaded (/usr/lib/systemd/system/mongod.service; enabled; preset: enabled)
     Active: active (running) since Fri 2025-08-29 11:04:12 UTC; 40s ago
       Docs: https://docs.mongodb.org/manual
   Main PID: 57174 (mongod)
     Memory: 89.5M (peak: 90.8M)
        CPU: 207ms
     CGroup: /system.slice/mongod.service
             └─57174 /usr/bin/mongod --config /etc/mongod.conf

Aug 29 11:04:12 demo systemd[1]: Started mongod.service - MongoDB Database Server.
Aug 29 11:04:13 demo mongod[57174]: {"t":{"$date":"2025-08-29T11:04:13.006Z"},"s":"I",  "c":"CO>
lines 1-12/12 (END)
If you see active (running), MongoDB is up and running.
You can press Ctrl + C to return to the shell.
#Disk Partitioning and File System Choices
XFS is the recommended filesystem to get the best performance from MongoDB’s WiredTiger storage engine. XFS is generally recommended because it manages large files and concurrent I/O more efficiently than EXT4.
If you have a spare disk available, you may choose to format it with XFS before using it for MongoDB’s data directory. Adding the noatime option when mounting can further reduce unnecessary disk writes and improve performance.
If your server is already running on its root disk, leave it as it is. Reformatting should only be considered when setting up a separate, unused disk for MongoDB.
#How to Configure MongoDB for Secure Remote Access
This section contains steps to configure MongoDB, covering everything from securing your server with a firewall to enabling user authentication.
#Step 1: Configure UFW firewall for MongoDB
First, allow SSH connections so as not to get locked out of the server:
sudo ufw allow OpenSSH
OutputRules updated
Rules updated (v6)
Next, allow incoming connections to MongoDB's default port, which is 27017. You should only allow connections from specific trusted IP addresses (like your application server).
sudo ufw allow from <trusted_ip_address> to any port 27017
OutputRules updated
Now, enable the firewall:
sudo ufw enable
You will be prompted to confirm:
OutputCommand may disrupt existing SSH connections. Proceed with operation (y|n)? y
Firewall is active and enabled on system startup
Verify the firewall status to ensure the rules are active:
sudo ufw status
OutputStatus: active

To                         Action      From
--                         ------      ----
OpenSSH                    ALLOW       Anywhere
27017                      ALLOW       <trusted_ip_address>
OpenSSH (v6)               ALLOW       Anywhere (v6)
#Step 2: Create an admin user and enable authentication
By default, MongoDB runs without authentication, which is highly insecure for production environments. You need to tell MongoDB to require a username and password for connections.
To create an administrative user, first access the MongoDB shell by running the following command:
mongosh
OutputCurrent Mongosh Log ID: 68b9b07ff1fc860875fa334f
Connecting to:          mongodb://127.0.0.1:27017/?directConnection=true&serverSelectionTimeoutMS=2000&appName=mongosh+2.5.7
Using MongoDB:          8.0.13
Using Mongosh:          2.5.7

For mongosh info see: https://www.mongodb.com/docs/mongodb-shell/


To help improve our products, anonymous usage data is collected and sent to MongoDB periodically (https://www.mongodb.com/legal/privacy-policy).
You can opt-out by running the disableTelemetry() command.

------
   The server generated these startup warnings when booting
   2025-09-04T15:06:10.023+00:00: Using the XFS filesystem is strongly recommended with the WiredTiger storage engine. See http://dochub.mongodb.org/core/prodnotes-filesystem
   2025-09-04T15:06:10.119+00:00: Access control is not enabled for the database. Read and write access to data and configuration is unrestricted
   2025-09-04T15:06:10.119+00:00: For customers running the current memory allocator, we suggest changing the contents of the following sysfsFile
   2025-09-04T15:06:10.119+00:00: For customers running the current memory allocator, we suggest changing the contents of the following sysfsFile
   2025-09-04T15:06:10.119+00:00: We suggest setting the contents of sysfsFile to 0.
   2025-09-04T15:06:10.119+00:00: We suggest setting swappiness to 0 or 1, as swapping can cause performance problems.
------

test>
Then switch to the admin database:
use admin
Outputswitched to db admin
admin>
The admin database is meant for administrative users only (root, cluster manager, backup/restore roles, etc.).
Create a user with administrative privileges:
db.createUser({
  user: "yourAdminUsername",
  pwd: "1StrongPassword",
  roles: [ { role: "root", db: "admin" } ]
})
Replace yourAdminUsername with a username of your choice and 1StrongPassword with a strong, secure password.
Output{ ok: 1 }
Type exit and press ENTER` to exit the shell.
Now, enable authentication in the MongoDB configuration file (mongod.conf). MongoDB's main configuration file is located at /etc/mongod.conf. Create a backup of the file and open the file using the Nano editor:
sudo cp /etc/mongod.conf /etc/mongod.conf.backup

sudo nano /etc/mongod.conf
Scroll down and uncomment (by removing the # symbol) or add the following lines under the security section:
security:
  authorization: enabled
Save the file by pressing CTRL + O and hitting ENTER. Then press CTRL+X to exit the configuration file..
Now, restart MongoDB for the change to take effect:
sudo systemctl restart mongod
From now on, you will need to authenticate to access your MongoDB instance. You can connect using the following format:
mongosh -u <username> -p --authenticationDatabase <database>
You’ll be prompted for your password:
OutputEnter password: ***************
Current Mongosh Log ID: 68b19c513d15709a40fa334f
Connecting to:          mongodb://<credentials>@127.0.0.1:27017/?directConnection=true&serverSelectionTimeoutMS=2000&authSource=admin&appName=mongosh+2.5.7
Using MongoDB:          8.0.13
Using Mongosh:          2.5.7

For mongosh info see: https://www.mongodb.com/docs/mongodb-shell/
#Create a database and a database user
With your administrative user set up, you can go on to create an application database and a dedicated user for it. This follows the principle of least privilege, granting each user only the permissions required for their role. Separating databases and users by application improves security isolation and simplifies permission management as your environment grows. Always use dedicated users for applications rather than the admin account.
First, connect as admin:
mongosh -u adminuser -p --authenticationDatabase admin
Next, switch to your application database:
use appdb
Outputswitched to db appdb
appdb>
(Optional) Create a test collection:
db.createCollection("sample")
Output{ ok: 1 }
To confirm the newly created collection, run the query:
show collections
Outputsample
Now, create an application user:
db.createUser({
  user: "appuser",
  pwd: "1StrongPassword",
  roles: [
    { role: "readWrite", db: "appdb" }
  ]
})
Output{ ok: 1 }
To list the users created in the database, run the query:
db.getUsers()
Output{
  users: [
    {
      _id: 'appdb.appuser',
      userId: UUID('0fd51e54-c054-4732-be77-f7b8032ca696'),
      user: 'appuser',
      db: 'appdb',
      roles: [ { role: 'readWrite', db: 'appdb' } ],
      mechanisms: [ 'SCRAM-SHA-1', 'SCRAM-SHA-256' ]
    }
  ],
  ok: 1
}
This user can only read and write to the "appdb" database. Administrative users manage the server, and specific application users read and write only to their databases.
To exit the MongoDB shell, run:
exit
#Step 3: Bind IP address
By default, MongoDB binds to 127.0.0.1 (localhost). That is, it only accepts connections from the same server. To allow remote connections, you’ll need to modify the bind IP value in the MongoDB configuration file to listen on your server’s IP address.
By default, MongoDB might bind to 127.0.0.1 (localhost), meaning it only accepts connections from the same server. For external access, you need to bind it to your server's public or private IP address.
Open the MongoDB configuration file:
sudo nano /etc/mongod.conf
Locate the bindIp setting under the net section and change it to include your server's IP address separated by a comma:
net:
  port: 27017
  bindIp: 127.0.0.1,<server_ip>
Save the file (Ctrl+O, Enter) and exit nano (Ctrl+X).
Restart MongoDB to apply the changes:
sudo systemctl restart mongod
To test remote connectivity, run the following nc command from a trusted remote server.
nc -zv server-ip 27017
This should yield the following output.
OutputConnection to mongo-db-server-ip 27017 port [tcp/*] succeeded!
To initiate a remote connection, use the syntax:
mongosh "mongodb://user@mongodb-server-ip:27017"
Provide the user’s password when prompted and hit ENTER to access the MongoDB server’s shell.
#Step 4: Enable TLS/SSL on MongoDB for encrypted connections
By default, MongoDB sends data in plain text, which risks exposing sensitive information. To secure communication, enable TLS/SSL encryption. You’ll need a certificate, either self-signed (suitable for testing or internal use) or CA-signed (recommended for production). In this guide, we’ll generate and use a self-signed certificate.
Create a working directory:
sudo mkdir -p /etc/ssl/mongodb
cd /etc/ssl/mongodb
Generate a Certificate Authority (CA) key:
sudo openssl genrsa -out ca.key 2048
This command generates the secret key that your CA will use to sign certificates.
Now, you'll create the public certificate for your CA:
sudo openssl req -x509 -new -nodes -key ca.key -sha256 -days 365 -out ca.crt
You'll be prompted to enter identifying information. When prompted, provide details for your organization. For the Common Name, you must enter a unique name for your CA. Do not reuse the MongoDB server’s IP or hostname here.
OutputYou are about to be asked to enter information that will be incorporated
into your certificate request.
What you are about to enter is what is called a Distinguished Name or a DN.
There are quite a few fields but you can leave some blank
For some fields there will be a default value,
If you enter '.', the field will be left blank.
-----
Country Name (2 letter code) [AU]:
State or Province Name (full name) [Some-State]:
Locality Name (eg, city) []:
Organization Name (eg, company) [Internet Widgits Pty Ltd]:
Organizational Unit Name (eg, section) []:
Common Name (e.g. server FQDN or YOUR name) []:serverCA
Email Address []:
Generate a private key for the MongoDB server:
sudo openssl genrsa -out mongodb.key 2048
Next, create a certificate signing request (CSR) with SAN:
sudo openssl req -new -key mongodb.key -out mongodb.csr \
  -subj "/CN=<server_ip>" \
  -addext "subjectAltName = IP:<server_ip>"
The server certificate must include a Subject Alternative Name (SAN) to match the IP address or hostname of your MongoDB server. Replace <server_ip> with your server IP or hostname.
This single command creates the CSR non-interactively. It sets the Common Name and, crucially, adds the Subject Alternative Name (SAN) extension for the server's IP address.
Replace <server_ip> with your server's IP address.
Create an extension file:
echo "subjectAltName = IP:<server_ip>" | sudo tee extfile.cnf
OutputsubjectAltName = IP:<server_ip>
Now, use the CA to sign the MongoDB server certificate.
sudo openssl x509 -req -in mongodb.csr -CA ca.crt -CAkey ca.key -CAcreateserial \
  -out mongodb.crt -days 365 -sha256 -extfile extfile.cnf
If successful, you should see:
OutputCertificate request self-signature ok
subject=CN = <server_ip>
Combine the key and certificate into a single .pem file for MongoDB by running:
cat mongodb.key mongodb.crt > mongodb.pem
Restart MongoDB to apply SSL/TLS settings
sudo systemctl restart mongod
Before connecting, verify that the certificate is valid and trusted by the CA:
openssl verify -CAfile /etc/ssl/mongodb/ca.crt /etc/ssl/mongodb/mongodb.crt
Output/etc/ssl/mongodb/mongodb.crt: OK
Finally, verify that SSL/TLS is working. Connect using mongosh, passing both the CA certificate and the server PEM file:
mongosh --tls --tlsCAFile /etc/ssl/mongodb/ca.crt --tlsCertificateKeyFile /etc/ssl/mongodb/mongodb.pem --host <server_ip> --port 27017
OutputCurrent Mongosh Log ID: 68bba3c9cb2e32226bfa334f
Connecting to:          mongodb://xx.xxx.xxx.xxx:27017/?directConnection=true&tls=true&tlsCAFile=%2Fetc%2Fssl%2Fmongodb%2Fca.crt&tlsCertificateKeyFile=%2Fetc%2Fssl%2Fmongodb%2Fmongodb.pem&appName=mongosh+2.5.7
Using MongoDB:          8.0.13
Using Mongosh:          2.5.7

For mongosh info see: https://www.mongodb.com/docs/mongodb-shell/

test>
If the connection succeeds without warnings, TLS is enabled correctly. Now MongoDB will only accept encrypted connections. Clients must also use TLS when connecting to the MongoDB server.
While this guide helps you create a secure, production-ready standalone server, a single server is a single point of failure. For workloads that require little or no downtime, it’s standard practice to run MongoDB as a replica set (a cluster of at least three servers), which ensures automatic failover, high availability, and data redundancy.
#Conclusion
At this point, you should be able to set up and host MongoDB on a dedicated server, install it, and configure it for secure access. Hosting MongoDB on a dedicated server not only improves performance but also gives you more control over your environment.
From here, you can build on this foundation. You can explore ways to fine-tune performance, set up automated backups, and prepare your server for scalability and high availability with replica sets and sharding.


