How To Create an ERC20 Token: Step-by-Step


In Ethereum’s early days, tokens were created without a standard, making integration with every new token difficult. To solve this, the ERC20 tokens were developed to bring consistency and interoperability to token development. ERC20 tokens serve as building blocks of the Ethereum ecosystem, powering DeFi protocols, DAOs, and more. What makes the ERC20 token standard stand out is not only its simplicity, but its numerous use cases as an exchange medium, in voting rights, and staking.
When you deploy an ERC-20 token, it is immediately compatible with the whole Ethereum ecosystem. ERC20 tokens must not be misunderstood for Ether, the native token of the Ethereum blockchain. ETH is used to pay for computations and network resources, while ERC-20 tokens can be used to represent any real-world or virtual asset. This guide walks you through how to create an ERC20 token.
#What is an ERC20 token?
The ERC-20 (Ethereum Request for Comments 20) introduces a standard for fungible tokens on the Ethereum blockchain.
ERC20 defines a set of rules and functions that Ethereum-based tokens must follow, ensuring interoperability with numerous dApps, wallets, decentralized exchanges, and smart contracts in the Ethereum ecosystem.
The ERC-20 standard makes it easier for developers to predict with more accuracy the interaction between different tokens and applications. It also defines how ERC-20 tokens are transferred within the Ethereum blockchain and how their respective supply and address balances are consistently recorded.
#Token Standard and key ERC20 functions
The ERC20 standard ensures that all tokens have the same properties, all tokens are fungible, and no tokens have special rights or properties associated with them. All tokens created using this standard are compatible with other Ethereum tokens. For a token to follow the ERC-20 token standard, it must implement the following API methods and events:
totalSupply()- This method defines the total supply of ERC-20 tokens
function totalSupply() public view override returns (uint256)
- balanceOf(account)` - This method returns the balance of ERC-20 tokens held by a single wallet address
function balanceOf(address _owner) public view returns (uint256 balance)
-
transfer(receipt, amount)` - This method allows for transfers in a certain amount of ERC20 tokens from the total supply to the recipient
-
approve(spender, amount)` - This method permits one address to spend tokens on behalf of another, considering the total supply
function approve(address _spender, uint256 _value) public returns (bool success)
- transferFrom(sender, receipt, amount)` - This method allows one address to send tokens from a sender to a recipient
function transferFrom(address _from, address _to, uint256 _value) public returns (bool success)
- allowance(owner, spender)` - This method checks if a user-approved address has enough balance to send a token to another user.
function allowance(address _owner, address _spender) public view returns (uint256 remaining)
#ERC20 token list
Even thougch the ERC20 tokens follow the same ERC20 standard, their use cases vary, demonstrating their multiple use cases and how the ERC20 standard is the foundation across payments, finance, infrastructure, governance, and asset bridging. The common ERC20 tokens are:
- USDC: A fiat-backed stablecoin issued by Circle
- AAVE: Governance and staking token for the AAVE protocol.
- LINK: Chainlink’s utility token for paying for decentralized data fields
- IMX: Immutables’ token for gasless NFT minting and trading
- MATIC: Token for Polygon’s L2 scaling solution
- UNI: Uniswap’s governance token
- WETH (Wrapped ETH): An ERC20-compatible version of ETH used in asset-bridging.
#How much does it cost to create an ERC20 token?
The cost of creating an ERC20 token typically depends on the network you want to use for the deployment. On testnets like Sepolia, creating an ERC20 token just involves the testnet ETH and it's free.
Deploying an ERC 20 token on the Ethereum mainnet costs around 0.4ETH in gas, and on the Arbitrum and other L2, the cost can drop below $100. Network congestion and smart contract complexities are other factors that can influence the total cost of creating an ERC-20 token.
A standard ERC20 smart contract requires 150,000 to 500,000 gas units, and additional functionality can require more gas. Gas fluctuates based on demand from 10 Gwei to 200+ Gwei. To know the amount of gas needed to build an ERC-20 smart contract, we must first estimate deployment costs, which are calculated as gas units used X gas price.
#Prerequisites
You will need the following for this tutorial:
- Node.js is installed on your machine(version 20)
- (NPM)[https://www.npmjs.com/] package installed
- (Metamask)[https://metamask.io/] wallet installed as a browser extension
- (Hardhat)[https://hardhat.org/] version 2.9.7
- Some Sepoilia Testnet ETH
- An enthusiastic attitude to learning Web3.
- RPC Service like Alchemy
#How to Create an ERC20 Token: Step-by-Step
Creating and deploying an ERC20 token is a straightforward process that typically takes under an hour, requiring only basic Solidity knowledge and access to tools like Remix or Hardhat.
#Step 1: Writing the Smart Contract
Using Remix, create a file called Token.sol and paste the following code:
// SPDX-License-Identifier: MIT
pragma solidity ^0.8.20;

import "@openzeppelin/contracts/token/ERC20/ERC20.sol";
import "@openzeppelin/contracts/access/Ownable.sol";

contract MyToken is ERC20, Ownable {
    constructor(uint256 initialSupply)
        ERC20("newtoken", "NTK")
            {
        _mint(msg.sender, initialSupply);
    }
}
Now let’s break this down:
- The first step is to create a token called NewToken, which inherits all functions, variables, and behaviour from the ERC20 base contract from OpenZeppelin. Unless you are designing a custom logic token logic, avoid using low level
transferorapprovefunctions yourself. - Ownable is an access control module that gives you upgrade or mint control if needed later.
- We have a token called newtoken, and symbol NTK
_mintis an internal function in Openzeppelin’s ERC-20 contract that creates the amount of new tokens and adds them to the account of msg.sender (which in this case is you). The mint() function is not public to avoid future inflationary vectors.
Go to the deployment and run transactions tab, and use the injected provider under the environment. Before the deployment, ensure your Metamask is set to Sepolia network and the Token.sol is the selected contract to be deployed.
1. Writing a deployment script
The next step is creating a development script using Foundry. With Foundry, we can write deployment scripts directly in Solidity. The foundry-based on-chain development script compiles the contract and runs the script, and broadcasts the deployment transaction securely.
Create another Deploy.sol file and paste the following code:
// SPDX-License-Identifier: MIT
pragma solidity ^0.8.20;

import "forge-std/Script.sol";
import "../src/Token.sol";

contract DeployToken is Script {
    function run() external {
        vm.startBroadcast();
        new MyToken(1_000_000 ether);
        vm.stopBroadcast();
    }
}
The vm.startBroadcast() and the vm.stopbroadcast() tells Foundry to sign and send real transactions during execution and not only simulate transactions locally.
2. Writing tests
Create the test file and name it test.sol
// SPDX-License-Identifier: MIT
pragma solidity ^0.8.20;

import "forge-std/Test.sol";
import "../src/Token.sol";

contract MyTokenTest is Test {
    MyToken token; // Declares a state variable to hold the token instance
    function setUp() public {
        token = new MyToken(1_000_000 ether);
    }
// Verifies that the token has the correct initial supply after deployment

    function testInitialSupply() public {
        assertEq(token.total supply(), 1_000_000 ether);
    }
    function testTransfer() public {
        address user = address(0xBEEF);
        token.transfer(user, 100 ether);
        assertEq(token.balanceOf(user), 100 ether);
    }
} /validates that the token supply works perfectly
The test helps us to validate the supply, transfer behavior and event integrity under default conditions. By testing the code before deploying, we can catch edge cases early, validate assumptions and gain confidence that the code will behave correctly when deployed on-chain.

Link to all images - https://drive.google.com/drive/folders/1SLbbAc9smH5_4YIwcwnJZH531qxqxT5A?usp=drive_link
#Step 2: Deploying to the SepoliaTest Network
In this section, we will be compiling and deploying our contract using Foundry
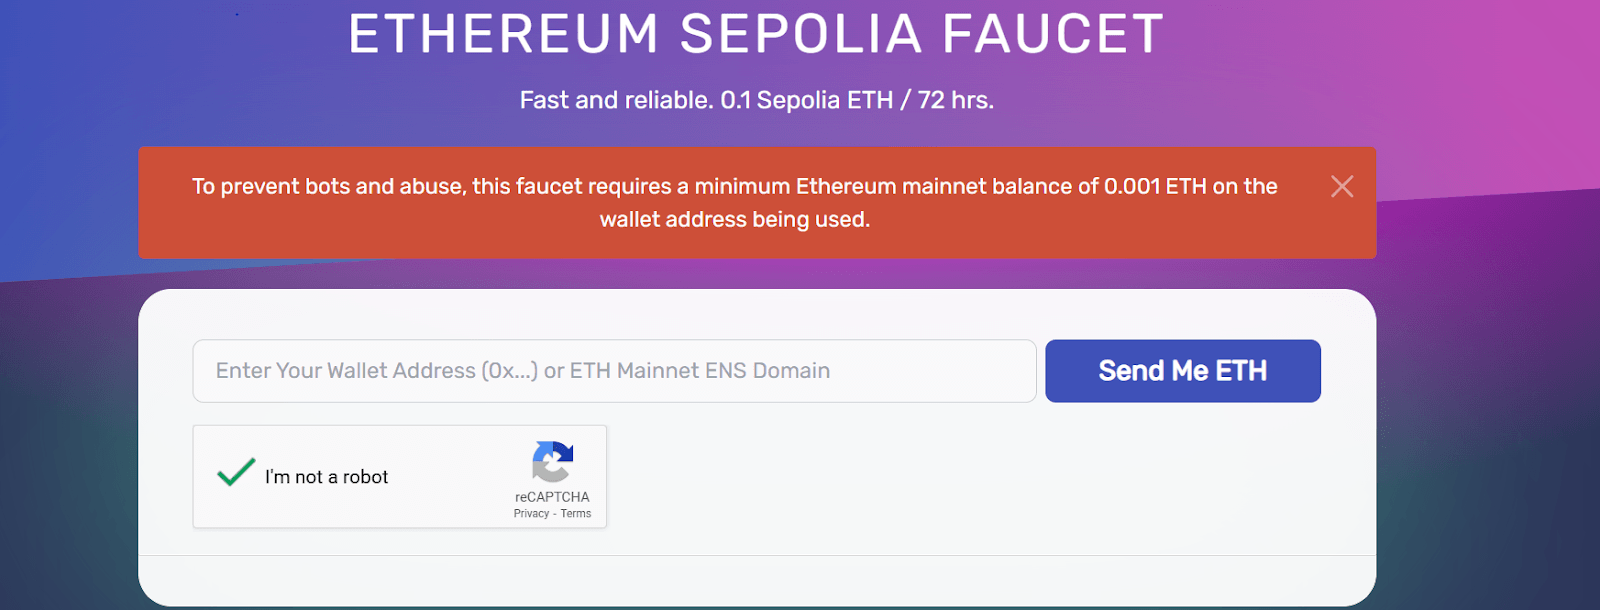
1. Getting Test ETH
Once our contract is battle-tested and ready for deployment, we need to get the Sepolia testnet using the Sepolia faucet or Alchemy faucet to get free Sepolia ETH that will cover the deployment.
Paste your MetaMask wallet address and claim.
2. Compiling and deploying the contract
To deploy a smart contract on any Ethereum network, you need a wallet private key (to sign the transactions) and provide your RPC endpoint as a URL (To broadcast the signed transactions). Below is the development workflow using Foundry:
Start by compiling:
forge build
Then export your deploy key and endpoint:
export PRIVATE_KEY=your_wallet_private_key
export RPC_URL= https://eth-sepolia.g.alchemy.com/v2/npLnODpZPN96pTCa2-C6VdyPYU0Y3Tp_
Then Deploy:
forge script script/Deploy.s.sol:DeployToken --rpc-url $RPC_URL --private-key $PRIVATE_KEY --broadcast --verify
A contract extension is signed with your private key and broadcast to Sepolia via the RPC. Upon deployment, Foundry calls Etherscan’s API to verify the source code.
#Step 3: Adding the Token to Metamask
To view your contract on a blockchain explorer, go to the Etherscan Sepolia Explorer and search for your token. You will see your token name and symbol under the token tracker section. After deployment, you will see the contract address when you check Sepolia Etherscan, and now you need to add it to Metamask.
To add the tokens,
- Open Metamask, go to Assets, Import tokens
- Paste the contract address
- It should auto-fill, but if not, input the token symbol: NTK and 18 decimals
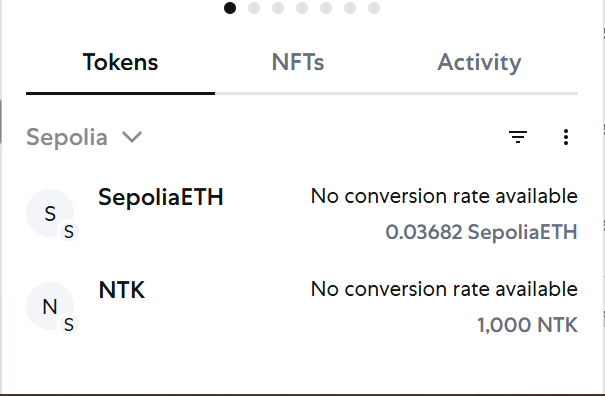
Now, you have successfully added a token to Metamask.
#Step 4: Sending Tokens to Friends
To transfer the token to friends, go to your custom token on Metamask, click send, and paste any Sepolia wallet address.
#Step 5: Creating a Token with Real-life Utility
One of the biggest use cases of ERC 20 tokens so far has been for creating stablecoins, but this is not the only place where we can utilize ERC 20 tokens. They have important use cases in governance where DAOs use these tokens to empower community members and distribute decision-making power; they can also serve as utility tokens within various applications and ecosystems to incentivize certain behaviors. In-game currencies are also an important real-life utility that ERC 20 tokens can provide.
#Conclusion
In this article, we designed, tested, and deployed our ERC20 tokens using Foundry, Remix, and OpenZeppelin. We also discussed in detail the fundamentals of the ERC20 standard and applied all these in deploying our NTK token. The next step will involve taking this knowledge and integrating it to solve problems that reward users and create value.