Ethereum RPC Node Requirements [Architecture, Hardware & Cost]

![Ethereum RPC Node Requirements [Architecture, Hardware & Cost]](/v3/img/containers/blog_main/blockchain.jpg/0ee7c10cd1b2699b0fec51a87d63af75/blockchain.jpg?id=1739046670)


Ethereum quietly processes millions of interactions every single day. Every token swap, NFT mint, DAO vote, wallet balance check, and DeFi liquidation relies on something most users never see: an RPC endpoint. Behind every smooth frontend interaction sits a server answering JSON-RPC calls in real time, and when that layer slows down, rate-limits you, or goes offline, your entire application feels broken.
Note: Hardware pricing and storage requirements in this guide reflect dedicated server configurations available as of 2026. NVMe storage costs and blockchain data growth can change over time, affecting the total cost of operating a node. We recommend periodically reviewing infrastructure requirements and pricing as both factors evolve.
Many teams start by relying on shared infrastructure providers like Infura or Alchemy. It worked in the early days, but as usage grows, the rate limits tighten, compute units become expensive, and latency becomes unpredictable during network congestion. More importantly, you are building on infrastructure you do not control; specifications like logs, throttling policies, and uptime guarantees sit outside your hands.
That is where running your own Ethereum RPC node becomes not just an upgrade, but a strategic decision. In this guide, we will walk through what an Ethereum RPC node actually does, how different architectures work, what hardware you realistically need in 2026, how much it costs to operate, and how to deploy and optimize one properly.
#What is an Ethereum RPC Node?
At its core, an Ethereum RPC (Remote Procedure Call) node is a server that exposes blockchain data and transaction functionality through JSON-RPC or WebSocket endpoints. When a wallet checks your ETH balance, it sends a request like eth_getBalance. When a backend simulates a smart contract call before submitting a transaction, it uses eth_call. When a bot broadcasts a signed transaction, it sends eth_sendRawTransaction; all of these interactions pass through an RPC layer.
#Ethereum RPC Node vs Validator Node
An important clarification is that an RPC node is not the same thing as an Ethereum validator node. Validators participate in Ethereum’s consensus process and stake ETH to secure the network. An RPC node, on the other hand, focuses on serving data quickly and reliably; it can run without [staking](https://www.cherryservers.com /blog/how-to-stake-ethereum) and without producing blocks. Its purpose is performance, throughput, and availability.
This distinction becomes critical when designing infrastructure; validators prioritize correctness and consensus participation while RPC nodes prioritize low latency, high request volume handling, and fast state access. If your primary goal is powering dApps, wallets, bots, indexers, or analytics platforms, then your infrastructure decisions should reflect RPC performance rather than staking rewards.
Running your own Ethereum RPC node gives you control over request limits, logging policies, caching layers, and geographic placement. It also removes third-party visibility into your transaction flow, which is particularly important for trading systems, MEV strategies, and private backend operations.
#RPC Node Architectures
Ethereum’s architecture changed significantly after the Merge. A full node now consists of two components: an execution client and a consensus client. The execution client handles the EVM, state database, transaction pool, and RPC interface. The consensus client maintains the Beacon Chain, tracks finality, and communicates with the execution client through the Engine API.
Common execution clients include Geth, Nethermind, Erigon, and Reth. On the consensus side, clients such as Lighthouse and Prysm are widely used. Even if you are not validating, both layers must run for a fully functional node.
The simplest architecture is a single-node setup where one execution client and one consensus client run on the same machine. The execution client exposes HTTP and WebSocket RPC endpoints directly, this configuration works well for development environments, internal tools, or low-to-moderate traffic backends. It is straightforward to deploy and easier to manage, but it has limitations. If the machine fails, your RPC goes offline; if traffic spikes, CPU and disk I/O(Input/Output) can become saturated quickly.
As traffic grows, teams typically move toward a clustered architecture. In this model, multiple execution-consensus pairs run across separate machines, a reverse proxy or load balancer sits in front of them. Requests are distributed across nodes, improving availability and allowing horizontal scaling; if one node fails, traffic automatically shifts to others. This design dramatically improves uptime and resilience, which is essential for production systems.
Another architectural decision involves whether to run a pruned full node or an archive node. A pruned node stores recent state and block data but discards old intermediate state. This is sufficient for most dApps and backend services. An archive node, by contrast, retains every historical state change; while powerful for deep analytics and historical queries, archive nodes require significantly more storage and higher operational cost.
#Ethereum RPC Node Requirements
Defining the right Ethereum RPC node hardware requirements is where many deployments fail. Ethereum’s state size continues to grow, and disk I/O has become one of the most critical performance bottlenecks.
#1. Entry-Level
A basic entry-level RPC node can operate with four to eight high-frequency CPU cores, 16 to 32 GB of RAM, and between 2TB-4TB of NVMe storage. Network bandwidth should be at least 25-100 Mbps symmetric to maintain healthy peer connections and handle moderate RPC traffic.
#2. Production Workloads
However, for production workloads, these specifications are rarely enough. A realistic production-grade RPC node in 2026 should have 8-16 CPU cores, 32-64 GB of RAM, and 4-8 TB of high-performance NVMe storage. Bandwidth requirements increase substantially as traffic scales, often reaching 300 Mbps to 1 Gbps for high-traffic public RPC endpoints. Client choice also affects storage requirements. Geth and Nethermind tend to consume more disk space over time compared to Erigon or Reth, which are designed for more efficient state storage and indexing.
One major decision is whether to run on virtualized cloud infrastructure or dedicated bare metal servers. Ethereum nodes are I/O-intensive. During sync and under heavy RPC load, consistent disk throughput and low latency are essential. Virtualized environments often suffer from shared I/O contention and unpredictable performance. Dedicated bare metal servers, on the other hand, provide stable NVMe speeds and predictable bandwidth pricing. For high-throughput RPC workloads, bare metal typically offers better performance per dollar and fewer surprises in production.
Low latency network routing, DDoS protection, and reliable power infrastructure also matter. An RPC node is only as reliable as the infrastructure beneath it. If uptime is a priority, redundancy and monitoring must be built into the design from the beginning.
#Ethereum RPC Node Cost Breakdown
Ethereum RPC node cost is often the deciding factor between self-hosting and managed providers. On dedicated bare metal infrastructure, entry-level full nodes generally range between $140 and $300 per month. A mid-tier production RPC node can range from $300 to $600 per month, depending on CPU, RAM, and NVMe capacity. High-spec clustered deployments can easily exceed $800 to $1500 per month.
Cloud providers such as AWS, GCP, or Azure may initially appear competitive. However, once you factor in high-performance storage and outbound bandwidth fees, costs can become unpredictable. Egress traffic charges in particular can significantly inflate monthly bills for public-facing RPC endpoints.
Additional operational costs include monitoring systems, backup storage, domain registration, SSL certificates, and potential bandwidth overages. A realistic estimate for a basic self-hosted RPC node falls between 200 and 400 dollars per month, while high-traffic production environments typically range from 500 to 1500 dollars or more.
When compared to managed RPC providers, pricing becomes workload-dependent. Managed services often charge based on request volume or compute units. At low usage levels, this can be economical. At high usage levels, especially for trading platforms or data-intensive applications, self-hosting frequently becomes more cost-effective and offers greater performance stability.
#Ethereum RPC Node Deployment
Before you even think about exposing your node externally, your Ethereum RPC must be fully installed, correctly configured, and completely synced. This cannot be skipped.
You need at least 4TB of NVMe storage available before syncing; it’s recommended to get more storage. If the disk fills up during sync, the Geth client will shut down abruptly and may corrupt the database, forcing a resync. Many first-time operators underestimate storage growth; don’t make that mistake.
The full base setup is already documented in detail in our Ethereum node guide. That tutorial walks you through:
- Provisioning your bare metal server
- Installing the Geth execution client
- Pairing it with the Prysm consensus client
- Generating the JWT secret for Engine API communication
- Configuring systemd services
- Opening peer-to-peer ports
- Syncing the blockchain
You do not need to configure validator duties if your goal is purely RPC infrastructure. Only once your node is fully synced and responding locally at http://127.0.0.1:8545 should you continue; this takes about 6 - 18 hours.
Now, before exposing your RPC endpoint, make sure both clients are up-to-date and running cleanly. Updating packages ensures you’re not running outdated dependencies:
sudo apt-get update && sudo apt-get install ethereum && sudo apt-get upgrade geth
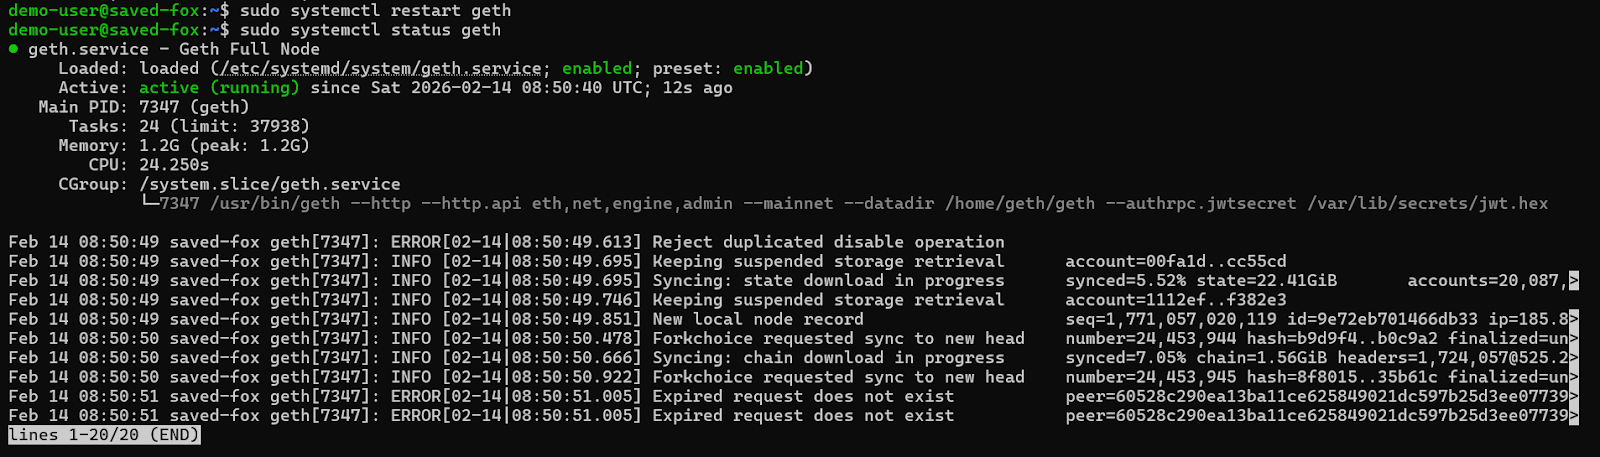
sudo systemctl restart geth
sudo systemctl status geth
This command downloads the latest Prysm launcher script directly from the official repository and saves it in the appropriate directory under the prysm-beacon user.
sudo -u prysm-beacon curl https://raw.githubusercontent.com/OffchainLabs/prysm/master/prysm.sh -o /home/prysm-beacon/bin/prysm.sh

The journalctl -f command streams logs in real time. You should see peer connections and sync progress without repeated errors.
sudo -u prysm-beacon chmod +x /home/prysm-beacon/bin/prysm.sh
sudo systemctl restart prysm-beacon
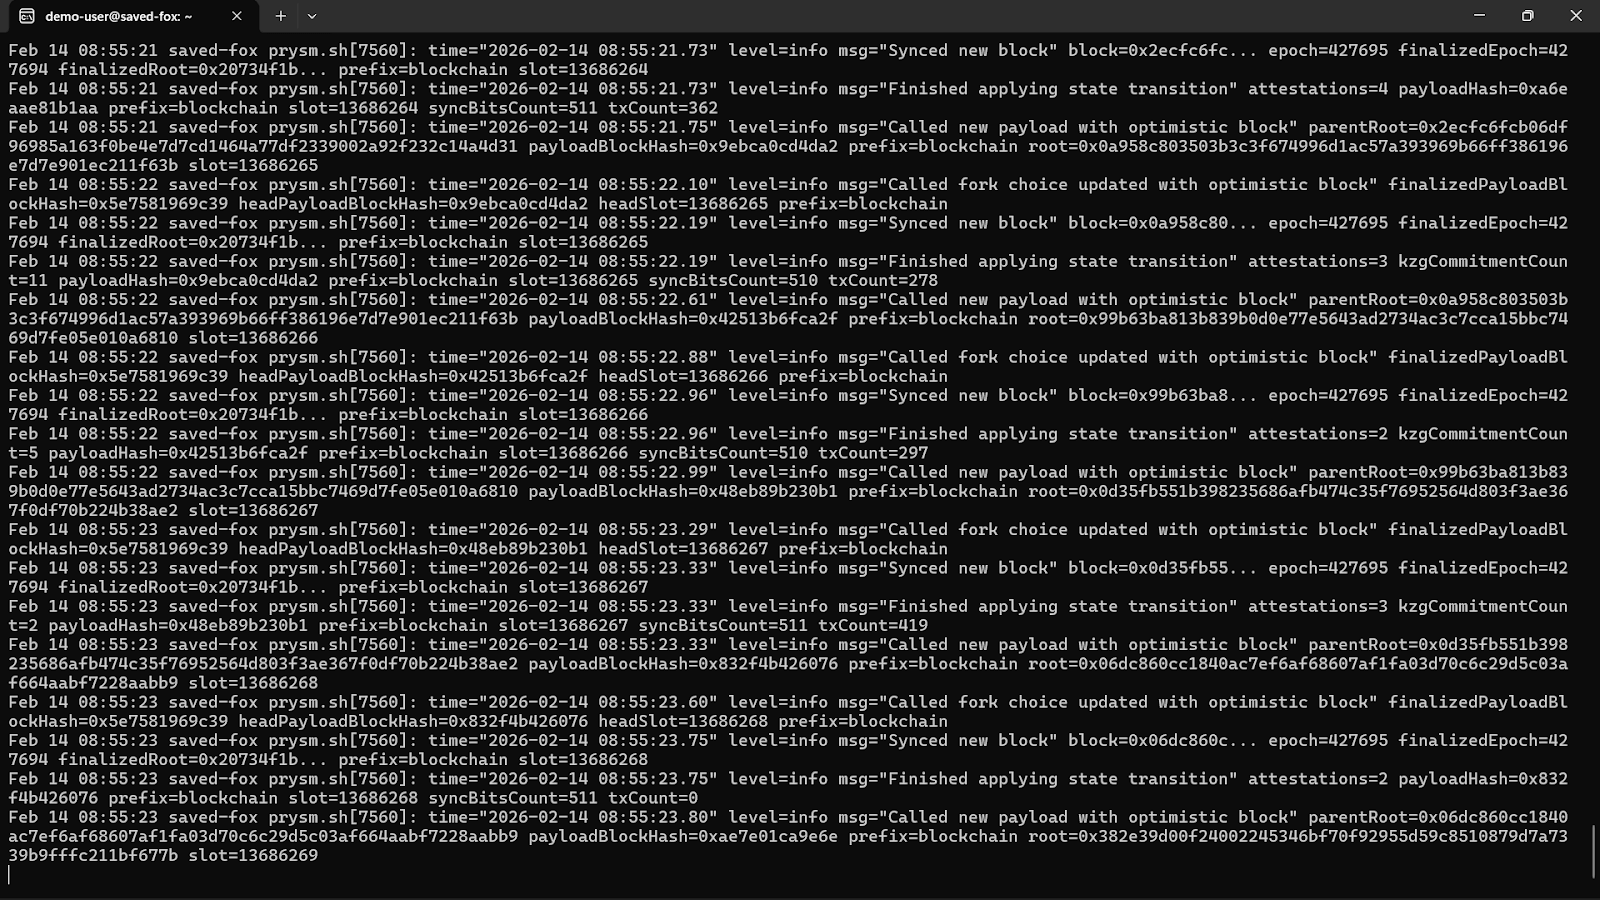
sudo journalctl -u prysm-beacon -f

At this stage, both execution and consensus clients should be fully synchronized and stable.
#Enabling Remote RPC Access
By default, Geth’s HTTP RPC binds to localhost for safety. To allow controlled external access, you modify the existing systemd service configuration created during the base setup.
Open the service file using the command below:
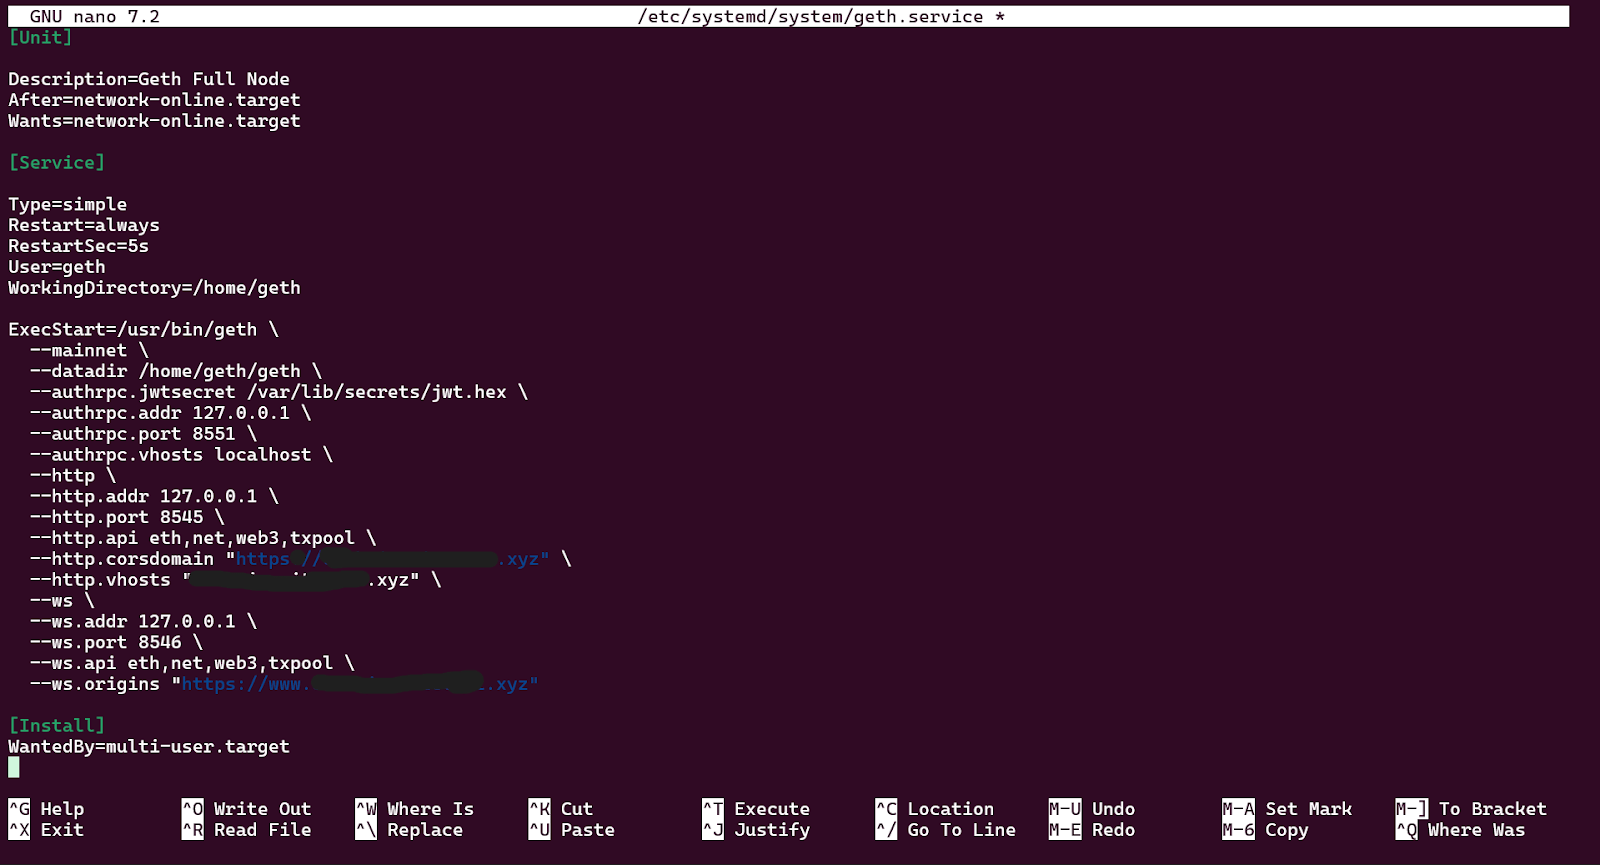
sudo nano /etc/systemd/system/geth.service
You should locate the ExecStart line, it defines how Geth launches. You need to ensure HTTP RPC is enabled correctly and configured for remote listening.
ExecStart=/usr/bin/geth \
--mainnet \
--datadir /home/geth/geth \
--authrpc.jwtsecret /var/lib/secrets/jwt.hex \
--authrpc.addr 127.0.0.1 \
--authrpc.port 8551 \
--authrpc.vhosts localhost \
--http \
--http.addr 127.0.0.1 \
--http.port 8545 \
--http.api eth,net,web3,txpool \
--http.corsdomain "https://your-domain.com" \
--http.vhosts "your-domain.com" \
--ws \
--ws.addr 127.0.0.1 \
--ws.port 8546 \
--ws.api eth,net,web3,txpool \
--ws.origins "https://your-domain.com"
Let’s break down what this does:
First, --http.addr 127.0.0.1 binds Geth to the loopback interface only, meaning no external client can reach port 8545 directly even if the firewall had a gap.
Next, --http.api eth,net,web3,txpool limits which RPC modules are exposed. The admin module is not included because it exposes peer management and node internals.
The --http.corsdomain and --http.vhosts are locked to your specific domain instead of a wildcard "*". Wildcards allow any origin or virtual host to reach your node, which undermines access control.
Lastly, --ws flags add WebSocket support on port 8546, also bound to localhost only. WebSocket is required for eth_subscribe, the real-time subscription method used for new block notifications, pending transaction feeds, and log filters. Any dApp, bot, or indexer relying on event-driven data needs this.
After saving the file, reload systemd so it recognizes the changes:
sudo systemctl daemon-reload
sudo systemctl restart geth
sudo systemctl status geth
At this stage, although Geth can technically accept external connections, you must not expose port 8545 directly.
#Securing RPC With an NGINX Reverse Proxy
One thing to know is that exposing your 8545 port publicly invites abuse. We’ll install NGINX and require authentication before traffic reaches Geth.
Install required packages:
sudo apt update
sudo apt install nginx apache2-utils -y
The apache2-utils package provides the htpasswd utility, which creates username/password credentials for HTTP Basic Authentication.
Now we’ll create a password file, and then be prompted for a strong password. This file stores a hashed version of the password. Replace yourusername with your desired username.
sudo htpasswd -c /etc/nginx/.rpc-pass yourusername
sudo chmod 640 /etc/nginx/.rpc-pass
sudo chown root:www-data /etc/nginx/.rpc-pass

Running RPC over plain HTTP is acceptable internally, but not recommended publicly, so we’ll install Certbot:
sudo apt install certbot python3-certbot-nginx -y
Before running Certbot, go to your domain provider and add the following to your DNS records:
- Type: A
- Host/Name: @ (root domain)
- Value: Server’s public IP address
- TTL: 300–600 seconds (fast propagation)
- Optional: Add another A record for www and the same IP address.
Now you’ll wait for 5–30 minutes after adding the variables above, then test from your server.
dig A YOUR-DOMAIN-ADDRESS +short
This should return your server’s public IP address.
![]()
Allow the firewall to communicate over port 80:
sudo ufw allow 80/tcp
sudo ufw allow 443/tcp
sudo ufw reload
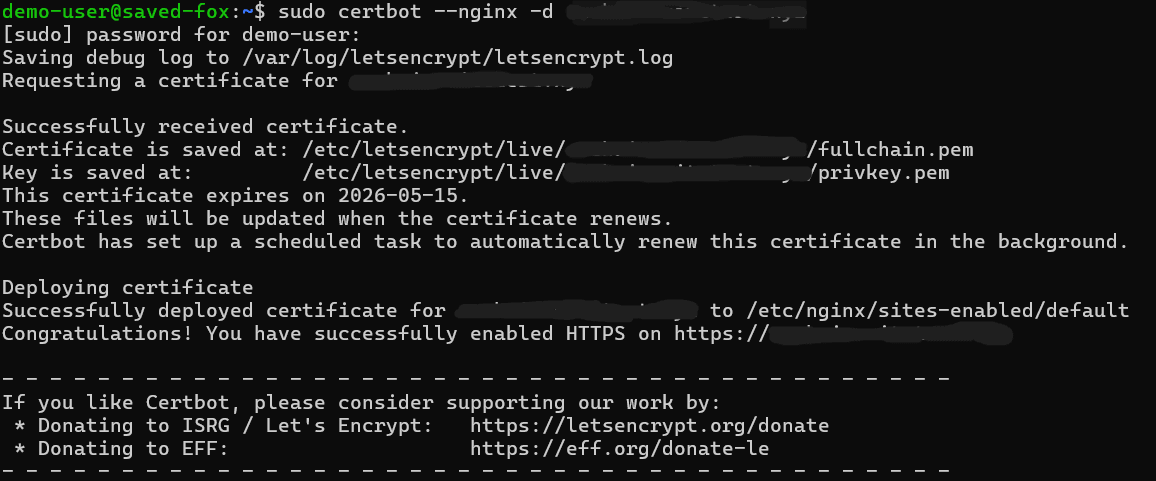
If it returns your server IP, request the certificate:
sudo certbot --nginx -d YOUR-DOMAIN-ADDRESS
Follow prompts:
- Enter email
- Agree to terms
- Choose redirect HTTP → HTTPS (recommended)
Certbot will:
- Obtain certificate
- Update NGINX config to use port 443 + SSL
- Create an auto-renewal timer
#Add Rate Limiting to nginx.conf
Open the main NGINX config and add the rate limit zone inside the http {} block:
sudo nano /etc/nginx/nginx.conf
Find the http block and add this line inside it:
limit_req_zone $binary_remote_addr zone=rpc_limit:20m rate=10r/s;
Replace the default NGINX configuration:
sudo nano /etc/nginx/sites-available/default
Configure it to proxy authenticated traffic to Geth, replace your server_namewith your registered domain address:
server {
    listen 80 default_server;
    listen [::]:80 default_server;
    server_name your-domain.com www.your-domain.com;
    return 301 https://$host$request_uri;
}


server {
    listen 443 ssl;
    listen [::]:443 ssl;
    server_name your-domain.com www.your-domain.com;
    ssl_certificate /etc/letsencrypt/live/your-domain.com/fullchain.pem;
    ssl_certificate_key /etc/letsencrypt/live/your-domain.com/privkey.pem;
    include /etc/letsencrypt/options-ssl-nginx.conf;
    ssl_dhparam /etc/letsencrypt/ssl-dhparams.pem;
    location / {
        limit_req zone=rpc_limit burst=10 nodelay;
        auth_basic "Ethereum RPC - Authorized Access Only";
        auth_basic_user_file /etc/nginx/.rpc-pass;
        proxy_pass http://127.0.0.1:8545/;
        proxy_http_version 1.1;
        proxy_set_header Host $host;
        proxy_set_header X-Real-IP $remote_addr;
        proxy_set_header X-Forwarded-For $proxy_add_x_forwarded_for;
        proxy_set_header X-Forwarded-Proto $scheme;
    }
    location /ws
    {
        limit_req zone=rpc_limit burst=10 nodelay;
        auth_basic "Ethereum RPC - Authorized Access Only";
        auth_basic_user_file /etc/nginx/.rpc-pass;
        proxy_pass http://127.0.0.1:8546/;
        proxy_http_version 1.1;
        proxy_set_header Upgrade $http_upgrade;
        proxy_set_header Connection "upgrade";
        proxy_set_header Host $host;
        proxy_set_header X-Real-IP $remote_addr;
        proxy_read_timeout 3600s;
        proxy_send_timeout 3600s;
    }
}
This configuration ensures that:
- All incoming traffic hits NGINX first
- Authentication is required
- Requests are forwarded internally to Geth
Port 8545 remains private
Test and restart NGINX:
sudo nginx -t
sudo systemctl restart nginx

Now your RPC is available at your domain.
#Testing Your RPC Endpoint
Before pointing any application at your node, verify that each part of the stack is working correctly. The tests below confirm that NGINX is proxying correctly, authentication is enforced, and Geth is responding with real chain data. Run all of these from a machine outside your server, not from localhost, so you're testing the full path through NGINX and TLS.
In each command, replace ‘yourusername’ and ‘yourpassword’ with the credentials you set earlier, and replace ‘your-domain.com’ with your actual domain.
#Confirm the Endpoint Rejects Unauthenticated Requests
The first thing to verify is that your endpoint is not open to anyone without credentials. Send a request without any authentication headers:
curl -s -o /dev/null -w "%{http_code}" \
  -X POST -H "Content-Type: application/json" \
  --data '{"jsonrpc":"2.0","method":"eth_blockNumber","params":[],"id":1}' \
  https://your-domain.com

You should receive a 401 response code. If you get anything other than 401, your authentication layer is not configured correctly and the endpoint should not be used until it is.
#Get the Current Block Number
This is the simplest end-to-end health check. It confirms that your credentials are accepted, NGINX is forwarding requests to Geth, and Geth is synced and responding.
curl -s \
  -u yourusername:yourpassword \
  -X POST -H "Content-Type: application/json" \
  --data '{"jsonrpc":"2.0","method":"eth_blockNumber","params":[],"id":1}' \
  https://your-domain.com

The response will look like this:
{"jsonrpc":"2.0","id":1,"result":"0x…."}
The result field is the current block number in hexadecimal. Convert it to decimal to cross-reference against a block explorer like Etherscan.
#Check an Account Balance
This call fetches the ETH balance of any address at the current block. It exercises the eth module and confirms that state queries are working.
curl -s \
  -u yourusername:yourpassword \
  -X POST -H "Content-Type: application/json" \
  --data '{
    "jsonrpc": "2.0",
    "method": "eth_getBalance",
    "params": ["0xde0B295669a9FD93d5F28D9Ec85E40f4cb697BAe", "latest"],
    "id": 1
  }' \
  https://your-domain.com
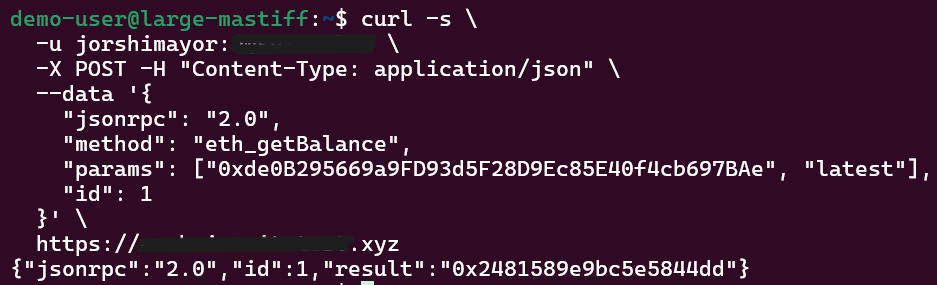
The response returns the balance in wei as a hexadecimal string as of this article’s writing:
{"jsonrpc":"2.0","id":1,"result":"0x……..."}
#Execute a Read-Only Contract Call
We’ll use eth_call to execute a function on a deployed contract without broadcasting a transaction. This tests that your node can resolve contract state, which is what the majority of dApp and wallet queries rely on. The example below calls totalSupply() on the USDC contract.
curl -s \
  -u yourusername:yourpassword \
  -X POST -H "Content-Type: application/json" \
  --data '{
    "jsonrpc": "2.0",
    "method": "eth_call",
    "params": [
      {
        "to": "0xA0b86991c6218b36c1d19D4a2e9Eb0cE3606eB48",
        "data": "0x18160ddd"
      },
      "latest"
    ],
    "id": 1
  }' \
  https://your-domain.com
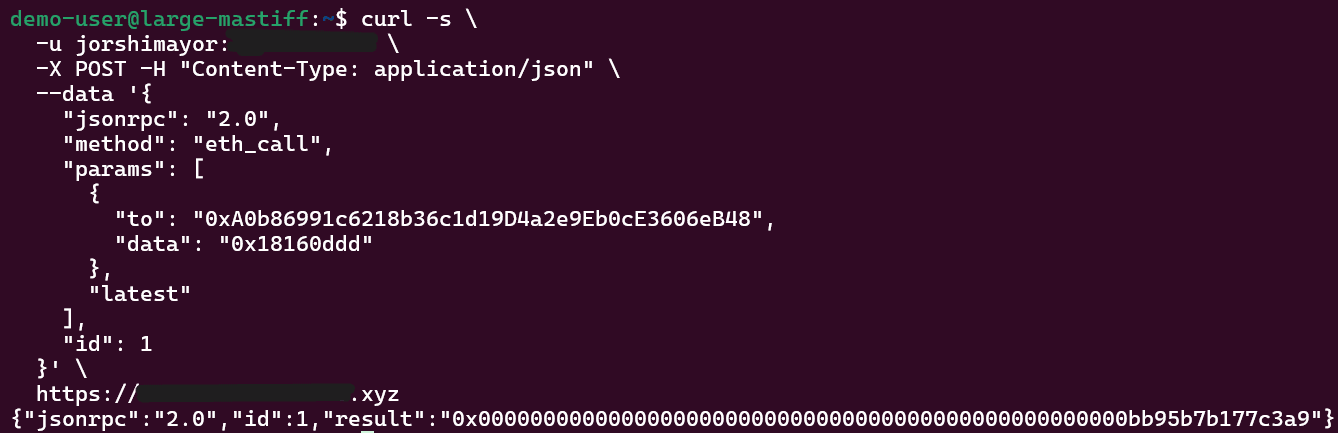
0x18160ddd is the 4-byte function selector for totalSupply(), derived from the keccak256 hash of the function signature. The response will be a 32-byte hex-encoded integer representing the total USDC supply:
{"jsonrpc":"2.0","id":1,"result":"0x…."}
If this returns a result, your node is resolving the contract state correctly.
At this point, your RPC layer is confirmed to be working end-to-end. Authentication is enforced, TLS is in place, and your node is serving real chain data for all three core query types.
#Conclusion
For serious builders operating high-demand applications, dedicated bare metal infrastructure often provides the most consistent and cost-effective solution. Platforms like Cherry Servers offer configurations tailored specifically for blockchain workloads, combining high-performance NVMe storage with predictable pricing models suited for sustained RPC traffic.