How to Install CUDA on Ubuntu 22.04 | Step-by-Step


CUDA (Compute Unified Device Architecture), a parallel computing platform, allows software developers to use a GPU for general-purpose processing. Performance gains, heterogeneous acceleration capabilities, and a vast ecosystem make CUDA very appealing for developers targeting the acceleration of workloads.
In the past, CUDA was only accessible through languages such as C and C++ but it's now available through languages such as Rust. Rust offers efficient concurrency that is crucial for high-performing computing processes. Combining Rust programming and NVIDIA GPUs produces robust and parallel computing efficiency.
This tutorial will first briefly explain what CUDA is, after which we will show you how to install CUDA on Ubuntu 22.04, including how to install the NVIDIA drivers so that you can unlock your NVIDIA GPUs capabilities for compute-intensive applications.
#What is CUDA?
CUDA (Compute Unified Device Architecture) is a parallel computing platform developed by NVIDIA. It provides an application programming interface (API) that enables developers to harness the immense processing power of NVIDIA graphics processing units (GPUs) for general-purpose computing.
CUDA cores are specialized processing units within the GPU optimized for parallel computing tasks. They are capable of executing multiple threads concurrently.
#What is CUDA used for?
With its parallel computing feature and the ever-growing power of GPUs, CUDA can be used for machine learning and AI applications, scientific simulations involving complex calculations, financial modeling, cybersecurity, cryptocurrency mining, and other computationally intensive tasks.
-
Fast Rust CUDA: Rust CUDA is an integration of Rust programming language with NVIDIA’s CUDA. This integration brings together Rust's safety, concurrency model, and performance with CUDA's ability to execute thousands of threads in parallel on NVIDIA GPUs.
-
Scientific simulations and computational modeling: Researchers use CUDA to speed up simulations in physics, chemistry, biology, and astronomy. This enables complex modeling tasks such as fluid dynamics, molecular dynamics, and astrophysical computations.
-
Real-time video processing and graphics rendering: CUDA provides real-time performance for video editing, visual effects, and rendering tasks. Applications include 3D modeling software, virtual reality experiences, and live broadcast streaming enhancements.
In this tutorial, we will cover how to install CUDA on Ubuntu 22.04 and install the NVIDIA drivers.
#Prerequisites
To follow along with this tutorial, you will need the following:
- The latest Ubuntu installed
- Before starting this tutorial, make sure that your GPU supports CUDA. In addition, you need sufficient RAM(at least 8GB) and a multi-core CPU that can process alongside the GPU.
- A CUDA-compatible NVIDIA card
#How to Install CUDA on Ubuntu 22.04: Step-by-step
After completing the following steps, you can compile and execute CUDA applications, taking advantage of the parallel processing power of your NVIDIA GPU. We will first install the NVIDIA driver and then proceed to install the CUDA toolkit.
#Step 1: Upgrade your Ubuntu
We will start by upgrading our Ubuntu to ensure we have all the latest software. Use the following command to upgrade your system:
sudo apt update
sudo apt upgrade

#Step 2: List the recommended NVIDIA drivers
We will now isntall ubuntu-drivers-common and use the ubuntu-drivers command to get the list of recommended NVIDIA drivers available for your system:
sudo apt install ubuntu-drivers-common
sudo ubuntu-drivers devices

We can see that the ubuntu-drivers command lists the model of our computer as well as the NVIDIA GPU installed.
model : GP108M [GeForce MX150] (Mi Notebook Pro [GeForce MX150])
It also recommends the NVIDIA driver 535
driver : nvidia-driver-535 - distro non-free recommended
#Step 3: Install the driver nvidia-driver-535
Let's install the driver using the following command:
sudo apt install nvidia-driver-535

In this case, the NVIDIA driver was already installed by default on Ubuntu.
Also read: How to Add a User to Sudoers in Ubuntu
#Step 4: Reboot your system
We will now reboot the system to ensure everything has been installed and loaded correctly.
sudo reboot now
![]()
#Step 5: Check the driver installation
Now that we have rebooted our system, we will check our installation with the NVIDIA System Management Interface, which is called with the nvidia-smi command.
nvidia-smi

At the top of the table, we will see the driver version and CUDA driver API compatibility:
NVIDIA-SMI 535.86.05 Driver Version: 535.86.05 CUDA Version: 12.2
Please note that CUDA is not yet installed at this stage.
Also read: How to Check CUDA Version on Linux
#Step 6: Install GCC
We will need to install the gcc compiler as it will be used when installing the CUDA toolkit. Make sure that you have gcc installed with the following command:
sudo apt install gcc

You can verify if gcc has been installed using the following command:
gcc -v
This should return the version of gcc that has been installed.
#Step 7: Install CUDA toolkit Ubuntu
We will now head to the NVIDIA CUDA download website to get the latest CUDA toolkit for Ubuntu. The website will navigate you through the right package to download as well as the commands to execute to complete the CUDA toolkit installation.
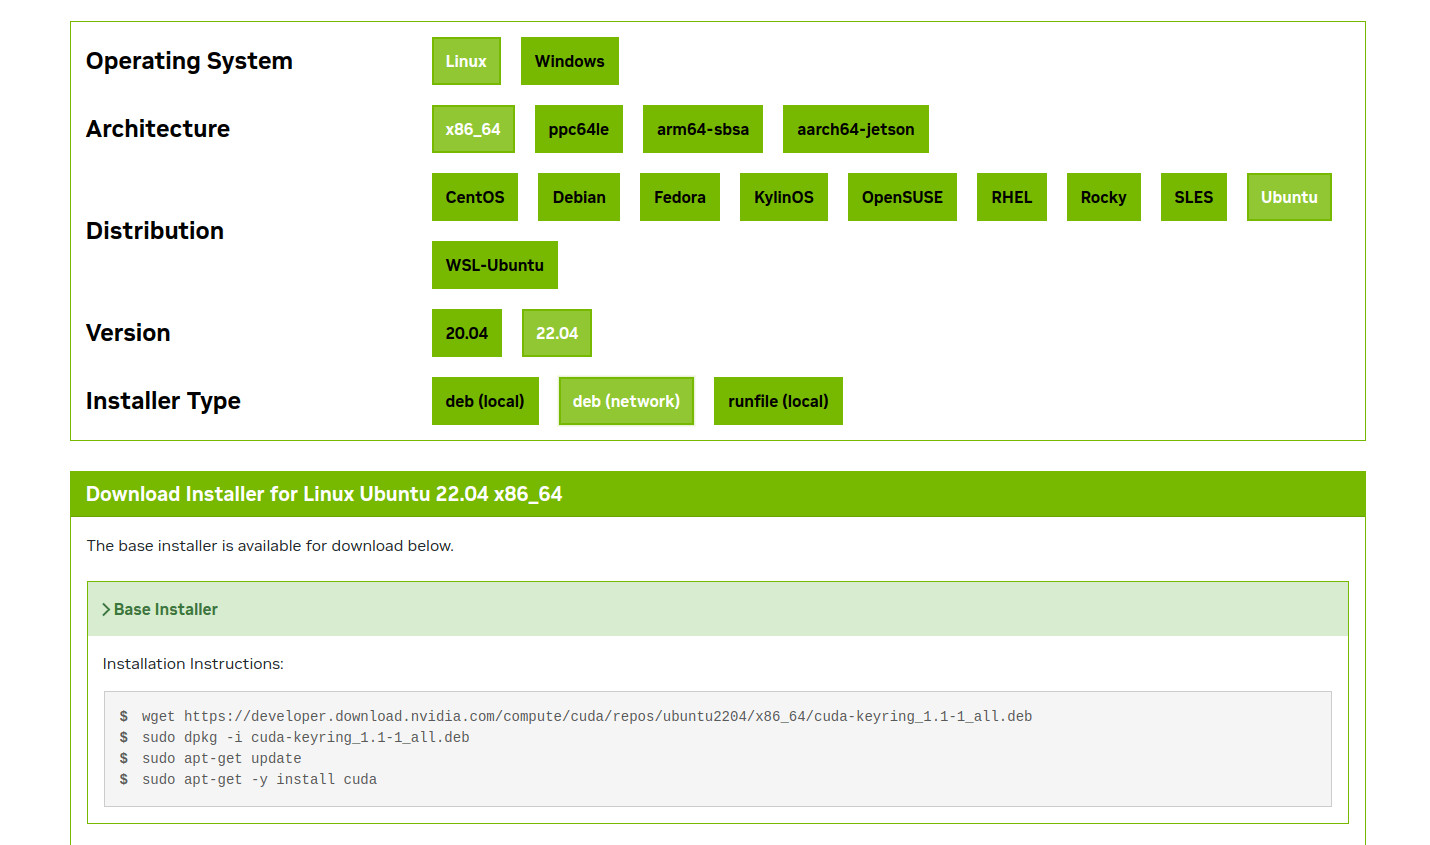
The website provides the following procedure:
wget https://developer.download.nvidia.com/compute/cuda/repos/ubuntu2204/x86_64/cuda-keyring_1.1-1_all.deb
sudo dpkg -i cuda-keyring_1.1-1_all.deb
sudo apt-get update
sudo apt-get -y install cuda
Please proceed by executing each of the commands to complete the installation.
If you encounter dependency errors during the installation, try running sudo apt --fix-broken install to fix them. Apt will suggest running it if needed.
#Step 8: Reboot your system
Now that the CUDA toolkit has been installed, we will reboot the system to load the right modules required by CUDA.
sudo reboot now
Also read: How to install go file on Ubuntu 22.04
#Step 9: Environment setup
The CUDA toolkit is now installed, and a few manual actions must be executed to complete the setup. We will now proceed to update the environment variables as recommended by the NVIDIA documentation.
Add the following line to your .bashrc file using nano ~/.bashrc and paste the following lines at the end of the file.
export PATH=/usr/local/cuda/bin${PATH:+:${PATH}}
export LD_LIBRARY_PATH=/usr/local/cuda-12.2/lib64\
                         ${LD_LIBRARY_PATH:+:${LD_LIBRARY_PATH}}
Save the file using Ctrl+x and y.
We will now reload the file:
. ~/.bashrc
#Step 10: Test the CUDA toolkit
Now that the environment has been set, we can test the CUDA toolkit, and we can execute nvcc, the CUDA compiler.
nvcc -V

This returns the nvcc version and confirms that the CUDA toolkit has been installed.
Also read: How to Install Chrome on Ubuntu 24.04
#Conclusion
In this tutorial, we have learned how to install CUDA on Ubuntu, the latest NVIDIA drivers, the CUDA toolkit, and how NVIDIA has brought general-purpose and parallel computing to GPUs. You can now use your CUDA setup to work with scientific simulations or get the most out of your deep learning applications. Find more information on CUDA on the NVIDIA CUDA zone website.
Once you have CUDA successfully installed on your Ubuntu system, you can unlock its full performance in a hassle-free cloud environment with Cherry Servers cost-effective dedicated GPU servers. Choose your GPU accelerator, configure it with your server, and deploy in 2 to 24 hours.


