How to Install Postman on Ubuntu 24.04 | Step-by-Step


Postman is one of the most widely used API development platforms, with over 40 million developers relying on it to build, test, and document APIs. Ubuntu 24.04 LTS is the current long-term support release, and setting up Postman on it takes just a few minutes.
This tutorial walks you through three methods to install Postman on Ubuntu 24.04: Snap, Flatpak, and the official tarball. You will also learn how to verify the installation, update Postman, and uninstall it. A comparison table and troubleshooting section at the end will help you pick the right method and fix common issues.
#Prerequisites
- A computer with Ubuntu 24.04 installed and running.
- A user account on your computer with privileges to install applications.
- A stable internet connection to download and test the Postman application.
opensslinstalled on your system. Ubuntu 24.04 includes it by default, but you can confirm withopenssl version.- Read/write permission for the
~/.configdirectory, where Postman stores its data.
#What is Postman?
Postman is a popular choice among API developers, API testers, and API consumers. You can use Postman for API development, testing, and documentation purposes, as it offers a simple and user-friendly interface for working with APIs.
Postman is available for all the main operating systems, such as Windows, Linux, and MacOS. Moreover, there is a web version if you want to avoid installing it on your computer. You can use the free version of Postman for most of your tasks. Furthermore, there is a Pro version that offers advanced testing features and team collaboration capabilities.
#What is Postman used for?
Postman offers a straightforward interface for developers to design, build, and modify APIs. Below are five use cases for Postman:
1. API testing: This is the most fundamental Postman use case. Developers and testers use Postman to manually send various HTTP requests (GET, POST, PUT, and DELETE) to API endpoints. They can easily configure request headers, body payloads in JSON or form-data, and query parameters. This allows them to inspect the responses, such as status codes and headers to verify if the API behaves as expected under different conditions.
2. Automated API testing: Postman allows users to write test scripts using JavaScript within their requests. These scripts can assert conditions on the response, such as:
- Checking the status code
- Validating JSON schema
- Verifying specific values in the response body
Collections of requests with tests can be run automatically using the Collection Runner or integrated into CI/CD pipelines.
3. API development & debugging: During the development phase, backend developers use Postman to test their API endpoints iteratively as they build them. Postman provides a quick way to send requests to local or development servers, inspect detailed responses, and check error messages. Features like environment variables allow easy switching between different development stages, such as local, dev, and staging.
4. API documentation generation: Postman Collections can be enriched with descriptions, examples of requests and responses, and detailed explanations for each endpoint. Postman can then automatically generate interactive, web-based API documentation from these collections. This documentation can be shared with frontend developers, making it easier for them to understand and integrate with the API.
5. API monitoring: Postman allows users to set up monitors that automatically run specific API test collections at scheduled intervals against deployed environments. This helps teams proactively check the health, performance, and correctness of their APIs in real-time. If any tests within the monitored collection fail, Postman can trigger alerts through email or Slack. This enables rapid response to production issues.
Postman can also be integrated with popular development tools like Git, Newman, and Jenkins. Other than that, Postman supports many other extensions and integrations to enhance its customization capabilities and functionalities.
#Installing Postman on Ubuntu 22.04: three methods
There are three practical methods to install Postman on Ubuntu 24.04. Each method has trade-offs in terms of auto-update support, sandboxing, and disk usage. The sections below walk through all three options so you can pick the one that fits your workflow.
Before using any method, update your package index to ensure dependencies are up to date using:
sudo apt update
#Method 1: Install Postman using Snap
Snap is a package manager developed by the parent company of Ubuntu. It allows users to install, update, and manage software packages. You don’t have to install Snap, as it’s pre-installed on Ubuntu.
Run the following command to install Postman with Snap.
sudo snap install postman
Output2026-02-24T04:36:55+02:00 INFO Waiting for automatic snapd restart...
postman (v11/stable) 11.71.7 from Postman, Inc. (postman-inc✓) installed
You should first run the sudo apt install snapd command if somehow your operating system does not have the Snap package manager.
Snap handles automatic updates in the background, so you will always run the latest version without manual intervention. However, Snap packages use more disk space because they bundle all dependencies inside the package.
Note: Do not launch Postman with sudo. Running Postman as root causes file permission issues in the ~/.config directory and may prevent the application from saving settings or collections.
#Method 2: Install Postman using Flathub
Flathub is a software repository for Flatpak applications. Like the Snap package manager, Flatpak lets developers package applications and dependencies into bundles. To install Postman, you need to run the following command.
sudo apt install flatpak
To confirm if Flatpak is installed run the command:
flatpak --version
Then you should add the Flathub repository (Flathub) by entering the below command.
flatpak remote-add --if-not-exists flathub https://flathub.org/repo/flathub.flatpakrepo
Next, install Postman using the below command.
flatpak install flathub com.getpostman.Postman
OutputLooking for matches...
Required runtime for com.getpostman.Postman/aarch64/stable (runtime/org.freedesktop.Platform/aarch64/24.08) found in remote flathub
Do you want to install it? [Y/n]: y

com.getpostman.Postman permissions:
ipc network pulseaudio x11 dri file access [1] dbus access [2] tags [3]

[1] home
[2] com.canonical.AppMenu.Registrar
[3] proprietary


ID Branch Op Remote Download
1. [✓] org.freedesktop.Platform.GL.default 24.08 i flathub 138.9 MB / 139.5 MB
2. [✓] org.freedesktop.Platform.GL.default 24.08extra i flathub 17.4 MB / 139.5 MB
3. [✓] org.freedesktop.Platform.Locale 24.08 i flathub 18.7 kB / 388.3 MB
4. [✓] org.freedesktop.Platform.openh264 2.5.1 i flathub 864.0 kB / 930.4 kB
5. [✓] org.gtk.Gtk3theme.Yaru 3.22 i flathub 139.1 kB / 191.4 kB
6. [✓] org.freedesktop.Platform 24.08 i flathub 205.1 MB / 261.6 MB
7. [✓] com.getpostman.Postman stable i flathub 148.7 MB / 149.3 MB

Installation complete.
Once the installation is complete, you can start Postman by executing the flatpak run com.getpostman.Postman command.
Otherwise, you can always find Postman by searching for it on the Ubuntu application launcher.
Flatpak also sandboxes applications, similar to Snap. One difference is that Flatpak shares runtime libraries across applications, which can save disk space if you use multiple Flatpak apps. Updates require a manual command (covered in the update section below), unlike Snap's automatic approach.
#Method 3: Install Postman using the official tarball
The official tarball from Postman's website gives you the most control over the installation. It does not rely on Snap or Flatpak, uses less disk space, and lets you manage versions manually. Many developers prefer this approach on servers or minimal Ubuntu setups where Snap is not available.
Step 1: Download the latest Postman tarball for 64-bit Linux.
wget https://dl.pstmn.io/download/latest/linux64 -O postman-linux-x64.tar.gz
--2026-02-24 03:12:29-- https://dl.pstmn.io/download/latest/linux64
Resolving dl.pstmn.io (dl.pstmn.io)... 52.84.143.122, 52.84.143.85, 52.84.143.107, ...
Connecting to dl.pstmn.io (dl.pstmn.io)|52.84.143.122|:443... connected.
HTTP request sent, awaiting response... 200 OK
Length: 142494015 (136M)
Saving to: 'postman-linux-x64.tar.gz'

postman-linux-x64.tar.gz 100%[=================================================================================================>] 135.89M 1.77MB/s in 58s

2026-02-24 03:13:28 (2.34 MB/s) - 'postman-linux-x64.tar.gz' saved [142494015/142494015]
Step 2: Extract the archive to /opt so it is available system-wide.
sudo tar -xzf postman-linux-x64.tar.gz -C /opt/
Step 3: Create a symbolic link so you can launch Postman from any terminal session.
sudo ln -sf /opt/Postman/Postman /usr/local/bin/postman
Step 4: Create a desktop entry so Postman appears in your application launcher.
cat << 'EOF' | sudo tee /usr/share/applications/postman.desktop
[Desktop Entry]
Name=Postman
Exec=/opt/Postman/Postman
Icon=/opt/Postman/app/resources/app/assets/icon.png
Type=Application
Categories=Development;
Terminal=false
EOF
Step 5: Launch Postman from the terminal or find it in your application menu.
postman
The tarball method does not provide automatic updates. You will need to repeat steps 1 and 2 with the new archive whenever a new version is released. The update section below covers this process in detail.
#How to verify your Postman installation
After completing any of the three methods above, confirm that Postman is working correctly.
Check the installed version from the terminal:
For Snap:
snap list postman
For Flatpak:
flatpak info com.getpostman.Postman
For the tarball:
postman --version
Launch the application and confirm the Postman GUI loads without errors. You should see the main workspace with the request builder, sidebar, and response viewer.
If Postman does not launch, check the troubleshooting section at the end of this article for solutions to common issues.
#General Postman working environment guidelines for beginners
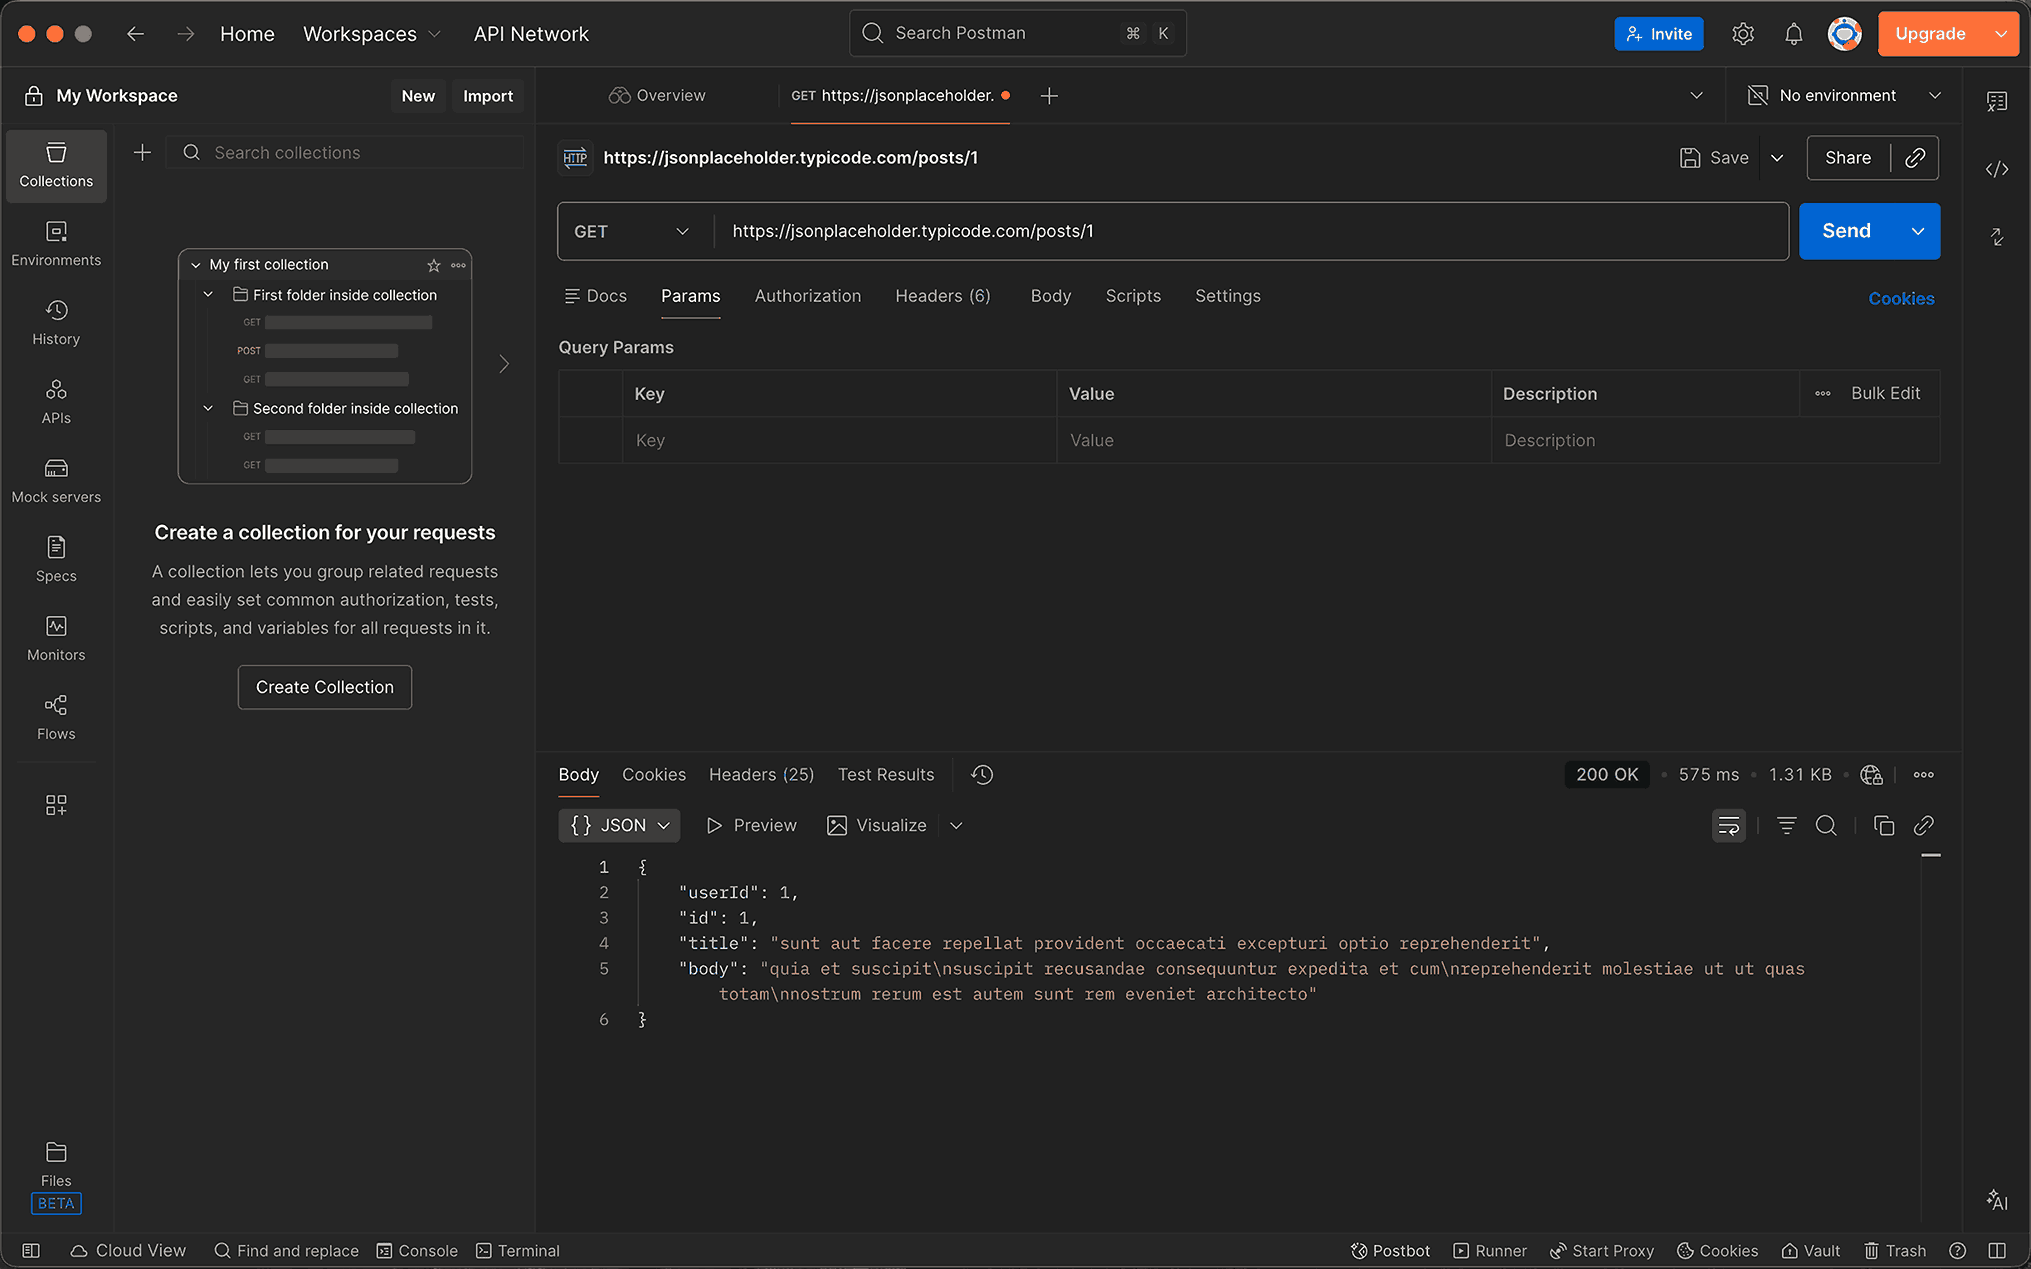
Launch Postman after installation. The main workspace window gives you access to Collections (for grouping requests into folders), Environments (for managing variables like API keys), a request builder in the center panel, and tools like Console, Runner, and Postbot along the bottom bar.

Create a simple GET request to a public API by entering the URL in the request builder, selecting the GET method, and clicking the “Send” button to send a request.
See the response in the response viewer as shown below.
Following the same steps, you can try other HTTP methods such as PUT, POST, and DELETE.
Other features include
- Creating collections and folders inside collections to categorize your requests in different ways.
- Setting query parameters and URL-encoded parameters.
- Creating simple tests and automating the API response validation process.
- You can experiment by generating documentation for your requests and trying to customize them.
- Sharing your collections or importing collections shared by others.
#How to update Postman on Ubuntu
Each installation method handles updates differently. Here is how to update Postman depending on the method you used.
#Update Postman installed via Snap
Snap updates packages automatically in the background. To trigger a manual update, run:
sudo snap refresh postman
#Update Postman installed via Flatpak
Flatpak does not auto-update by default. Run the following command to pull the latest version:
flatpak update com.getpostman.Postman
#Update Postman installed via tarball
The tarball method requires a manual download of the new version. Download the latest archive, remove the old installation, and extract the new one:
wget https://dl.pstmn.io/download/latest/linux64 -O postman-linux-x64.tar.gz
sudo rm -rf /opt/Postman
sudo tar -xzf postman-linux-x64.tar.gz -C /opt/
The symbolic link and desktop entry from the original installation remain valid, so you do not need to recreate them.
#How to uninstall Postman from Ubuntu: two methods
Now we will see how to uninstall Postman from our Ubuntu operating system. The uninstallation steps depend on which method you used to install Postman.
#Method 1: Snap uninstallation
If you used the Snap package manager for installing Postman, you can uninstall Postman using the below command.
sudo snap remove postman
#Method 2: Flathub uninstallation
If you used the Flathub package manager for installing Postman, you can use the below command to uninstall Postman.
flatpak uninstall flathub com.getpostman.Postman
#Method 3: Tarball uninstallation
If you installed Postman using the tarball method, remove the application directory, the symbolic link, and the desktop entry:
sudo rm -rf /opt/Postman
sudo rm /usr/local/bin/postman
sudo rm /usr/share/applications/postman.desktop
#Which installation method should you choose?
The table below compares all three methods to help you decide:
| Feature | Snap | Flatpak | Tarball |
|---|---|---|---|
| Pre-installed on Ubuntu 24.04 | Yes | No | No |
| Auto-updates | Yes | No | No |
| Sandboxed environment | Yes | Yes | No |
| Disk usage | Higher (~500 MB+) | Moderate | Lowest (~350 MB) |
| Setup complexity | One command | Three commands | Five steps |
| Desktop integration | Automatic | Automatic | Manual (desktop entry) |
| Version control | Snap channel | Flathub repo | Full manual control |
| Best for | Most users | Multi-Flatpak setups | Minimal systems, advanced users |
Snap works best for most Ubuntu users because it requires a single command and handles updates automatically. Flatpak is a solid alternative if you already use Flatpak for other applications and want to share runtime libraries. The tarball method suits developers who want full control over versions, run Ubuntu on a server, or prefer to avoid sandboxed packaging systems.
#Troubleshooting common Postman installation issues
#Postman fails to launch after Snap installation
Snap's sandboxing can block access to certain directories. Connect the required interfaces:
sudo snap connect postman:desktop
sudo snap connect postman:home
If the issue persists, check AppArmor logs for denied operations:
sudo journalctl -xe | grep postman
#Flatpak runtime errors
Flatpak requires a compatible runtime. If you see errors about missing runtimes, update your Flatpak installation and runtimes:
flatpak update
You may also need to restart your session after adding the Flathub repository for the first time. Log out and log back in, then try launching Postman again.
#Missing libraries with tarball installation
The tarball does not bundle all system libraries. On a fresh Ubuntu 24.04 installation, you may need to install missing dependencies:
sudo apt install libgconf-2-4 libnotify4 libsecret-1-0 libxss1
#Blank screen or GPU rendering issues
Postman uses Electron, which relies on GPU acceleration by default. If you see a blank or white screen (common with outdated NVIDIA drivers), disable GPU acceleration:
postman --disable-gpu
On Wayland sessions, you can also try forcing X11:
GDK_BACKEND=x11 postman
#Permission errors on launch
Running Postman with sudo creates root-owned files in your ~/.config directory. Fix ownership with:
sudo chown -R $USER:$USER ~/.config/Postman
Then launch Postman again without sudo.
#Conclusion
You now have three methods to install Postman on Ubuntu 24.04: Snap for a one-command setup with automatic updates, Flatpak for sandboxed cross-distribution support, and the official tarball for full manual control. Each approach works reliably on Ubuntu 24.04 LTS.
After installation, verify the setup by checking the version from the terminal and launching the GUI. Keep Postman up to date using the method that matches your installation.
FAQs
Is Postman free on Ubuntu?
Yes. Postman offers a free plan that covers individual API development, testing, and basic collaboration. The free tier includes up to 25 collection runs per month and access to most core features. Paid plans (Basic, Professional, Enterprise) add higher usage limits, team workspaces, advanced monitoring, and role-based access controls.
Can I run Postman from the terminal without a GUI?
Yes. Postman provides Newman, a command-line companion tool built on Node.js. Newman lets you run Postman collections directly from the terminal, which is useful for CI/CD pipelines and headless server environments.
What is the difference between Postman and cURL?
cURL is a command-line tool for transferring data using URLs. It handles single HTTP requests and outputs raw responses. Postman provides a graphical interface, environment variables, test scripting, collection management, and team collaboration features. Developers often use cURL for quick one-off requests and Postman for structured API workflows that involve multiple endpoints, automated tests, and documentation.
Does Postman work on Ubuntu 24.04?
Yes. Postman fully supports Ubuntu 24.04 LTS. All three installation methods (Snap, Flatpak, and tarball) work on this release. Postman recommends Snap as the primary installation method on Ubuntu because it bundles all required libraries.
How much disk space does Postman need?
Postman requires approximately 350–500 MB of disk space, depending on the installation method. Snap and Flatpak packages are larger because they include bundled dependencies. The tarball installation uses the least space since it relies on system libraries.
Can I use Postman on a headless Ubuntu server?
The Postman desktop application requires a GUI. For headless environments, use Newman to run collections from the command line. Newman provides the same collection execution capabilities without needing a graphical desktop. You can also use the Postman API to manage collections and environments programmatically.


