How to Set up a Chainlink Node: Deploying Operator Contracts


So you’ve followed the setup steps, configured your Chainlink node, and you can access the Operator UI from your browser which is a great start. But running the node is only half of the journey.
To actually use your Chainlink node to respond to data requests from smart contracts, you need to go a step further, connect it to the blockchain using an Operator contract, create jobs, and test those jobs using a consumer smart contract.
This guide picks up where the first one left off — we show how to set up a Chainlink node, specifically, how to deploy operator contracts and create jobs, getting a testnet node up and running. If you haven’t yet set up your node, check out Part 1 of this tutorial before continuing.
In this continuation, we’ll cover:
-
Deploying an Operator contract on the blockchain
-
Creating and registering a basic job in your Chainlink node
-
Testing your node with a simple consumer smart contract
This article is intended for developers, builders, or curious engineers looking to make their node actually fulfill requests — using publicly available tools, testnet tokens, and real-world data APIs.
🔗 References:
#How to Set up a Chainlink Node: Operator Contracts
#Step 1: Deploying the Operator Contract
Before your Chainlink node can fulfil any requests, it needs to be linked to the blockchain through a smart contract known as the Operator contract. This contract acts as a bridge between your Chainlink node and any smart contracts that want to request data from it.
Think of it this way: your Chainlink node lives off-chain, but smart contracts need a way to talk to it on-chain. The Operator contract is that point of contact.
#What Is the Operator Contract?
The Operator contract:
-
Accepts data requests from other smart contracts
-
Forwards those requests to your Chainlink node
-
Lets your node respond with the requested result
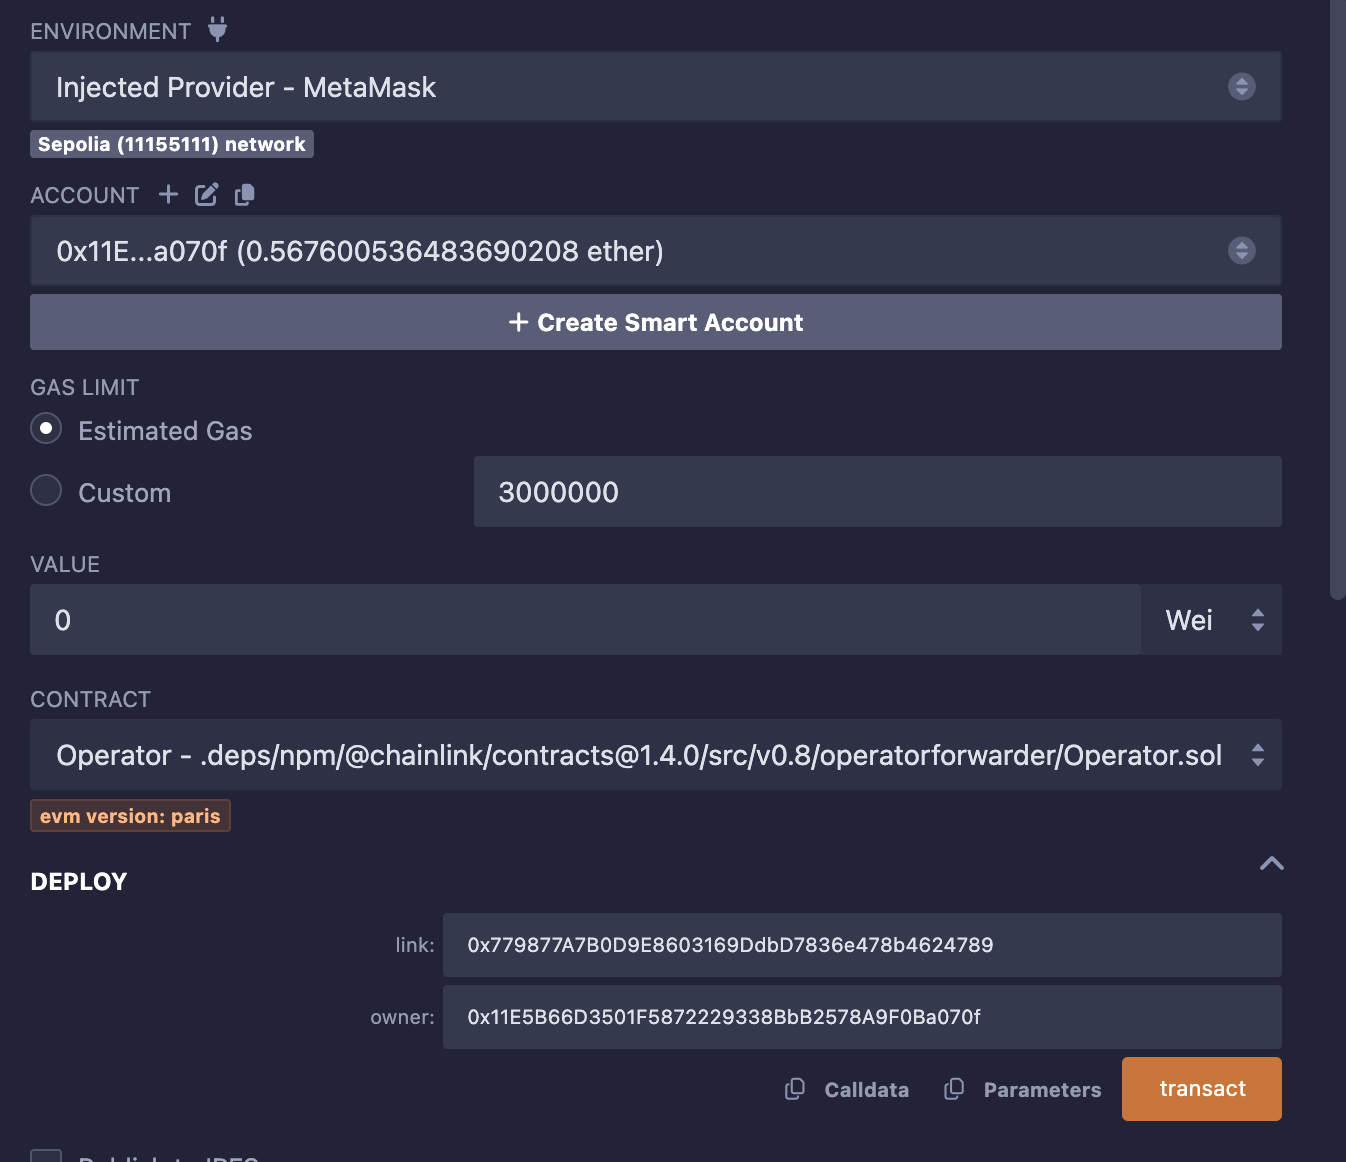
Use Remix to Deploy
Chainlink provides a pre-loaded link to the contract on Remix, so you don't need to paste anything manually. Just open this link:
Once Remix loads:
-
Make sure you’re connected to the right network (Sepolia) in MetaMask.
-
Select the
Operatorcontract in the "Deploy & Run" tab.
Get the LINK Token Address
The Operator contract requires the LINK token contract address for your target network. You can find the correct address for each supported network here:
👉 LINK Token Contract Addresses
For this article, we are using the sepolia network with the LINK token address below:
0x779877A7B0D9E8603169DdbD7836e478b4624789
#Setting the Owner Address
When deploying the Operator contract, the owner parameter should be the same Ethereum account you’re using in MetaMask, since MetaMask will be the account that deploys the contract. This account becomes the administrative owner of the Operator contract which is responsible for managing permissions, including whitelisting the Chainlink node.
Deployment Steps in Remix
-
In Remix's Deploy & Run pane, ensure:
-
Environment is set to Injected Provider – MetaMask
-
MetaMask is unlocked and connected to your testnet (Sepolia)
-
-
Select Operator from the contract dropdown.
-
For constructor inputs, provide:
-
LINK: e.g., Sepolia LINK token address:
0x779877A7B0D9E8603169DdbD7836e478b4624789 -
OWNER: your MetaMask address (the account logged into Remix and deploying the contract)
-
-
Click Deploy, then confirm the transaction in MetaMask.
Why This Matters
Deploying via your MetaMask account ensures that you, as the owner, have full permissions to manage the Operator contract—such as authorizing your Chainlink node and withdrawing LINK.
After deployment, be sure to note down the contract address—it will be required when creating jobs and configuring your consumer contracts.
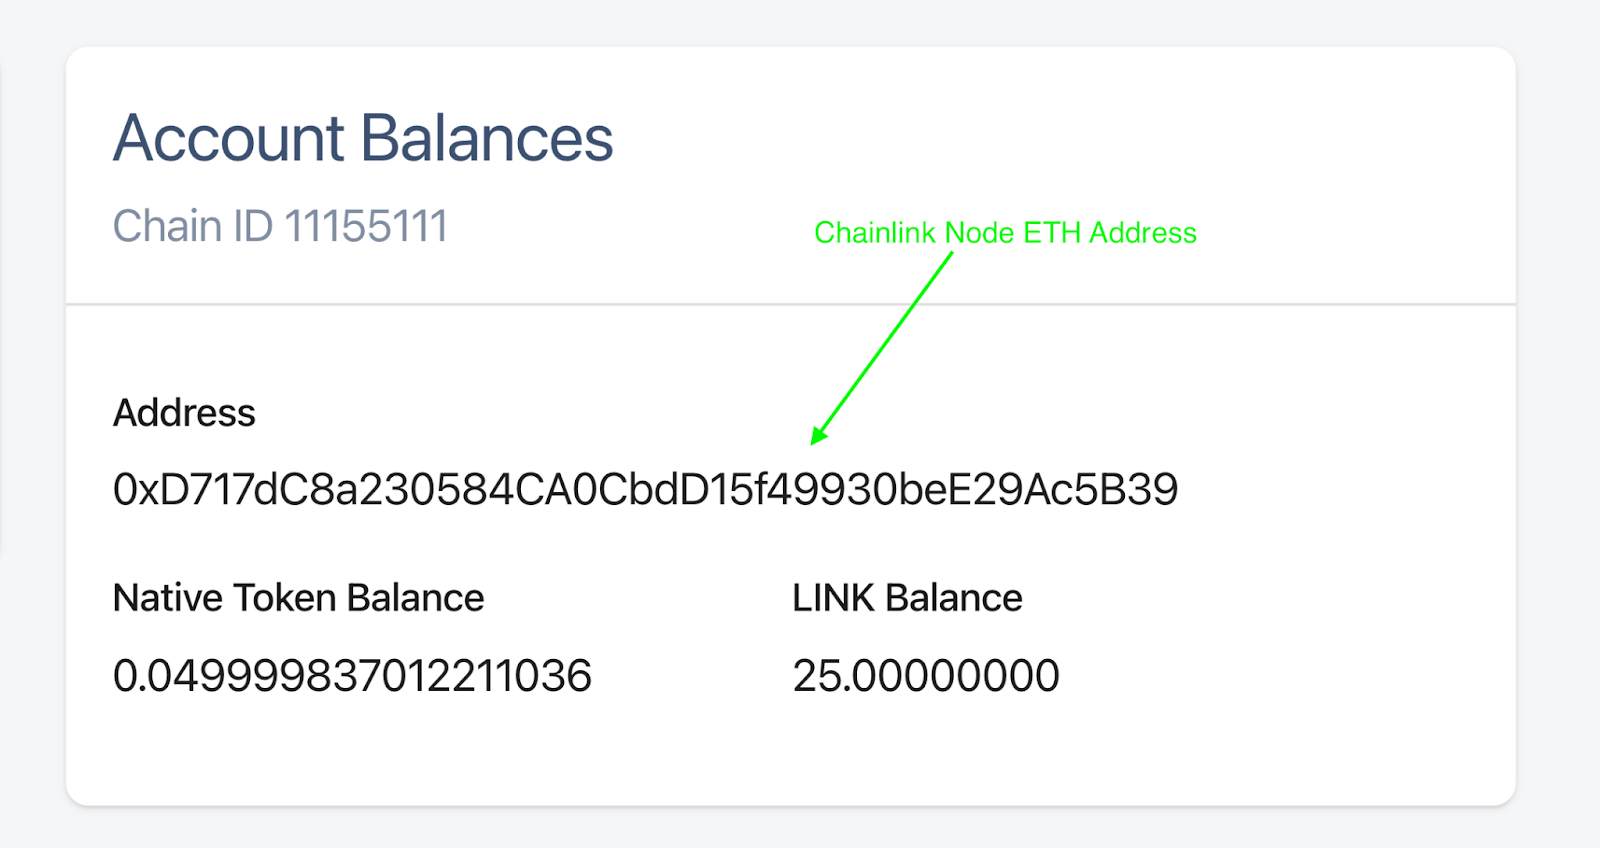
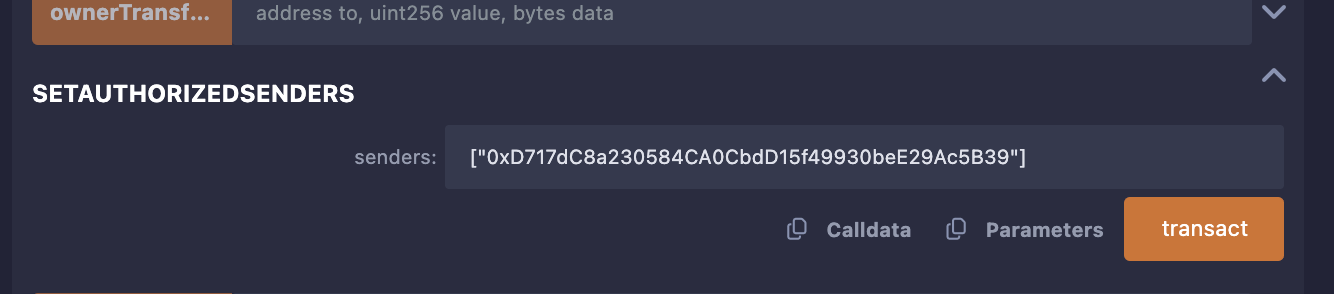
#Authorizing Your Node
After deploying your Operator contract, the next key step is to authorize your Chainlink node so it’s allowed to fulfill requests. This is done by calling the setAuthorizedSenders function on the Operator contract.
According to Chainlink's official docs, this step is essential, the Operator contract maintains a list of "senders" and only these addresses can trigger data fulfillment. (docs.chain.link)
#How to Authorize
-
Open Remix, connect to your network via MetaMask.
-
Select your deployed Operator contract instance under the Deployed Contracts section.
-
Expand the
setAuthorizedSendersfunction. -
Enter your Chainlink node’s ETH address in the array format — for example:
["0xYourChainlinkNodeAddress"] -
Click transact, and confirm the transaction in MetaMask.
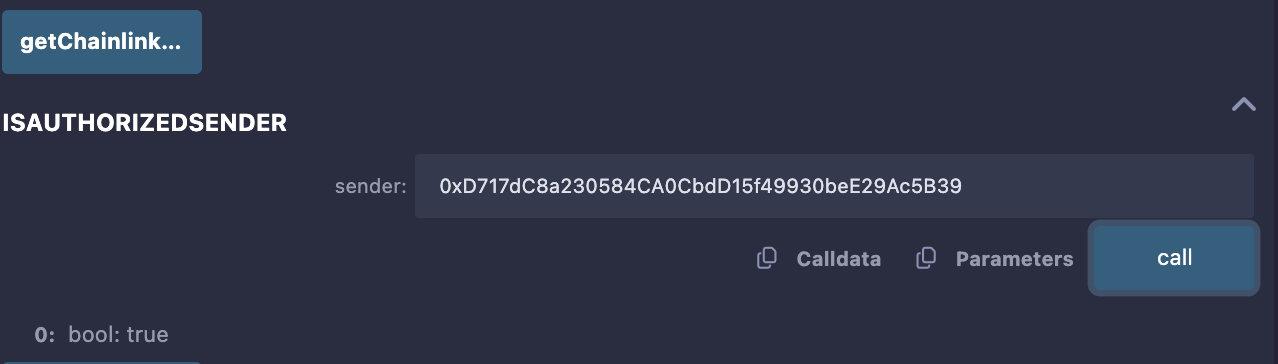
-
Verify by calling
isAuthorizedSender(<your-node-address>). It should returntrue. (docs.chain.link)
#Step 2: Add a Job to Your Node
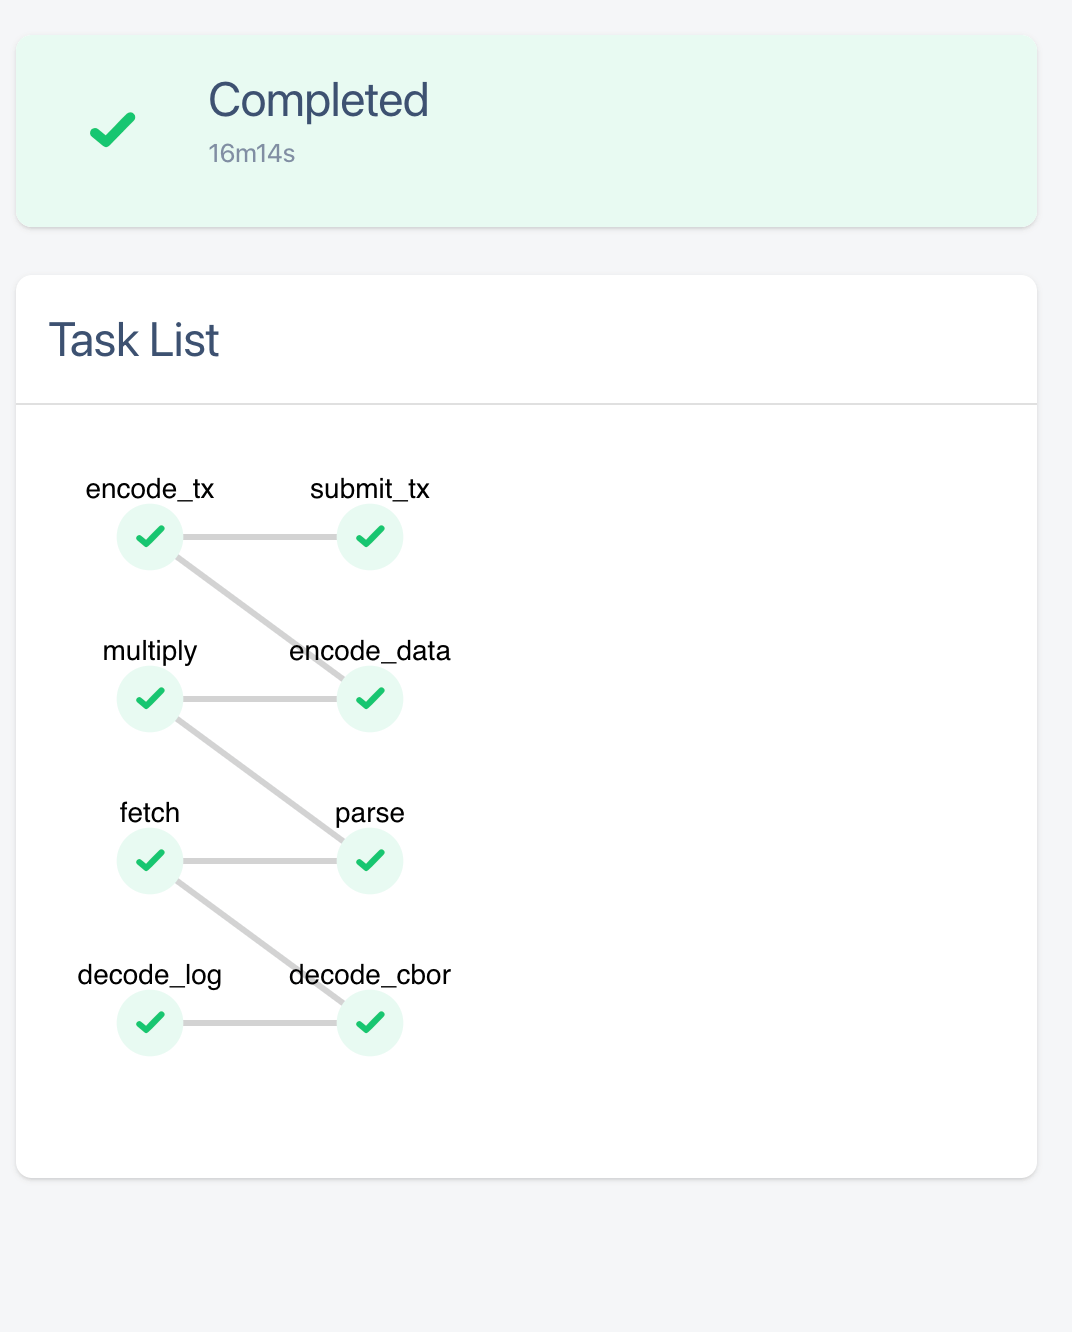
Chainlink nodes need jobs defined in TOML format to fulfill external requests using APIs and return data on-chain.
- In the Operator UI (e.g.
http://<your-node-IP>:6688), go to the Jobs tab and click New Job.

- Paste the following example specification into the textfield (tailored for Sepolia):
# THIS IS EXAMPLE CODE THAT USES HARDCODED VALUES FOR CLARITY.
# THIS IS EXAMPLE CODE THAT USES UN-AUDITED CODE.
# DO NOT USE THIS CODE IN PRODUCTION.

name = "Get > Uint256 - (TOML)"
schemaVersion = 1
type = "directrequest"
# evmChainID for Sepolia Testnet
evmChainID = "11155111"
# Optional External Job ID: Automatically generated if unspecified
# externalJobID = "b1d42cd5-4a3a-4200-b1f7-25a68e48aad8"
contractAddress = "YOUR_OPERATOR_CONTRACT_ADDRESS"
maxTaskDuration = "0s"
minIncomingConfirmations = 0
observationSource = """
    decode_log   [type="ethabidecodelog"
                  abi="OracleRequest(bytes32 indexed specId, address requester, bytes32 requestId, uint256 payment, address callbackAddr, bytes4 callbackFunctionId, uint256 cancelExpiration, uint256 dataVersion, bytes data)"
                  data="$(jobRun.logData)"
                  topics="$(jobRun.logTopics)"]

    decode_cbor  [type="cborparse" data="$(decode_log.data)"]
    fetch        [type="http" method=GET url="$(decode_cbor.get)" allowUnrestrictedNetworkAccess="true"]
    parse        [type="jsonparse" path="$(decode_cbor.path)" data="$(fetch)"]

    multiply     [type="multiply" input="$(parse)" times="$(decode_cbor.times)"]

    encode_data  [type="ethabiencode" abi="(bytes32 requestId, uint256 value)" data="{ \\"requestId\\": $(decode_log.requestId), \\"value\\": $(multiply) }"]
    encode_tx    [type="ethabiencode"
                  abi="fulfillOracleRequest2(bytes32 requestId, uint256 payment, address callbackAddress, bytes4 callbackFunctionId, uint256 expiration, bytes calldata data)"
                  data="{\\"requestId\\": $(decode_log.requestId), \\"payment\\":   $(decode_log.payment), \\"callbackAddress\\": $(decode_log.callbackAddr), \\"callbackFunctionId\\": $(decode_log.callbackFunctionId), \\"expiration\\": $(decode_log.cancelExpiration), \\"data\\": $(encode_data)}"
                  ]
    submit_tx    [type="ethtx" to="YOUR_OPERATOR_CONTRACT_ADDRESS" data="$(encode_tx)"]

    decode_log -> decode_cbor -> fetch -> parse -> multiply -> encode_data -> encode_tx -> submit_tx
"""
Replace both instances of YOUR_OPERATOR_CONTRACT_ADDRESS with the address of your deployed Operator contract.
-
Click Create Job. A message with the new job number will confirm it was added successfully.

-
Click on the job number to view its details and copy the
externalJobI, you’ll need that ID for the next step when creating requests from your smart contract.


#Step 3: Send a Request from a Consumer Contract
You’ve added a job to your node, now it’s time to test it using a consumer smart contract. This is a way to validate that your node is working end-to-end.
-
Open
ATestnetConsumer.solin Remix. -
Compile it, ensuring:
-
The contract code includes:
_setChainlinkToken(0x779877A7B0D9E8603169DdbD7836e478b4624789);This sets the LINK token for Sepolia.
-
-
Deploy the consumer contract:
-
In Remix’s Deploy & Run panel:
-
Set Injected Provider – MetaMask (connected to Sepolia).
-
Select
ATestnetConsumerfrom the contract dropdown. -
Click Deploy and confirm in MetaMask.
-
-
-
Fund the deployed contract with LINK:
- Send 1 LINK to the contract’s address (visible in Remix).
This ensures it can pay for its own requests.
- Send 1 LINK to the contract’s address (visible in Remix).
-
Initiate a price request:
-
In Remix, locate the
requestEthereumPricefunction. -
Input:
-
operator contract address (deployed earlier)
-
externalJobID (from Step 2, without dashes)
-
-
Click Transact and approve in MetaMask.

-
-
Monitor fulfillment:
-
In the Operator UI’s Runs tab, watch for your job execution.
-
Back in Remix, call the consumer contract’s getter (
currentPrice)—
it should now show the updated ETH price.
-


This confirms your node is fully operational—from blockchain trigger to real-world data and back on-chain. 🎉
#Step 4: Withdraw LINK from Your Operator Contract
Once your node has fulfilled requests and accumulated LINK, the owner of the Operator contract can withdraw those funds. Recall, the owner is the account specified during contract deployment via MetaMask.
According to the Operator contract docs:
“Allows the node operator to withdraw earned LINK … The owner of the contract can be another wallet and does not have to be a Chainlink node.” (docs.chain.link)
🔐 Only the owner address set at deployment has permission to execute the withdraw(...) function.
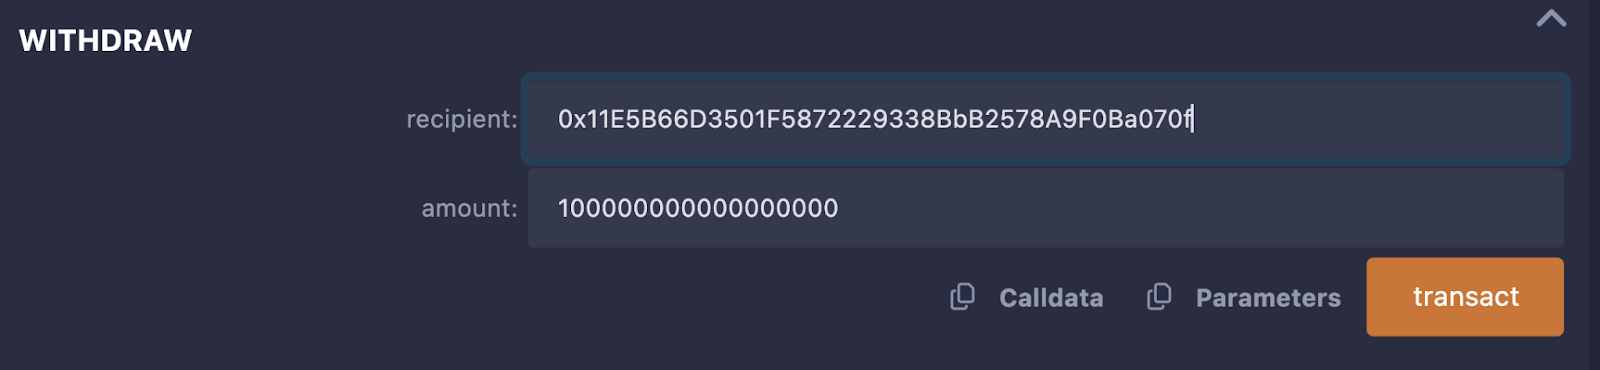
#Withdrawal Process
-
In Remix’s Deploy & Run Transactions, ensure your Injected Provider – MetaMask is connected to Sepolia and using the owner account (same as deployment).
-
Under Deployed Contracts, expand your deployed
Operatorcontract. -
Locate the
withdrawfunction. -
Provide:
-
recipient: the address to receive the LINK (often the owner’s own address). -
amount: in wei (e.g.,100000000000000000for 0.1 LINK).
-
-
Click transact and confirm the MetaMask transaction.
🔄 Optionally, use the withdrawable() function to check how much LINK is available before or after withdrawing.
Once complete, the LINK will be transferred from the Operator contract to your specified recipient address.
#Wrapping Up
We began by deploying our Operator contract on the testnet, using our MetaMask wallet to establish administrative control. Then, we authorized our Chainlink node to ensure it could securely fulfill requests directed at that contract. With the groundwork set, we created a job through the Operator UI, defining a workflow for fetching external data and returning it on-chain.
Next, we sent a real request from a consumer smart contract. Our node successfully detected it, executed the job, and delivered the data—proving our system worked from end to end. Finally, as the designated owner, we withdrew LINK earnings from the Operator contract, completing the full cycle