How to Check CUDA Version on Linux


The introduction of GPUs marked a significant turning point in the field of computing. GPUs substantially boost performance across numerous disciplines, not just in graphics rendering. They are optimized for parallel computing, enabling the massive acceleration of tasks and applications through thousands of cores designed to execute multiple concurrent tasks simultaneously. They have revolutionized gaming through realistic and visually rich images. Additionally, they play a crucial role in deep learning, AI, and other resource-intensive tasks thanks to their exceptional processing capabilities.
NVIDIA developed CUDA as an alternative to platforms such as OpenGL. It runs purely on NVIDIA GPUs and enables developers to harness its massive processing capabilities in developing general-purpose code
This tutorial presents various avenues of checking the CUDA version on Linux.
#Prerequisites
First, ensure that you have the following in place before beginning.
-
NVIDIA GPU on your PC
-
CUDA toolkit installed. Check out how to install CUDA on Ubuntu.
#How to Check CUDA Version on Linux
There are multiple ways of checking the version of CUDA on your system. Let’s check them out.
#Method 1: Using the nvcc command
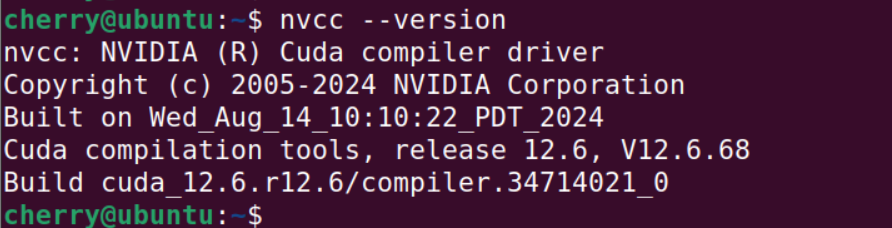
NVCC, short for NVIDIA CUDA Compiler, is NVIDIA's compiler used to compile CUDA and C/C++ applications. You can easily leverage the nvcc command to check the CUDA version
Simply invoke the nvcc command as shown.
nvcc --version
OR
nvcc -V
The command prints the version of CUDA currently being used by your Linux system. It also includes the NVIDIA copyright information and build date of the CUDA compiler driver. The output reports that we are running CUDA 12.6.
#Method 2: Using the apt package manager
The apt package manager (for Debian/Ubuntu users) is a decent tool for checking the CUDA version. To reveal the version, run:
apt info cuda
On the output, you get attributes including CUDA's version, download, and installed size.
Alternatively, you can run the apt list command as follows.
apt list --installed | grep cuda
This provides more comprehensive output that includes all the installed CUDA packages, toolkit, libraries, and documentation.
#Method 3: Using the dpkg package manager
If you prefer using the dpkg package manager, you can reveal CUDA's installed version as follows.
dpkg -l | grep cuda-toolkit
Outputii  cuda-toolkit-12-6                     12.6.1-1          amd64      CUDA Toolkit 12.6 meta-package
ii  cuda-toolkit-12-6-config-common       12.6.68-1         all        Common config package for CUDA Toolkit 12.6.
#Method 4: Check CUDA version from Pytorch
If you are leveraging Pytorch, you can check CUDA version using just a few lines of code.
import torch
print(torch.version.cuda)

#Error when checking CUDA version
Have you, by any chance, encountered the nvcc is not installed! error? If yes, fret not. This is usually due to the $PATH variable for CUDA and its libraries not being defined.
To fix the matter, append the following lines in the ~/.bashrc file.
export PATH=/usr/local/cuda-12.6/bin${PATH:+:${PATH}}
export LD_LIBRARY_PATH=/usr/local/cuda-12.6/lib64${LD_LIBRARY_PATH:+:${LD_LIBRARY_PATH}}
Save the changes and exit the file. Then apply the changes by running:
source ~/.bashrc
And that’s it. You should now check the CUDA version without running into any errors.
Also read: How to Install Xrdp on Ubuntu 24.04
#Conclusion
We have outlined various methods for checking the CUDA version on your preferred Linux distribution. You have also learned how to debug the nvcc is not installed error, which is usually a result of CUDA not being installed or its $PATH variable not being specified.


