How to Create a High Availability Cluster by Using Local BGP Routing

A high availability (HA) system has the capacity to instantly redirect its workload to another node if one fails. HA cluster implementations typically try to eliminate single points of failure. Such clusters are often used for critical databases, business applications, and other systems that cannot tolerate downtime.
HA clusters differ by their operational uptime, and may vary from three nines (99,9%) to five nines and beyond as the promised percentage of system’s annual uptime. An HA system is worth having for your business, if its implementation and maintenance costs are lower than the expenses that you would incur in case of a system downtime.
#What is BGP Routing?
Border Gateway Protocol (BGP) is a standardized exterior gateway protocol designed to exchange routing and reachability information among autonomous systems (AS) on the Internet. BGP is arguably the most important of all the Internet protocols as it glues thousands of distinct Internet Service Providers (ISPs) together.
BGP ensures network stability and guarantees that routers can adapt to route failures. It can provide such functionality, because:
- BGP obtains network prefix reachability information from neighboring Autonomous Systems (AS), while each subnet advertises its existence to the Internet. BGP then makes sure that all routers in the Internet know about these subnets.
- BGP determines the best routes to the network prefixes. A BGP route selection procedure is executed by the local routers using the prefix reachability information obtained from the neighboring autonomous systems. The best route is then determined based on pre-set policy, as well as reachability information.
#Local BGP vs. Global BGP
Autonomous systems, besides other protocols, can also use an internal version of BGP to route traffic through their internal networks. Such technique is known as local or internal BGP (iBGP).
The main difference between the two is that external BGP (eBGP) runs between two BGP routers in different Autonomous Systems, while iBGP runs between two BGP routers in the same Autonomous System.
In other words, iBGP service is a way to automatically manage your local network routing within a single data center region. In this guide we are going to create a Local BGP based high availability cluster with an OSI layer 4 fail-over solution.
#Prerequisites
To follow this guide please make sure that you have:
- A user account with a cloud vendor that supports internal BGP routing, or an on-premises network setup with pre-configured BGP route reflectors. We are going to use Cherry Servers cloud infrastructure for this guide.
- Two servers with Ubuntu 20.04 installed, since the minimum size of a HA cluster is a two node system.
- A virtual IP address (Floating IP, Elastic IP, etc.) that can be used for fault tolerance.
- Basic familiarity with Apache Web Server for HA cluster testing (optional).
#Enable BGP
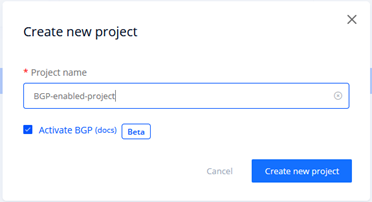
As we are using Cherry Servers Cloud infrastructure, the first step is to create a Cherry Servers user account. After this is done you should create a BGP-enabled project on your account. Select “Activate BGP” option during project creation to initiate BGP session tracking:
Cherry Servers BGP route reflectors are now ready to receive BGP session information from any server created within this project.
#Deploy Servers and Virtual IP Address
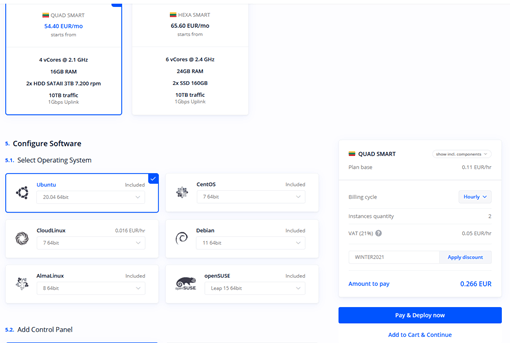
You are now ready to deploy your cloud infrastructure for your high availability cluster. First deploy two servers that support Local BGP service. You may choose between Dedicated Servers and Cloud VDS servers for that matter.
Let‘s deploy two Cloud VDS servers billed by the hour:
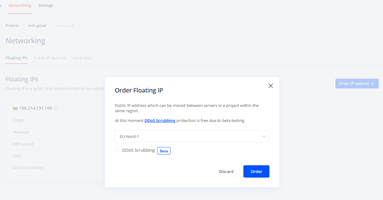
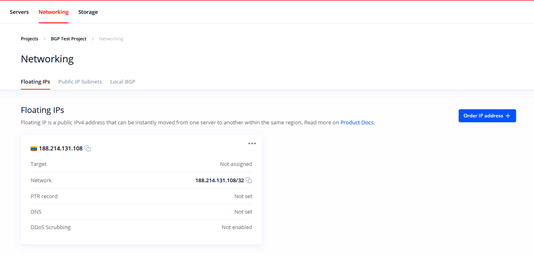
Next, you should get a virtual IP address that is used to build a high availability environment. There are different names for a virtual IP address in the indudstry, while at Cherry Servers it is called a Floating IP. Let‘s order one:
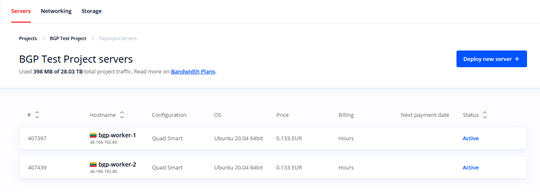
By this point you should have everything you need to create a high availability cluster using Local BGP. There should be two active servers in your project:
As well as an active Floating IP address that must not be assigned to any server:
#Set up BGP Routing on Your Servers
To use Local BGP service you should have a BGP agent installed on your servers. We will use BIRD as a BGP routing daemon for our servers. It allows you to establish BGP sessions between your servers and Cherry Servers BGP reflection routers.
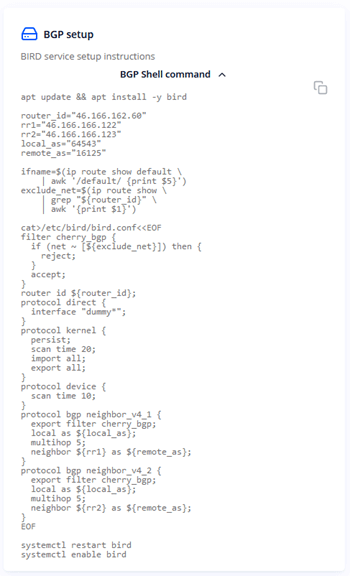
Cherry Servers provides you with a helper script with local variables to install and configure BIRD for each of your servers. Access an individual server and find the helper script under Network --> Local BGP section:
Login to the server via SSH and copy this script into a new file on the server:
vim configure-bgp.sh
Also make that file executable:
chmod u+x configure-bgp.sh
Run the script to install and configure BIRD service. After the script finishes, a BGP session will be initiated to announce the IP addresses and advertise routes to upstream Cherry Servers BGP reflection routers.
After the first server is configured, connect to the second server via SSH and repeat the same steps to have two BGP sessions initiated in your project.
#Configure Floating IP Address
Even though a BGP session is now established, we haven‘t configured the IP address for the network interface that is being annoucned by our BGP sessions. Let‘s now specify our Floating IP address that is going to be announced to Cherry Servers BGP reflection routers.
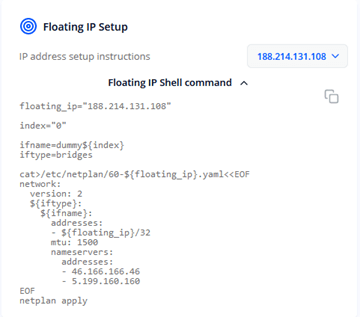
Cherry Servers provides you with a helper script with local variables to configure your network interface with a selected Floating IP address. Access an individual server and find the helper script under Network --> Local BGP section:
Login to the server via SSH and copy this script into a new file on the server:
vim configure-ip.sh
Also make that file executable:
chmod u+x configure-ip.sh
Run the script to configure Floating IP address on the server. After the script finishes, your Floating IP address will be periodically announced to BGP reflection routers. This will enabled the upstream routers to point traffic coming to this Floating IP address to your server through Local BGP service.
You can make sure you have successfully configured Local BGP service on your server by running the following command:
birdc show route
The output shows that BIRD daemon version 1.6.8 is ready with a single route to your Floating IP address (188.214.131.108) configured successfully.
After you finish configuring the first server, connect to the second server via SSH and repeat the same steps to have your Floating IP address being announced from both of your servers.
#Monitor Local BGP Service
You have now successfully configured your high availability cluster using Local BGP service. You may now monitor your BGP sessions and learned routes through Cherry Servers Client Portal.
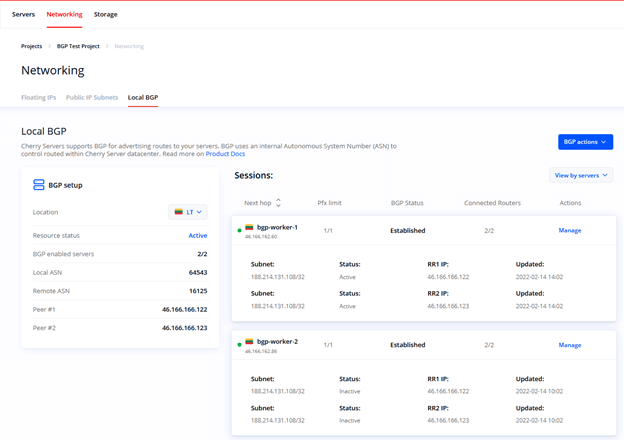
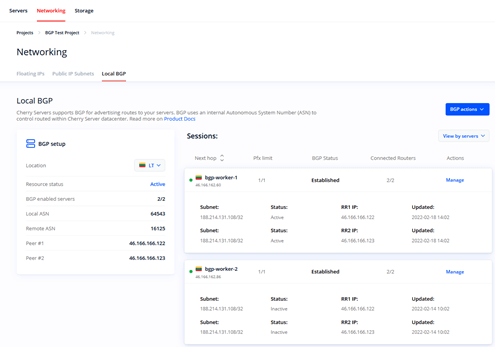
Open Networking --> Local BGP section to get the latest information about the status of your Local BGP service:
In the left section you can check that there are two BGP-enabled servers in your project. There is also information about local and remote AS numbers, as well as IP addresses of Cherry Servers BGP reflection routers.
On the right side you can see two sections for each BGP session that has been established between your server and BGP routers. More specifically, there is information about:
- Next hop – server‘s hostname and its IP address
- Pfx limit – a number of announced IP addresses that the routers expect. For instance, if you had two Floating IP addresses in the project, you would see 2/2 of them expected.
- BGP status - the status of your BGP session that can take a few values:
- Idle – session initiated;
- Connect – session started;
- Active – session active;
- Established – session established with data being transferred;
- Degraded – session is only established with one out of two Cherry Servers BGP reflection routers
#Set up Web Servers
It is now time to prepare your high availability cluster for testing. Even though there are many ways of testing, we are going to install Apache Web Server and create different index pages on each server to be able to track which server responds when we make an HTTP request to the Floating IP address that we have just configured.
Let‘s now log in to each server via SSH and install Apache Web Server:
apt update && apt install -y apache2
After installation Apache daemon should be up and running. If something went wrong, you could double check our Apache Web Server installation guide to troubleshoot the issue.
On the first server let‘s overwrite the default Apache index page with a custom string "Hello from machine 1":
echo "Hello from machine 1" > /var/www/html/index.html
On the second server overwrite the same file with a different string "Greetings from machine 2":
echo "Greetings from machine 2" > /var/www/html/index.html
Now every time someone sends an HTTP request to the first server you will get "Hello from machine 1" response, while the second server will respond with "Greetings from machine 2".
#Test Your High Availability Cluster
You are now ready to test your High Availability cluster.
Open a new terminal window and query the Floating IP address. Use watch command that repeats curl query every 2 seconds by default:
watch curl 188.214.131.108
You can now see a "Hello from machine 1" message, meaning that the first server is responding when you make an HTTP query to the Floating IP address.
Now reboot machine 1 and see how the response message changes:
As machine 1 is temporary unavailable due to system reboot, the HTTP query is being routed to machine 2 automatically by the Local BGP service.
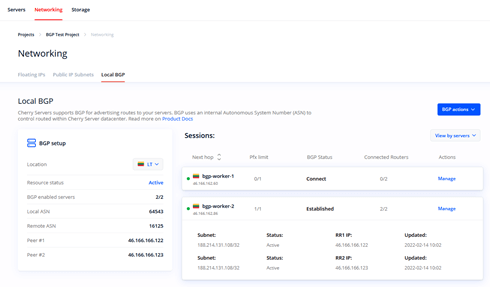
If you refresh BGP service status on your Client Portal, you will see the following output:
As bgp-worker-1 is being restarted, its BGP session has been lost and the server has no routers connected at the moment.
If you wait a few minutes until bgp-worker-1 is rebooted and refresh BGP service status once again, you should see that the session has been automatically reestablished:
The output of our curl query has now changed to the initial message, since the BGP session is reestablished:
#Conclusion
You have now successfully deployed and configured a high availability cluster by using Local BGP service at Cherry Servers. Continue building on top of it or incorporate the concept to your production system to make your it more resilient and available in case of an outage.
Check Local BGP documentation at Cherry Servers as a reference guide when building further.
Starting at just $3.24 / month, get virtual servers with top-tier performance.

