How to Secure Your PostgreSQL Server?


PostgreSQL is considered one of the world’s most powerful, and advanced object-relational database management systems. It’s highly scalable, extensible, and an excellent choice for handling large datasets, especially in production environments.
However, documented security vulnerabilities according to the CVE database make it a soft target for hackers. In this guide we explore different measures that you can implement to fortify the security of the PostgreSQL server and establish a safeguard against potential breaches.
#Lock Down Port Level Access to PostgreSQL
Network access to the database should be limited to just a few ports; the database port itself ( port 5432 ) and a management port, preferably the SSH port. All other ports with network access should be locked down to reduce the attack surface.
Thus, deploying a firewall is highly recommended on the host machine running the PostgreSQL server. A firewall allows you to define what inbound or outbound network traffic is allowed. There are various ways of doing this including opening the default PostgreSQL port 5432 and defining the protocol (whether IPv4 or IPv6). In addition, you can set a source address, or a subnet of hosts that are allowed to access the database server.
Typically, modern Linux distributions come with a preinstalled firewall application to filter traffic. For Debian / Ubuntu derivatives, we have the UFW, while Firewalld is the default firewall in Red Hat distributions such as RHEL, Fedora, Rocky Linux, and AlmaLinux.
Run your PostgreSQL deployments in a high-performing and cost-effective open cloud infrastructure. Cherry Servers' bare metal cloud and virtual servers offer automatic scaling, pay-as-you-go pricing, and free 24/7 technical support.
On Debian/ Ubuntu systems running UFW firewall, allow inbound traffic on ports 5432 and 22 as shown:
sudo ufw allow 5432/tcp

sudo ufw allow 22/tcp
Then reload the firewall to apply the changes made.
sudo ufw reload
On systems running Firewalld such as Red Hat, Fedora, and Rocky, open ports 5432 and 22 as follows:
sudo firewalld --add-port=5432/tcp --zone=public --permanent

sudo firewalld --add-port=22/tcp --zone=public --permanent
Then reload the firewall for the changes to come into effect.
sudo firewalld --reload
If you are running the Iptables firewall utility, run the following commands to allow SSH and PostgreSQL connections respectively.
iptables -A INPUT -p tcp -m state --state NEW --dport 22 -j ACCEPT

iptables -A INPUT -p tcp -m state --state NEW --dport 5432 -j ACCEPT
Next, allow all outbound connections and drop any other inbound traffic.
iptables -A OUTPUT -j ACCEPT
iptables -A INPUT -j DROP
iptables -A FORWARD -j DROP
#Disable Remote Access to PostgreSQL
This measure alone wards off a substantial host of other attack vectors which include brute force and man-in-the-middle attacks.
To restrict access to localhost only, modify the postgresql.conf file and set listen_addresses to localhost.
To access the configuration file, run the following command. Be sure to replace 14 with the version number of the PostgreSQL database server installed.
sudo vim /etc/postgresql/14/main/postgresql.conf
Next, locate the listen_addresses directive and set it to localhost.
listen_addresses = 'localhost'
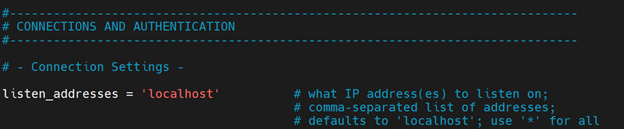
Then restart the PostgreSQL service to effect the change made.
sudo systemctl restart postgresql
#Configure Allowed Hosts
Alternatively, you can allow specific hosts to connect to the database server instead of entirely disabling remote connections. This ensures that only authorized users can make a connection to the database server.
To achieve this, access the pg_hba.conf file.
sudo vim /etc/postgresql/14/main/pg_hba.conf
Under the comment section that describes how to allow non-local connections, insert an entry that includes the public IP address of the database server along with the database and the user allowed to access the database.
host sample_db cherry client_ip_address/24 md5
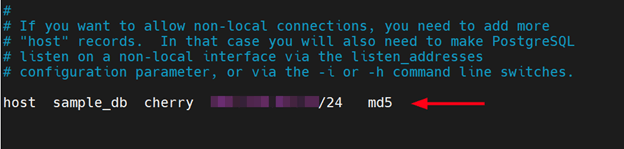
Let’s have a look at the values in detail.
The host attribute indicates that a TCP/IP connection will be used to connect to the database.
The sample_db entry specifies the database that the user will connect to. Multiple databases can be specified by separating the database names using a comma.
The cherry entry indicates the user that is allowed to make a connection. And just like the database name, multiple users can be specified by separating their names using commas.
The client_ip_address entry is the public IP address of the client machine that is connecting to the server.
Once you’re done, save and exit the file. Next, edit the postgresql.conf file.
sudo vim /etc/postgresql/14/main/postgresql.conf
Locate the listen_addresses line and specify the public IP address of your database server denoted by the server-ip attribute.
listen_addresses = 'localhost, server-ip'
Once done, save the changes and close the file. Then restart PostgreSQL for the changes to come into effect.
sudo systemctl restart postgresql
#Set up SSL with PostgreSQL
PostgreSQL provides native support for SSL connections. SSL encrypts client/server communications and provides enhanced security. By default, SSL is not configured, and you have to manually do it yourself.
Check out our guide on how to Configure SSL on PostgreSQL.
#Proper Management Of Users and Group Roles
So far, we have looked at how you can secure PostgreSQL at a network level. At a database level you can also harden your server by proper assignment of privileges to users and roles.
In information security the golden rule is to always apply the least privilege principle. This implies granting users just the right number of permissions to accomplish a task.
The same applies to user and role management. Users should be granted the minimum privileges that don’t allow too much access.
Users, roles, and groups are synonymous in PostgreSQL, with the only difference being that users have login permissions by default. To be more specific, a user is a role with CONNECT privilege.
Both CREATE USER and CREATE ROLE statements can be used to create a user. The user, however, must have a LOGIN role. When created using the CREATE USER statement, the user is automatically granted the LOGIN role.
For example, in the following SQL command, the LOGIN role is assigned to the cherry_user user.
CREATE USER cherry_user WITH ENCRYPTED PASSWORD 'secret';
After creating the user or role, invoke the following SQL query to verify if the user can log in.
SELECT rolcanlogin from pg_roles where rolname = 'cherry_user';
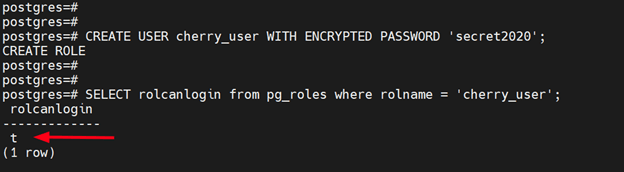
The output returns a boolean value that indicates whether the user can log in or not. The value t indicates that the user can log in and f shows the converse.
However, when you create a user using the CREATE ROLE statement, you must explicitly add the LOGIN attribute to allow the user to log in.
CREATE ROLE cherry_user LOGIN;
#PostgreSQL Roles
A role defines a user, a group, or a set of permissions assigned to a group or user for various objects in the database. It's an entity that can have database privileges and own database objects.
The CREATE USER and CREATE GROUP statements have been replaced by the more general, CREATE ROLE with specific properties to distinguish database users.
A database user is a role with the LOGIN privilege by default. The postgres user is the most privileged database user in the PostgreSQL server. It possesses a special privilege called SUPERUSER that grants it unrestricted access to the database, just like root account on Linux.
#Role attributes
Role attributes are directives on the role itself that specify some of the core privileges it has on a database level. Attributes can be specified when creating a role, or modified later on.
Examples of role attributes that can be applied to a role include:
LOGIN: This allows database users to connect to the database cluster. As we have seen earlier, the CREATE USER statement automatically adds this attribute, while CREATE ROLE command does not.
CREATEDB: The attribute allows the role to create new databases.
CREATEROLE: This allows the role to create, alter and delete other roles. In addition, it allows the role to assign or alter role membership. The only exception is that a role with the CREATEROLE attribute cannot alter SUPERUSER roles without the SUPERUSER attribute.
SUPERUSER: Allows the role to circumvent all permission checks with an exception of a right to log in. Note that only SUPERUSER roles can create roles with this attribute.
REPLICATION: This allows the role to initiate streaming replication. Roles with this attribute must also bear the LOGIN attribute.
INHERIT: Determines whether the role can inherit the privileges of roles it is a member of.
For more check out PostgreSQL's documentation on role attributes.
To view the roles and role attributes assigned to users run the following query.
\du
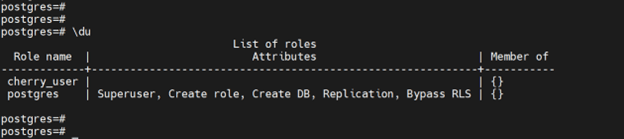
From the output, you can see that the postgres has a list of database roles including the superuser role that provides it with unrestricted access to the database.
#Granting Role Permissions
Rather than assigning access privileges to users/roles individually, the most recommended approach is to create a group role and grant other roles (map individual users) membership of this group.
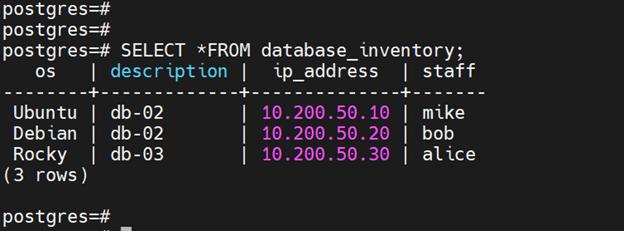
To demonstrate this, we have a table called database_inventory that contains records of database servers managed by different system administrators.
Below is the table schema.
CREATE TABLE database_inventory (
    os            text,
    description   text,
    ip_address    text,
    staff 	    text

);
We have already added some records, and this is how the table looks.
Suppose you want to allow your sysadmins, say, Mike, Bob, and Alice to view the table but not modify it.
Instead of individually assigning permissions to view the table to the users here’s how you would go about it.
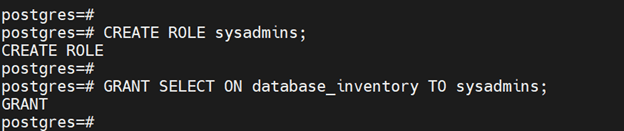
First, create a group role that does not have login abilities by itself and then grant it SELECT privileges on the schema.
CREATE ROLE sysadmins;
GRANT SELECT ON database_inventory TO sysadmins;
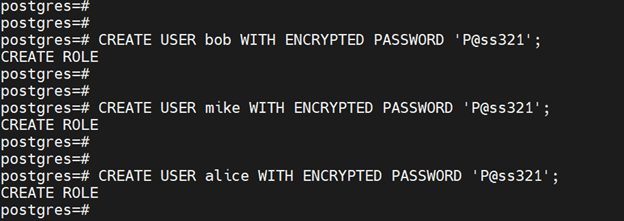
Next, create three user accounts that will inherit sysadmins permissions once logged into the database.
CREATE USER bob WITH ENCRYPTED PASSWORD 'P@ss321';

CREATE USER mike WITH ENCRYPTED PASSWORD 'P@ss321';

CREATE USER alice WITH ENCRYPTED PASSWORD 'P@ss321';
Lastly, assign the sysadmins role to the user accounts.
GRANT sysadmins TO bob, mike, alice;

Once connected to the database, Bob, Mike, and Alice will inherit privileges of the "sysadmins" group role and be able to view records in database_inventory table but not modify it.
To verify this, we will switch to a user called ‘bob’ and view the table using the SELECT statement.
SELECT * FROM database_inventory;
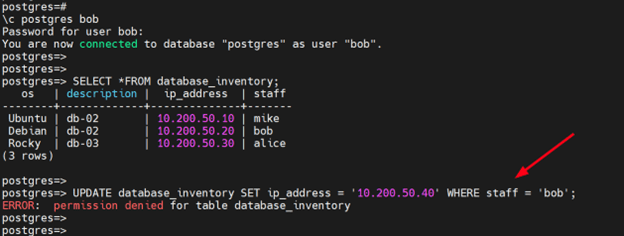
The query prints out the entire table. However, any attempt to update the records in the table results in an error since the user only has read-only rights on the table.
#Row-Level Security
In addition to granting roles or permissions to users on tables, you can implement tighter policies on a row level. Row-Level Security (RLS) is a security mechanism that controls access to rows in a database table based on the current user’s authorization.
Records from tables are displayed based on who the user is, and which records the user has access to. The objective of Row-Level Security is to allow specific users access to their data only without giving the privilege to view or modify other users' records.
To demonstrate the Row-Level Security concept, we will build on our previous table example. First, you need to enable Row-Level Security on the table.
ALTER TABLE database_inventory ENABLE ROW LEVEL SECURITY;
Next, we will create a policy called modify_servers that will restrict users to only view their records based on the staff field in the table. The SELECT keyword grants users permission to query their own records. The USING expression compares the currently logged-in username with the staff column in the table.
CREATE POLICY modify_servers on database_inventory FOR SELECT TO sysadmins USING (staff = current_user);
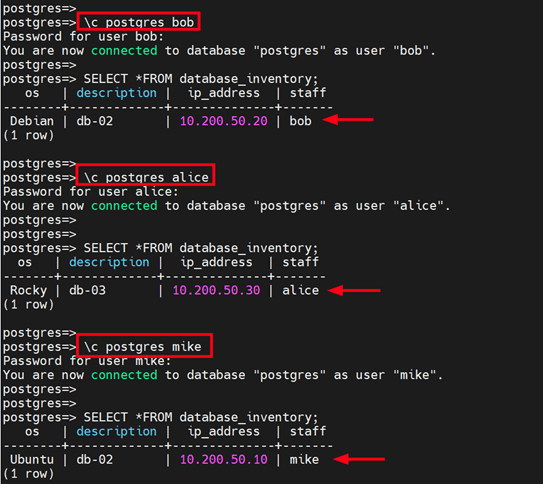
To put our policies to the test, we will switch over to one of the database users, in this case bob.
\c postgres bob
When the user queries the entire table, he views his record only and not of other users. The same happens to other users as well. They can only access records that belong to them based on the policies applied.
#Regular Patching
As a rule of thumb, applying critical security updates and patches is recommended for software applications. This addresses vulnerabilities and loopholes that can be exploited to gain access to the databases. In addition, staying on top of security updates is a prerequisite in PCI-DSS compliance if your PostgreSQL-based web application stores credit card data, including the card security code.
For organizations looking to integrate data seamlessly from PostgreSQL to Databricks, ensuring these updates are consistently applied not only supports compliance efforts, such as PCI-DSS for credit card data storage, but also bolsters overall data security
#Conclusion
In this guide, we have looked at different levels of addressing database security. We have looked at network-level security which includes the implementation of firewalls and TCP/IP sockets, transport-level security that enables secure communication using SSL/TLS and, lastly, database-level security which involves assigning permissions to users using roles and permissions alongside row-level security.
Check out PostgreSQL’s security information page for additional security considerations.


