How To Install and Start Using RabbitMQ on Ubuntu 22.04


Message brokers are intermediary applications that play a key role in delivering reliable and stable communication between different services. They can store incoming requests in a queue and serve them one by one to receiving services. By decoupling your services this way you make them more scalable and performant.
#What is RabbitMQ?
RabbitMQ is a popular open-source message broker that stores and passes asynchronous messages between two or more services according to pre-defined rules. It is an intermediary software that ensures your systems are more reliable, scalable, and always available. For instance, RabbitMQ can be used to reduce system load by delegating heavy tasks to some other service that is idle at the given moment. Let’s get familiar with some of the most important concepts of RabbitMQ before we dive deeper into specifics:
- Producer – client application that creates messages and delivers them to an exchange.
- Consumer – an application that connects to the queue and subscribes to messages to be processed.
- Exchange – a message routing agent that is responsible for receiving messages from a producer and pushing them to one or more queues depending on the rules defined by the bindings.
- Bindings - rules that exchanges use to route messages to queues.
- Queue – a large buffer that stores messages and is bound to at least one exchange. Consumers and producers have many-to-one relationship with a queue.
- Message – a binary BLOB of data that can be of value to the consuming application, including process triggers, task state, simple text messages, etc.
- Virtual Host – a virtual environment that isolates different producers, consumers, exchanges, queues, and other objects on a RabbitMQ server.
#How Does RabbitMQ Work?
RabbitMQ allows you to decouple different services by managing their communication through the messages they are sending to each other. RabbitMQ is based on Advanced Message Queuing Protocol (AMQP) that gives developers a lot of flexibility to define entities and routing schemes on the application level. Let’s go through a standard RabbitMQ workflow cycle. A producer application first publishes a message to some type of an exchange. The exchange is bind to one or more queues. When the exchange receives a message, it takes into consideration different message attributes and routes the message to one or more queues accordingly. The message then stays in a queue until it is taken out by a consumer.
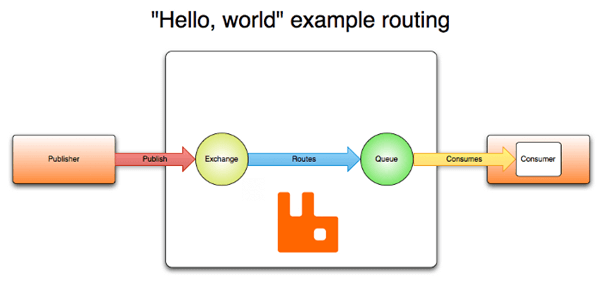
Image 1 - a simple message routing scheme.
#RabbitMQ Exchange Types
A producer can only send messages to an exchange which is responsible for pushing messages to different queues with the help of header attributes, bindings, and routing keys. In RabbitMQ there are four distinct types of exchanges that route messages according to different parameters and binding setups.
#Direct Exchange
With direct exchange a message is routed to one or more queues with a binding key that exactly matches the routing key of the message. The routing key is added to the message header by the producer application. If the message doesn‘t match any binding key, it is discarded. For instance, you may use Direct Exchange to balance messages between multiple consumers in a round-robin mode and employ multiple workers for the same job.
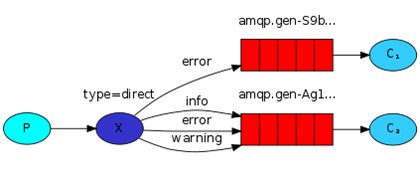
Image 2 - in the image above you can see a producer (P) connected to a direct exchange (X) that has four direct match bindings ("error”, “info”, “warning”) to two queues that are each used by a different consumer (C).
#Topic Exchange
With topic exchange a message is routed to one or more queues with a wildcard binding pattern that matches the routing key of the message. A list of words in a routing pattern are delimited by dots, an asterisk (*) stands for any single word, while a hash tag (#) represents zero or more words. Topic exchanges are very flexible and has a wide array of use cases for problems where several applications selectively choose which type of messages they want to consume.
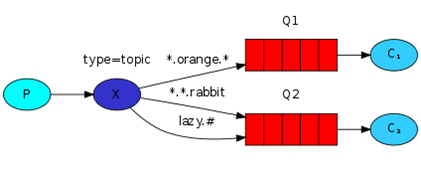
Image 3 - in the image above you can see a producer (P) connected to a topic exchange (X) that has three bindings (“.orange.”, “..rabbit”, “lazy.#”) to two queues each used by a different consumer (C).
#Fanout Exchange
With fanout exchange a message is simply pushed to all of the queues binded to the fanout exchange, regardless of routing keys or pattern matching. Fanout exchange is great when you want to always broadcast certain messages to the same multiple consumers.
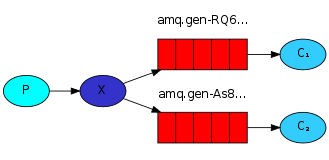
Image 4 - in the image above you can see a producer (P) connected to a direct exchange (X) that has two direct bindings to two queues each used by a different consumer (C).
#Headers Exchange
With headers exchange a message is routed by using message header attributes instead of the routing keys. You may use more than one header key – not only strings, but also integers, hashes, etc. – for matching messages with queues
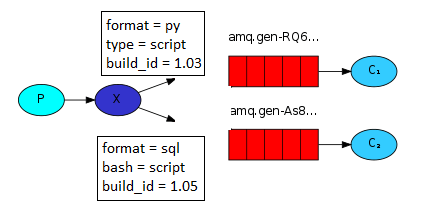
Image 5 - in the image above you can see a producer (P) connected to a message exchange (X) that has two bindings with unique message header to two queues each used by a different consumer (C).
#Advantages of Using RabbitMQ
Apart from getting quick responses from web servers, here are a few other benefits of using RabbitMQ:
- Distributed Deployment - You can easily deploy the lightweight software as clusters federated across multiple zones, thus offering high availability and better throughput.
- Developer Tools and Plugins - It offers a wide range of developer tools for popular languages and plugins for continuous integration and operational metrics.
- Lightweight and Easy to Deploy - RabbitMQ requires minimal RAM which makes it one of the lightweight message brokers and that can be easily deployed on the public as well as private clouds.
- Asynchronous Messaging - It supports several exchange types, delivery acknowledgment, message queuing, and messaging protocols.
- Reliable - RabbitMQ offers multiple features, including delivery acknowledgment, persistence, and high availability, that help users trade off performance with reliability.
- Scalable and Flexible - RabbitMQ is mainly responsible for the communication part, and the rest (maintaining consumers and publishers) is managed by developers.
- Supports Multi-protocol - Another advantage of RabbitMQ is it allows users to send messages over multiple messaging protocols.
#How to Install And Start Using RabbitMQ?
In this article we'll show you a step-by-step guide on how to install and configure a RabbitMQ Server on Ubuntu 22.04 to help you get up and running with this great piece of software.
#Prerequisites
To follow this guide, you need to meet the following set of requirements:
- An instance of Ubuntu 22.04.
- A user with sudo privileges
- Python 3 with pip package manager installed
#Step 1: Install RabbitMQ Server
First things first, let’s install the prerequisites:
apt-get install curl gnupg apt-transport-https -y
We are now ready to add repository signing keys for RabbiMQ main, ErLang, and RabbitMQ PackageCloud repositories respectively:
curl -1sLf "https://keys.openpgp.org/vks/v1/by-fingerprint/0A9AF2115F4687BD29803A206B73A36E6026DFCA" | sudo gpg --dearmor | sudo tee /usr/share/keyrings/com.rabbitmq.team.gpg > /dev/null
curl -1sLf "https://keyserver.ubuntu.com/pks/lookup?op=get&search=0xf77f1eda57ebb1cc" | sudo gpg --dearmor | sudo tee /usr/share/keyrings/net.launchpad.ppa.rabbitmq.erlang.gpg > /dev/null
curl -1sLf "https://packagecloud.io/rabbitmq/rabbitmq-server/gpgkey" | sudo gpg --dearmor | sudo tee /usr/share/keyrings/io.packagecloud.rabbitmq.gpg > /dev/null
Create a new file at /etc/apt/sources.list.d/rabbitmq.list and add the following repositories for ErLang and RabbitMQ respectively that are suited for Ubuntu 22.04 jammy release:
deb [signed-by=/usr/share/keyrings/net.launchpad.ppa.rabbitmq.erlang.gpg] http://ppa.launchpad.net/rabbitmq/rabbitmq-erlang/ubuntu jammy main
deb-src [signed-by=/usr/share/keyrings/net.launchpad.ppa.rabbitmq.erlang.gpg] http://ppa.launchpad.net/rabbitmq/rabbitmq-erlang/ubuntu jammy main
deb [signed-by=/usr/share/keyrings/io.packagecloud.rabbitmq.gpg] https://packagecloud.io/rabbitmq/rabbitmq-server/ubuntu/ jammy main
deb-src [signed-by=/usr/share/keyrings/io.packagecloud.rabbitmq.gpg] https://packagecloud.io/rabbitmq/rabbitmq-server/ubuntu/ jammy main
Save the file and you are ready to update your repository listings:
apt-get update -y
After your repository listings are updated, continue with installing required ErLang packages:
apt-get install -y erlang-base \
    erlang-asn1 erlang-crypto erlang-eldap erlang-ftp erlang-inets \
    erlang-mnesia erlang-os-mon erlang-parsetools erlang-public-key \
    erlang-runtime-tools erlang-snmp erlang-ssl \
    erlang-syntax-tools erlang-tftp erlang-tools erlang-xmerl
Finally, we can install RabbitMQ server and its dependencies:
apt-get install rabbitmq-server -y --fix-missing
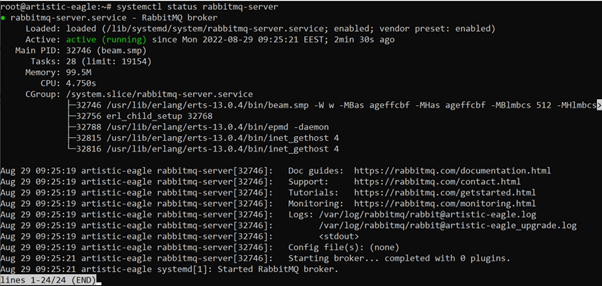
If all went well, you should see a rabbitmq-server process up and running:
systemctl status rabbitmq-server
Congrats, you have now successfully installed RabbitMQ! It’s now time to learn to use it.
#Step 2: Enable RabbitMQ Management Console
RabbitMQ has a Management Console plugin that allows you to perform various management and monitoring tasks via a web-based interface. You can manage exchanges, queues, bindings, users, and other RabbitMQ objects, as well as monitor things like memory usage, message rates, connections, and other processes. To check the list of all available RabbitMQ plugins, run the following command:
rabbitmq-plugins list
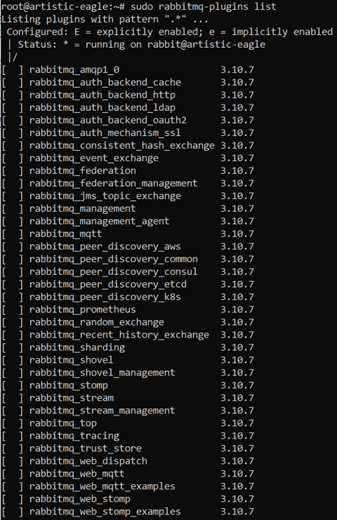
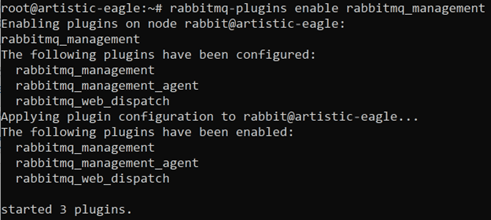
As you can see, all plugins are currently disabled. You can enable the RabbitMQ management plugin by using the following command:
rabbitmq-plugins enable rabbitmq_management
You can now connect to RabbitMQ web interface. To gain access, open your web browser and type the URL http://your-server-ip:15672:
A default username and password are guest, however, you can only connect to your RabbitMQ server with user guest from localhost. Any other user is not restricted this way.
In case you do not know your IP address, type the following command to figure it out:
hostame -I
#Step 3: Set Up RabbitMQ Administrative User
It is recommended to create a new user and assign administrative permissions to it when setting up a RabbitMQ server. You can use the rabbitmqctl add_user command to add new users. Pick a unique username and set a secure password to continue:
rabbitmqctl add_user thebigrabbit MyS3cur3Passwor_d
![]()
Next, set a tag for your created user to the administrator using the following command:
rabbitmqctl set_user_tags rabbitadmin administrator
It is also advisable to delete the default user guest for security reasons:
rabbitmqctl delete_user guest
Feel free to check the list of users to make sure your configuration is correct:
rabbitmqctl list_users

You can now see only a single user thebigrabbit with a tag administrator, and no default user guest available. So far so good.
#Step 4: Create RabbitMQ Virtual Host
RabbitMQ manages user permissions on a virtual host level. A virtual host in RabbitMQ provides logical grouping and separation of different resources. Such resources may include connections, exchanges, queues, bindings, user permissions, and some other RabbitMQ objects. To add a new virtual host, go ahead and execute the following command:
rabbitmqctl add_vhost cherry_broker
You can apply various kinds of configuration settings to a Virtual Host like set the maximum number of concurrent client connections, configure maximum number of queues and others. Let’s now list all available Virtual Hosts on a server:
rabbitmqctl list_vhosts
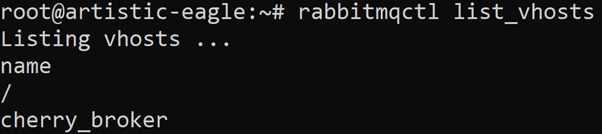
As you can see, there are currently two available virtual hosts - / and cherry_broker - on your server. You may delete the default virtual host with the following command:
rabbitmqctl delete_vhost /
#Step 5: Assign User Permissions on a Virtual Host
Next, you need to set specific user permissions for your administrative user on the newly created virtual host. The basic command pattern for setting user permissions is the following:
sudo rabbitmqctl set_permissions -p <virtual_host> <user_name> <permissions>
To set full permissions on a virtual host cherry_broker for user thebigrabbit run the following command:
sudo rabbitmqctl set_permissions -p cherry_broker thebigrabbit ".*" ".*" ".*"
To be more specific:
- -p is used to define the virtual host.
- The first permission argument “.*” grants configuration permissions on all virtual host entities. It allows you to declare exchanges, queues, etc.
- The second permission argument “.*” grants write permissions on all virtual host entities. It allows you to create bindings, publish messages etc.
- The third permission argument “.*” grants read permissions. It allows you to read queues, consume messages, etc.
You can see the permission that you have just set on the virtual host by using the following command:
sudo rabbitmqctl list_permissions -p cherry_broker

#Step 6: Set Up RabbitMQ via Web Management Console
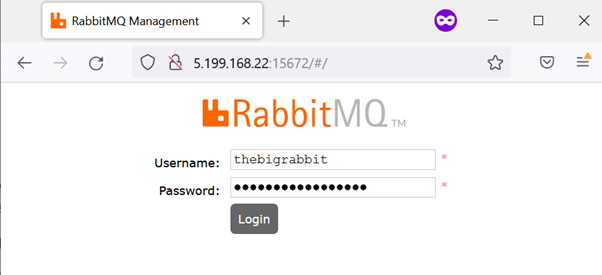
You may now connect to the web management console by using your newly created username and password:
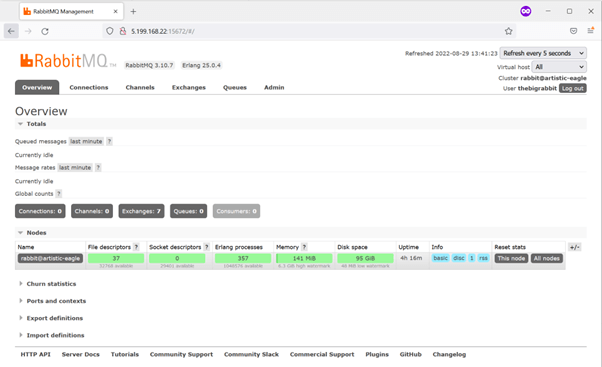
After a successful authentication, you should see a similar RabbitMQ dashboard:
#Step 7: Send and Consume RabbitMQ Messages in Python
Even though there are many SDKs available for RabbitMQ, we will use Python for this tutorial. First, we need to install pika Python client that is recommended by the RabbitMQ development team. Use pip install to continue with the installation:
pip install pika --upgrade
We are now ready to start writing our Python development scripts. We will run these scripts on a remote Linux host that will connect to the RabbitMQ server on a standard port 5672 for sending and consuming messages. We will be using producer.py and consumer.py scripts to illustrate how a message broker works.
Let’s now define our producer.py script which job will be to generate messages and push them to RabbitMQ:
#!/usr/bin/env python
import pika

# If you want to have a more secure SSL authentication, use ExternalCredentials object instead
credentials = pika.PlainCredentials(username=’thebigrabbit’, password='MyS3cur3Passwor_d', erase_on_connect=True)
parameters = pika.ConnectionParameters(host='5.199.168.22', port=5672, virtual_host='cherry_broker', credentials=credentials)

# We are using BlockingConnection adapter to start a session. It uses a procedural approach to using Pika and has most of the asynchronous expectations removed
connection = pika.BlockingConnection(parameters)
# A channel provides a wrapper for interacting with RabbitMQ
channel = connection.channel()

# Check for a queue and create it, if necessary
channel.queue_declare(queue='hello')
# For the sake of simplicity, we are not declaring an exchange, so the subsequent publish call will be sent to a Default exchange that is predeclared by the broker
channel.basic_publish(exchange='', routing_key='hello', body='Hello World!')
print(" [x] Sent 'Hello World!'")

# Safely disconnect from RabbitMQ
connection.close()
Save it and create a consumer.py script which job will be to consume messages from RabbitMQ:
#!/usr/bin/env python
import pika, sys, os

# Here we define the main script that will be executed forever until a keyboard interrupt exception is received
def main():
    credentials = pika.PlainCredentials('thebigrabbit', 'MyS3cur3Passwor_d')
    parameters = pika.ConnectionParameters(host='5.199.168.22', port=5672, virtual_host='cherry_broker', credentials=credentials)

    connection = pika.BlockingConnection(parameters)
    channel = connection.channel()
    channel.queue_declare(queue='hello')

    # Since RabbitMQ works asynchronously, every time you receive a message, a callback function is called. We will simply print the message body to the terminal
    def callback(ch, method, properties, body):
        print(" [x] Received %r" % body)

    # Consume a message from a queue. The auto_ack option simplifies our example, as we do not need to send back an acknowledgement query to RabbitMQ which we would normally want in production
    channel.basic_consume(queue='hello', on_message_callback=callback, auto_ack=True)
    print(' [*] Waiting for messages. To exit press CTRL+C')

    # Start listening for messages to consume
    channel.start_consuming()

if __name__ == '__main__':
    try:
        main()
    except KeyboardInterrupt:
        print("Interrupted")
        try:
            sys.exit(0)
        except SystemExit:
            os._exit(0)
We can now send our first message by running our producer script:
python3 producer.py

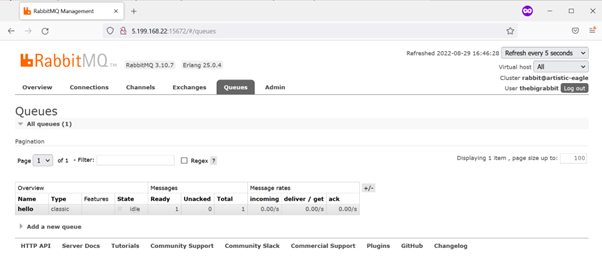
You can double check the web management console to see a queue hello with a single message that is ready to be consumed:
Let’s now run the consumer script to receive this message:

As you can see, a message Hello World! has been successfully consumed before KeyboardInterrupt signal (CTRL + C) was received.
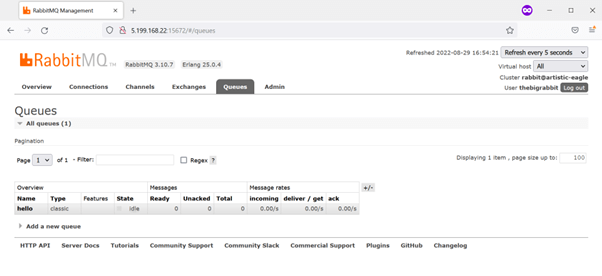
If you checked the web management console, you would see an empty hello queue:
#Conclusion
In this guide you have learned quite a lot about RabbitMQ, its advantages and a possible use case. You can now continue developing further to implement your desired message broker use case in the production environment. Check the official RabbitMQ and Pika documentation for any additional information along the way.