How to Install OpenClaw on Linux VPS


The past few years have seen a rapid rise in the number of AI tools. There’s an AI tool in almost every field: whether it's research, content creation, code generation, voice cloning, image and video generation, or anything you can think of. The list is endless.
OpenClaw, formerly Clawdbot/Moltbot, is the latest AI tool to grab the headlines and take the internet by storm. From its showcase page, it’s the Swiss Army Knife of automation, letting you automate almost anything: from everyday tasks like basic research and checking emails to more technical operations like running shell commands and creating issues on GitHub.
In this guide, we will explore OpenClaw and see how you can install it on a Linux VPS.
#What is OpenClaw?
OpenClaw is a free and open-source self-hosted AI assistant that runs locally on your PC or, even better, a VPS. It connects to messaging apps like WhatsApp, Slack, and Telegram via AI models like Anthropic, OpenAI, and Google Gemini via API keys. It runs tasks quietly in the background, scheduling and executing tasks on your behalf.
Like top AI platforms like ChatGPT, it persists data and remembers chats and conversations, making for a wholesome experience. Its model of interaction via messaging apps eliminates the need to switch between browser tabs, as evident with Claude, ChatGPT, and other popular tools.
OpenClaw helps you accomplish everyday tasks like setting reminders, browsing the internet, and fetching articles, taking notes, and organizing files. You can also use it to perform system tasks and automate technical workflows.
#Installing OpenClaw on a Linux VPS
Let’s look at how to install OpenClaw on a Linux VPS.
NOTE:
OpenClaw can be installed locally on your Linux PC; however, this is not recommended. Running OpenClaw on your machine can give it access to your personal files and emails, and, if compromised, could potentially lead to leakage of sensitive and confidential information.
Also, as OpenClaw is still in Beta, there is an elevated risk of undiscovered zero-day vulnerabilities. In fact, this warning is indicated at the start of its installation, as we shall see.
#System requirements
To mitigate security risks, we recommend deploying OpenClaw on a cloud server or dedicated machine, rather than hosting it locally. To follow along, here is what you need.
A Linux VPS with 2GB minimum RAM and 2 vCPU cores. Cherry Servers provides a simple and intuitive control panel for rapid setup of a cloud VPS.
API keys from your preferred AI model (e.g., OpenAI, Anthropic, and Google). This walkthrough utilizes Google’s Gemini 3 Pro. To use this model, you will first need to create an account in Google AI Studio and generate the keys.
#Step 1. Log in to the VPS
To get started, log in to your Linux VPS via SSH as a root user.
ssh root@server-ip-address
Once logged in, confirm you are logged in as the root user.
whoami
The output should display your account username.
Outputroot
#Step 2. Install and set up OpenClaw
There are multiple ways to set up OpenClaw, including using npm, a Node.js package manager, pnpm (a faster, more efficient package manager than npm), and Docker. However, these methods are quite manual.
Thankfully, the developers provide an installation script that automates the entire setup, from installation to integration with messaging apps. This is the direction we are going to take.
To proceed, visit OpenClaw’s website and navigate to the Quick Start section. Click change, then select the macOS/Linux option.
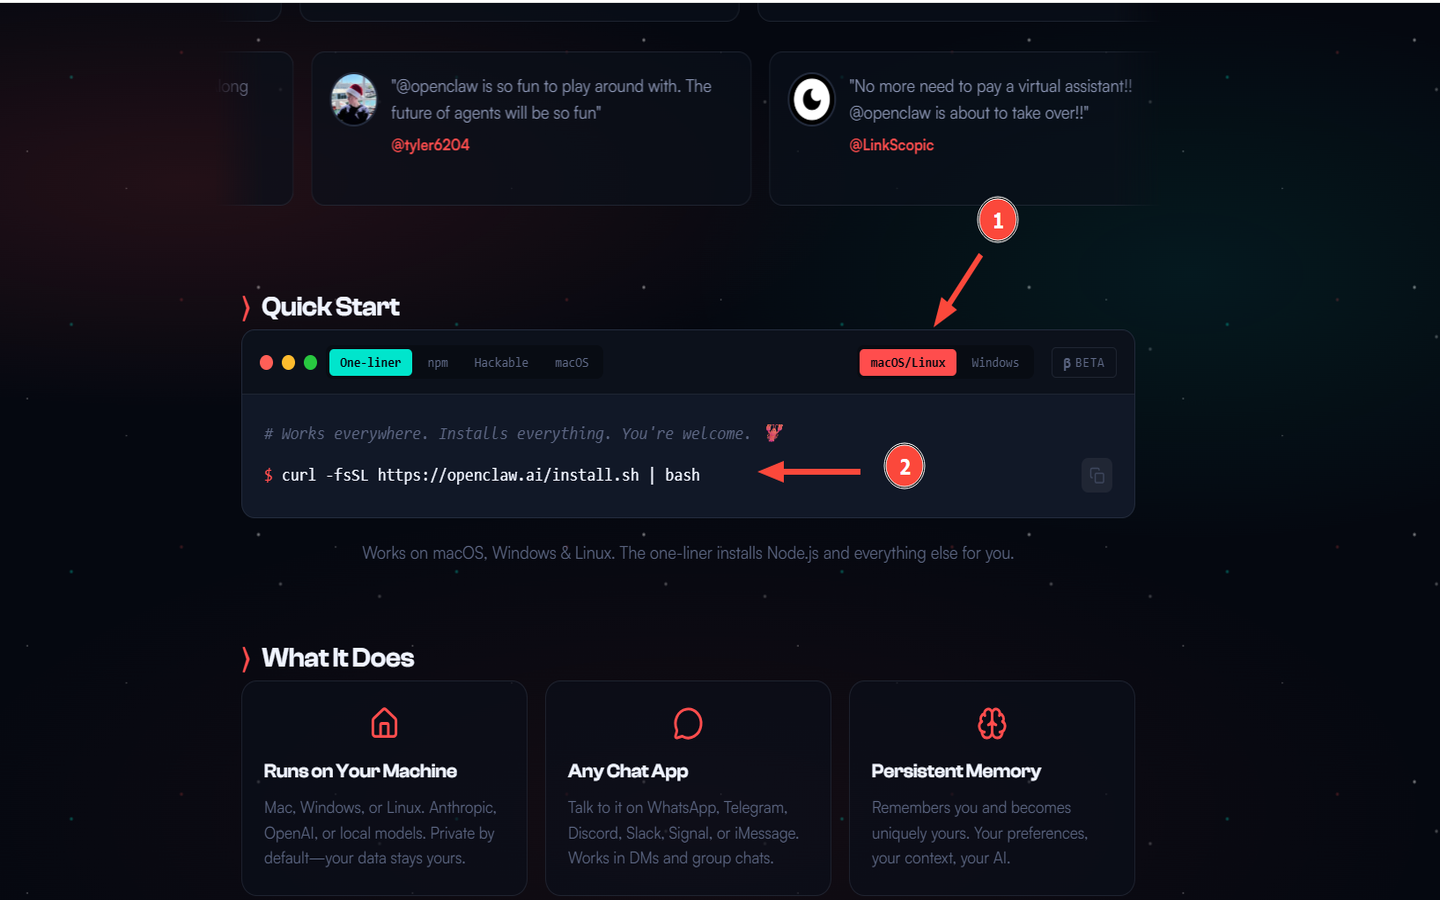
Copy and run the script.
curl -fsSL https://openclaw.ai/install.sh | bash
The script does a few things:
- Detects your OS
- Updates the local package index
- Installs Node.js 22.22 from Nodesource
- Installs prerequisite packages like git, curl, gnupg, and ca-certificates
- Installs OpenClaw and starts the onboarding setup
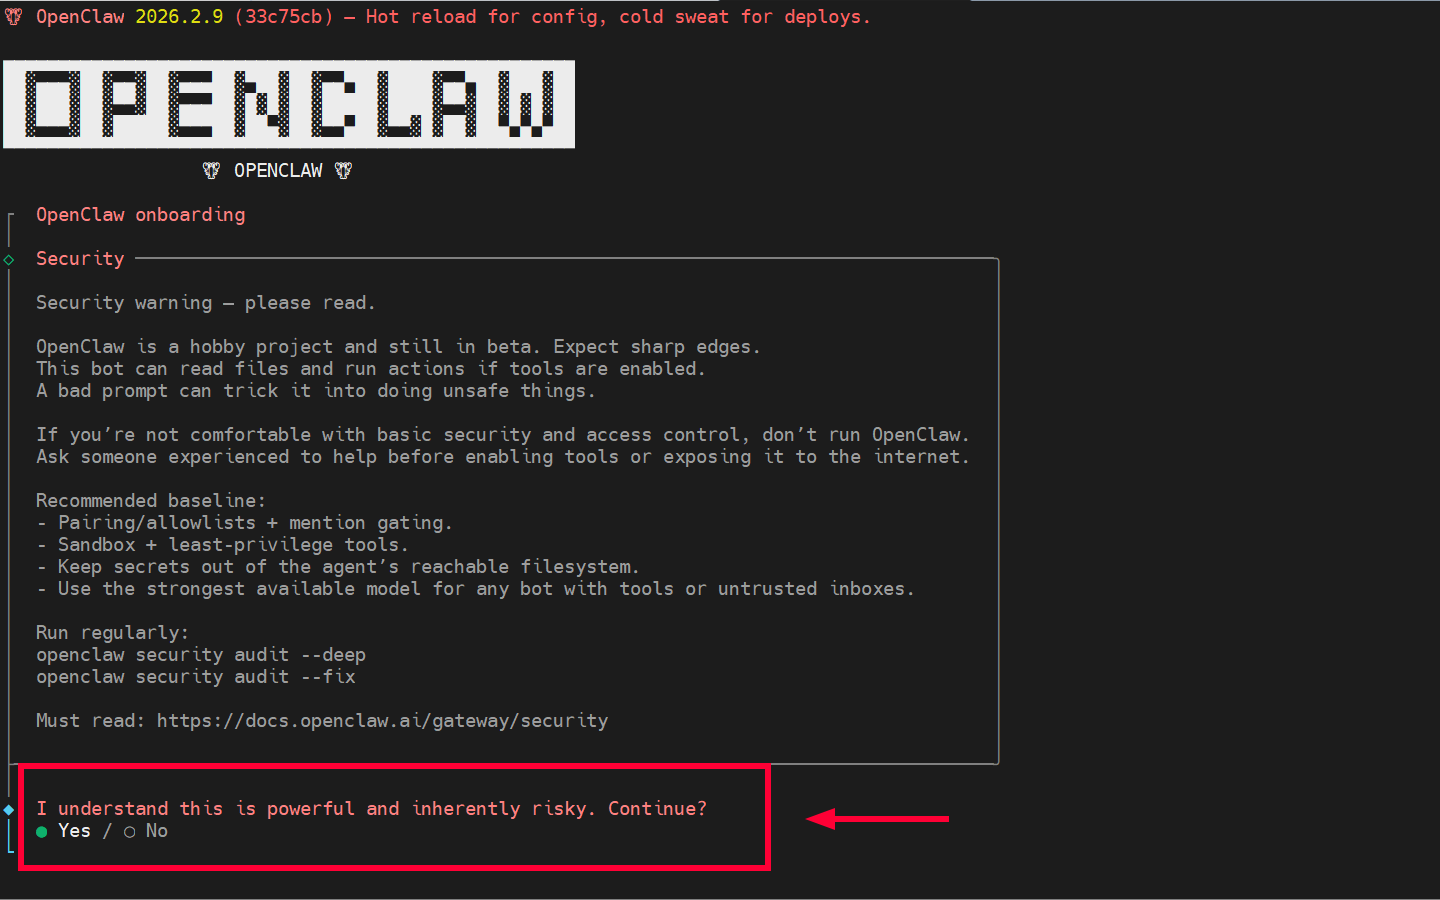
Once all prerequisite packages are installed, the onboarding setup will appear as a text-based user interface with instructions in each section. Be sure to read through before responding to the prompts.
The first section provides a disclaimer about running OpenClaw and associated risks. It also provides guidelines for running OpenClaw for enhanced security.
To proceed, select Yes and press ENTER.
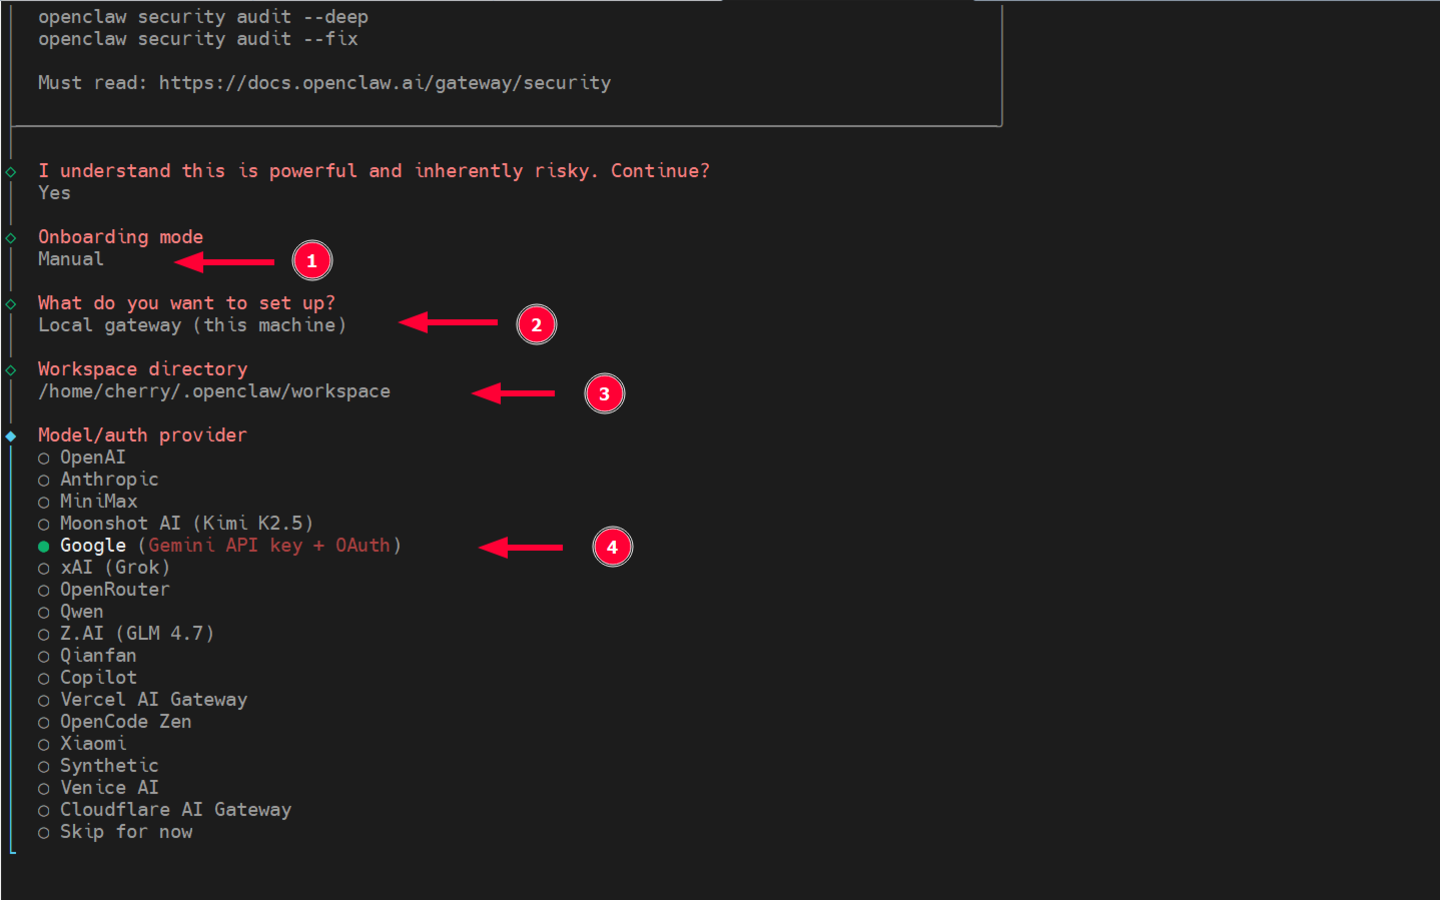
Next, select Manual for the onboarding mode. This will allow you to manually define OpenClaw’s settings, including the gateway mode, AI model to use, etc.
For the Gateway type, select Local Gateway on loopback address (127.0.0.1).
The workspace directory is automatically created in the root home directory. So, press ENTER.
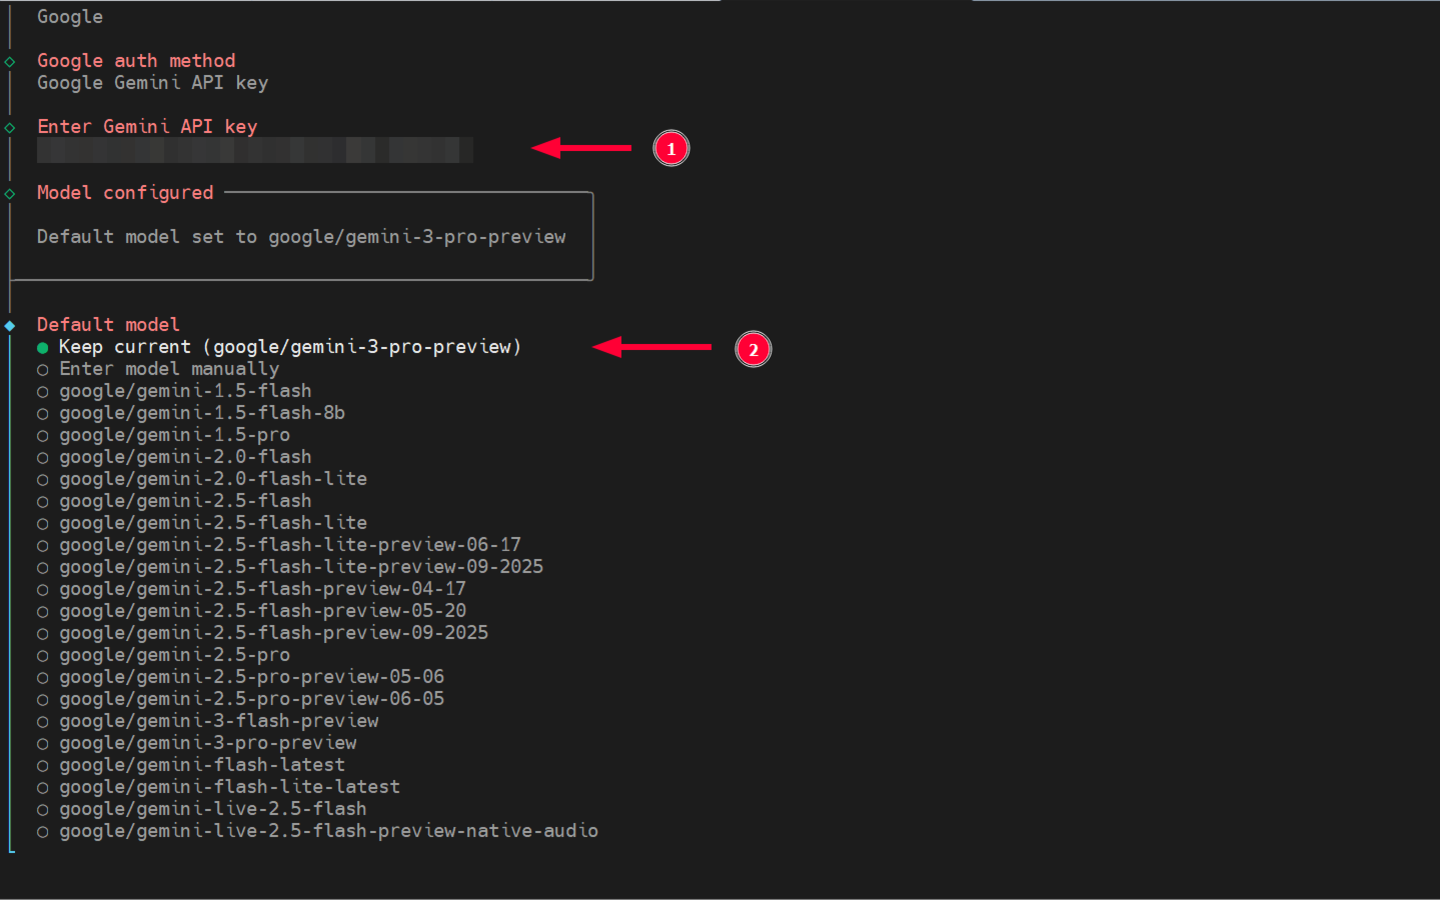
Next, specify your preferred AI provider. In this example, we are using Google’s Gemini.
Next, specify an authentication method. Here, we have chosen to provide an API key.
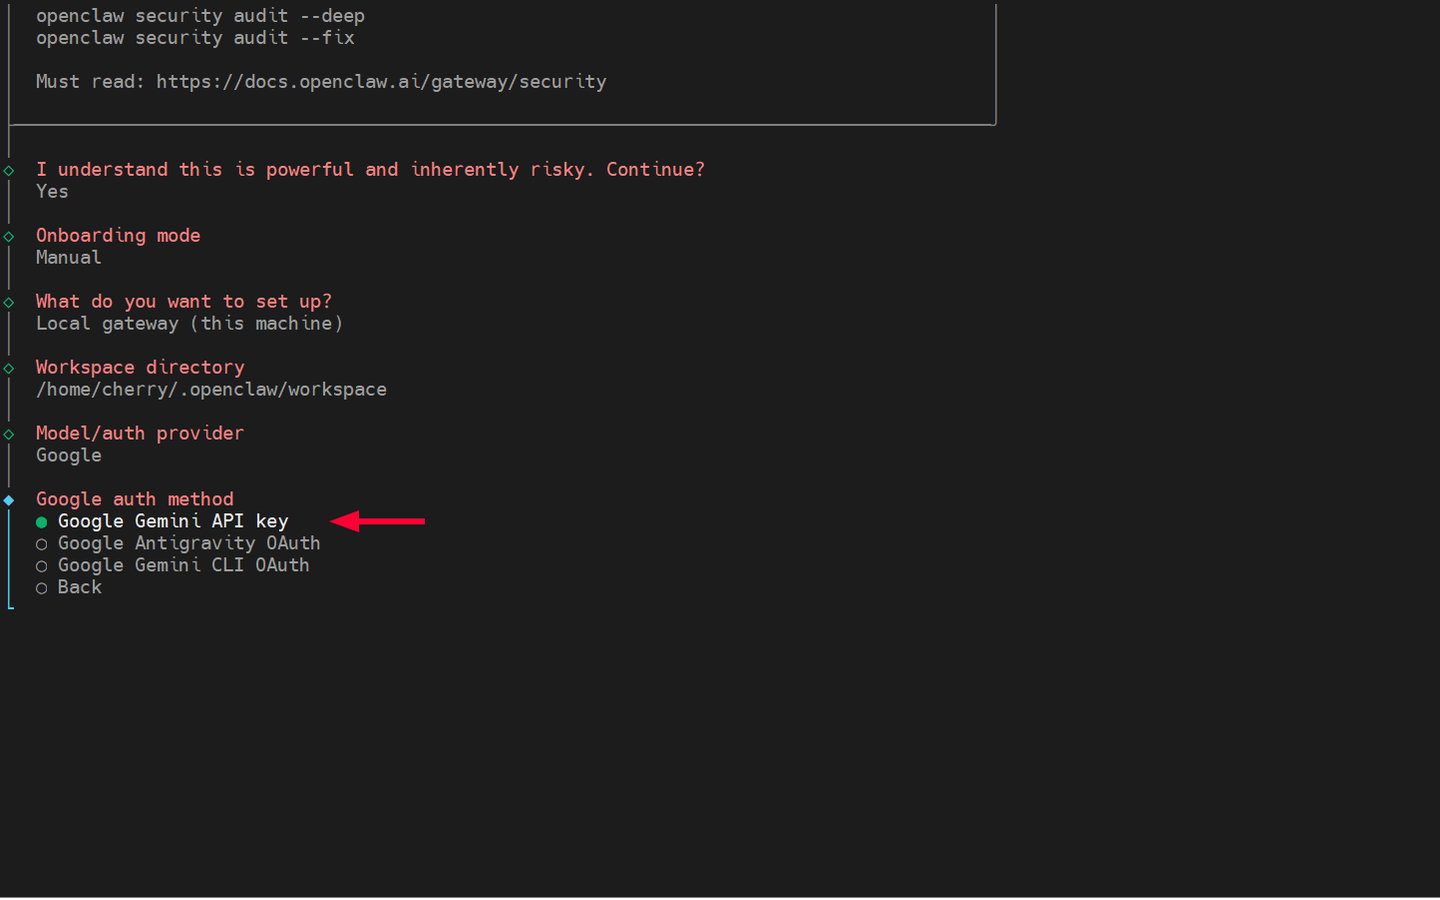
Ensure to paste the API key from your AI provider and select the model. For the model, we’ll keep it simple and go with the default.
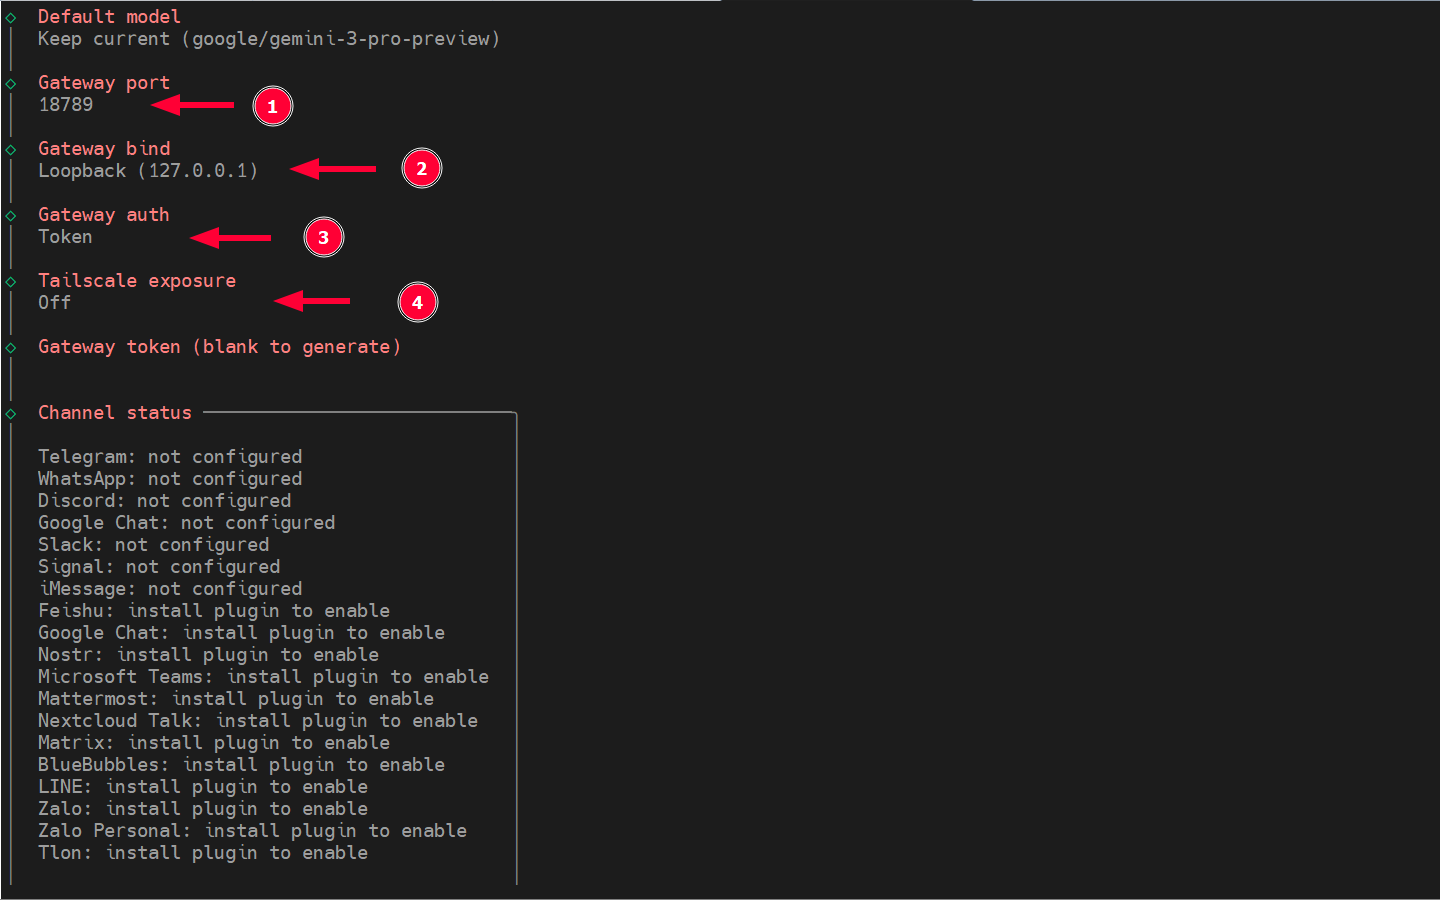
For the Gateway port, hit ENTER to select the default port ** (port 18789)**
Also select the default option for the Gateway bind: Loopback ( 127.0.0.1 ).
For Gateway auth, press ENTER to automatically generate a token that you will use to access the Control UI dashboard, as we shall see later on.
Leave the Tailscale setting in the default off selection.
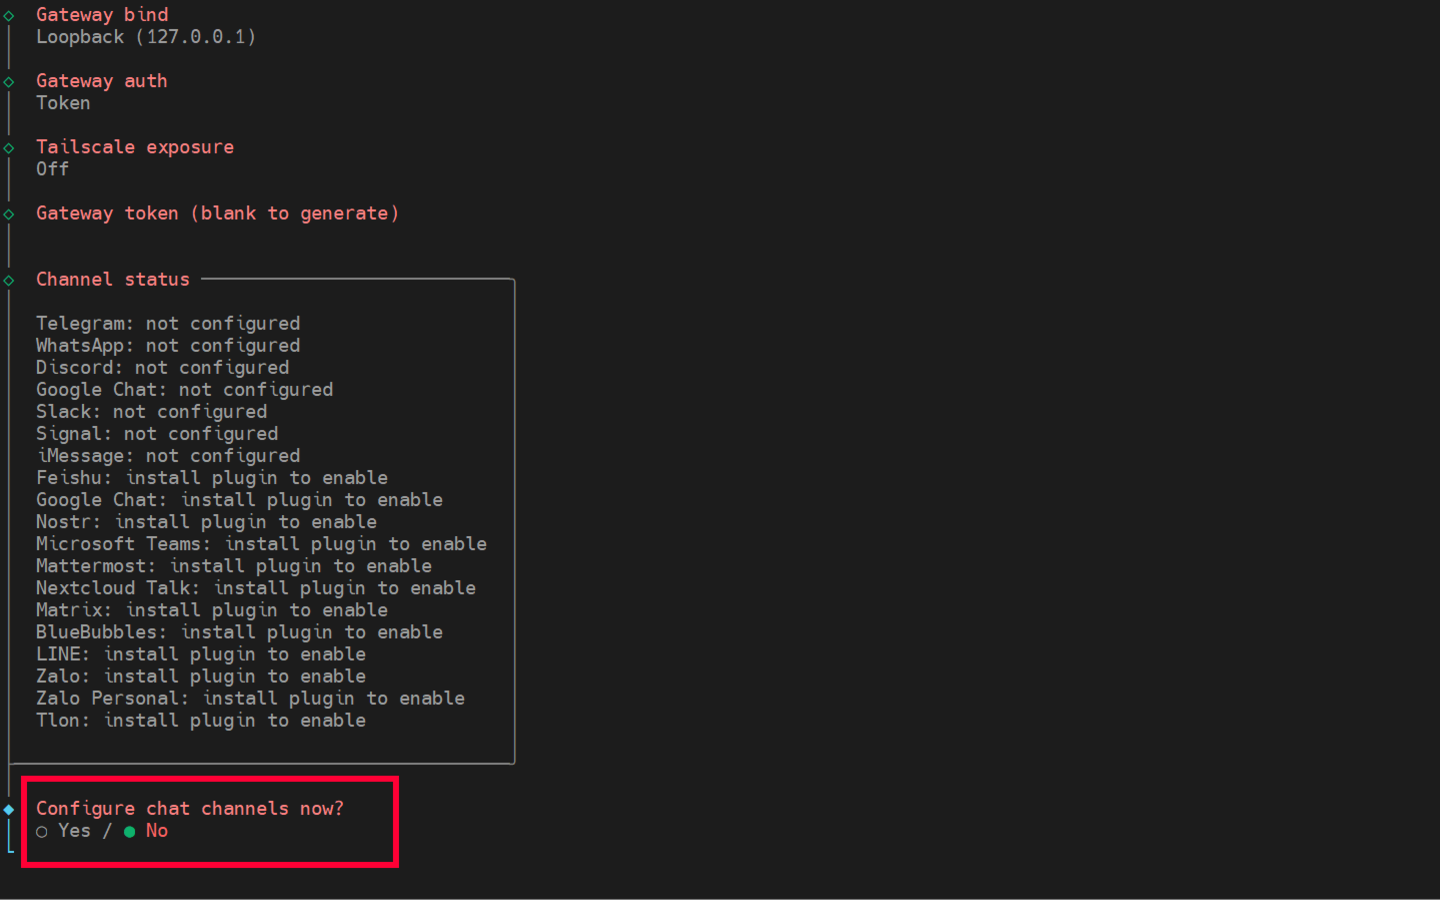
Next, you will be required to configure a Channel or messaging app to interact with OpenClaw. You can choose whether or not to configure your preferred Chat channel. For now, we will skip this and revisit once the setup is complete.
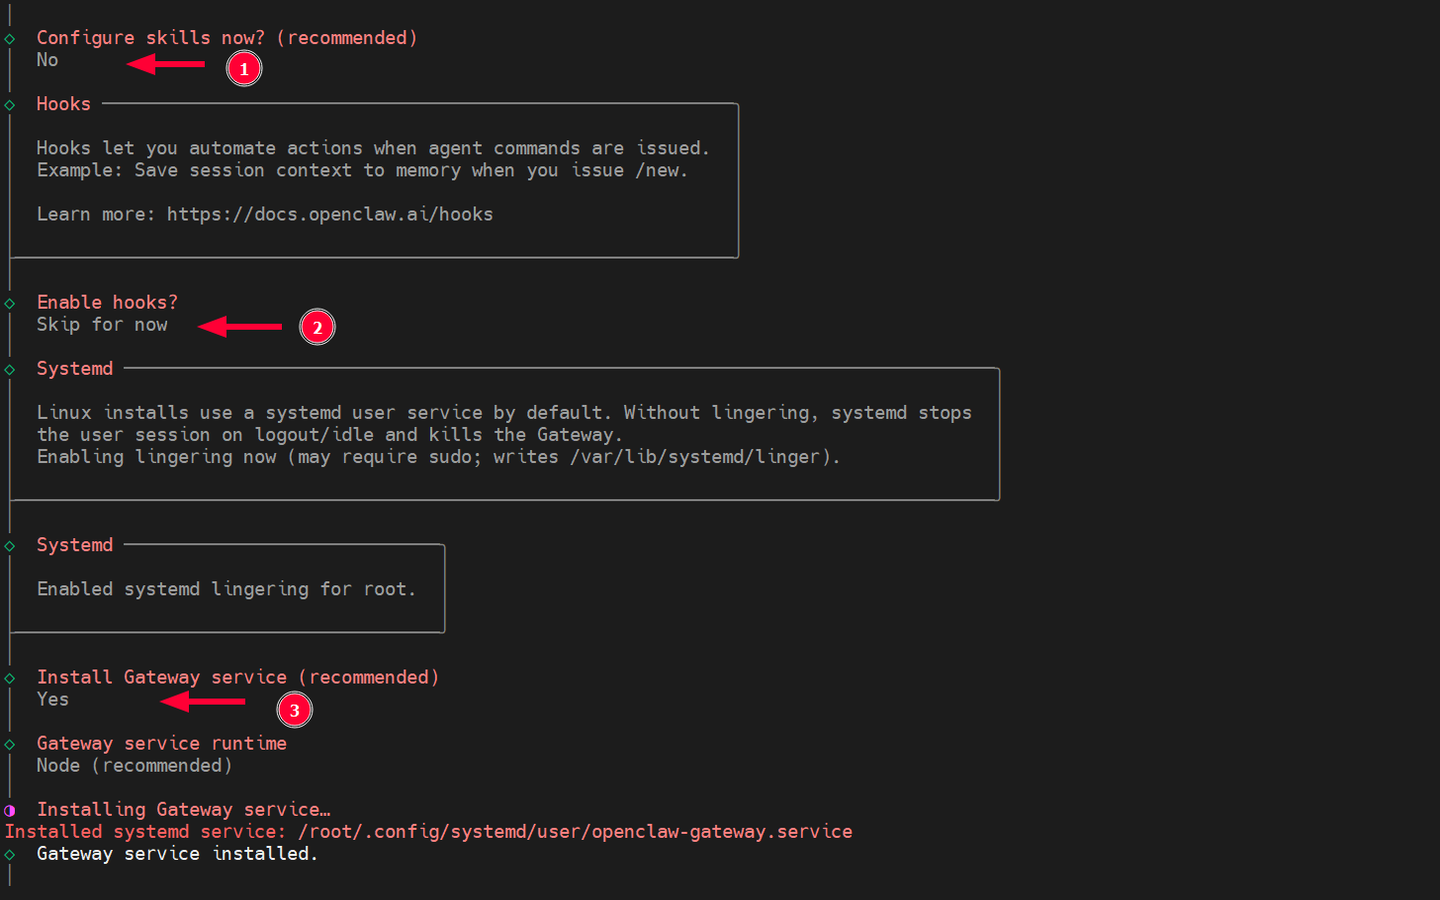
Similarly, you can skip configuring Skills and enabling Hooks.
In OpenClaw, a skill is an added functionality that performs a specific task, such as scraping a website, running shell commands, sending a message, or fetching data from an API. Clawhub is an online store for skills where you can browse and install your preferred skill via npm or pnpm.
A Hook is a trigger or code that executes before or after an event. It can also be triggered after task completion, on task failure, upon receipt of a message, or during agent startup or shutdown.

Moving on, install the Gateway service. This is a daemon service that handles communication between OpenClaw, messaging platforms, and other AI agents.
It also provides a web UI for browser-based tasks, enables automation, agent monitoring, configuration of various settings, and more.
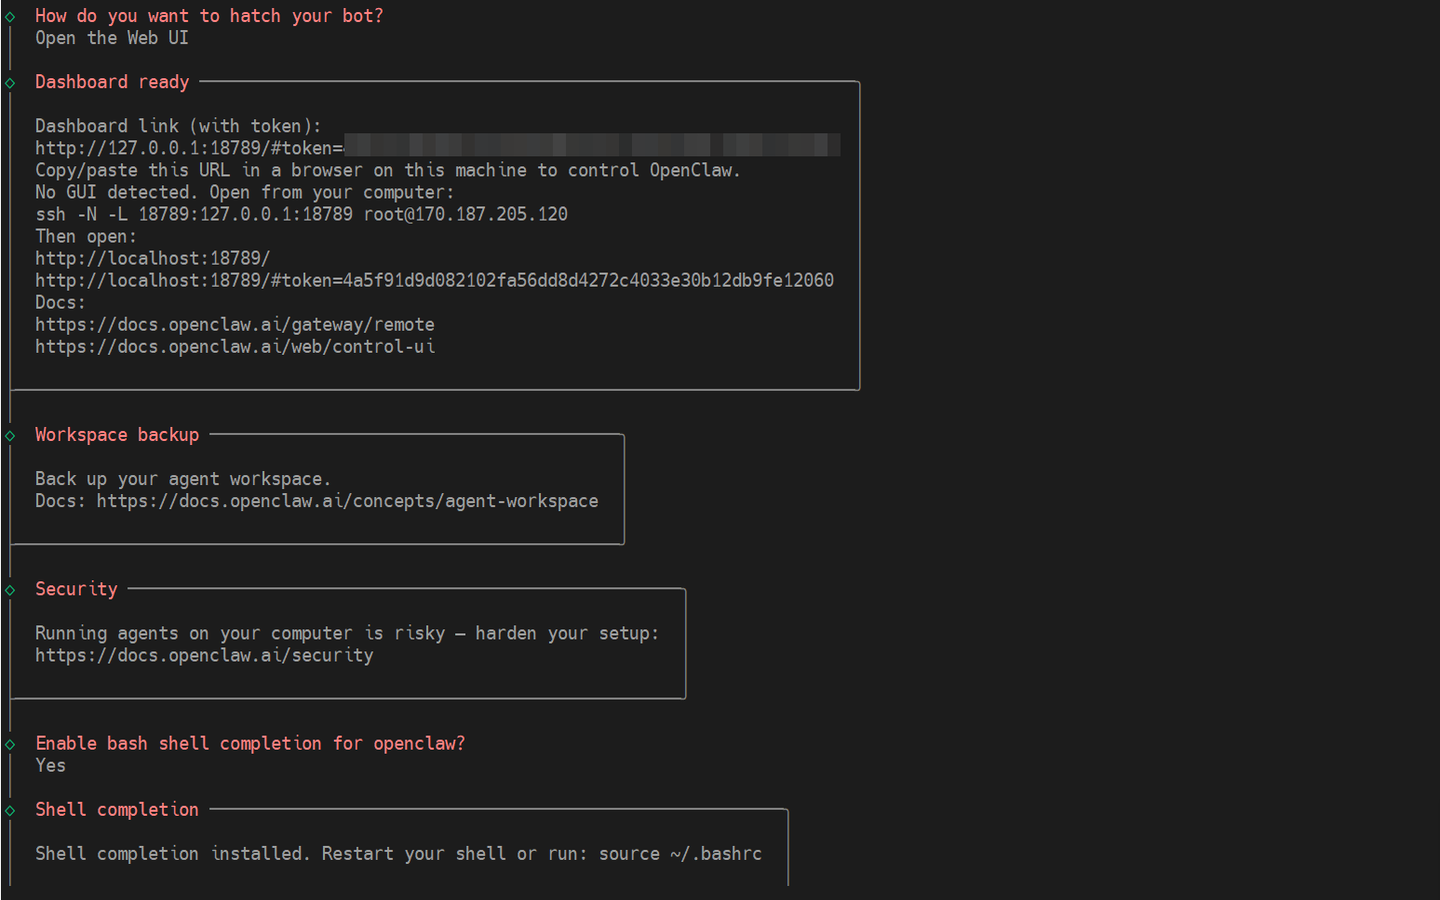
Lastly, you’ll get the option to hatch your Bot. The TUI (Text User Interface) is recommended, but this won’t work for now since we haven’t configured any messaging platforms. Instead, you can select the *Open the Web UI option.
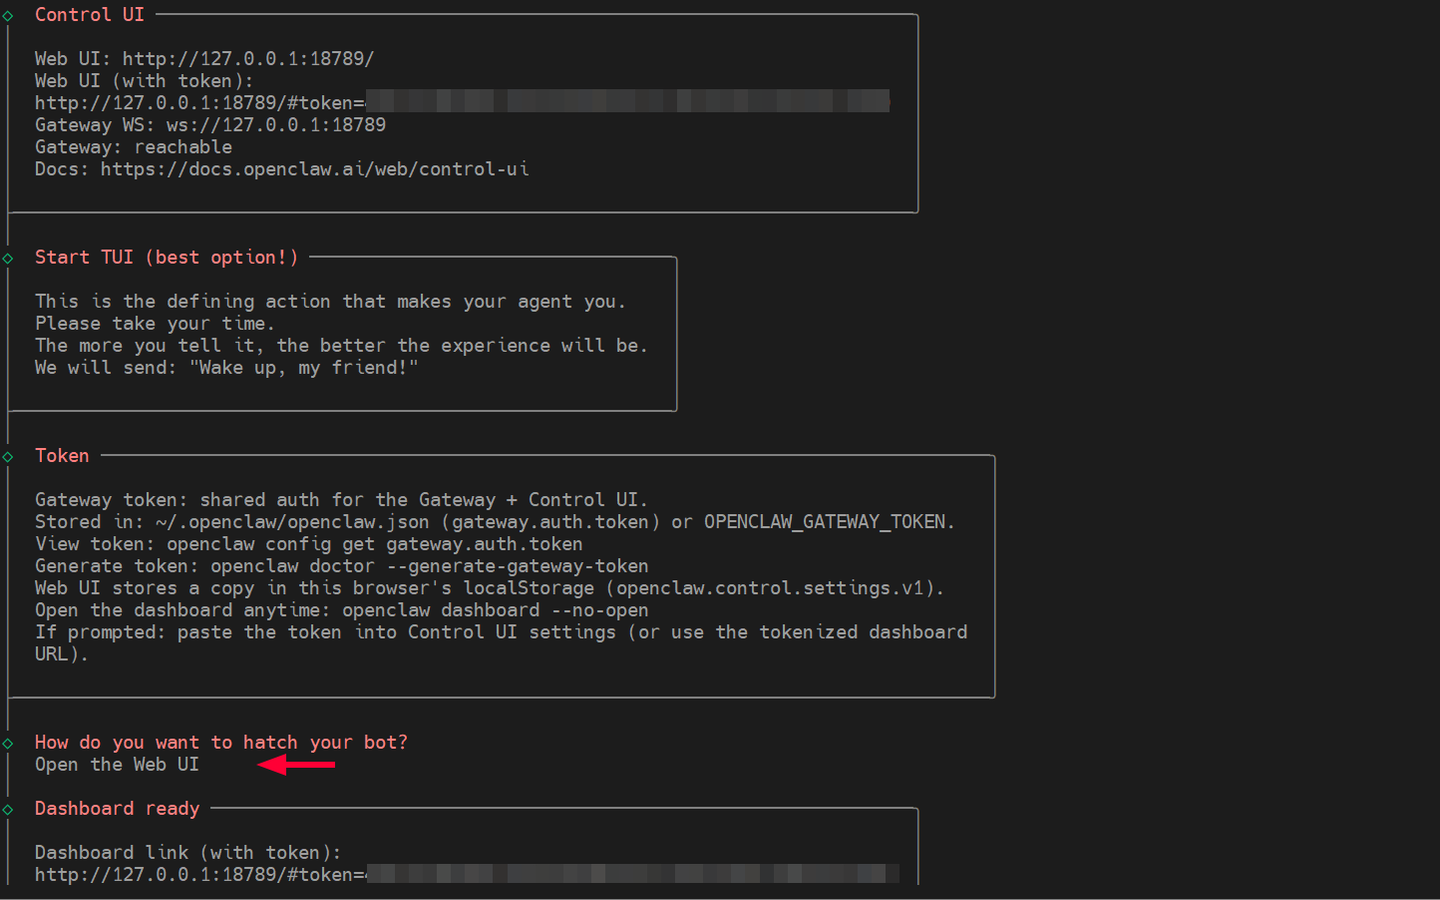
You will also find a tokenized dashboard link to access the OpenClaw web UI. But first, you need to initiate an SSH tunnel to the cloud server from your local machine.
#Step 3. Confirm gateway status and health
OpenClaw's gateway is the entry point to the AI system. It listens to inbound traffic from various channels like Webhooks, Telegram bots, WhatsApp, and API calls, then routes it to the appropriate workflows and agents. It also manages and tracks user sessions and maintains the context of conversations.
The gateway runs quietly in the background as a systemd service, ensuring the AI agent runs 24/7. It runs automatically upon installation. To confirm, simply run the command:
openclaw gateway status
The command displays the status of the service (this should appear as enabled). It also provides key information such as the location of the main configuration files, the dashboard URL, PID, port, and bind address (in this setup, the gateway should listen on IP 127.0.0.1 on TCP port 18789).
You can confirm the network connections and PID of the gateway service using the ss command:
ss -pnltu | grep openclaw
To restart the service, run the command:
openclaw gateway restart
#Step 4. Create an SSH tunnel to the VPS
One of the benefits of an SSH tunnel is support for dynamic port forwarding. This allows flexible network configurations, including access to services on a remote server without opening ports to the public. In our case, we will access OpenClaw's control UI from our local machine by creating an SSH tunnel.
To create an SSH tunnel, run the command shown, which was also provided by the setup at the end of OpenClaw’s setup. Remember to use your server’s IP.
ssh -N -L 18789:127.0.0.1:18789 root@170.187.205.120
Provide the password and hit ENTER. Afterward, you will only see a blinking cursor, confirming the tunnel has been set up.
#Step 5. Access OpenClaw web UI
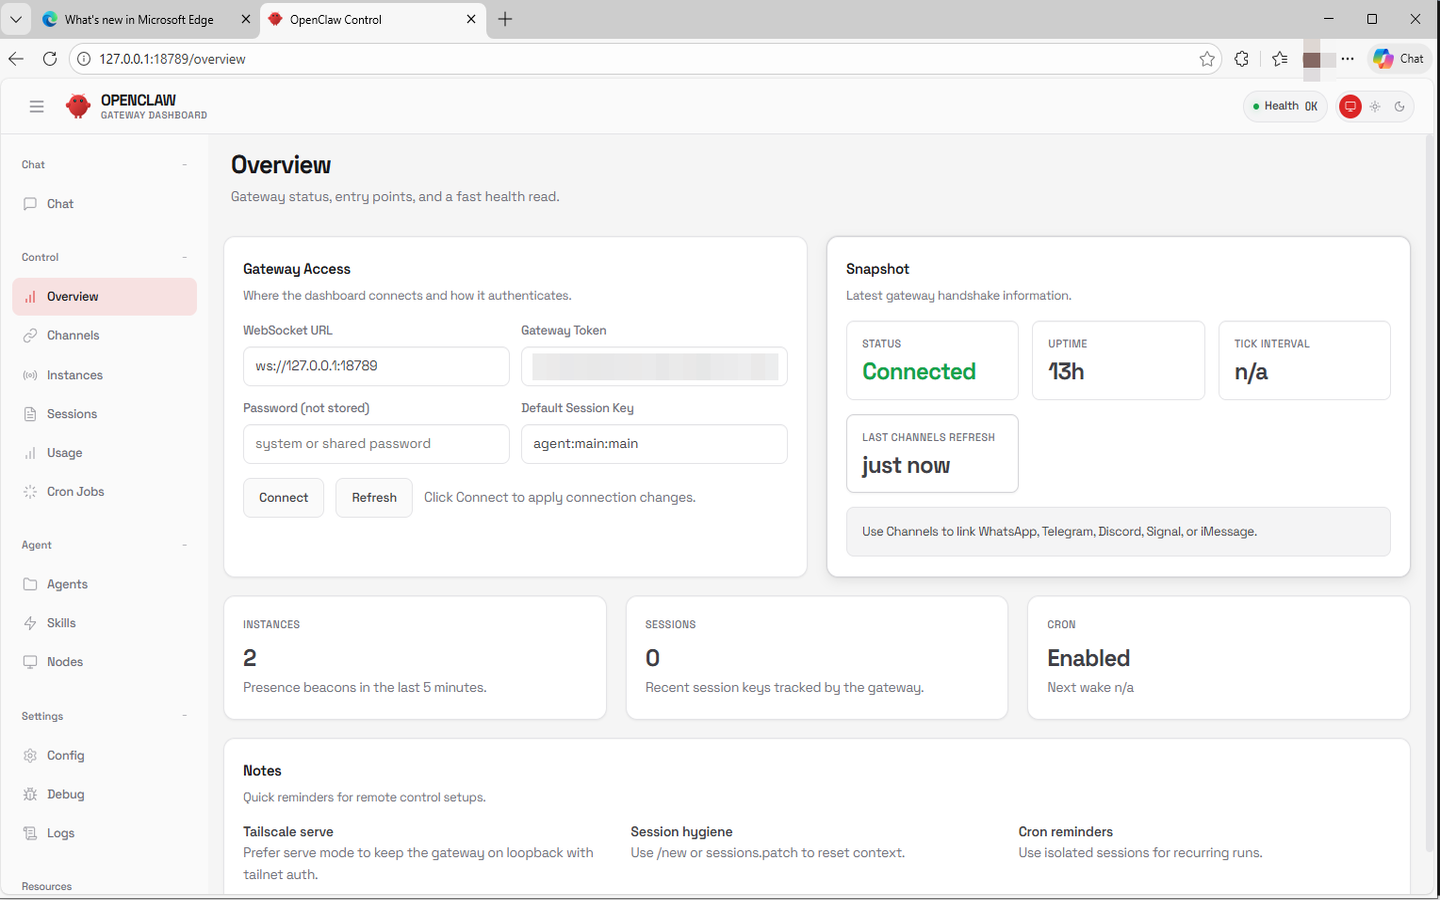
With the SSH tunnel in place, open your browser and browse the tokenized link provided in Step 2. You should be able to see OpenClaw’s web UI.
Click Overview to have a glance at the OpenClaw’s health status. If all went well, you should see a green Connected status indicator and uptime statistics.
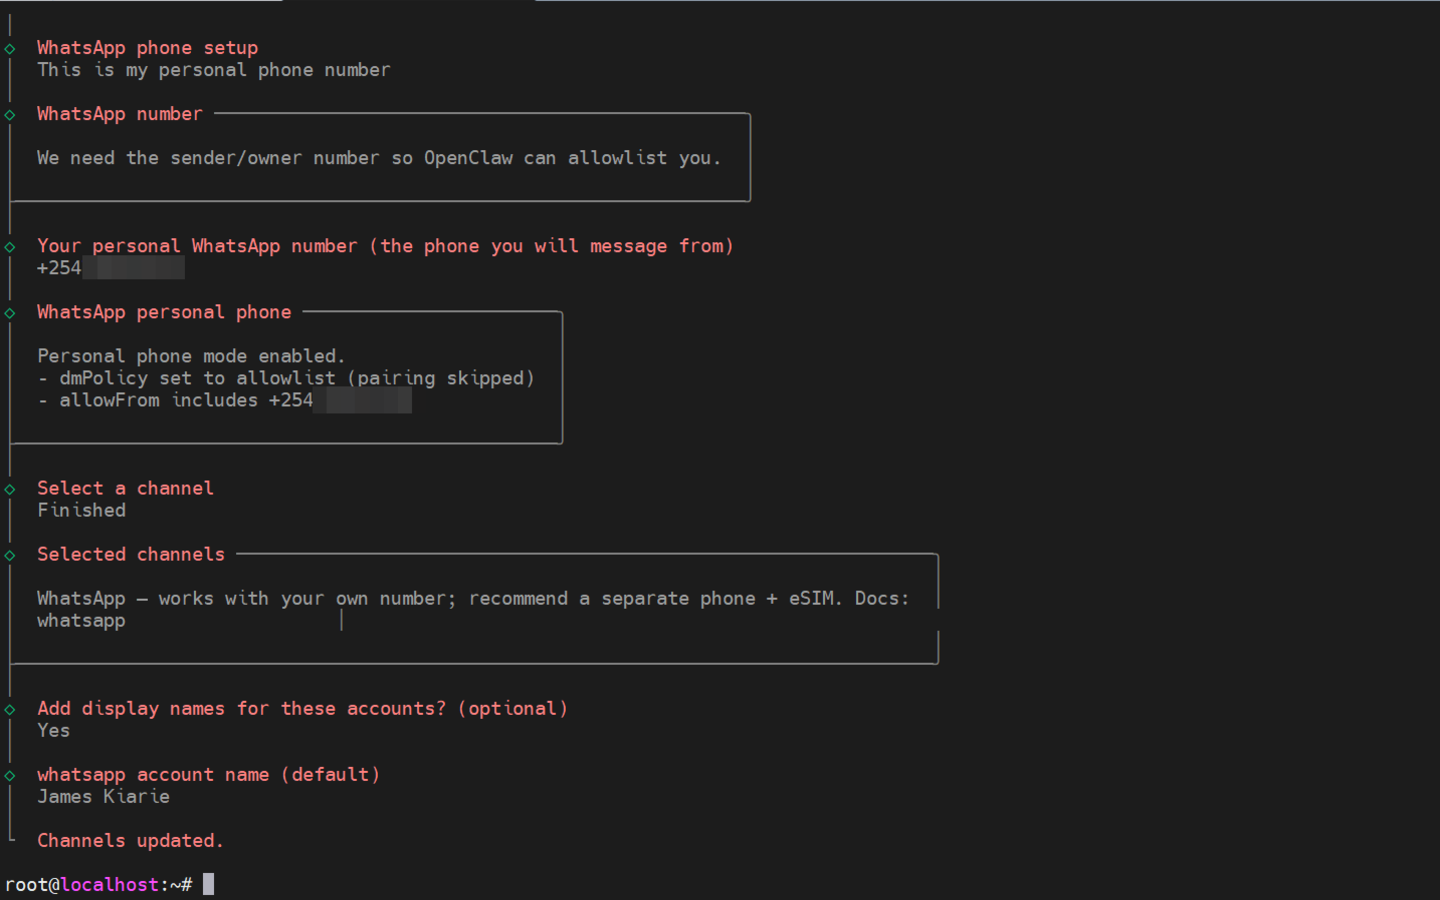
#Step 6. Add WhatsApp to OpenClaw
To add the WhatsApp application to OpenClaw, start by running the following command:
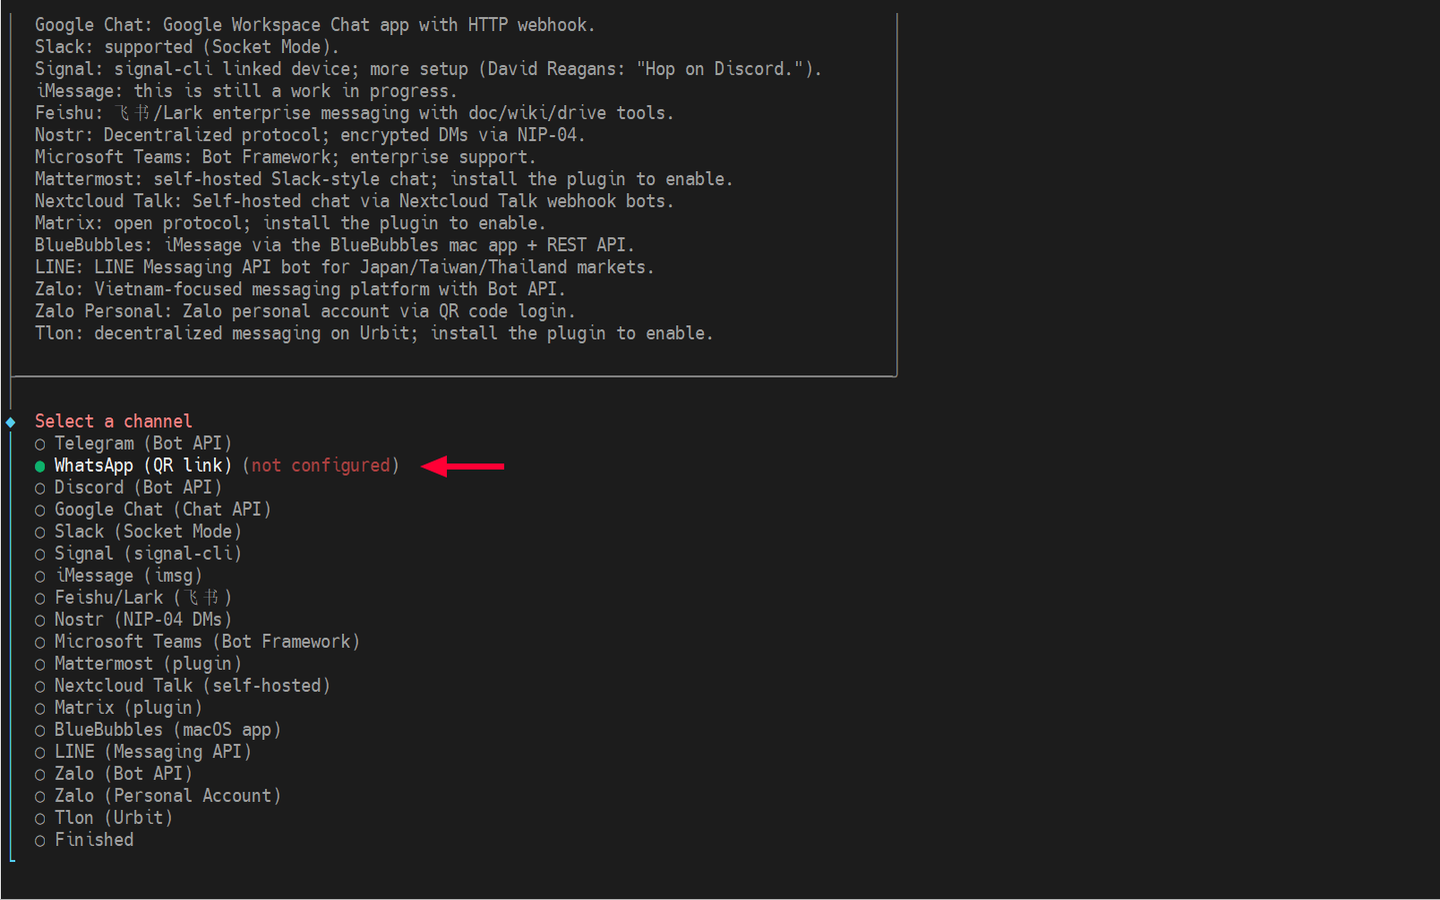
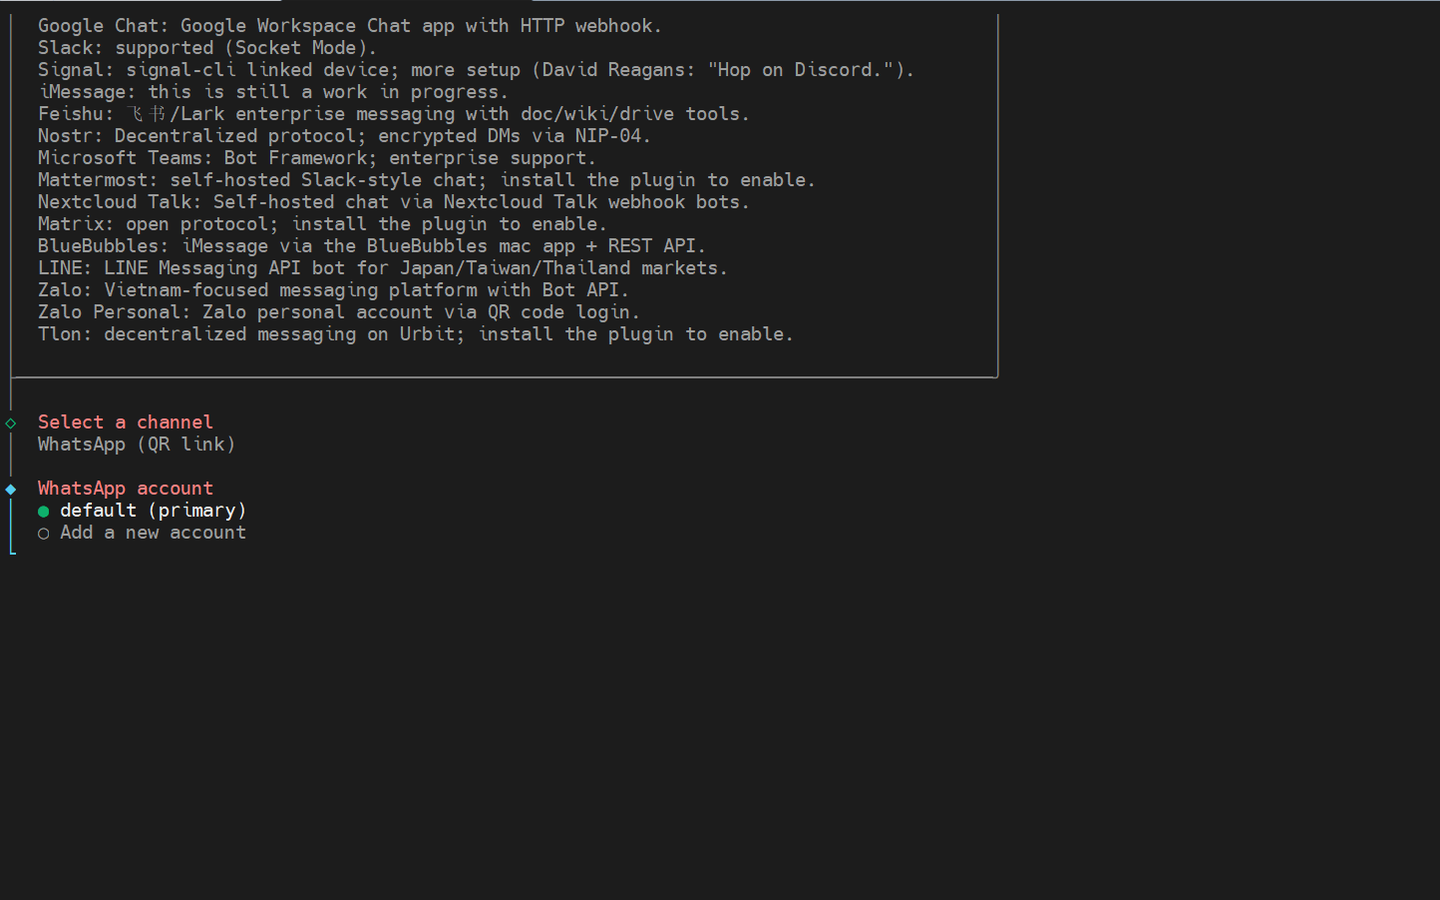
openclaw channels add
The command walks you step-by-step through adding your preferred messaging app. Since you are integrating WhatsApp with OpenClaw, select WhatsApp (QR Link). This will require you to scan a QR code from your phone.
Next, select default (primary account). This will use your WhatsApp default profile.
Next, select to link WhatsApp with a QR code.
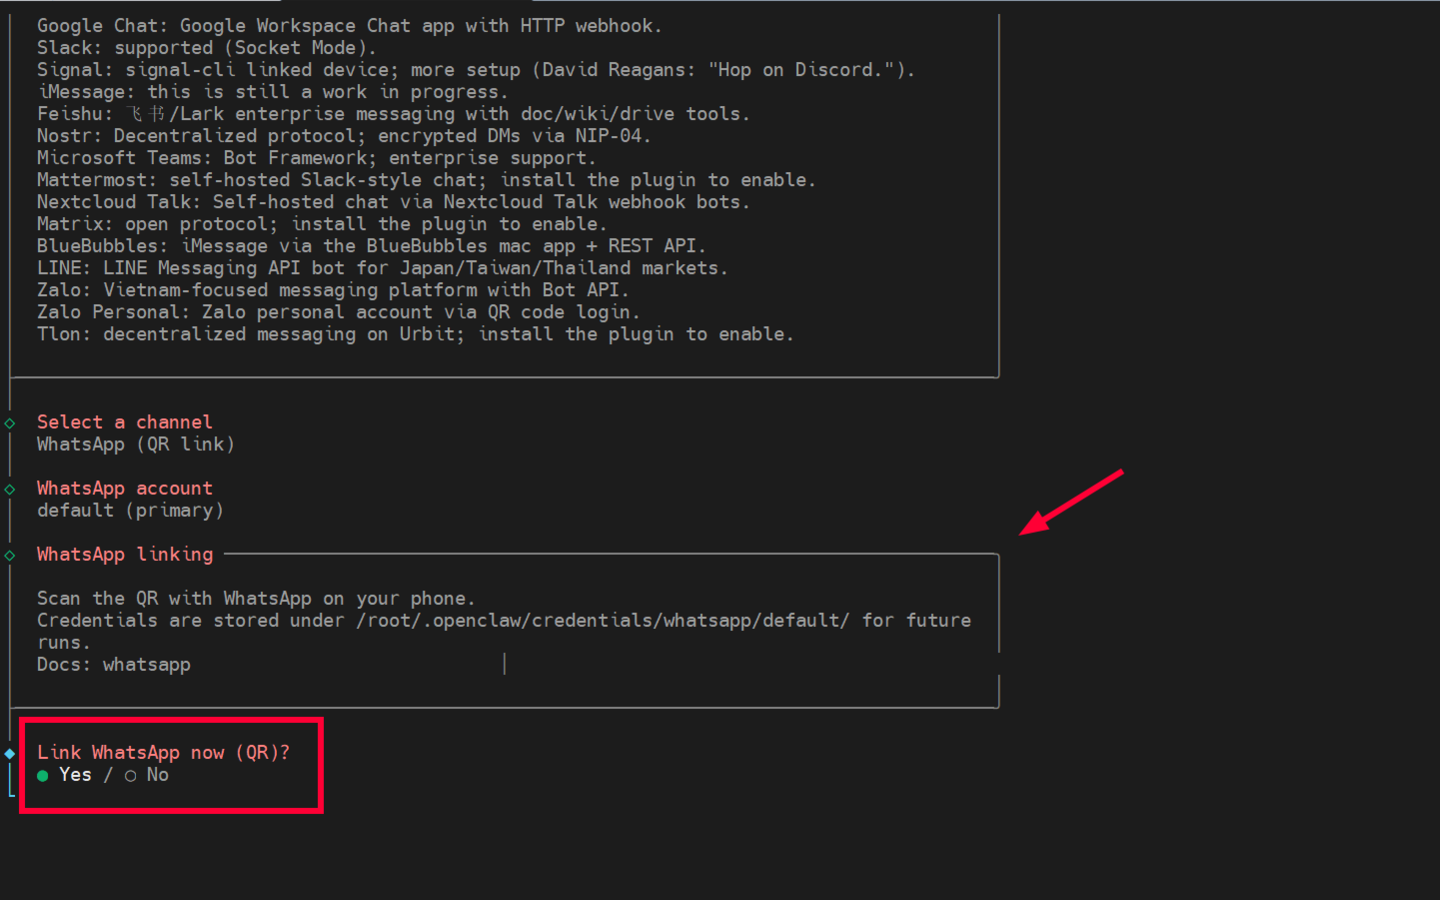
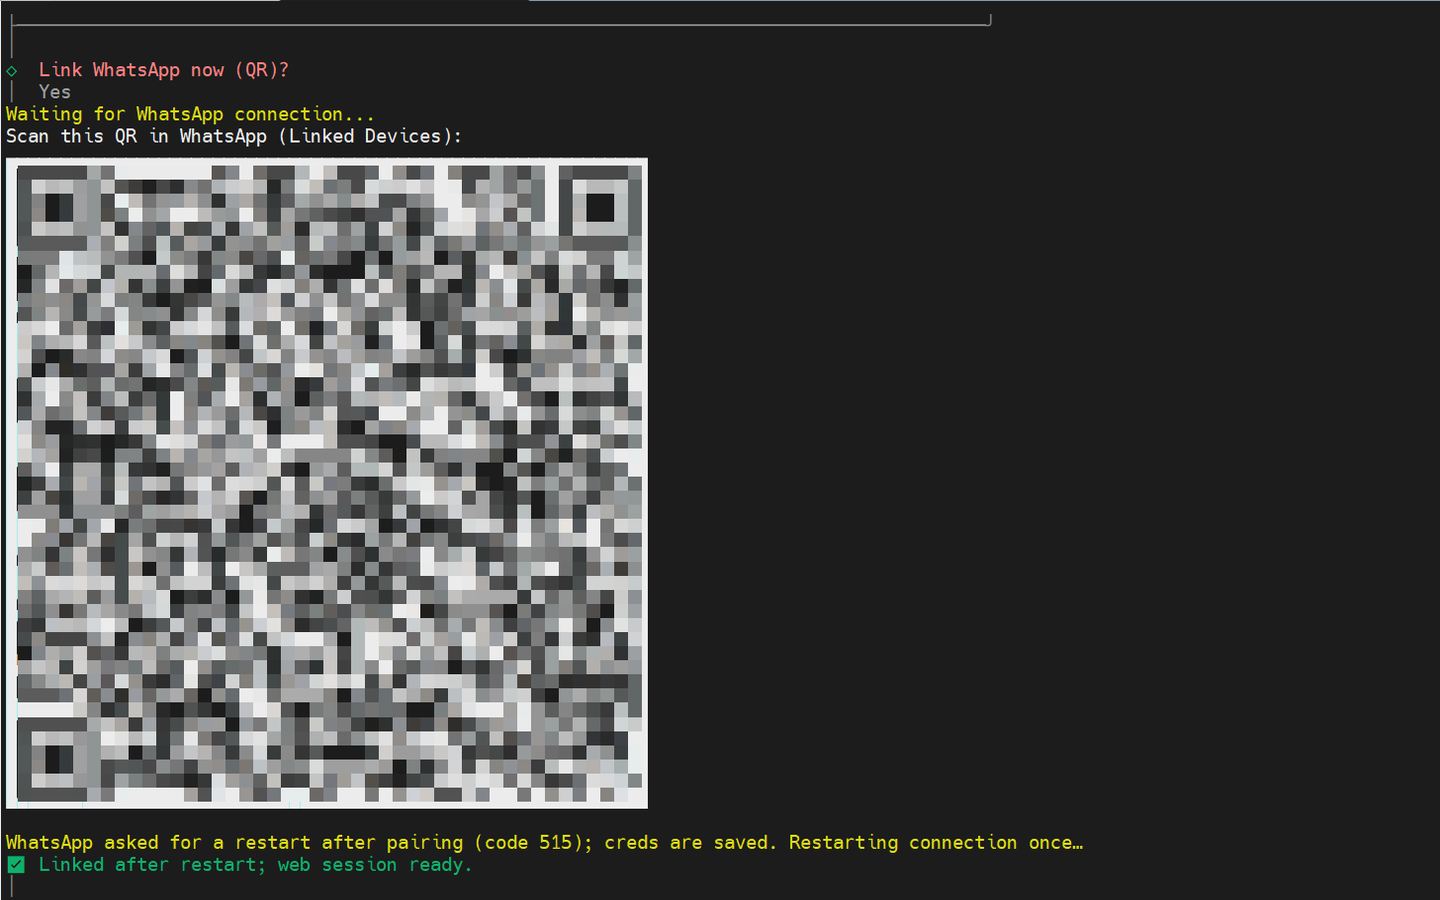
Scan the QR code with your smartphone/tablet to link it. Afterwards, you will get an acknowledgement of successful pairing.
Provide your full phone number (the one you typically use with WhatsApp), starting with the country code. Scroll down and select Finished.
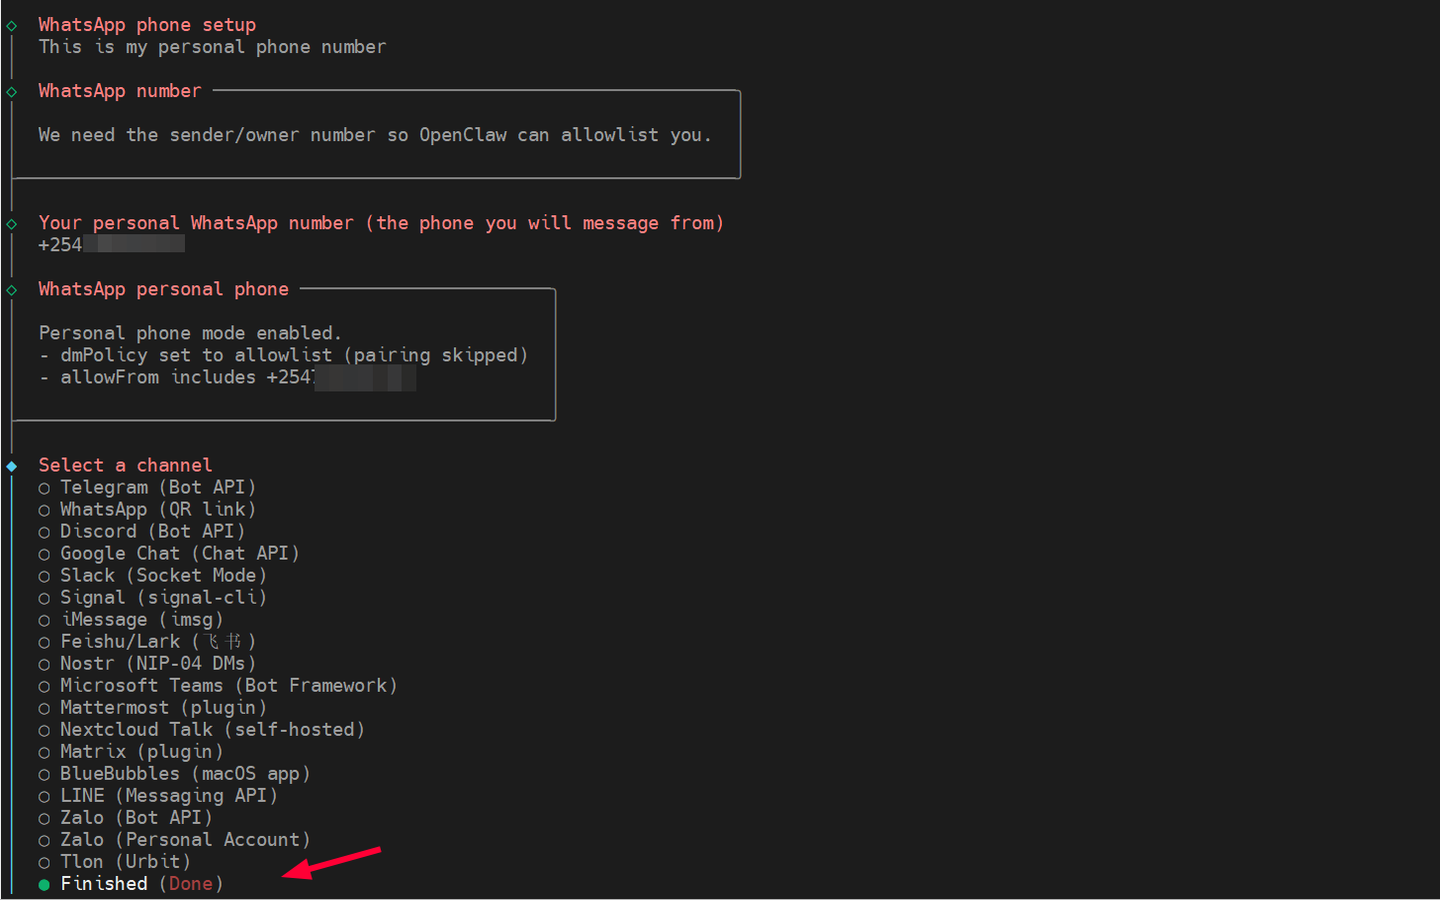
Feel free to add a display name at the end; this is optional and not strictly required.
#Step 7. Chat with OpenClaw from WhatsApp
At this point, we have successfully added WhatsApp as the preferred messaging channel or application. To list all connected apps, run the command:
openclaw channels list
You will get output that resembles ours.
Output🦞 OpenClaw 2026.2.9 (33c75cb) — curl for conversations.

Chat channels:
- WhatsApp default (James Kiarie): linked, enabled

Auth providers (OAuth + API keys):
- google:default (api_key)

│
◇
Usage: no provider usage available.

Docs: gateway/configuration
From here, you can now start interacting with OpenClaw. To test if the integration is working, run the following command from the CLI:
openclaw message send --channel whatsapp --target "your-phonenumber" --message "Hello from OpenClaw"
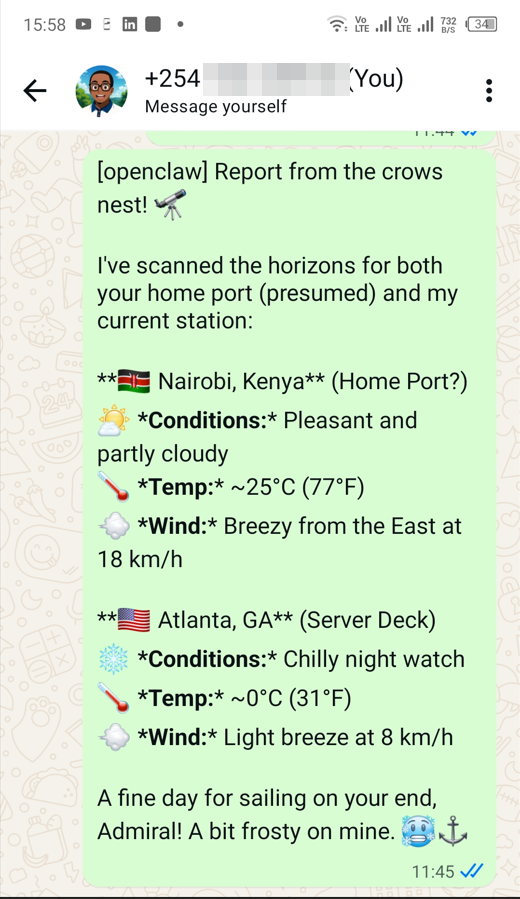
Head over to WhatsApp, and you should see the message. You will be prompted to identify yourself and give it a name, and from there, you can continue chatting with OpenClaw, fetch information, and schedule tasks.
Here is a screenshot of the conversation I had with OpenClaw 🙂

I prompted it for the current weather details at two locations: my current location and Atlanta, Georgia. This is the response I got.
From here, you can experiment with more prompts, add more skills, schedule jobs, and test various functionalities. Visit OpenClaw’s official documentation for more information and detailed use.
#Configuration files
This guide wouldn’t be complete without talking about where Openclaw stores its configuration files. Once installed, all configuration files go in the ~/.openclaw directory in your home directory. To preview its contents, run the command:
ls -al ~/.openclaw
Let’s focus on the main configuration files and folders. Understanding them will help you manage your installation.
-
~/.openclaw.json: This is the main configuration file of your OpenClaw setup. It contains your preferred AI provider, plugins, active messaging channels, session cookies, gateway settings, skills, and other global settings. -
workspace/- As the name implies, this is Openclaw’s work area. It contains files that provide a footprint of OpenClaw's actions, such as fetching data, reading, and writing files. It contains the following files:AGENTS.md,HEARTBEAT.md,IDENTITY.md,SOUL.md,TOOLS.md, andUSER.md. These files define the agent’s functionalities, personality, behavior, and automated reminders. -
devices/- contains thepaired.jsonfile, which provides information about paired devices such as smartphones, PCs, and tablets. It contains pairing information, token sessions, device IDs, and approval information, ensuring only approved devices can run tasks or trigger actions. -
agents/- Contains information about individual AI agents, including custom skills, configurations, definitions, and behavior. -
credentials/- Stores information about linked services (e.g., Telegram and WhatsApp sessions), OAuth tokens, and API keys. -
cron/- Stores cron jobs or scheduled tasks.
#Conclusion
OpenClaw is a powerful and autonomous toolkit that allows developers and AI enthusiasts build task-driven systems that integrate with the real world. With 50+ integrations and support for a wide range of chat applications, it offers a solid, hands-on experience with AI-powered automation.
That was a step-by-step tutorial on installing OpenClaw on a Linux VPS. You also learned how to add WhatsApp to the AI assistant and get started with running automated tasks. We hope you have managed to set it up on your VPS and you are up and about experimenting with various functionalities.


