How to Install PostgreSQL on Ubuntu 22.04 | 4 Steps


With over 35 years in active development, PostgreSQL has found its way into multiple domains, including web and mobile applications, geospatial analysis, and building highly scalable and fault-tolerant applications. If you want to use it to your advantage, this tutorial will show you how to install PostgreSQL on Ubuntu 22.04 in a few steps, including how to create a new database and tables.
#What is PostgreSQL?
PostgreSQL is one of the leading and most widely used open-source Relational Database Management Systems (RDBMS). It is a robust and high-performance database system known for its flexibility in handling multiple data types, stability, integrity, and concurrency.
#Why use PostgreSQL?
Some of the key reasons why PostgreSQL is a popular choice are that it is open-source and has a good reputation for being highly reliable and robust even under heavy database workloads. In many cases, PostgreSQL is preferred to MySQL owing to its advanced features such as materialized views, advanced locking system, table inheritance, PostGIS for analyzing Geospatial data, and many more.
PostgreSQL comes second overall after MySQL across all respondents (learners and professional developers), according to a StackOverflow Developer Survey of 2022. However, PostgreSQL is the most preferred database management system among professional developers, with a market share of 46.48%, with MySQL coming in second place with 45.68%.
PostgreSQL 16 is the latest release of PostgreSQL when publishing this tutorial, released on September 2023 and packs with numerous enhancements and improvements, including:
- Concurrent bulk loading;
- Enhanced JSON support;
- Detailed and insightful monitoring using pg_stat_io view;
- Improved security features and access control;
- Performance improvements in parallel execution;
- Improvements in privileges administration.
Check out the release notes for an in-depth look at all the improvements and new additions.
#Prerequisites
To follow along and learn how to install PostgreSQL on Ubuntu 22.04, ensure you have the following requirements in place:
- An instance of Ubuntu 22.04 with SSH access;
- A sudo user configured on the server.
Let’s now dive in and continue with the PostgreSQL installation instructions.
Run your PostgreSQL deployments in a high-performing and cost-effective open cloud infrastructure. Cherry Servers' bare metal cloud and virtual servers offer automatic scaling, pay-as-you-go pricing, and free 24/7 technical support.
#How to install PostgreSQL on Ubuntu 22.04?
You can install PostgreSQL on Ubuntu using two approaches:
- Install the database from the default Ubuntu repository
- Install it using the Official PostgreSQL repositories.
Not using Ubuntu 22.04? Check our guide on how to install PostgreSQL on Ubuntu 24.04.
#Option 1: Install PostgreSQL from Ubuntu repository
The first section walks you through installing PostgreSQL on Ubuntu 22.04 from the default Ubuntu repository.
#Step 1: Update the system
If you are starting with a fresh instance of Ubuntu 22.04, the first step is to refresh the local APT cache. This updates the local package index files on the latest packages available and their versions.
To update the local package lists, run the command
sudo apt update
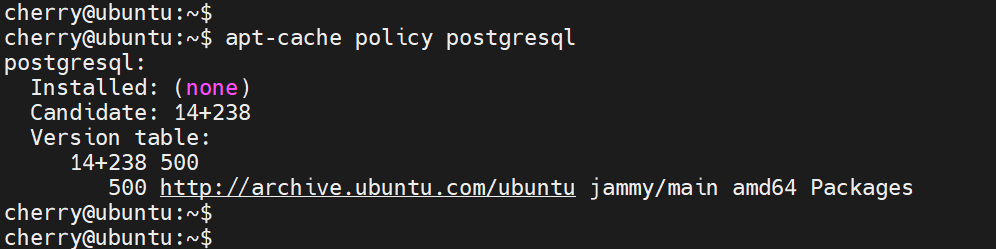
PostgreSQL is already available on Ubuntu repositories. You can confirm this by running the command:
sudo apt-cache policy PostgreSQL
#Step 2: Install PostgreSQL on Ubuntu 22.04
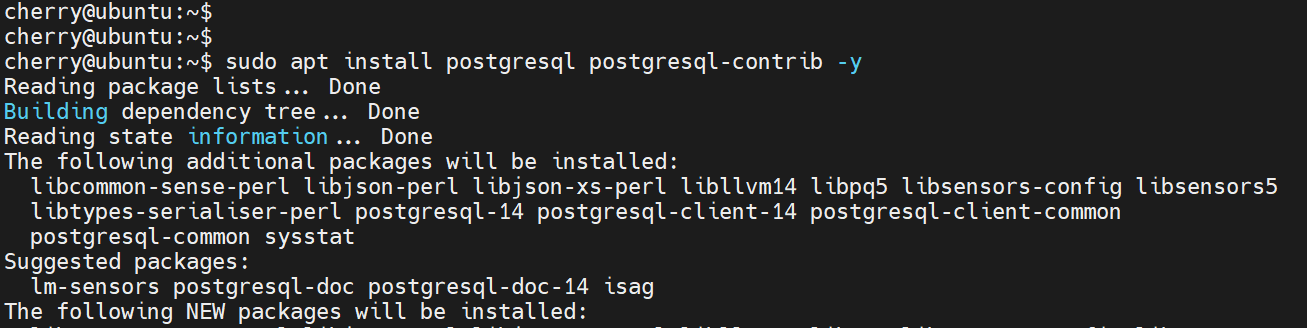
To install Ubuntu 22.04 from the default repository, run the command:
sudo apt install PostgreSQL PostgreSQL-contrib -y
The command installs the PostgreSQL database alongside other additional packages and libraries.
Verify the version installed by running the command:
psql --version
The following output confirms that we have successfully installed PostgreSQL 14.9.

#Option 2: Install PostgreSQL from the official PostgreSQL repository
As you may have noticed, the default Ubuntu repository does not provide the latest PostgreSQL version. We have installed PostgreSQL 14.9, which is not the current version. To install the latest release, you need to install it from the official PostgreSQL repository.
Follow the steps provided to install PostgreSQL from the Official repository.
#Step 1: Add the PostgreSQL repository
To start, add the PostgreSQL repository:
sudo sh -c 'echo "deb https://apt.PostgreSQL.org/pub/repos/apt $(lsb_release -cs)-pgdg main" > /etc/apt/sources.list.d/pgdg.list'
The command adds the pgdg.list repository file to the /etc/apt/sources.list.d directory.
#Step 2: Import the repository signing key
Next, import the repository signing key.
wget --quiet -O - https://www.PostgreSQL.org/media/keys/ACCC4CF8.asc | sudo apt-key add -
#Step 3: Update the local package index
With the repository signing key in place, update the package index so the system can use the newly added PostgreSQL repository.
sudo apt update
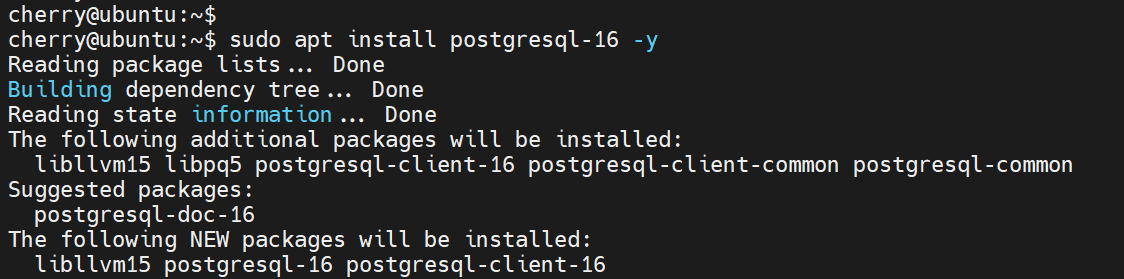
#Step 4: Install PostgreSQL 16 on Ubuntu 22.04
Finally, install PostgreSQL 16 from the PostgreSQL repository using the APT package manager.
sudo apt install PostgreSQL-16 -y
The command installs the PostgreSQL server and client alongside other additional packages and dependencies.
Once the installation is complete, confirm the version of PostgreSQL installed.
psql --version
The output below confirms that we have the latest version of PostgreSQL installed on Ubuntu 22.04.

#Manage PostgreSQL service
PostgreSQL runs quietly in the background upon installation. By default, it listens on TCP port 5432. You can verify this using the ss command:
sudo ss - pnltu | grep 5432

If you edit any configuration file that is tied to the database server, a restart is required to apply the changes made.
To restart PostgreSQL, run the command:
sudo systemctl restart PostgreSQL
Alternatively, you can reload the service. This applies to the changes made to the database configuration without restarting the service, which usually takes longer and causes service interruption.
sudo systemctl reload PostgreSQL
To confirm if PostgreSQL is running or not, check its status.
sudo systemctl status PostgreSQL
The output below confirms that PostgreSQL is running.

If PostgreSQL is not running for whatever reason, start it as shown.
sudo systemctl start PostgreSQL
To stop the service, execute:
sudo systemctl stop PostgreSQL
Those are the basic commands mostly used for managing the running nature of PostgreSQL.
#Access PostgreSQL prompt
The installation of PostgreSQL creates a user account called postgres, which is a standard UNIX account. The 'postgres' user also assumes the default Postgres role.
By default, PostgreSQL uses the concept of roles to handle authentication. It employs identity authentication, which associates the Postgres role with a corresponding UNIX account.
There are two ways of accessing the PostgreSQL prompt. One way is to switch to the postgres user account first.
sudo -i -u postgres
The command takes you to the bash shell of the ‘Postgresuser. Next, run thepsql` command to access the prompt.
psql
From here, you can start executing your database management tasks.
To exit the prompt, run:
\q
Quitting the prompt takes you back to the postgres account on your terminal. To exit, and go back to your regular account execute the exit command.
exit
Alternatively, you can switch over to the postgres user account and access the psql prompt in one command.
sudo -i -u postgres psql
This ushers you to the PostgreSQL prompt without passing through any bash shell. To exit the prompt, yet again, run the command:
\q
#Set up password authentication for Postgres user
This postgres user is the system's most highly privileged database user. The user has all the roles that allow them to perform all database operations, including creating the database, viewing and updating records, and deleting databases.
By default, accessing the database system using a Postgres user does not require a password, which can pose a serious security risk to anyone with access to your server.
Therefore, password authentication should be configured for the user so that only authorized personnel can run database management tasks.
To proceed, access the PostgreSQL prompt.
sudo -u postgres psql
Set the password for the postgres user as follows:
\password
Enter a password and confirm it.
Finally, exit the shell.
\q

Alternatively, you can run the following query:
ALTER USER postgres PASSWORD '<new-password>';
Next, access the pg_hba.conf configuration file.
sudo vim /etc/PostgreSQL/16/main/pg_hba.conf
Navigate and locate the following line.
local all postgres peer
Set peer to md5 to allow md5 authentication.
Next, locate these two lines.
host	 	 all           all				scram-sha-256
Host		 all	     127.0.0.1			scram-sha-256
Edit scram-sha-256 to md5.
host	 	 all           all				md5
Host		 all	     127.0.0.1			md5
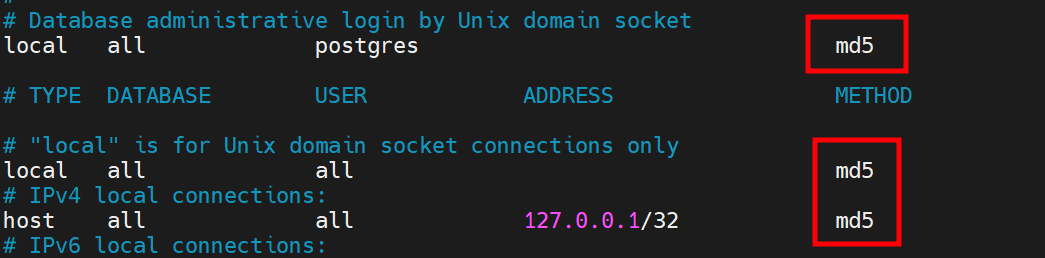
Save the changes and exit the configuration file.
To apply changes, reload PostgreSQL:
sudo systemctl reload PostgreSQL
The next time you log in to the shell, you will be prompted for a password.
#Create a new database
In this section, we will explore how to create a database in PostgreSQL and create tables in them. The default PostgreSQL installation comes with three existing databases: postgres, template0, and template1.
To list existing databases, run the command:
\l

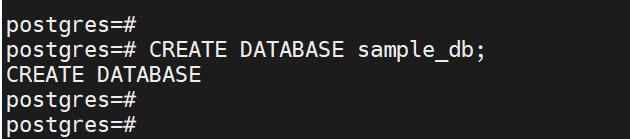
To create a database, run the CREATE DATABASE command followed by the database name. For example, to create a database called sample_db, run the query:
CREATE DATABASE sample_db;
You will get the following output on the PostgreSQL prompt proving that the database was successfully created.
Output
CREATE DATABASE
#Create a new table and insert records
To create a table you need to, first, switch over to the database you want the table to be stored in. To do so, use the \c option followed by the database name.
\c sample_db

Once you have switched to the database, you can start creating tables. In SQL syntax, a table takes the following syntax:
  CREATE TABLE [IF NOT EXISTS] table_name (
   column1 datatype(length) column_contraint,
   column2 datatype(length) column_contraint,
   column3 datatype(length) column_contraint,
);
In the above syntax:
The CREATE TABLE statement creates the table.
The IF NOT EXISTS option lets you create a new table only if it does not exist. If the table already exists, you'll get a notification instead of an error and PostgreSQL will skip creating the table.
Thirdly, specify a list of table columns separated by commas. A column comprises a column name, data type , the length of data, and lastly, the column constraints. Constraints are rules that determine the nature of the data to be stored. For example, 'PRIMARY KEYis a unique value that uniquely identifies a record. TheNOT NULL` constraint ensures that a value cannot be null. This is a missing or unknown value.
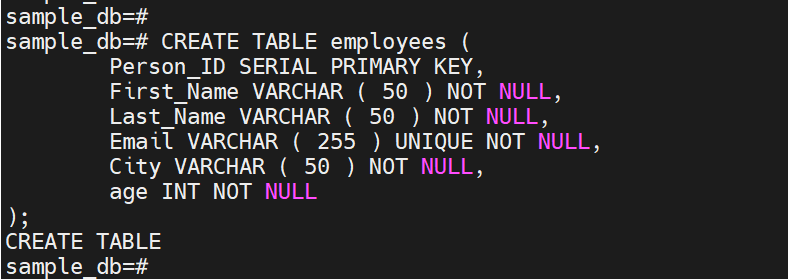
In this example, we will create a table called employees with the following six columns:
CREATE TABLE employees (
	Person_ID serial PRIMARY KEY,
	First_Name VARCHAR ( 50 ) NOT NULL,
	Last_Name VARCHAR ( 50 ) NOT NULL,
	Email VARCHAR ( 255 ) UNIQUE NOT NULL,
           City VARCHAR ( 50 ) NOT NULL,
           age INT NOT NULL
);
Once you press ENTER, you will get the output CREATE TABLE, an acknowledgment that the table has been successfully created.
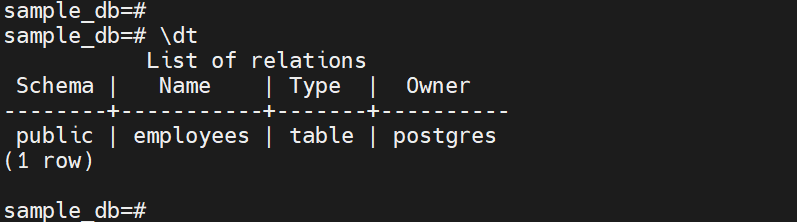
To show or display the tables existing in a database, run the \dt command:
\dt
The output provides you with a list of tables created in your current database.
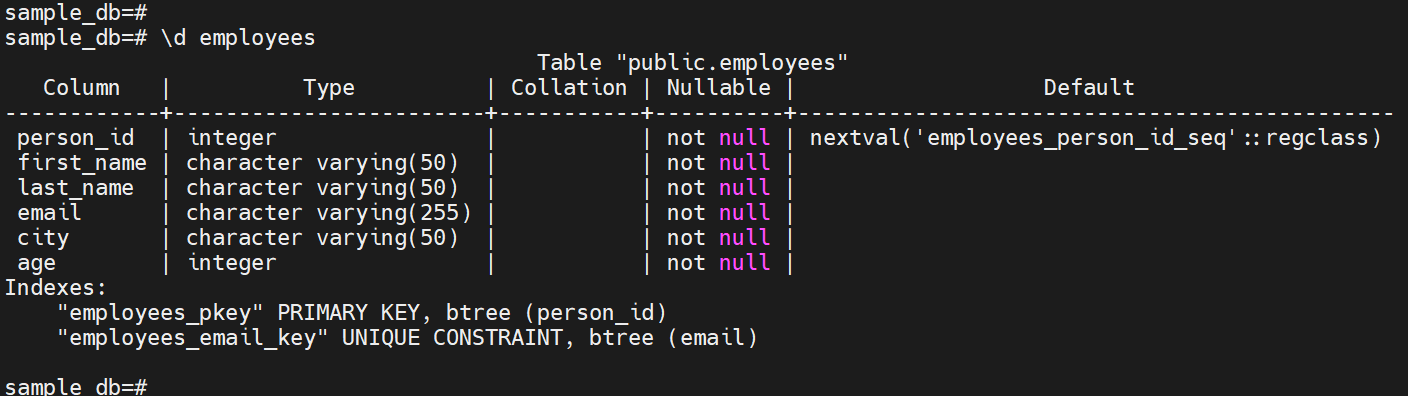
You can also use the \d table_name syntax to view the table schema.
\d employees
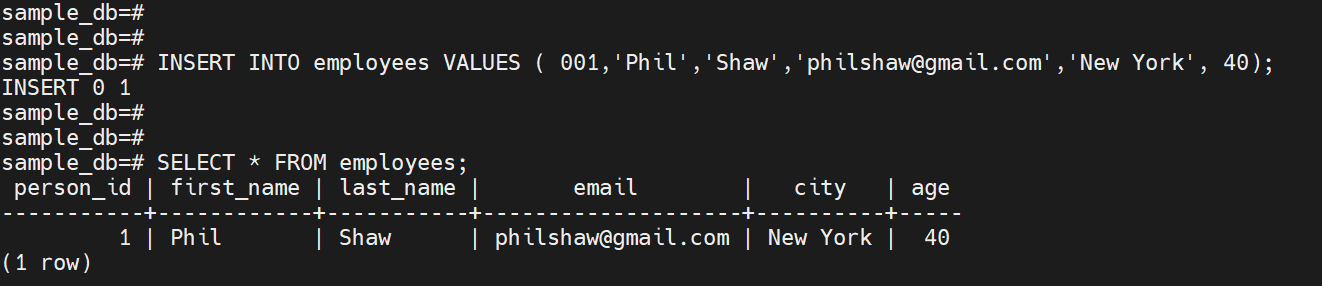
To insert values into the table, use the INSERT INTO statement.
INSERT INTO employees
VALUES ( 001, 'Phil', 'Shaw', 'philshaw@gmail.com', 'New York', 40);
Use the SELECT statement to display all the table records.
SELECT *
FROM employees;
#Conclusion
In this tutorial, we looked at how to install PostgreSQL on Ubuntu 22.04. We also explored how to create a database and tables, as well as how to insert records in a table. Check outPostgreSQL’s official documentation for more information about PostgreSQL.


