How to Install and Configure Apache Reverse Proxy Server With SSL/TLS Encryption


In this step-by-step tutorial, we’ll first briefly explain what a reverse proxy is and how it is used, after which we will show you how to install an Apache reverse proxy server with SSL/TLS encryption.
#What is a reverse proxy?
A reverse proxy server is an intermediate connection point positioned in front of the back-end servers that routes client requests to those servers and ensures that no client ever communicates directly with the back-end.
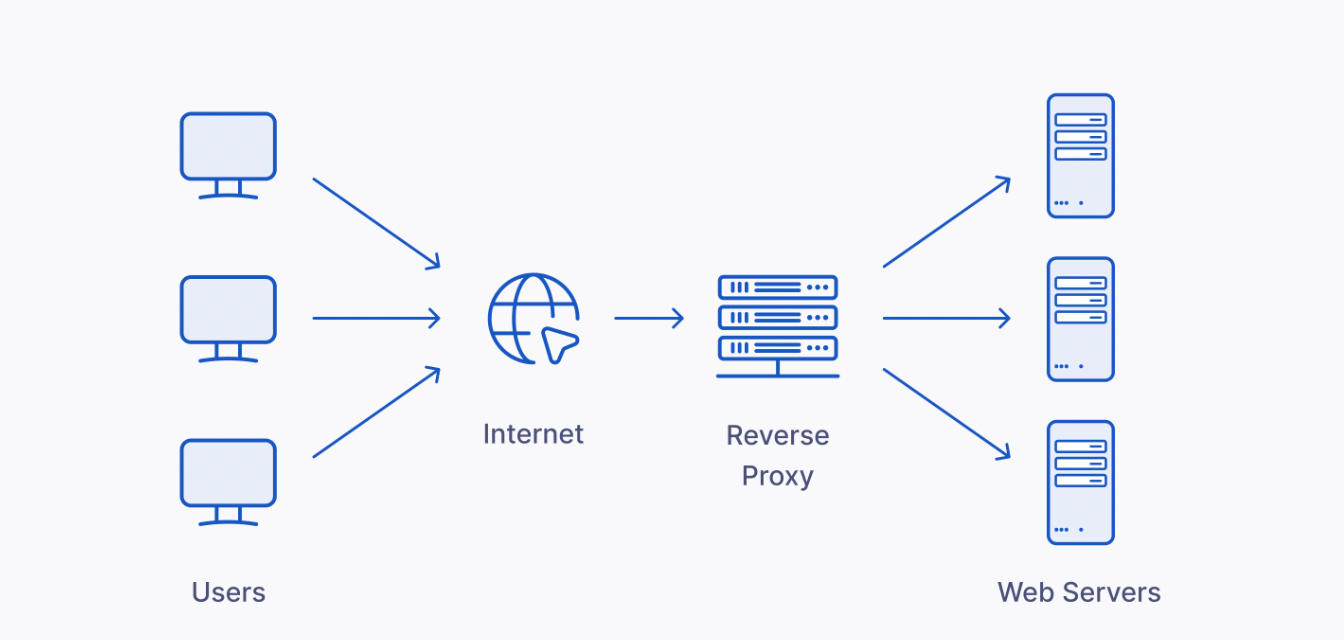 Reverse Proxy. Source: upguard.com
This is different from a forward proxy, where the proxy sits in front of the clients and works as an intermediary between a client and an origin server. Reverse proxy acts like an actual endpoint and provides an additional layer of security and control to your system.
#Forward proxy vs. reverse proxy
The main difference between a proxy vs. reverse proxy is that a proxy server functions as an intermediary for client devices, forwarding their requests to servers, whereas a reverse proxy server serves as an intermediary for servers, managing client requests and optimizing server-side operations. And adding proxy browser extension can enhance your online security and privacy.
If you are configuring a forward proxy for your browser, you might need to adjust your Chrome proxy settings to route traffic through the proxy correctly. A reverse proxy server handles tasks like load balancing, SSL/TLS connections, caching, as well as serving static content.
What is a reverse proxy? Source: Java Brains YouTube account.
#What are some reverse proxy use cases?
Reverse proxy is one of the fundamental system administration concepts that can help you increase scalability, performance, resilience, and security of your system. Let’s go through some of the most popular reverse proxy use cases.
- Load Balancing. A reverse proxy can serve as a load balancer distributing incoming requests among a pool of different servers. It may use round robin, least connections, least response time, or some other algorithm to route incoming requests and make your whole system faster and more resilient. If a server goes down, your reverse proxy load balancer will redirect traffic to the remaining online servers.
- Anonymity. A reverse proxy intercepts all requests before transmitting them to the back-end server. This way your back-end servers never need to reveal their IP addresses and can only be accessed through the reverse proxy, making it much harder to attack them directly. For example, residential proxies, a type of reverse proxy, intercept all requests before transmitting them to the back-end server.
- Traffic scrubbing. A reverse proxy server may have some traffic control mechanism installed to filter malicious or unwanted requests and prevent them from reaching your back-end services. You may use a firewall, an anti-virus system, or any other application content inspection mechanism to harden your system security.
- Caching. A reverse proxy server can store frequently accessed static or dynamic web content to serve it faster and take off load from your back-end servers.
- SSL encryption. Encrypting and decrypting TLS traffic is computationally expensive. A reverse proxy can take care of SSL encryption to load off work from your back-end servers.
- Content compression. With a reverse proxy you may compress inbound and outbound data to make communication between a client and your back-end servers faster.
- A/B Testing. A/B testing can be performed on a browser, a web application or a back-end layer. With reverse proxy you can implement back-end layer A/B testing and randomly distribute incoming traffic to servers running different versions of your application.
Now, let’s start with the Apache reverse proxy setup. We’ll first define what you’ll need to follow along with this tutorial and then dive into the steps you’ll have to take to install and configure it.
#Prerequisites
Before we begin, you‘ll need:
- Access to a Linux server with sudo privileges. We are going to use Ubuntu 20.04, but you may choose a different distribution.
- A domain name pointed at your server’s IP address for configuring SSL certificate. You may use a custom Cherry Servers subdomain name that is available free of charge for every server.
#Step 1: Install Apache
In this guide we are going to install Apache Web Server to create a working concept of a reverse proxy. Apache comes with a few handy extension modules that enable a reverse proxy solution. To start with, connect to your server and update local package index from APT repositories:
sudo apt update
Now let’s install apache2 package from official Ubuntu 20.04 repositories:
sudo apt install -y apache2
When the installation is completed, you can verify that Apache is installed by checking its version:
apache2 -version

It is also possible to check apache2 status using the following command:
sudo systemctl status apache2
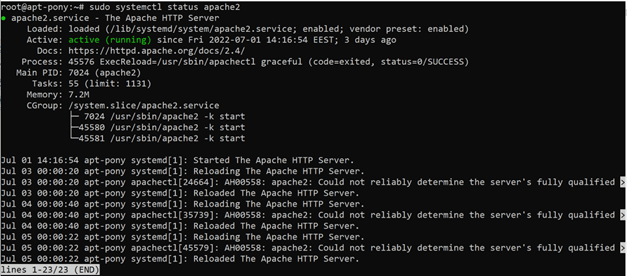
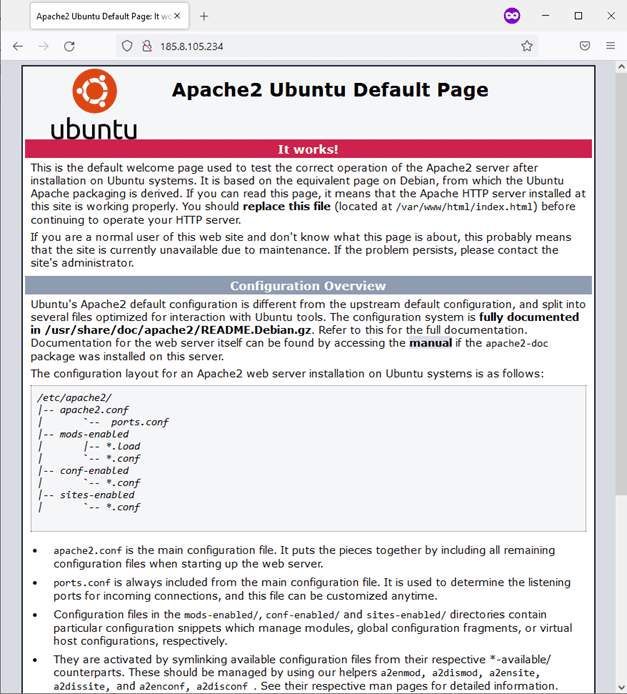
As you can see, apache2 had been active and running right after you installed it. You may perform a spot check to verify that it is working as intended by requesting a default Apache index page. Just type the IP address of your server to your web browser and press enter:
In case you do not know your IP address, use the following command to obtain it:
hostname -I
This command will showcase all configured IP addresses on all network interfaces that are available on your machine, including an IP address of your public network interface.
#Step 2: Enable Apache Modules for Reverse Proxy
To use reverse proxy with Apache Web Server you need to enable specific Apache modules to support additional functionality that is required for reverse proxy servers. We will need the following modules for our scenario:
- mod_proxy: It is the main proxy module for Apache used to manage connections and redirect them. It allows Apache to act as a gateway to underlying back-end servers. This module is mandatory for all reverse proxy scenarios.
- mod_proxy_http: This module depends on mod_proxy and is required to support HTTP and HTTPS requests for a proxy server.
- mod_ssl: The module provides SSL v3 and TLS v1.x protocol support for the Apache HTTP server.
Let’s now enable these modules with a2enmod command:
sudo a2enmod proxy && sudo a2enmod proxy_http && a2enmod ssl
Every time you enable new Apache modules, don’t forget to restart the apache2 server:
sudo systemctl restart apache2
You may verify that these modules are active by using the following command:
apache2ctl -M
#Step 3: Apache Reverse Proxy Configuration
It is now time to configure Apache reverse proxy to accept requests from the internet and forward them to your selected resource. You may forward reverse proxy requests anywhere you want, including other servers, but we will use a local network for educational purposes.
First, let’s disable the default Apache virtual host configuration file 000-default.conf by using the following command:
sudo a2dissite 000-default.conf
Now create a new virtual host configuration file cherry.conf in the /etc/apache2/sites-available directory with the following configuration text:
<VirtualHost *:80>
    ServerName site1.com
    ServerAlias www.site1.com
    ServerAdmin postmaster@site1.com
    ErrorLog ${APACHE_LOG_DIR}/error.log
    CustomLog ${APACHE_LOG_DIR}/access.log combined

    ProxyPass / http://127.0.0.1:8080/
    ProxyPassReverse / http://127.0.0.1:8080/
    ProxyRequests Off

</VirtualHost>
We begin our configuration file with the <VirtualHost> command that contains the IP address and the port number that Apache accepts for this virtual host. In this case the meta character * is used, since all IP addresses are accepted, while the port number is 80 which stands for a default HTTP port. The configuration continues with the following items:
- ServerName: Defines the domain name associated with a server. You may either configure it on the Internet via DNS or set it up locally via the
/etc/hostsfile, if you want to reach your server by the associated domain name. - ServerAlias: Allows you to define additional names that are going to be accepted by the server.
- ServerAdmin: The contact email address that the server includes in error messages that are returned to the client.
- ErrorLog: Sets the name of a file that Apache uses to store any errors it encounters.
- CustomLog: Sets the name of a file that Apache uses to log client requests to the server.
- ProxyPass: Maps remote servers into the space of the local server.Defines the target address for traffic redirection.
- ProxyPassReverse: A proxy server not only receives requests but can also forward response packets back to the client.
ProxyPassReversecommand rewrites the originallocation,content-locationanduriHTTP response headers of the back-end server with the proxy server’s information. This is essential to avoid bypassing the reverse proxy and isolate back-end servers from the Internet. - ProxyRequests: Prevents the Apache HTTP server from being used as a forward proxy and makes it more secure. The
ProxyRequestscommand should usually be set to off when usingProxyPass.
Save the configuration file and enable the new virtual host with the following command:
sudo a2ensite cherry.conf
After your configuration is complete don’t forget to restart apache2 to activate the changes:
sudo systemctl restart apache2
#Step 4: Configure Flask Application
Your reverse proxy configuration is now complete, but we are still missing a web application that would be listening on port 8080, since our ProxyPass directive is forwarding incoming requests to this destination.
We may use a simple Flask application for this purpose. Let’s install python3 and pip package manager first:
sudo apt install python3 python3-pip
When the installation is done, continue with installing Flask through pip:
pip3 install flask
Now we are ready to create a simple Flask web application. Let’s call it app.py:
vim app.py
In the following Python code we import Flask library, instantiate a Flask application and call the index() function on „/“ route:
from flask import Flask

app = Flask(__name__)

@app.route(“/”)
def index():
return “Apache reverse proxy is working!”
Save the Python script in your working directory and set a FLASK_APP environment variable to app.py so that Flask would know where to instantiate your web application:
FLASK_APP=app.py
Now you are ready to run your Flask application. Let’s run it on port 8080 as a background job by redirecting standard output and standard error output to /dev/null file to keep our terminal clean:
flask run --port=8080 > /dev/null 2 > &1 &
Now open your browser and try connecting to your IP address through a standard HTTP 80 port:
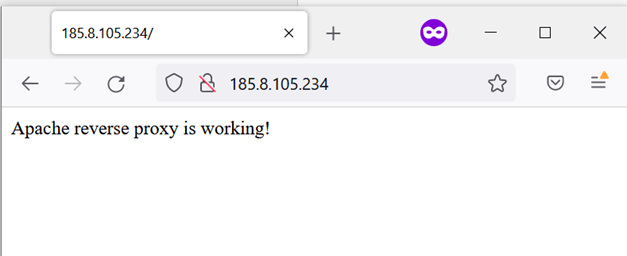
You have just sent an HTTP GET request to port 80 on your IP address and your request has been forwarded to port 8080 by the Apache reverse proxy where your Flask application sent back a response. Congrats, your Apache reverse proxy configuration is working!
#Step 5: Configure SSL Certificate
Typically, you would like to have SSL encryption for your application traffic. You may configure SSL/TLS encryption with Apache reverse proxy by using a free Let’s Encrypt TLS certificate. First, install Certbot ACME client that allows you to automatically issue and install certificates:
sudo apt install certbot
Next, install Apache plugin for Certbot that simplifies installation process:
sudo apt install python3-certbot-apache
Let’s Encrypt doesn’t issue TLS certificates for servers without a domain name. To continue with certificate configuration, you will need to purchase a domain name from any domain name provider and point it to your server’s IP address. Alternatively, you may use a custom DNS name that can be set for every server at Cherry Servers.
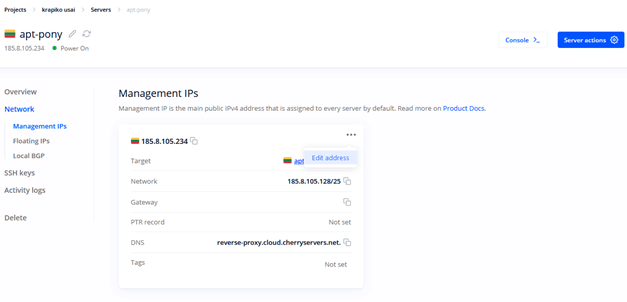
To do so go to your Client Portal, access your server's Network options, and press “Edit address” button on the Management IP:
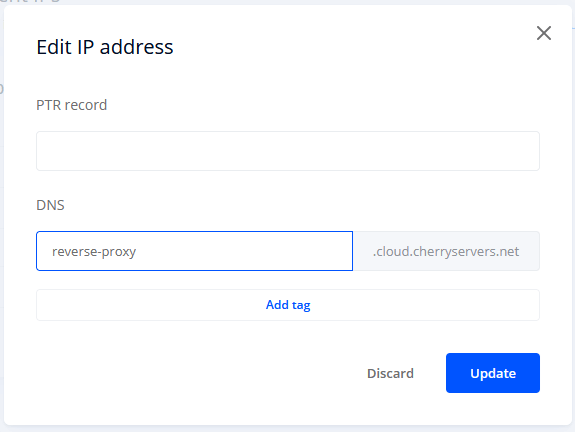
You may now enter a custom DNS name and press Update:
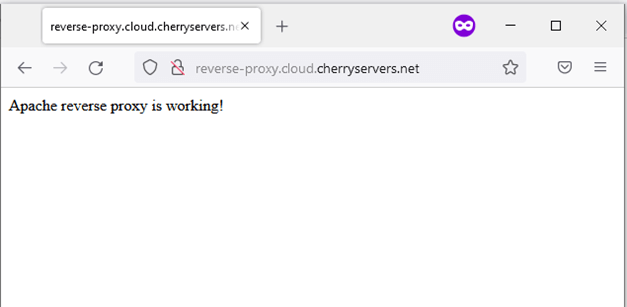
After doing so, a subdomain name reverse-proxy.cloud.cherryservers.net will become available for your server. You may now query it by using this subdomain name instead of the IP address:
You should add this subdomain name to your cherry.conf configuration file as well:
<VirtualHost *:80>
	ServerName cherry.com
	ServerAlias www.cherry.com reverse-proxy.cloud.cherryservers.net
	[…]
</VirtualHost>
Now you may start TLS certificate configuration by using the following command:
sudo certbot --apache
First, you will be asked to enter your email address to which you are going to receive renewal and security notifications:

Next off, you will need to read and agree to the Let’s Encrypt terms of service:

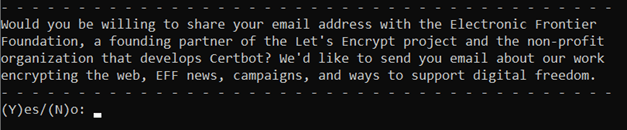
Decide on whether you would like to receive news and product updates from Let’s Encrypt:
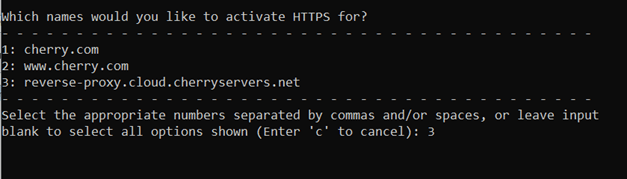
Certbot will automatically read ServerName and ServerAlias variables from your Apache virtual host configuration file. Choose the right domain name that you would like to use for HTTPS queries and continue with the installation:
Certbot will now create a new Apache virtual host for SSL connections and generate the certificate for you.
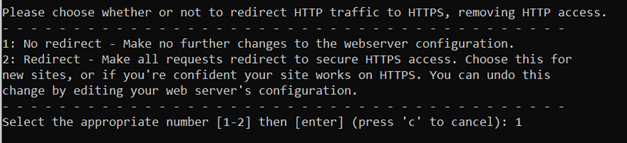
Finally, you will be asked whether you want to automatically redirect all HTTP traffic to HTTPS. For the sake of simplicity select No redirect:
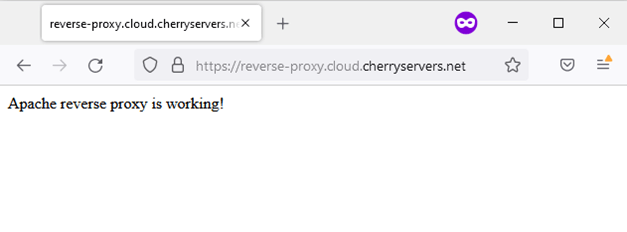
And this is it – you now have a fully functional Apache reverse proxy with SSL encryption! You may now access your web proxy server through a secure HTTPS connection:
💡 Pro Tip: You can simplify TLS certificate installation even more by using Certbot with a few mandatory arguments in one line:
sudo certbot --apache --non-interactive --agree-tos -m mantas.levinas@cherryservers.com -d reverse-proxy.cloud.cherryservers.net
If you want to delve a little bit deeper into what Certbot did, feel free to look at the newly created Apache virtual host:
<IfModule mod_ssl.c>
<VirtualHost *:443>
    ServerName cherry.com
    ServerAlias www.cherry.com reverse-proxy.cloud.cherryservers.net
    ServerAdmin mantas.levinas@cherryserers.com
    ErrorLog ${APACHE_LOG_DIR}/erro.log
    CustomLog ${APACHE_LOG_DIR}/access.log combined

    ProxyPass / http://127.0.0.1:8080/
    ProxyPassReverse / http://127.0.0.1:8080/
    ProxyRequests Off

	SSLCertificateFile /etc/letsencrypt/live/reverse-proxy.cloud.cherryservers.net/fullchain.pem
	SSLCertificateKeyFile /etc/letsencrypt/live/reverse-proxy.cloud.cherryservers.net/privkey.pem
	Include /etc/letsencrypt/options-ssl-apache.conf
</VirtualHost>
</IfModule>
You can see that Apache checks whether you have mod_ssl available and, if you do, it uses the given virtual host configuration to accept all IP addresses on port 443 that is typically reserved for HTTPS traffic.
The virtual host is nearly a copy of our original configuration at cherry.conf but has three additional lines. It includes references to SSL certificate files and imports an SSL configuration file to supplement your virtual host configuration with some required SSL settings.
#Conclusion
In this article we have learned what is a reverse proxy and how it is used. We have also set up a working concept of Apache reverse proxy with SSL encryption for an extra layer of security. There are many more reverse proxy use cases that you can build with Apache Web Server, so do not hesitate to learn more about this fundamental systems engineering concept at the official Apache documentation page.


