How to Keep Docker Secrets When Working with Sensitive Data?


Storing sensitive data in a container or a docker-compose file directly is evil. But what can we do about that? Luckily, Docker provides a way to cope with this problem by using Docker secrets.
In this guide, we will cover what Docker secrets are, explain where they are stored, and give detailed instructions on how to use Docker secrets.
#What is Docker secrets?
A Docker secret is a Docker Swarm service, part of the Docker container orchestration stack.
A Docker secret is a BLOB of sensitive data that should not be transmitted over the network or stored unencrypted in your application. This binary large object (BLOB) may include:
- Login credentials,
- TLS certificates,
- SSH keys,
- Internal service addresses,
- Or any other piece of sensitive information.
Docker manages secrets centrally in a Docker Swarm. Sensitive data is transmitted on run-time and upon request to only those containers that are authorized to access this information. When using Docker Secrets sensitive data is never stored in container image, nor source control, making your application much more secure.
#What is Docker Swarm?
Docker Swarm is a container orchestration platform that groups together several physical or virtual machines running Docker to allow centralized container management. You set a desired state of your container cluster and Docker Swarm takes care to keep it as you defined.
Docker Swarm has a rich feature set, including multi-host networking, auto scaling, load balancing, and secret management, among others. Let‘s now dive deeper into Docker secret management to help you make your application more secure.
Ready to supercharge your Docker infrastructure? Scale effortlessly and enjoy flexible storage with Cherry Servers bare metal or virtual servers. Eliminate infrastructure headaches with free 24/7 technical support, pay-as-you-go pricing, and global availability.
#How to use Docker secrets?
When you create a secret in a swarm, Docker transmits the secret to the swarm manager over a mutual TLS connection. The secret then is stored in the encrypted Raft log. The log is replicated across other managers to guarantee high availability of secrets along with the rest of the swarm management data.
When the user grants a running service access to the secret, the decrypted secret gets mounted into the container in an in-memory file system. You may find the mounted secret in the following directories:
- In Linux containers: /run/secrets/<secret_name>
- In Windows containers: C:\ProgramData\Docker\secrets<secret_name>
You can update the default secret directory path if need be.
As soon as the container task halts, the decrypted secret becomes unmounted from the in-memory file system for that container. In case a container loses connectivity to the swarm, that node can still access the secret, but cannot retrieve updates until the node resumes connection to the swarm.
#Prerequisites
To follow along this tutorial, you need:
- Install Docker and install docker-compose on a Linux machine
- Root user privileges
- Basic familiarity with Docker concepts
#How to use docker secrets: Step-by-step
#Step 1: Create Docker Swarm
Let’s have a look at a case where Docker secrets are used for Redis - an in-memory database. We will use Docker CLI to create and manage Docker secrets.
First, we should initiate a Docker Swarm with the following command:
docker swarm init

If you have more than one network interface configured on your server, you will need to specify an --advertise-addr flag with a selected IP address that will be advertised to other members of the swarm for API access.
#Step 2: Create Docker Secrets
Now we can create our first Docker secret. You may do so by passing a string to the docker secret create command:
echo “My super secret data” | docker secret create my_secret_data -
![]()
This way you have just created a string that is now encrypted in Docker as a secret and got back a unique hash identifier for the secret as an output.
Secret strings are great, but we may sometimes need to encrypt an entire file. Let’s create a sample file and store it as a Docker secret:
echo “My super secret data in a file” > my_secret_data_file

docker secret create my_secret_data_file ./my_secret_data_file
You may now list your created secrets to confirm their existence:
docker secret ls

#Step 3: Assign Secrets to Docker Swarm Services
We are now ready to launch a Redis service in a Docker Swarm and grant it access to the secret. The created container will be able to access the secret at /run/secrets/<secret_name> by default.
docker service create --name redis --secret my_secret_data redis:alpine
You may check if the service is running normally:
docker service ps redis
![]()
As there is no output in the ERROR column, we may suppose that the service is up and running.
We may inspect the running service to make sure our secret string is available in the container. First, let’s retrieve a unique ID of the redis service container:
docker ps –filter name=redis -q

We may now use this unique identifier to run commands against the running container by using the docker exec command with the container ID and a given command to list secret mount point directory:
docker exec 646c8be1911d ls -l /run/secrets

As you can see, there is a secret name “my_secret_data” mounted to your redis container. We can check its contents:
docker exec 646c8be1911dcat /run/secrets/my_secret_data
![]()
And here it is – your super-secret data is decrypted and available in your container.
If you would like to add a new secret to the redis service, you need to use docker service update command that will rebuild the service, spin up a new container and mount the second secret to it:
docker service update –secret-add=my_secret_data_file redis

Feel free to list the secrets that are mounted to your container to double check that the new secret has been assigned:
docker exec $(docker ps --filter name=redis -q) ls -l /run/secrets
💡 Pro Tip: As the container has been rebuilt and its unique identifier is now changed, it’s a good idea to be a little bit more abstract and get the container ID by using a sub-command $(your_sub_command) inside docker exec.

We can see that both secrets are now available in your container.
#Step 4: Ephemeral State of Docker Secrets
Docker Secrets are only available until the service task is running. If you committed your running container by making a new image from it, you wouldn’t be able to access secrets in containers newly created from this image. Suppose you run the following commands:
docker commit $(docker ps --filter name=redis -q) committed_redis

docker run --rm -it committed_redis cat /run/secrets/my_secret_data

As you can see, when you spin up a new container from the committed_redis image and access the same my_secret_data secret, there will be no output, because the secret hasn’t been stored in the committed_redis Docker image.
#Step 5: Remove Docker Secrets
As long as your secrets are mounted to a running service, you cannot remove them, no matter how hard you try:
docker secret rm my_secret_data
![]()
If you want to remove a secret from the running service, use the following docker service update command pattern and then double check the default secret mount point directory:
docker service update --secret-rm <secret_name> <service_name>
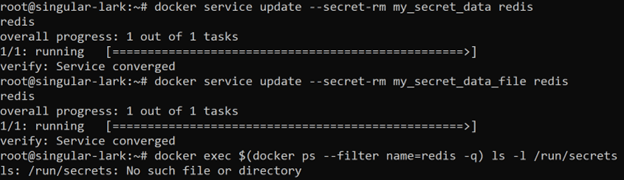
As you can see, after removing both of our assigned secrets the default mount point directory no longer exists.
You can now remove both of our added secrets from Docker completely, if you like by using the following command:
docker secret rm my_secret_data my_secret_data_file

#Step 6: Use Secrets in Docker Compose
Being aware of how Docker secrets work, we may now proceed to building a service stack in a more convenient way by using Docker Compose. We will spin up a basic Wordpress application with a MySQL database to show how it’s being done. Let’s first leave the swarm mode, since Docker Compose operates on a normal mode:
docker swarm leave --force
![]()
You may need to use the --force tag, because as soon as the last manager leaves the swarm it gets erased.
It’s now time to create our secrets. This time we will put our secrets in local files, since Docker Compose, in contrast to Docker Swarm, cannot use secret management commands.
The official WordPress image is designed to accept some of its environment variables as files, when _FILE string is appended to the variable name. We will pass sensitive variables, namely MYSQL_ROOT_PASSWORD and MYSQL_PASSWORD as secrets when building our containers. This way we won’t need to encode them in the configuration file, nor pass them as plain environment variables – both of which are bad practices.
Let’s now create our passwords and store them in the following files:
echo MasterPassword1 > mysql_root_password.txt
echo MinorPassword2 > mysql_password.txt
💡 Pro Tip: We are passing passwords through the command line for the sake of convenience, but it is better to create new files and edit them directly. This way you won’t leave your passwords in the bash history file, which automatically logs all your commands.
It is now time to define our docker-compose.yml file:
version: "3.9"

services:
   db:
     image: mysql:latest
     volumes:
       - db_data:/var/lib/mysql
     environment:
       MYSQL_ROOT_PASSWORD_FILE: /run/secrets/db_root_password
       MYSQL_DATABASE: wordpress
       MYSQL_USER: wordpress
       MYSQL_PASSWORD_FILE: /run/secrets/db_password
     secrets:
       - db_root_password
       - db_password

   wordpress:
     depends_on:
       - db
     image: wordpress:latest
     ports:
       - "8000:80"
     environment:
       WORDPRESS_DB_HOST: db:3306
       WORDPRESS_DB_USER: wordpress
       WORDPRESS_DB_PASSWORD_FILE: /run/secrets/db_password
     secrets:
       - db_password

secrets:
   db_password:
     file: db_password.txt
   db_root_password:
     file: db_root_password.txt

volumes:
    db_data:
In the example above we define two secrets - db_password and db_root_password – below service definitions and associated them with the files we have just created in our current directory. We then need to reference db_password and db_root_password in service definitions, adjust relevant variables by appending _FILE string to the end of their names, and specify the paths to the secret files by using the /run/secrets/<secret_name> pattern.
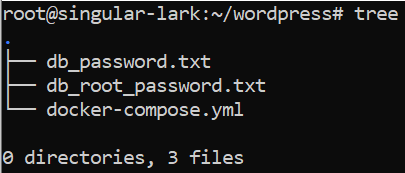
After saving the docker-compose.yml file your directory should compound of the following:
Even though we are not using Docker Swarm, with Docker Compose secrets behave the same, the only difference being that data is not encrypted at rest. After you build your containers, secrets are mounted in the default mount point directory at /run/secrets/ and only persist throughout the lifetime of a container.
Let’s now spin up the containers in a detached mode, and check if everything works as expected:
docker-compose up -d

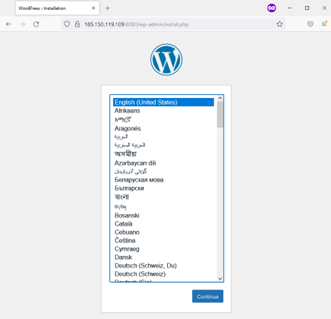
As you can see, WordPress application is up and running on port 8080 of our server. Let’s call it a day.
#Conclusion
Data security is a tough issue. According to IBM, an average cost of a data breach may be as high as $4.77 million for a company to swallow. If you are a developer, stay tuned with industry best practices when it comes to data security, and always apply them in your work. Better safe than sorry. In this guide, we covered how to use Docker secrets when working with sensitive data. If you would like to learn more about Docker Secrets, there is an official in-depth documentation that you can follow.
If you found this guide helpful, also check our guide on how to list Docker images, how to remove Docker images and how to update Docker images.


