How to Configure Ingress SSL Certificates in Kubernetes


When you expose a Kubernetes service over plain HTTP, you reveal every header, cookie, and form submission. Intermediaries, such as proxies and load balancers, can read or alter data. Browsers warn about “Not secure” connections, and search engines lower rankings. Using SSL/TLS encrypts the connection and protects your applications.
A TLS certificate encrypts the stream between the client and the Kubernetes Ingress. The Ingress controller then ends TLS and sends requests to the correct service. A valid certificate on an Ingress keeps sensitive data safe. It also moves encryption tasks away from your pods.
In this tutorial, you’ll install the NGINX Ingress Controller. Next, you’ll deploy a simple app and add TLS. You will create your own TLS secret and reference it in the Ingress. Then, you’ll install cert-manager. It will help you request and renew certificates automatically with Let’s Encrypt.
#Prerequisites
-
You need a running Kubernetes cluster. A dedicated bare metal server helps with performance, though any cluster works for this guide.
-
kubectlmust be installed and talking to your cluster. -
An Ingress controller should already be running. We use NGINX Ingress Controller in this tutorial.
-
Your domain name with DNS A records pointing to your Ingress controller's external IP.
-
You should also know your way around Kubernetes objects such as Deployments, Services, and Secrets.
-
Remove taint from your cluster (if it’s a single-node cluster).
#What is Kubernetes Ingress?
Ingress is a Kubernetes API object for managing external access to services. It routes HTTP and HTTPS traffic based on hostnames and URL paths.
Kubernetes already has other ways to expose services externally. NodePort is one. LoadBalancer is another. So Ingress needs some justification.
NodePort opens a specific port on every node in your cluster. Traffic hits that port and gets forwarded to your service. This works for testing, but not for production. You’ll end up with a lot of port numbers. Port 30080 for this service, port 31443 for that one. Six months later, nobody remembers which is which.
LoadBalancer takes a cleaner approach. Kubernetes asks your cloud provider to spin up an external load balancer for each service. Simple. Until you have fifteen services and fifteen load balancers on your cloud bill. That adds up fast.
Ingress solves both problems. You get a single external IP address. All traffic enters through that one point. Ingress looks at each incoming request and decides where to send it based on the hostname or URL path.
A few examples of what you can do:
-
Route
api.example.comto your API service andapp.example.comto your frontend -
Send
/apirequests to one backend and/dashboardrequests to another -
Terminate TLS at the edge so your backend services receive plain HTTP
One load balancer. One IP. Multiple services behind it.
#How Ingress works
An Ingress resource is just a configuration file in YAML format. You define routing rules in it. Hostnames, paths, backend services. Then you apply it to your cluster with kubectl.
And then nothing happens.
Nothing happens because the Ingress resource itself is passive. It stores rules. It does not enforce them. Kubernetes needs a separate component to read those rules and actually route traffic. That component is the Ingress Controller.
The Ingress Controller runs as a pod inside your cluster. Sometimes multiple pods for high availability. Inside each pod is a reverse proxy. NGINX is what most people use. Traefik and HAProxy are solid alternatives. The controller watches the Kubernetes API for Ingress resources. Create one, and the controller notices. Update one, same thing. Delete one, and the controller removes those routing rules from its configuration.
Here is how traffic actually flows:
A user types your domain into their browser. DNS resolves it to the external IP of your Ingress Controller. That IP might come from a cloud load balancer sitting in front of the controller pods. On bare metal setups, it might be a node IP with some external routing configured.
The request arrives at the controller. The reverse proxy examines two things:
-
The Host header in the HTTP request
-
The URL path
It compares these values against every Ingress resource in the cluster. When it finds a matching rule, it forwards the request to the backend service defined in that rule.
The service maintains a list of endpoints. Each endpoint is the IP address of a pod running your application. The service picks one and sends the traffic there. Your pod processes the request and sends a response back through the same chain.
#Ingress vs other service types
Kubernetes offers several ways to expose applications:
| Service Type | External Access | Use Case |
|---|---|---|
| ClusterIP | Internal only | Inter-service communication |
| NodePort | Via node IP:port | Development, simple testing |
| LoadBalancer | Via external IP | Production traffic with cloud provider integration |
| Ingress | Via HTTP/HTTPS routing | Multiple services, TLS termination, path-based routing |
Ingress excels when you need to expose multiple services through a single external IP, implement host-based or path-based routing, or terminate TLS at the edge.
#How Ingress TLS works
When a client connects via HTTPS:
-
The client initiates a TLS handshake with the Ingress Controller
-
The controller presents the certificate from the configured TLS secret
-
After encryption is established, the controller routes the request to the backend service
-
Backend communication typically occurs over unencrypted HTTP within the cluster
The Ingress Controller terminates TLS, which means it handles both encryption and decryption. Backend pods receive plain HTTP traffic. This architecture centralizes certificate management at the Ingress layer rather than requiring each application to handle TLS.
#Installing the NGINX Ingress Controller
The NGINX Ingress Controller is widely used and well-documented. It processes Ingress resources and routes external traffic to services.
#Deploy the controller
Apply the NGINX Ingress Controller manifest:
kubectl apply -f https://raw.githubusercontent.com/kubernetes/ingress-nginx/controller-v1.14.0/deploy/static/provider/cloud/deploy.yaml
Verify that the controller pod is running:
kubectl get pods -n ingress-nginx
OutputNAME 									                    READY  STATUS   RESTARTS  AGE
ingress-nginx-controller-5c6d4449f-wsl67  1/1	   Running	0	        11s
#Verify external IP assignment
Check that the Ingress Controller received an external IP:
kubectl get svc -n ingress-nginx ingress-nginx-controller
OutputNAME                     TYPE         CLUSTER-IP   EXTERNAL-IP PORT(S)                    AGE
ingress-nginx-controller LoadBalancer 10.108.40.97 <pending>   80:31194/TCP,443:32479/TCP 8m28s
The EXTERNAL-IP column should display an IP address. If it shows <pending>, your cluster needs a load balancer implementation. Cloud providers handle this automatically, but bare metal and on-premises clusters require MetalLB.
#Install MetalLB (if needed)
Skip this section if your Ingress Controller already has an external IP.
MetalLB provides load-balancer functionality for clusters without cloud provider integration. Apply the MetalLB manifest:
kubectl apply -f https://raw.githubusercontent.com/metallb/metallb/v0.15.3/config/manifests/metallb-native.yaml
Verify that the MetalLB pods are running:
kubectl get pods -n metallb-system
OutputNAME                        READY  STATUS  RESTARTS AGE
controller-d54bf7b99-gdzm2  1/1    Running 0        28s
speaker-kpx7b               1/1    Running 0        28s
Next, configure an IP address pool. Create the file, metallb-config.yaml and add the content below. Replace the value of addresses below with your server's public IP or an available range:
apiVersion: metallb.io/v1beta1
kind: IPAddressPool
metadata:
	name: default-pool
	namespace: metallb-system
spec:
	addresses:
	-  84.32.32.137/32
---
apiVersion: metallb.io/v1beta1
kind: L2Advertisement
metadata:
	name: default
	namespace: metallb-system
spec:
	ipAddressPools:
	-  default-pool
Apply the configuration:
kubectl apply -f metallb-config.yaml
Verify the Ingress Controller now has an external IP:
kubectl get svc -n ingress-nginx ingress-nginx-controller
OutputNAME                     TYPE         CLUSTER-IP   EXTERNAL-IP  PORT(S)                    AGE
ingress-nginx-controller LoadBalancer 10.108.40.97 84.32.32.137 80:31194/TCP,443:32479/TCP 14m
The EXTERNAL-IP column should now display an IP from your configured pool.
#Deploying a sample application
Create a simple application to test Ingress and SSL configuration.
#Create the deployment
Create a file app-deployment.yaml and paste the content below:
apiVersion: apps/v1
kind: Deployment
metadata:
	name: demo-app
	labels:
		app: demo
spec:
	replicas: 2
	selector:
		matchLabels:
			app: demo
	template:
		metadata:
			labels:
			app: demo
		spec:
			containers:
			- name: nginx
				image: nginxdemos/hello:latest
				ports:
				- containerPort: 80
				resources:
					requests:
						memory: "64Mi"
						cpu: "100m"
					limits:
						memory: "128Mi"
						cpu: "200m"
Apply the deployment:
kubectl apply -f app-deployment.yaml
#Create the service
Paste the content below into a file named app-service.yaml:
apiVersion: v1
kind: Service
metadata:
	name: demo-service
spec:
	selector:
		app: demo
	ports:
	- protocol: TCP
		port: 80
		targetPort: 80
	type: ClusterIP
Apply the service:
kubectl apply -f app-service.yaml
#Create the Ingress resource
Create a file, app-ingress.yaml, and add the below content:
apiVersion: networking.k8s.io/v1
kind: Ingress
metadata:
	name: demo-ingress
spec:
	ingressClassName: nginx
	rules:
	- host: app.example.com
	http:
		paths:
		- path: /
			pathType: Prefix
			backend:
				service:
					name: demo-service
					port:
						number: 80
Replace app.example.com with your actual domain name.
Apply the Ingress:
kubectl apply -f app-ingress.yaml
#Verify the deployment
Check that all resources are running:
kubectl get pods,svc,ingress
OutputNAME                            READY STATUS   RESTARTS AGE
pod/demo-app-5659b7bbbc-ddttv   1/1   Running  0        6m41s
pod/demo-app-5659b7bbbc-r82q4   1/1   Running  0        6m41s

NAME                 TYPE      CLUSTER-IP   EXTERNAL-IP PORT(S)  AGE
service/demo-service ClusterIP 10.96.229.28 <none>      80/TCP   5m6s
service/kubernetes   ClusterIP 10.96.0.1    <none>      443/TCP  26m

NAME                                   CLASS  HOSTS                ADDRESS      PORTS AGE
ingress.networking.k8s.io/demo-ingress nginx  emminextechdocs.xyz  84.32.32.137 80    2m17s
Test HTTP access:
curl -H "Host: app.example.com" http://84.32.32.137
Use your actual domain name and IP address. You should receive an HTML response from the NGINX demo application.
#SSL certificate options
Three common approaches exist for obtaining SSL certificates:
| Method | Use Case | Validity | Renewal |
|---|---|---|---|
| Self-signed | Development, testing | Custom | Manual |
| CA-issued | Production, compliance requirements | 1-2 years | Manual |
| Let's Encrypt | Production, public-facing sites | 90 days | Automated with cert-manager |
-
Self-signed certificates are certificates you create yourself using OpenSSL. No certificate authority signs them. You generate the key, the cert, and install it. The problem is trust. Browsers keep a list of authorities they trust. Your self-signed cert is not on that list. Users see a warning page and have to click through before anything loads. For a dev environment or internal tools, that is fine. For a production site customer visit, that is completely unacceptable.
-
CA-issued certificates come from commercial certificate authorities. DigiCert, Sectigo, GlobalSign, and others. You pay for them. You renew them manually, usually once a year. The upside is compliance. Some industries and auditors require certificates from specific authorities. Some organizations need Extended Validation (EV) certificates that display the company name in the browser address bar. If your compliance team or customers demand these, CA-issued certificates are your only option.
-
Let's Encrypt is a free certificate authority that changed the game when it launched in 2015. Certificates are valid for 90 days, which sounds like a hassle until you realize the entire renewal process can be automated. Cert-manager handles this for you in Kubernetes. No cost, no manual intervention. Let's Encrypt works for most production deployments. The only exceptions are situations where compliance rules specifically require a commercial CA.
#Configuring Ingress SSL certificates in Kubernetes
The Ingress controller handles TLS termination for your services. Requests arrive encrypted. The controller decrypts them and forwards plain HTTP to your backend pods.
Setting this up requires three things:
-
An SSL certificate and its private key
-
A Kubernetes Secret containing both
-
An Ingress resource configured to use that Secret
The sections below walk through manual configuration first, then automated certificate management with cert-manager.
#Method 1: Manual SSL certificate configuration
This method works regardless of where your certificate originates. Self-signed, purchased from a CA, exported from another system. The steps are the same either way.
#Generate a self-signed certificate
The following command creates a self-signed certificate valid for one year:
openssl req -x509 -nodes -days 365 -newkey rsa:2048 \
-keyout tls.key \
-out tls.crt \
-subj "/CN=app.example.com/O=MyOrganization"
This creates two files:
-
tls.key: Private key -
tls.crt: Certificate
Replace app.example.com with your domain name.
For CA-issued certificates, you would receive these files from your certificate authority after submitting a Certificate Signing Request (CSR).
#Create a Kubernetes TLS secret
Store the certificate and key in a Kubernetes secret:
kubectl create secret tls demo-tls-secret \
--cert=tls.crt \
--key=tls.key
Verify the secret:
kubectl get secret demo-tls-secret
OutputNAME             TYPE               DATA AGE
demo-tls-secret  kubernetes.io/tls  2    13s
#Update the Ingress resource
Modify the Ingress to enable TLS. Open the file named app-ingress.yaml, clear the content and paste everything below:
apiVersion: networking.k8s.io/v1
kind: Ingress
metadata:
	name: demo-ingress
	annotations:
		nginx.ingress.kubernetes.io/ssl-redirect:  "true"
spec:
	ingressClassName: nginx
	tls:
	- hosts:
		-  app.example.com
		secretName: demo-tls-secret
rules:
- host: app.example.com
	http:
	paths:
	- path: /
		pathType: Prefix
		backend:
			service:
				name: demo-service
				port:
					number: 80
The tls section specifies which hosts should use TLS and which secret contains the certificate. The ssl-redirect annotation automatically redirects HTTP requests to HTTPS.
Apply the updated Ingress:
kubectl apply -f app-ingress.yaml
#Test your manual SSL setup
Verify your certificate works by testing HTTPS connectivity. Replace app.example.com with your actual domain name:
curl -vk https://app.example.com 2>&1 | grep -E "SSL|subject|issuer|expire"
Output* SSL connection using TLSv1.3 / TLS_AES_256_GCM_SHA384 / X25519 / RSASSA-PSS
* subject: CN=emminextechdocs.xyz; O=MyOrganization
* expire date: Jan 20 04:27:24 2027 GMT
* issuer: CN=emminextechdocs.xyz; O=MyOrganization
* SSL certificate verify result: self-signed certificate (18), continuing anyway.
* old SSL session ID is stale, removing
< expires: Tue, 20 Jan 2026 04:52:06 GMT
The -k flag bypasses certificate verification, necessary for self-signed certificates. Remove this flag when using valid CA-issued certificates.
Check that HTTP redirects to HTTPS:
curl -I http://app.example.com
OutputHTTP/1.1 308 Permanent Redirect
Date: Tue, 20 Jan 2026 04:52:33 GMT
Content-Type: text/html
Content-Length: 164
Connection: keep-alive
Location: https://emminextechdocs.xyz
Verify the secret contains valid certificate data:
kubectl get secret demo-tls-secret -o jsonpath='{.data}' | jq -r '.["tls.crt"]' | base64 -d | openssl x509 -text -noout | head -15
OutputCertificate:
Data:
Version: 3 (0x2)
Serial Number:
7f:1c:de:22:45:1b:8b:13:1f:3d:23:73:1f:94:6b:3c:c7:43:bc:d4
Signature Algorithm: sha256WithRSAEncryption
Issuer: CN = emminextechdocs.xyz, O = MyOrganization
Validity
Not Before: Jan 20 04:27:24 2026 GMT
Not After : Jan 20 04:27:24 2027 GMT
Subject: CN = emminextechdocs.xyz, O = MyOrganization
Subject Public Key Info:
Public Key Algorithm: rsaEncryption
Public-Key: (2048 bit)
Modulus:
The output shows the certificate details decoded from the secret. Check that the Common Name (CN) matches your domain. Make sure the expiration date looks right.
Self-signed certificates trigger browser warnings. Users have to click through and manually accept the certificate before the page loads.

CA-issued certificates from trusted authorities behave differently. Browsers show a padlock icon. No warnings, no extra clicks.
#Method 2: Automated SSL with cert-manager
Managing certificates manually is tedious work. You generate a certificate, base64-encode it, create a secret, and update your Ingress. Ninety days later, you do it again. Multiply that by however many domains you have. One missed renewal, and your users get a browser warning page instead of your application.
Cert-manager takes this off your plate. You tell it which domains need certificates and which CA to use. It handles the rest.
#Install cert-manager
Deploy cert-manager along with its custom resource definitions:
kubectl apply -f https://github.com/cert-manager/cert-manager/releases/download/v1.19.1/cert-manager.yaml
Verify that the cert-manager pods are running:
kubectl get pods -n cert-manager
OutputNAME                                      READY  STATUS   RESTARTS AGE
cert-manager-74ff484cbd-s7rbp             1/1    Running  0        17s
cert-manager-cainjector-5595cb5f78-xb2k4  1/1    Running  0        17s
cert-manager-webhook-58756b95c-m6clh      1/1    Running  0        17s
#Create a staging ClusterIssuer
Start with Let's Encrypt staging to avoid rate limits during testing. Staging certificates are not trusted by browsers, but they still verify that your configuration works.
Create a file named staging-issuer.yaml, and add the following content:
apiVersion: cert-manager.io/v1
kind: ClusterIssuer
metadata:
	name: letsencrypt-staging
spec:
	acme:
		email: your-email@example.com
		server: https://acme-staging-v02.api.letsencrypt.org/directory
		privateKeySecretRef:
			name: letsencrypt-staging-key
		solvers:
		- http01:
			ingress:
				class: nginx
Replace your-email@example.com with your actual email address. Let's Encrypt sends expiration warnings to this address.
Apply the issuer:
kubectl apply -f staging-issuer.yaml
Verify the issuer is ready:
kubectl get clusterissuer letsencrypt-staging
OutputNAME                 READY  AGE
letsencrypt-staging  True   3m20s
#Update Ingress for cert-manager
Create the file app-ingress-certmanager.yaml and add the cert-manager annotation to request a certificate automatically:
apiVersion: networking.k8s.io/v1
kind: Ingress
metadata:
	name: demo-ingress
	annotations:
		nginx.ingress.kubernetes.io/ssl-redirect:  "true"
		cert-manager.io/cluster-issuer:  "letsencrypt-staging"
spec:
	ingressClassName: nginx
	tls:
	- hosts:
		-  app.example.com
		secretName: demo-tls-staging
rules:
- host: app.example.com
	http:
		paths:
		- path: /
			pathType: Prefix
			backend:
				service:
					name: demo-service
					port:
						number: 80
The cert-manager.io/cluster-issuer annotation tells cert-manager which issuer to use. Cert-manager automatically creates the TLS secret specified in secretName.
Apply the Ingress:
kubectl apply -f app-ingress-certmanager.yaml
#Monitor certificate issuance
Check certificate status:
kubectl get certificate
OutputNAME              READY  SECRET           AGE
demo-tls-staging  True   demo-tls-staging 46s
The READY column should show True after cert-manager completes the ACME challenge.
If the certificate shows False, check the certificate details:
kubectl describe certificate demo-tls-staging
Look at the Events section for error messages. Common issues include DNS misconfiguration or firewall blocking port 80.
#Switch to production issuer
After confirming staging works, create a production issuer. Paste the following content in the file production-issuer.yaml:
apiVersion: cert-manager.io/v1
kind: ClusterIssuer
metadata:
	name: letsencrypt-production
spec:
	acme:
		email: your-email@example.com
		server: https://acme-v02.api.letsencrypt.org/directory
		privateKeySecretRef:
			name: letsencrypt-production-key
		solvers:
		- http01:
			ingress:
				class: nginx
Apply the production issuer:
kubectl apply -f production-issuer.yaml
Update the Ingress to use the production issuer. Paste the below content in the file, app-ingress-production.yaml:
apiVersion: networking.k8s.io/v1
kind: Ingress
metadata:
	name: demo-ingress
	annotations:
		nginx.ingress.kubernetes.io/ssl-redirect:  "true"
		cert-manager.io/cluster-issuer:  "letsencrypt-production"
spec:
	ingressClassName: nginx
	tls:
	- hosts:
		-  app.example.com
		secretName: demo-tls-production
	rules:
	- host: app.example.com
		http:
			paths:
			- path: /
				pathType: Prefix
				backend:
					service:
						name: demo-service
						port:
							number: 80
Apply the updated Ingress:
kubectl apply -f app-ingress-production.yaml
Verify the production certificate:
kubectl get certificate
OutputNAME                 READY  SECRET               AGE
demo-tls-production  True   demo-tls-production  28s
Your application now has a valid, browser-trusted SSL certificate that cert-manager will automatically renew.
#Test your cert-manager setup
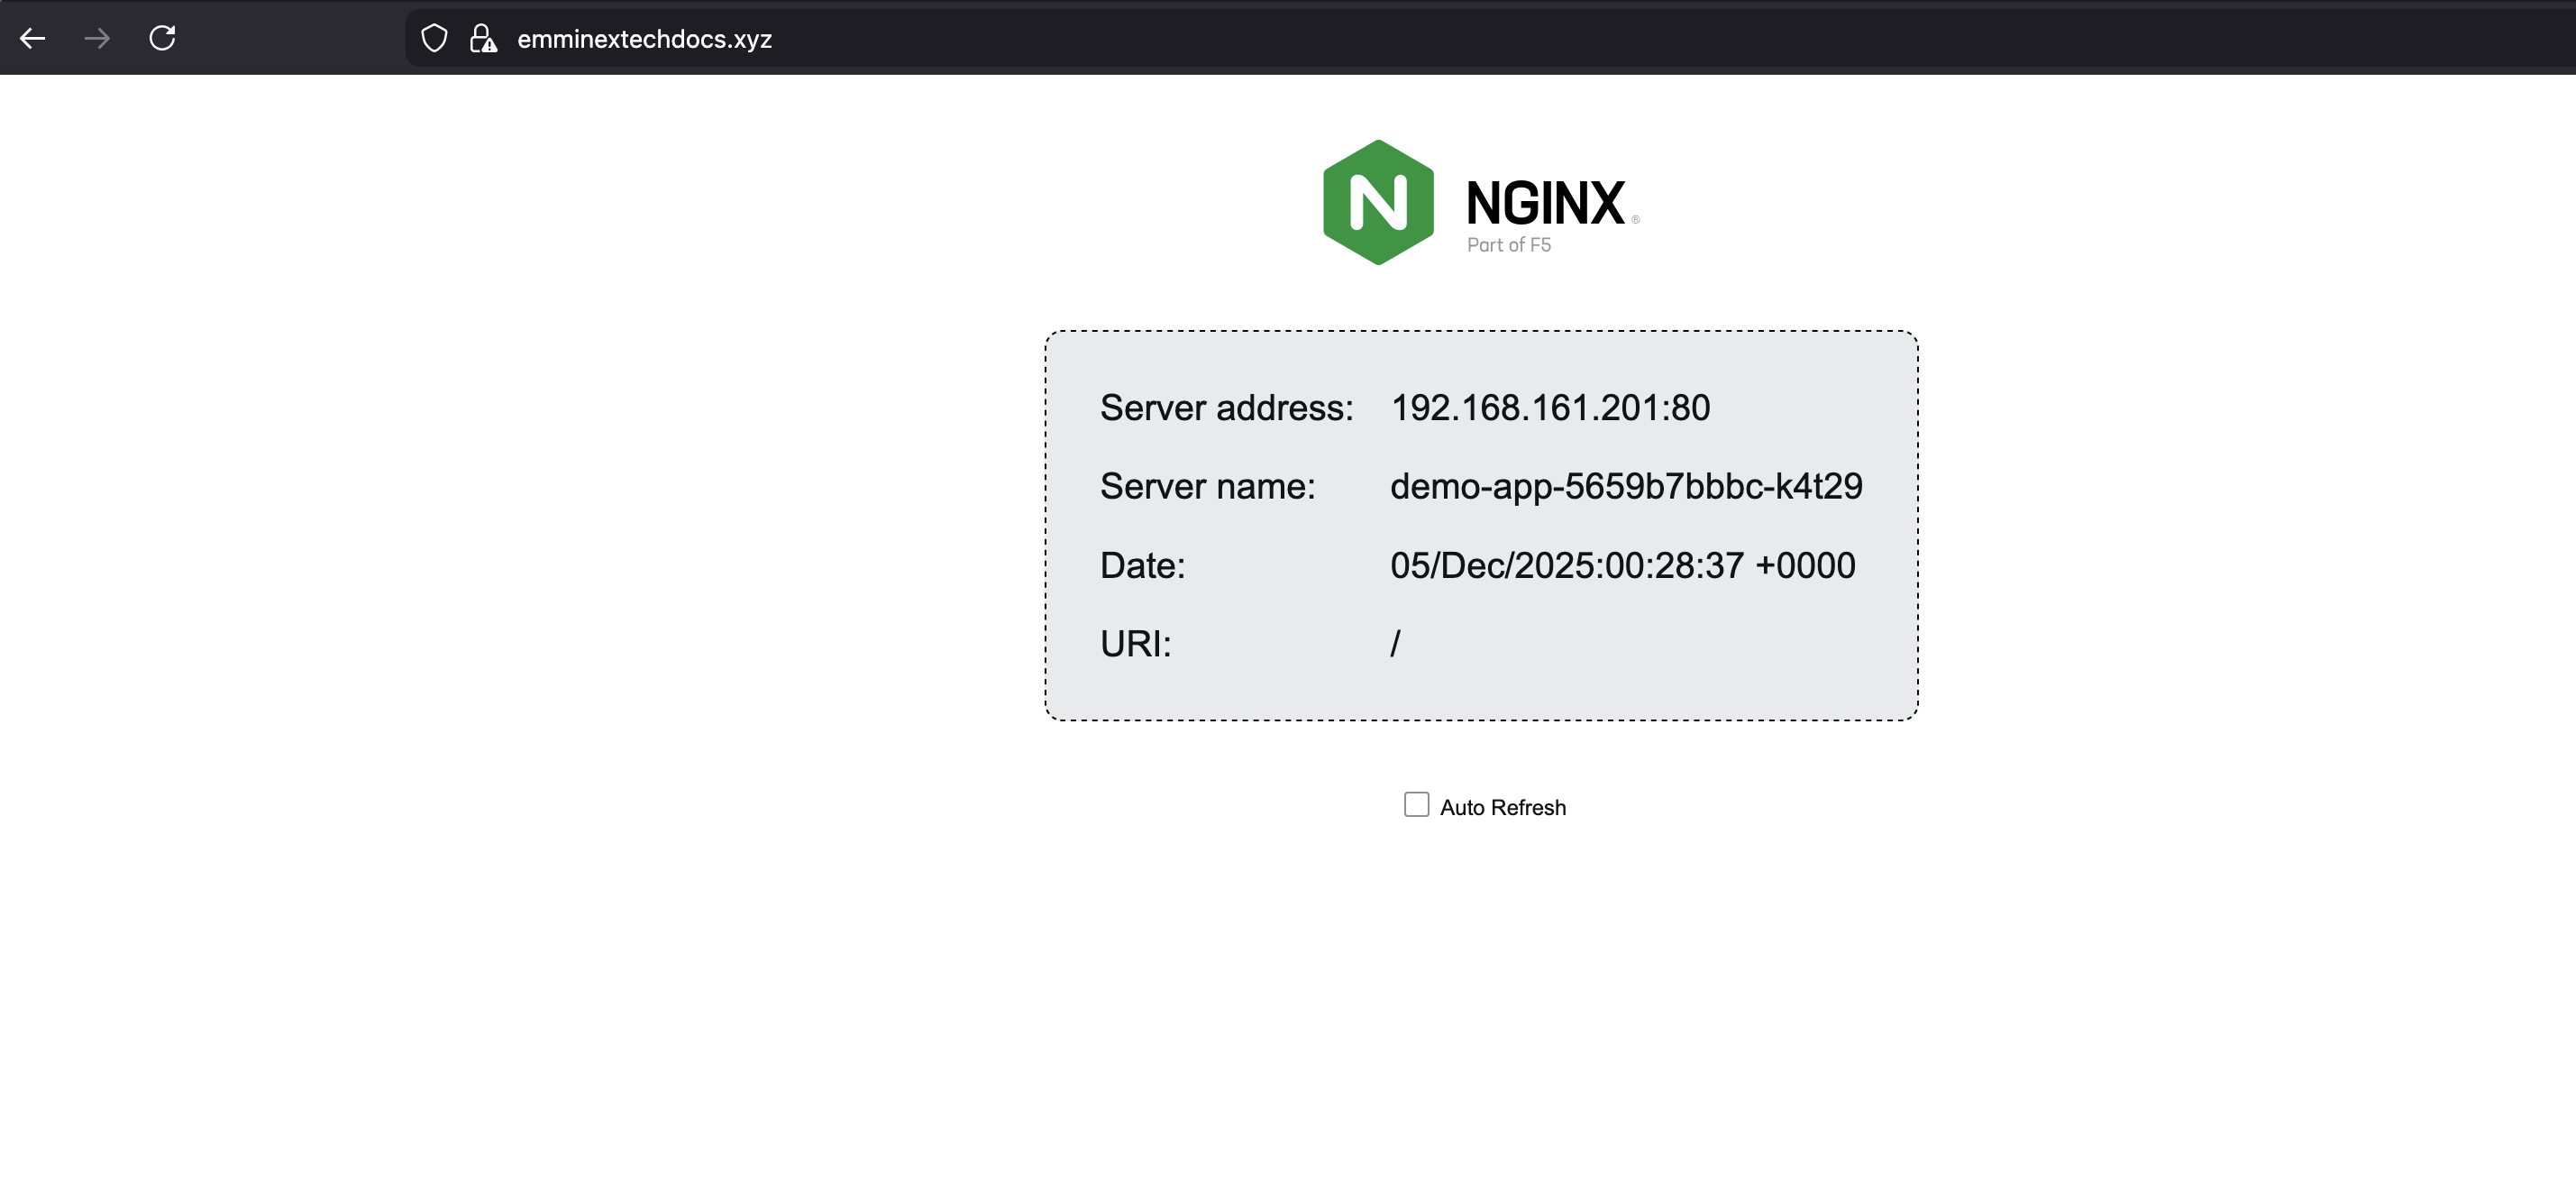
After the certificate issues, verify HTTPS connectivity with curl:
curl -v https://app.example.com 2>&1 | grep -E "SSL|subject|issuer|expire"
Output* SSL connection using TLSv1.3 / TLS_AES_256_GCM_SHA384 / X25519 / RSASSA-PSS
* subject: CN=emminextechdocs.xyz
* expire date: Apr 20 04:37:11 2026 GMT
* subjectAltName: host "emminextechdocs.xyz" matched cert's "emminextechdocs.xyz"
* issuer: C=US; O=Let's Encrypt; CN=R12
* SSL certificate verify ok.
* old SSL session ID is stale, removing
< expires: Tue, 20 Jan 2026 05:36:47 GMT
Production certificates from Let's Encrypt show "Let's Encrypt" as the issuer.
Monitor the Certificate resource for renewal status:
kubectl get certificate demo-tls-production -o jsonpath='{.status.conditions[0]}' | jq
Output{
"lastTransitionTime": "2026-01-20T05:35:44Z",
"message": "Certificate is up to date and has not expired",
"observedGeneration": 1,
"reason": "Ready",
"status": "True",
"type": "Ready"
}
Check the certificate's actual expiration date:
kubectl get secret demo-tls-production -o jsonpath='{.data.tls\.crt}' | base64 -d | openssl x509 -enddate -noout
OutputnotAfter=Apr 20 04:37:11 2026 GMT
cert-manager renews certificates 30 days before expiration. For a 90-day Let's Encrypt certificate, renewal occurs around day 60.
Test from a browser by visiting your domain. A valid Let's Encrypt production certificate displays a padlock icon. Click the padlock to view certificate details:
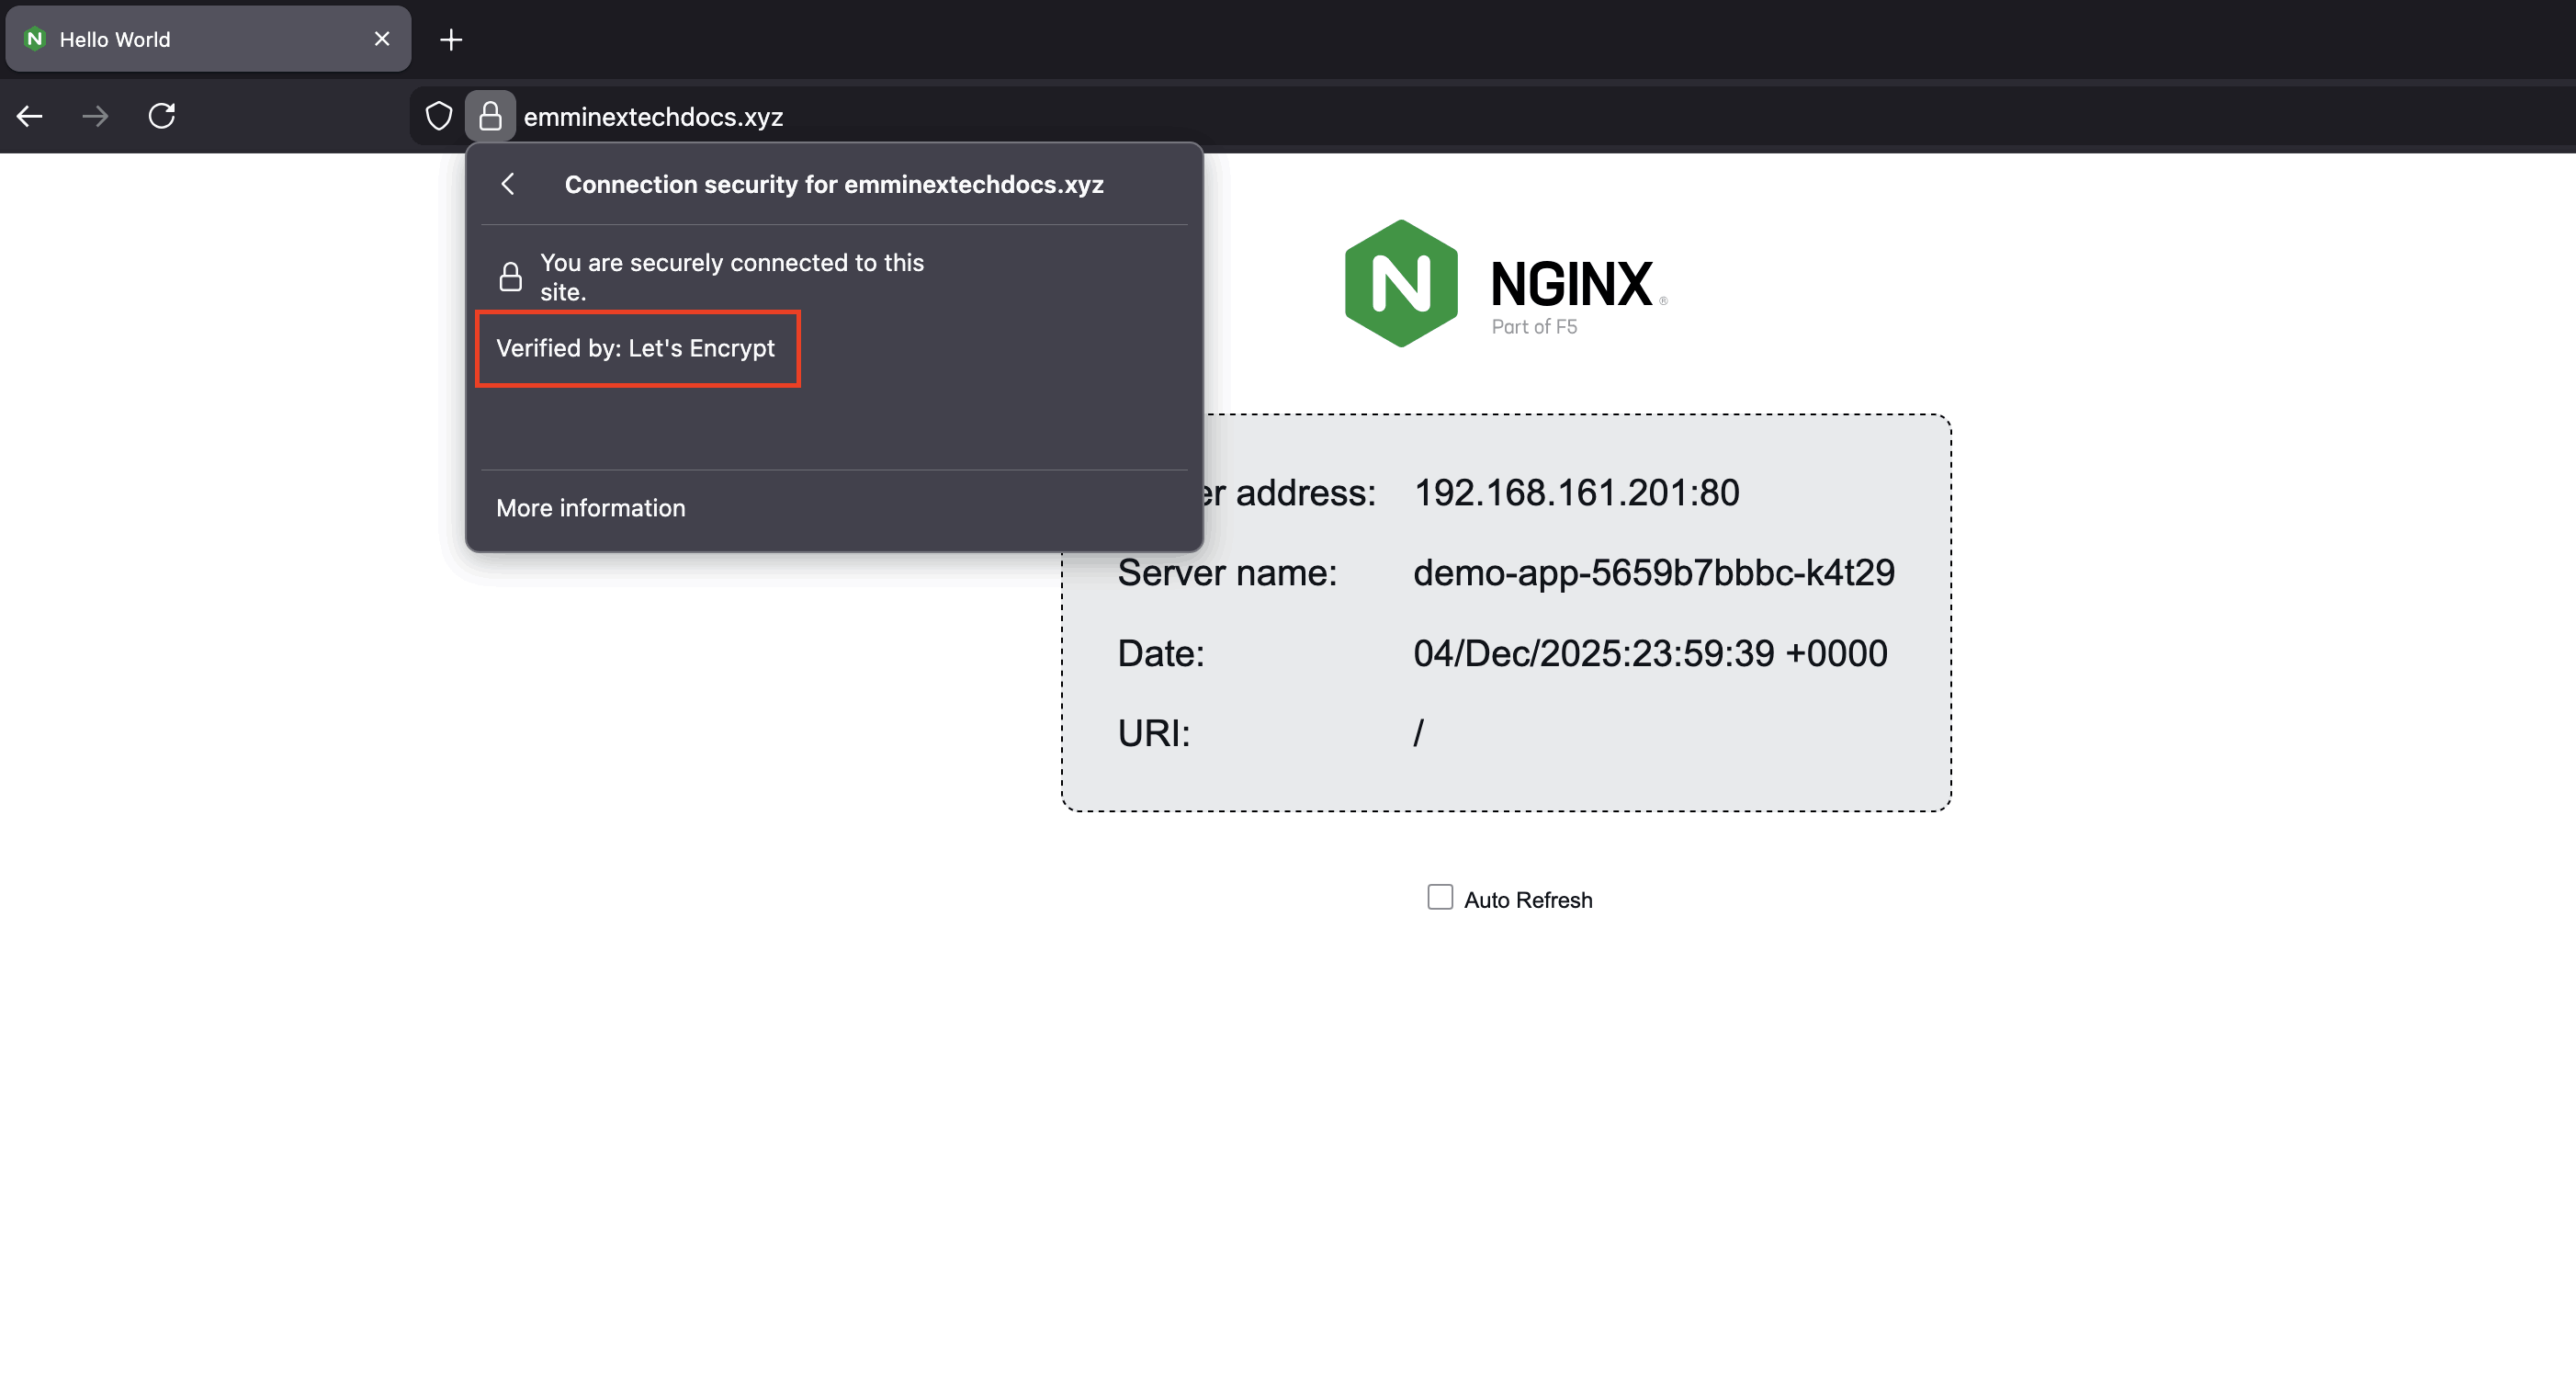
For comprehensive SSL testing, use online tools like SSL Labs. These services check certificate chain validity, protocol support, cipher strength, and common vulnerabilities.
#Troubleshooting
#Certificate is stuck in pending
Check the certificate request status:
kubectl get certificaterequests -n <namespace>
Common causes:
-
DNS record not pointing to your Ingress Controller's public IP
-
Port
80blocked by a firewall or security group (required for HTTP-01 challenge) -
Ingress is not using the correct Ingress class or
ingressClassName -
cert-manager pods not running or in
CrashLoopBackOff -
Wrong issuerRef (Issuer or ClusterIssuer name) in the Certificate spec
Verify DNS resolution:
dig +short app.example.com
The output should match your Ingress Controller's external IP.
Check if port 80 is accessible:
curl -I http://app.example.com/.well-known/acme-challenge/test
A 404 (or any other HTTP status code) indicates that port 80 is reachable and the request is being routed to your Ingress. Connection timeouts or 'connection refused' errors usually indicate firewall or networking issues.
#Ingress not responding
Check the Ingress Controller logs:
kubectl logs -n ingress-nginx -l app.kubernetes.io/name=ingress-nginx
Verify the Ingress configuration:
kubectl describe ingress demo-ingress
Look for error messages in the Events section.
Common issues:
-
ingressClassName not set or incorrect
-
Backend service not found
-
Backend pods not running
#Browser shows an untrusted certificate warning
If using staging certificates, this is expected. Staging certificates are not trusted by browsers.
If using production certificates, check:
kubectl get secret demo-tls-production -o jsonpath='{.data.tls\.crt}' | base64 -d | openssl x509 -noout -issuer
The issuer should show "Let's Encrypt" for production certificates, not "Fake LE".
#NGINX default certificate shown
The NGINX Ingress Controller uses a default self-signed certificate when TLS is misconfigured.
Check if the TLS secret exists:
kubectl get secret demo-tls-production
Verify the secret contains valid certificate data:
kubectl get secret demo-tls-production -o jsonpath='{.data.tls\.crt}' | base64 -d | openssl x509 -noout -text | head -20
Confirm the certificate's Common Name or Subject Alternative Names match your domain.
#Let's Encrypt rate limits
Let's Encrypt enforces rate limits:
-
50 certificates per registered domain per week
-
5 duplicate certificates per week
-
5 failed validations per hour per account
Use staging for testing to avoid hitting production limits. Staging has much higher rate limits.
#Best practices
-
Use cert-manager for production. Automated renewal prevents certificate expiration outages. Cert-manager renews certificates 30 days before expiry and handles the entire ACME workflow without manual intervention.
-
Start with staging certificates. Always test with Let's Encrypt staging before switching to production. Staging certificates verify your configuration without consuming production rate limits. The staging environment intentionally issues untrusted certificates, making it obvious when you are still in testing mode.
-
Monitor certificate expiration. Set up alerts for certificates approaching expiration. Check certificate status regularly. Configure monitoring tools like Prometheus with the cert-manager metrics endpoint to alert on certificate issues proactively.
-
Enable HTTPS redirects. The
nginx.ingress.kubernetes.io/ssl-redirect: "true"annotation automatically redirects HTTP traffic to HTTPS. Enforce HTTPS for all production traffic to prevent accidental unencrypted connections. -
Use separate secrets per domain. Each domain should have its own TLS secret. This simplifies certificate rotation, troubleshooting, and allows different renewal schedules or issuers per domain.
-
Back up CA-issued certificates. Store copies of manually obtained certificates securely outside the cluster. Kubernetes secrets can be deleted accidentally. Keep backups in a secure location like a password manager or secrets vault.
-
Test certificate renewal. Periodically verify that cert-manager successfully renews certificates. Delete a staging certificate and confirm it reissues automatically. This validates that your entire certificate pipeline works correctly.
-
Document your certificate configuration. Record which issuers, secrets, and Ingress resources relate to each domain. Clear documentation speeds troubleshooting and helps team members understand the certificate infrastructure.
#Conclusion
SSL certificates protect data in transit between clients and your Kubernetes applications. The NGINX Ingress Controller handles TLS termination, centralizing certificate management at the cluster edge.
Manual certificate configuration works with any certificate type and gives you full control. Cert-manager automates the lifecycle with Let's Encrypt, eliminating manual renewal tasks and reducing the risk of outages related to expiration.
Start with staging certificates to validate your configuration, then switch to production for browser-trusted certificates. Monitor certificate status and set up alerts to catch renewal failures before they affect users.
Cherry Servers provides dedicated servers and cloud infrastructure suitable for hosting Kubernetes clusters with full root access and flexible networking options.


