Advanced Linux Commands for Intermediate Users


In this tutorial, we will explore a set of advanced Linux commands suitable for intermediate users and those already familiar with command-line basics. From system resource management and text processing to file manipulation and network operations, this set of commands will provide the expertise and confidence required to handle complex tasks in a Linux environment.
#Prerequisites
To follow along, ensure you have the following:
-
A modern Linux distribution, whether a GUI or a headless server.
-
It’s also recommended to configure a sudo user.
#Overview of advanced commands for intermediate users
The commands we’re about to discuss cover key areas of system administration, including, but not limited to, text processing, user creation and administration, process control, network troubleshooting, and viewing system stats. Knowing these commands will help you manage servers more effectively, troubleshoot issues, and tune performance to align with your workloads.
#Text processing
Text processing refers to the manipulation of text, log files, configuration files, and some other files where search, filtering, extraction, and other engineering processes are needed to achieve the desired output. Here are some sets of intermediate commands for processing and manipulating text.
#sed command
The stream editor, short for sed, is another text transformation CLI tool. It's tailored specifically for searching and replacing text. It also supports advanced operations, including deleting text and lines in a text file.
To substitute a string in a file, use the following syntax:
sed 's/old_string/new_string/g' file
Let's take a few examples. Suppose you have a file called distro.txt with the following lines:
Ubuntu is one of the most widely used operating systems. Ubuntu is known for its stability and reliability. Not only is it beginner-friendly, but Ubuntu is also a perfect fit for enterprise environments.
To replace every occurrence of Ubuntu with Debian and print the output to the screen, run:
sed 's/Ubuntu/Debian/g' distro.txt

*NOTE
The command does not alter the contents of the file. It merely manipulates the output that appears on the stdout.
To replace the nth occurrence only of a string in a file, use the following syntax. Here, n is the numerical value of the occurrence.
sed 's/old_string/new_string/n' file
For example, to replace the second occurrence only of the string Ubuntu with Debian execute:
sed 's/Ubuntu/Debian/2' distro.txt

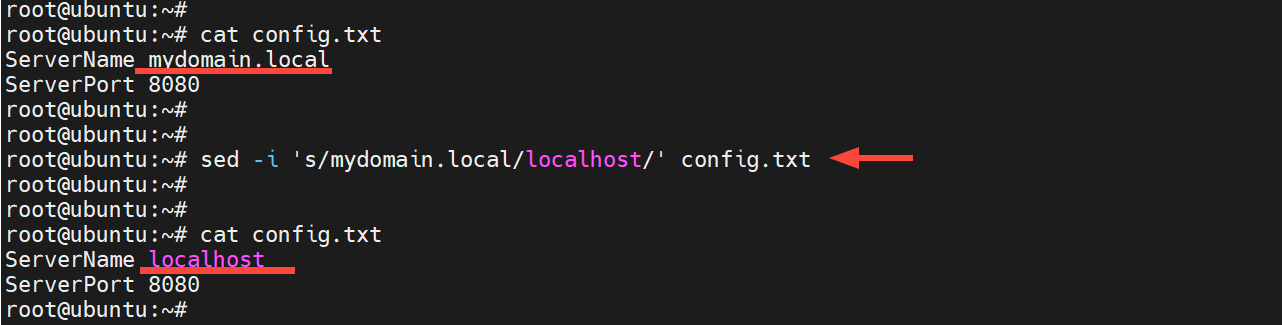
The -i option modifies or edits the file directly but does not display the output on the terminal. Suppose you have a configuration file, config.txt, with the following lines:
ServerName mydomain.local
ServerPort 8080
To remove the string mydomain.local and replace it with localhost, run the command:
sed -i 's/mydomain.local/localhost/' config.txt
Next, confirm the changes using the cat command:
cat config.txt
#grep command
Aside from utilizing the cat command to examine text files, other operations include searching for strings in a text file. The grep command (Global Regular Expression Print) is a useful command-line tool for searching strings and patterns in text files.
In the following example, we search for successful login attempts in the \var\log\auth.log log file by looking for the Accepted keyword.
grep “Accepted” /var/log/auth.log
The output displays the lines that contain logs providing details of the login, including timestamps, the login user, and the user's IP address.
Sample output
Output2025-11-06T18:51:40.195666+02:00 ubuntu sshd[993967]: Accepted password for cherry from 105.171.150.236 port 1984 ssh2
Optionally, you can use the cat command alongside grep to achieve the same goal.
cat /var/log/auth.log | grep "Accepted"
Additionally, consider the -n option for line numbering. In this second example, we are searching for the details of a user called cherry in the `/etc/passwd’ file.
grep -n "cherry" /etc/passwd
This time around, the output contains the line number of the entry containing the keyword cherry. The line number is printed at the start of the line. In this case, we can see the search pattern is contained in line number 40
Output40:cherry:x:1000:1000:cherry,,,:/home/cherry:/bin/bash
#The cut Command
The cut command allows you to extract certain slices of text from a particular file and print the output to stdout. To show portions of words (such as characters or particular columns) from various files (log files, CSV, configuration files, etc.), use the syntax:
cut [options] [file]
Some of the command-line switches include:
-c: The character(s) you wish to extract.
-f: Refers to the field(s) you want to extract.
-d: Specifies the delimiter (like a comma, colon or hyphen)
Consider a CSV file players.csv with the names of football players and their countries.
Bukayo,Saka,England
Christiano,Ronaldo,Portugal
Nico,Williams,Spain
Kylian,Mbappe,France
Cody,Gakpo,Netherlands
Kai,Havertz,Germany
Suppose you want to print only the first two columns. You would have to run the command:
cut -d ',' -f1,2 players.csv
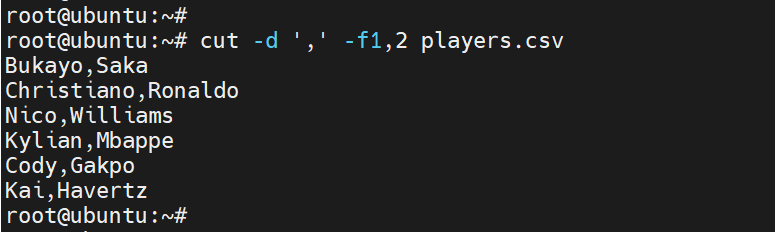
The delimiter option -d specifies the delimiter, in this case the comma, which is used to separate the values in the CSV file. The -f flag specifies the columns or fields to be separated (in this case, the first and second fields).
Different files use different separators for each item. For example, the /etc/passwd file is separated using a colon. In such a case, you need to use ':' as a delimiter. To display entries of the first column in the file, use the command:
cut - d ':' - f1 /etc/passwd

#uniq command
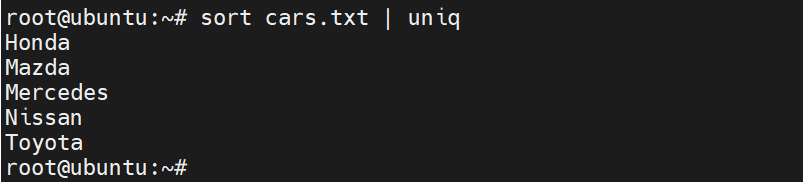
The uniq command identifies duplicate entries and, as the name implies, only prints unique values to stdout. However, this comes with a caveat: by itself, it only detects consecutive duplicate values. If the values are spread out within a file, they'll go unnoticed.
Best practice recommends using the sort command alongside unique to address this challenge and identify repeat values, regardless of their order of occurrence.
Consider a text file of cars, cars.txt, as shown below.
Honda
Mazda
Mercedes
Honda
Nissan
Toyota
Nissan
The Nissan and Honda entries have duplicate values. To print non-duplicate values to stdout, run the command.
sort cars.txt | uniq
#head/tail command
There are occasions when you'd want to just have a peek at the opening or closing lines of a file.
The commands head and tail enable users to quickly view the first and last portions of the specified text or configuration file.
To read the first 10 lines from the file /var/log/auth.log, run:
head -10 /var/log/auth.log
Conversely, you can view the last 10 lines as shown.
tail -10 /var/log/auth.log
#Process Management
Every operating system has hundreds of running processes. Some are user processes, while a majority are system processes. Let’s check out some of the advanced commands.
#pidof command
The pidof command is one of the simplest and quickest ways to obtain the PID of a running process. It retrieves the process's numerical PID only - a convenient tool if you are just interested in the PID only. This is in contrast to the ps command, which prints multiple lines to stdout, resulting in clutter on the terminal.
Say you want to get the PID of the Cups printing service, simply run:
pidof cupsd
Output1184328
Note that most processes have multiple PIDs associated with them. To find out the PIDs of the SSH daemon, you can run:
pidof sshd
Output1217960 1217923 4875
#lsof command
An abbreviation of List Open Files, lsof is a command widely used by system administrators for both process and network troubleshooting. It reports to the user which processes have a particular file opened, which can be a normal file, a network connection, a socket, etc. It is a highly effective command for auditing processes.
For connections within a network, it displays the details of TCP and UDP connections, their status, ports, and remote endpoints.
Specifying a file allows you to view the associated process; in this case, we are examining the process that uses the file /var/log/auth.log.
lsof /var/log/auth.log
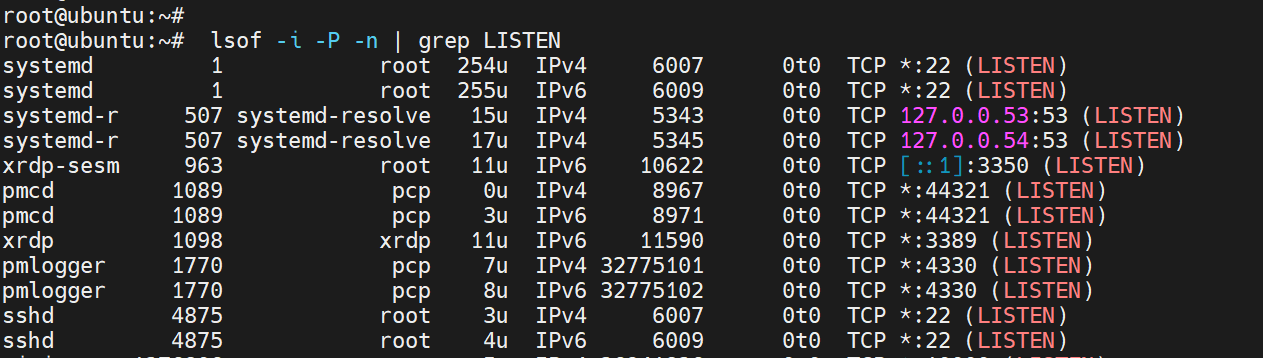
You can show all connections that are in a 'LISTEN' state:
sudo lsof -i -P -n | grep LISTEN
To list processes listening on a specific port, e,g, port 6379, pass the -i option.
sudo lsof -i :6379

To display all TCP connections, run:
sudo lsof -i tcp
For UDP connections, run:
sudo lsof -i udp
To see all active network connections, both TCP and UDP, you can also use:
sudo lsof -i
To view open files belonging to a given user, use the -u switch, specifying the user in this case as cherry.
sudo lsof -u cherry
#nice / renice commands
Each running process on a Linux system is assigned a priority value, which determines how much CPU it receives over others. This priority is referred to as the niceness value, which ranges from -20 to +19, with -20 being the highest priority and +19 being the lowest. Hence, the lower the value, the higher the priority. A process with a higher niceness value gets more frequent CPU access, and the converse is true.
By default, a majority of the processes are assigned a niceness value of 0 to ensure fair scheduling across all user processes. To check the niceness value, run the top or htop commands and locate the column labelled NI.
The nice command sets the niceness value when you want to start a new process, effectively handing you the mandate to specify a task's priority. In doing so, you gain control over demanding processes by assigning them a higher niceness value, which prevents them from impacting more crucial workloads.
On the other hand, the renice command reconfigures the niceness value of an already running process. This comes in handy when you want to control a CPU-intensive process that is slowing down the system, or boost a critical process that needs more compute power.
For example, to back up the home directory without slowing the server, you can assign a niceness value of 10 as shown.
nice -n 10 tar -czf backup.tar.gz /home/user
To launch a Python script with a higher priority, run:
sudo nice -n -10 python3 scripy.py
Suppose you have a process with a PID 27685 that is hogging too much CPU. You can adjust its niceness value as shown.
sudo renice 18 -p 27685
You can reduce the priority of all processes belonging to a user, for example, alex as shown. The goal is to limit the user's CPU utilization.
sudo renice 10 -u alex
#kill / pkill commands
The kill and pkill commands are used to end or terminate processes.
The kill command uses the following syntax.
kill <signal> <PID>
For example, to gracefully terminate a process with a PID of 27656, run:
kill -15 27656
The -15 option sends a SIGTERM signal, which gracefully ends the process.
You can pause the process by running:
kill -19 27656
Unlike kill, which uses PIDs to end processes, pkill terminates a process using the process name or pattern.
For example, to stop all processes with the name anydesk, run:
pkill anydesk
You can suddenly halt the Apache web server and all its processes by running:
pkill -9 apache2
The -9 option force-stops processes, unlike the -15 which allows for graceful shutdown.
#User and group management
In addition to the most basic instructions on creating users on your server, the following commands bundle more advanced instructions on performing user and group management.
#usermod command
When modifying user account customization, the usermod command performs several tasks.
For instance, to add a user named andrew to the sudo group, perform the command below.
usermod -aG sudo andrew
Changing a user’s login name can be done by using the lexically smaller -l option. Thus, if you want to change the name andrew to andy, perform:
usermod -l andy andrew
You can lock a user account with the -L option.
usermod -L andrew
Unlocking the account can be done by using the -U option.
usermod -U andrew
#passwd command
Sometimes, on your system, you may need to modify the passwords of normal users. The password command creates and modifies user passwords.
To change a user's password, use the following command.
sudo passwd alice
The -e option requires the user to change the password the next time they log in.
sudo passwd -e alice
You can disable a user as well after logging them out, using the ‘-l’ parameter.
sudo passwd -l alice
You can also undo the user lock using the parameter ‘-u’.
sudo passwd -u alice
#chage command
The chage command is used to modify password aging policies for login users in a Linux system.
For example, to view password aging policies for a user named alice, run:
sudo chage -l alice
You can use the -M option to make a password expire every 60 days.
sudo chage -M 60 alice
The -E option allows you to set a precise expiration date for a user account. For example, to expire the password on 2025-11-30, run the command below.. Whenever the date is reached, the user will be restricted from accessing their account, and they will also be unable to log in.
sudo chage -E 2025-12-31 alice
#Networking
Now, let’s take a closer look at some advanced commands in networking.
#nmcli command
NetworkManager Command Line Interface is a useful and flexible application to manage the NetworkManager daemon. It allows you to configure and manage your network settings via the network configuration manager.
You can view your interface statistics, such as MAC address, MTU, routes, and IPV4 and IPV6 addresses, using the nmcli device show command.
nmcli device show eth0
#ss command
The ss command, which has replaced the now-deprecated netstat command, is used to display network socket statistics.
ss [OPTIONS]
Use this command to show listening ports, IP addresses, and the corresponding processes.
sudo ss -tulnp
This command displays only the active TCP connections along with their corresponding processes.
sudo ss -tp
#mtr command
The mtr command uses ping and traceroute commands. mtr is used to monitor the available paths to a destination, showing the route a data packet takes.
The mtr command takes the target's name, IP address, or hostname as an input argument.
To mtr the target website, such as cloudflare.com, use the command:
mtr cloudflare.com
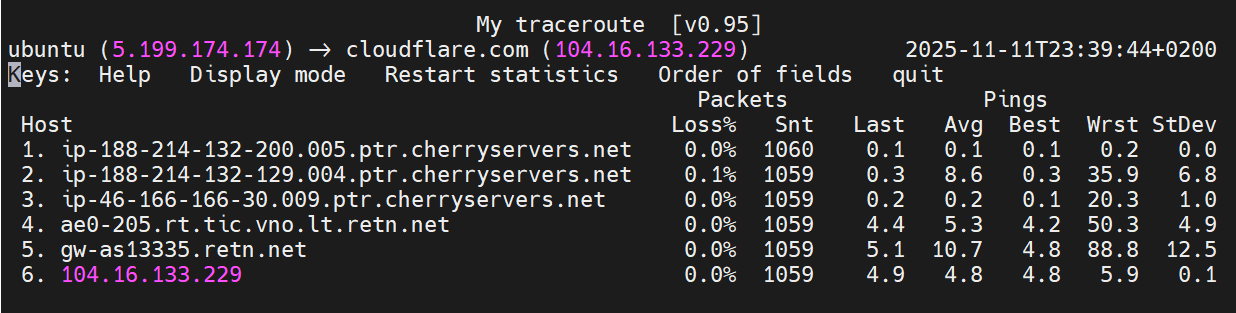
The mtr command shows the real-time packet loss and the latency at every hop.
It identifies and locates problematic links and the point in the connection where the network experiences congestion, allowing for diagnostic purposes.
#iwconfig command
When you work with a laptop or tablet running Linux, you can use the iwconfig command to view wireless interface statistics. It reveals the ESSID, access point MAC, signal strength, transmission (Tx) power, bit rate, noise, and many other statistics.
So, to show the statistics for the interface named wlan0, you can use the command of
iwconfig wlan0
#System Information
Let's check some more advanced commands you can use to get information from your server.
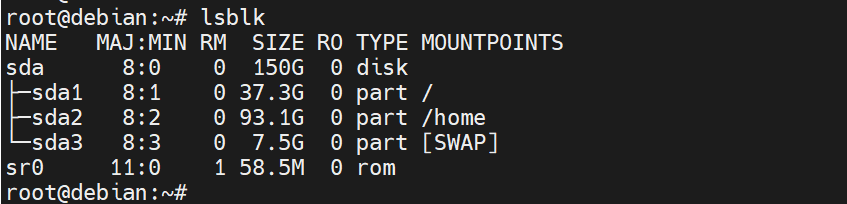
#lsblk
The lsblk command specifies the block devices and partitions on your system
lsblk
This provides the following information:
The -f option provides information such as the UUID, the type of file system, and details on its usage.
lsblk -f

#lscpu
You can use the lscpu command to view detailed information about your CPU in a more consolidated format. It will, however, print a lot of information on the command line if you do not set any flags for command-line options. You get to see your CPU model, architecture, CPU cores, caches, virtualization type, and potential vulnerabilities (if any).
Check out the output below.
lscpu
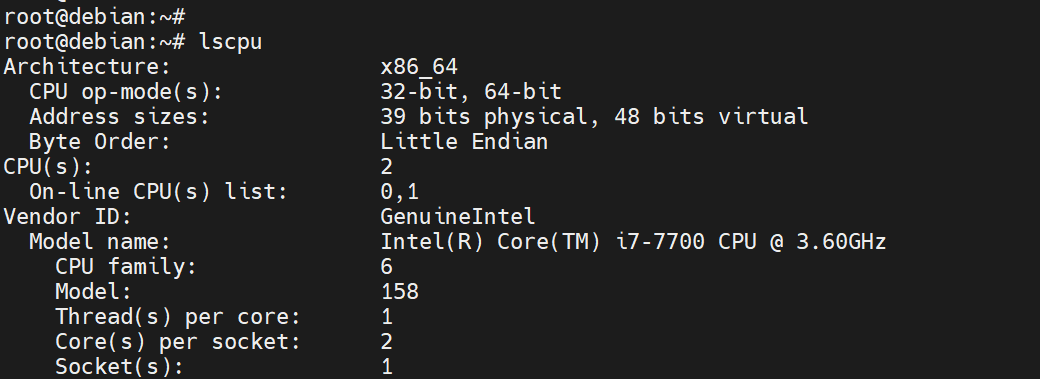
You can be more specific with the output using the grep filter. For instance, to find the particular model name, type:
lscpu | grep "Model name:"
OutputModel name: Intel(R) Core(TM) i7-7700 CPU @ 3.60GHz
You can also display several different values at once by using egrep, which is the extended version of grep. In the following, we are viewing Model name, Socket, and Threads.
lscpu | egrep 'Model name|Socket|Thread'
OutputModel name:                           Intel Core Processor (Broadwell, IBRS)
BIOS Model name:                  RHEL 7.6.0 PC (i440FX + PIIX, 1996)  CPU @ 2.0GHz
Thread(s) per core:                   1
Socket(s):                                   2
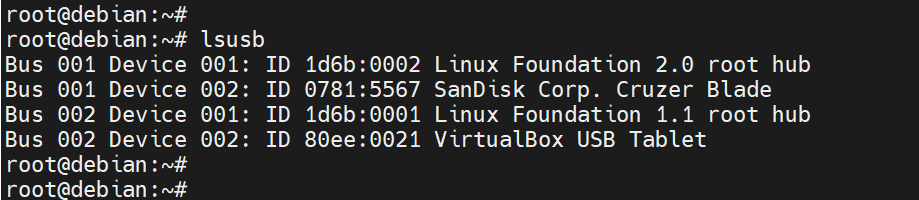
#lsusb
The lsusb command is useful for identifying USB buses and the devices attached to them, such as USB flash drives, mice, and external hard drives. A few important attributes are also provided, such as USB Bus number, type, and class of the device.
lsusb
You can also have more detailed information about each device using the -v option. Here, you receive information about the device's speed, its configuration, and the device descriptor.
lsusb -v
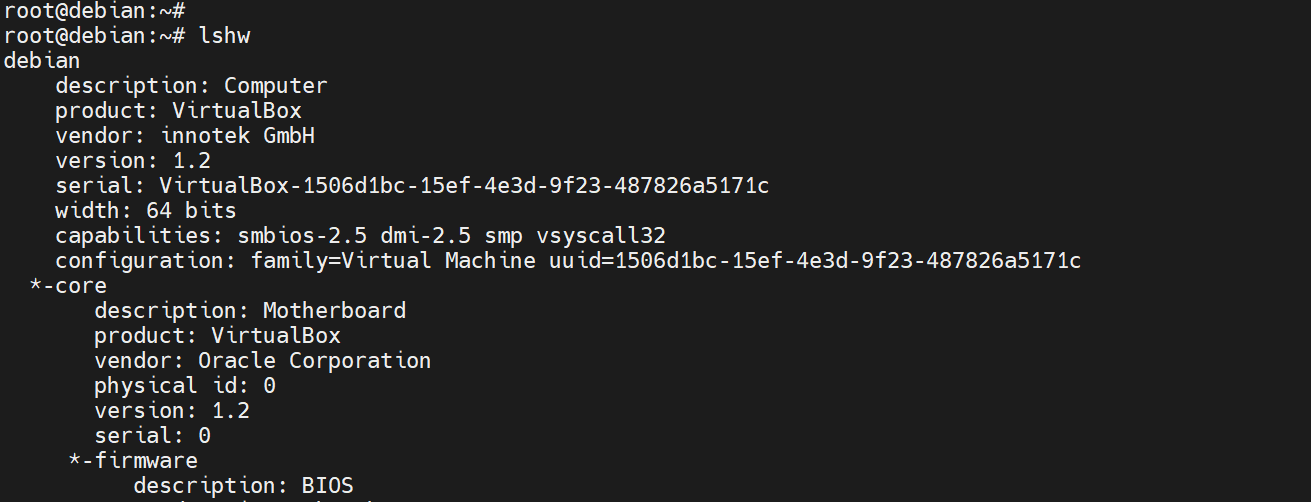
#lshw
The command lshw, which means "list hardware", is a very detailed and powerful command that shows you the entire hardware configuration of your server.
It displays information corresponding to the central processing unit, RAM, drives, network interfaces, devices such as speakers, and attached devices like TVs, mice, and USB drives.
lshw
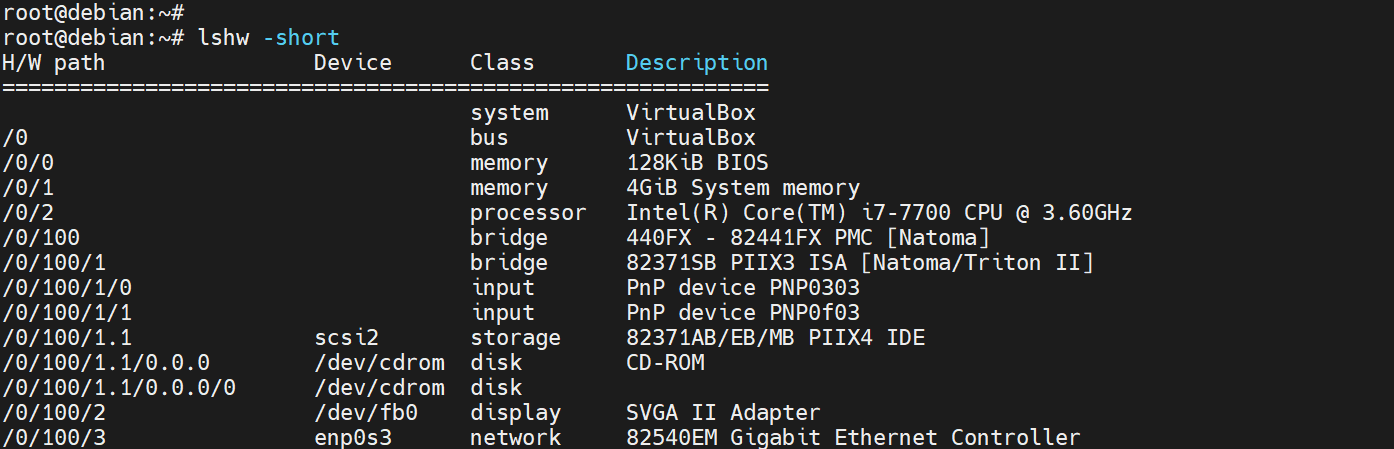
This command typically provides a substantial amount of information. Using the -short flag gives a brief, to-the-point, and summarized version of the information as follows.
lshw -short
#Conclusion
Mastering advanced Linux commands offers users the confidence to manage systems with increased efficiency, automate tasks, and troubleshoot at a greater depth. With enough practice, these commands provide a solid foundation needed to have full control and autonomy over your system, just like power users. You can deploy a VPS server at Cherry servers from as little as $3.54/month to practice these commands and refine your Linux command-line mastery.


