How to Install OpenVPN on Ubuntu 24.04: Step-by-Step Guide


OpenVPN has been the gold standard for self-hosted VPNs for quite a while. It's an open-source VPN that creates encrypted tunnels between devices over the internet and lets users browse securely and access restricted resources.
The Community Edition is completely free, though there is a commercial offering called OpenVPN Access Server for enterprise environments. This provides a web-based GUI for simplified management and allows up to 2 free concurrent connections. Beyond that, you need a paid license.
Aside from its cost-effectiveness, it works well with a wide variety of platforms and devices. It is natively supported in Linux and takes only a minute or two to get it up and running. Client GUI applications are available for all major operating systems, including Mac and Windows, as well as mobile platforms.
This guide walks you through installing OpenVPN on Ubuntu 24.04.
#Installing OpenVPN on Ubuntu 24.04
There are two ways of getting the OpenVPN service up and running. You can opt for the manual approach. This method requires you to set everything from the ground up, including client certificates, encryption keys, and firewall rules. Honestly, it’s a challenging approach that takes a lot of time and expertise to have everything working.
A much easier approach is to automate installation with a bash script provided by the developers. The script automates the entire installation, handling tedious and complex configurations and saving you time. This is the approach we will take to install the VPN in this guide.
#Prerequisites
To carry out this setup, the following are required:
-
A VPS instance with at least 2GB RAM and 2vCPUs. Cherry Servers offers a simple and quick way to deploy your cloud server.
-
SSH access to the server with a sudo user configured.
#Step 1: Update the server
To start, access your server via SSH and update the package index.
sudo apt update
#Step 2: Installing OpenVPN
The openvpn-install script is available on GitHub. It lets you install the VPN server on the CLI in just a few seconds. Once installed, you can manage your VPN by running tasks such as listing connected clients, customizing encryption settings, and generating new client profiles. When required, it can also help you gracefully remove OpenVPN.
To download the script, run:
wget https://git.io/vpn -O openvpn-install.sh
Be sure to make it executable.
chmod +x openvpn-install.sh
Next, run the script to start OpenVPN.
sudo ./openvpn-install.sh
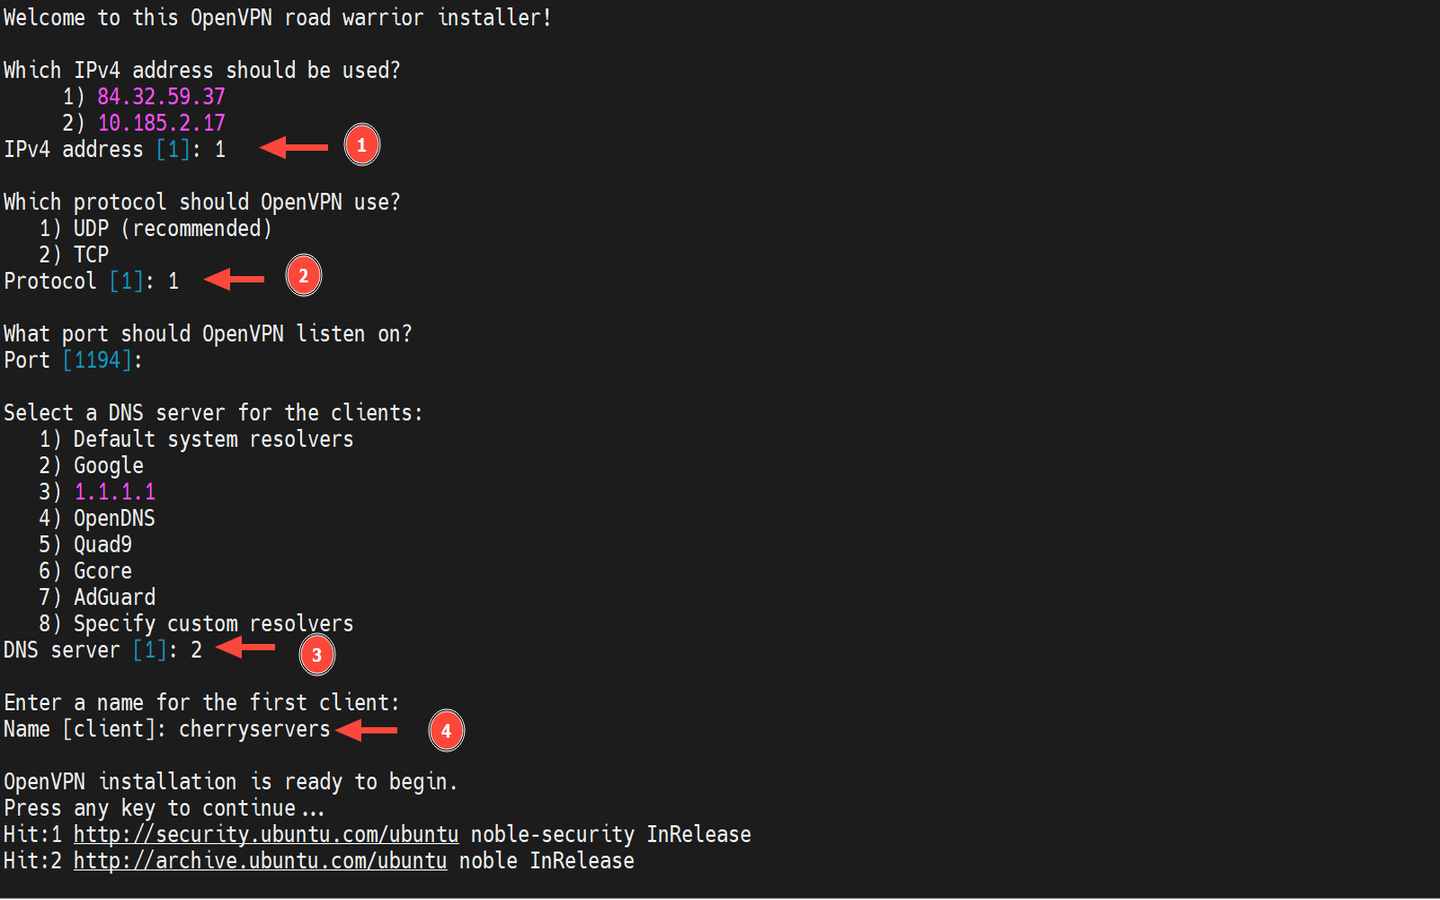
The installation is an interactive process that will prompt you to choose your preferred options. Let's pause and check them out.
-
IPv4 address: Select the server’s public IPv4 address.
-
Protocol: Select *UDP option.
-
Port: Hit ENTER to select the default port: 1194.
-
DNS Server for client: Select Google or CloudFlare (option 3).
-
Client name: Provide your preferred client name. The client configuration file will take this name and will be saved in the home directory.
The installer will automate the remainder of the installation process, ensuring you have a fully functional VPN service. A .ovpn client file will be generated and placed in your home directory.
OutputFinished!

The client configuration is available in: /home/cherry/cherryservers.ovpn
New clients can be added by running this script again.
In this setup, the client profile is named ~/cherryservers.ovpn since we provided "cherryservers" as the preferred client name. Obviously, this will likely be different in your case.
#Step 3: Confirm OpenVPN installation
Let’s now verify if OpenVPN is working as expected. There are various ways of doing this. First, let’s confirm the version installed.
openvpn --version
Here’s an excerpt of the output.
OutputOpenVPN 2.6.14 x86_64-pc-linux-gnu [SSL (OpenSSL)] [LZO] [LZ4] [EPOLL] [PKCS11] [MH/PKTINFO] [AEAD] [DCO]
library versions: OpenSSL 3.0.13 30 Jan 2024, LZO 2.10
DCO version: N/A
Originally developed by James Yonan
You can confirm the port and IP address the VPN service is listening on.
sudo ss -pnltu | grep 1194
Outputudp UNCONN 0 0 84.32.59.37:1194 0.0.0.0:* users:(("openvpn",pid=5246,fd=6))
Additionally, you can check if the systemd service is running.
sudo systemctl status openvpn
You should see the following output.
Output● openvpn.service - OpenVPN service
     Loaded: loaded (/usr/lib/systemd/system/openvpn.service; enabled; preset: enabled)
     Active: active (exited) since Fri 2026-02-20 22:03:59 EET; 4min 28s ago
       Docs: man:openvpn(8)
   Main PID: 3311 (code=exited, status=0/SUCCESS)
        CPU: 1ms

Feb 20 22:03:59 openvpn systemd[1]: Starting openvpn.service - OpenVPN service...
Feb 20 22:03:59 openvpn systemd[1]: Finished openvpn.service - OpenVPN service.
You can also verify if a tunnel interface exists (usually tun 0). This is a virtual interface that routes encrypted traffic from the client.
ip addr | grep -i tun0
Output5: tun0: <POINTOPOINT,MULTICAST,NOARP,UP,LOWER_UP> mtu 1500 qdisc fq_codel state UNKNOWN group default qlen 500
    inet 10.8.0.1/24 scope global tun0
#Step 4: Transfer the client config file to your local PC
We are done with the main task of setting up the VPN. The only part remaining is to connect to it. But before you do so, the last stage needs you to move or transfer the .ovpn config file to your local PC. We will go with the scp command, which is fairly simple. This is a one-line command as demonstrated below.
Download the file:
scp username@your-server_ip:~/client.ovpn /home/username
#Step 5: Connect to the OpenVPN server
The client file is now in place, and you can now initiate a connection to the VPN server. There are different ways of doing this depending on your computing environment. Let's go over different ways of connecting to the VPN.
Connect to OpenVPN via the CLI
To connect to the OpenVPN server, ensure that the client package is installed. To do so, run the command:
sudo apt install openvpn -y
From your Local Linux machine, run the following command as shown.
sudo openvpn --config client.ovpn &
This will establish an encrypted tunnel with the server, which will, in turn, mask your original IP address. You can check this by running the following command.
curl icanhazip.com
Since a secure tunnel has been established, verify that the tun0 logical interface exists.
ip addr | grep tun0
Output8: tun0: <POINTOPOINT,MULTICAST,NOARP,UP,LOWER_UP> mtu 1500 qdisc pfifo_fast state UNKNOWN group default qlen 500
    inet 10.8.0.2/24 scope global tun0
From the output, it has successfully connected to the VPN by establishing a virtual interface named tun0 and obtained a private IP address 10.8.0.2. 10.8.0.2–10.8.0.254 are client IP addresses of OpenVPN, and 10.8.0.1 is the IP address of OpenVPN server itself.
To disconnect from the VPN server, you need to end the background process. But first, you need the job ID. Therefore, run the command:
jobs
In our case, the job has a job ID of 1, as you can see from the output.
Output[1]+ Running sudo openvpn --config cherryservers.ovpn &
Bring it to the foreground:
fg %1
Then press Ctrl+C to terminate the process and effectively disconnect from the VPN. You can verify this by checking the public IP address assigned to your Linux machine.
Connect to OpenVPN via Network Manager GUI
Desktop users can easily connect to the VPN using the built-in VPN support via the NetworkManager graphical tool. It’s a simpler approach, especially for users not familiar with the CLI.
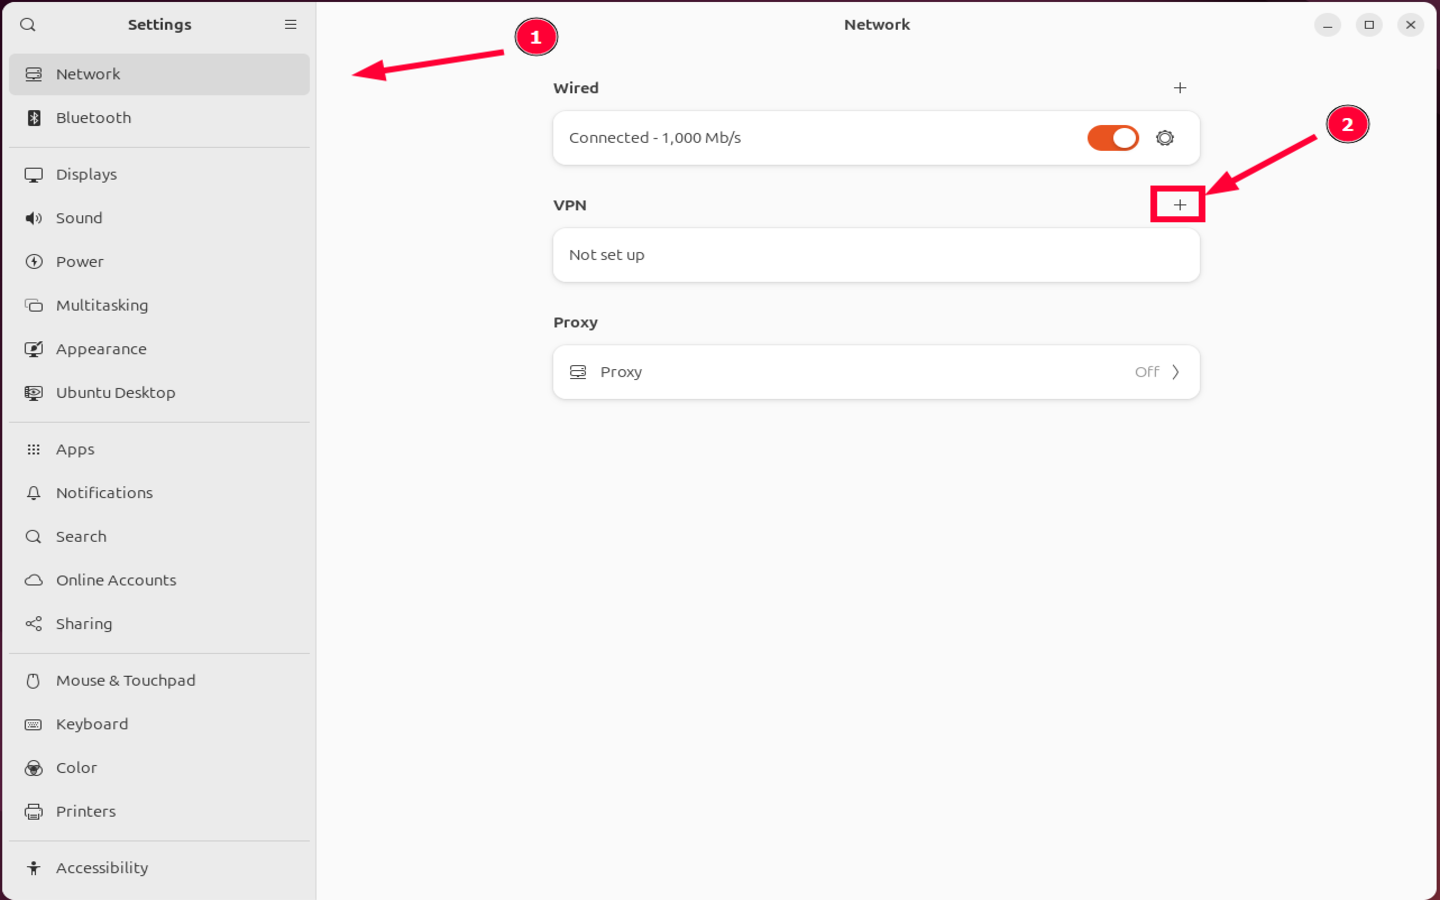
To initiate a connection, launch Settings and select Network. Next, click the plus sign [+] on the right-hand side next to the VPN section.
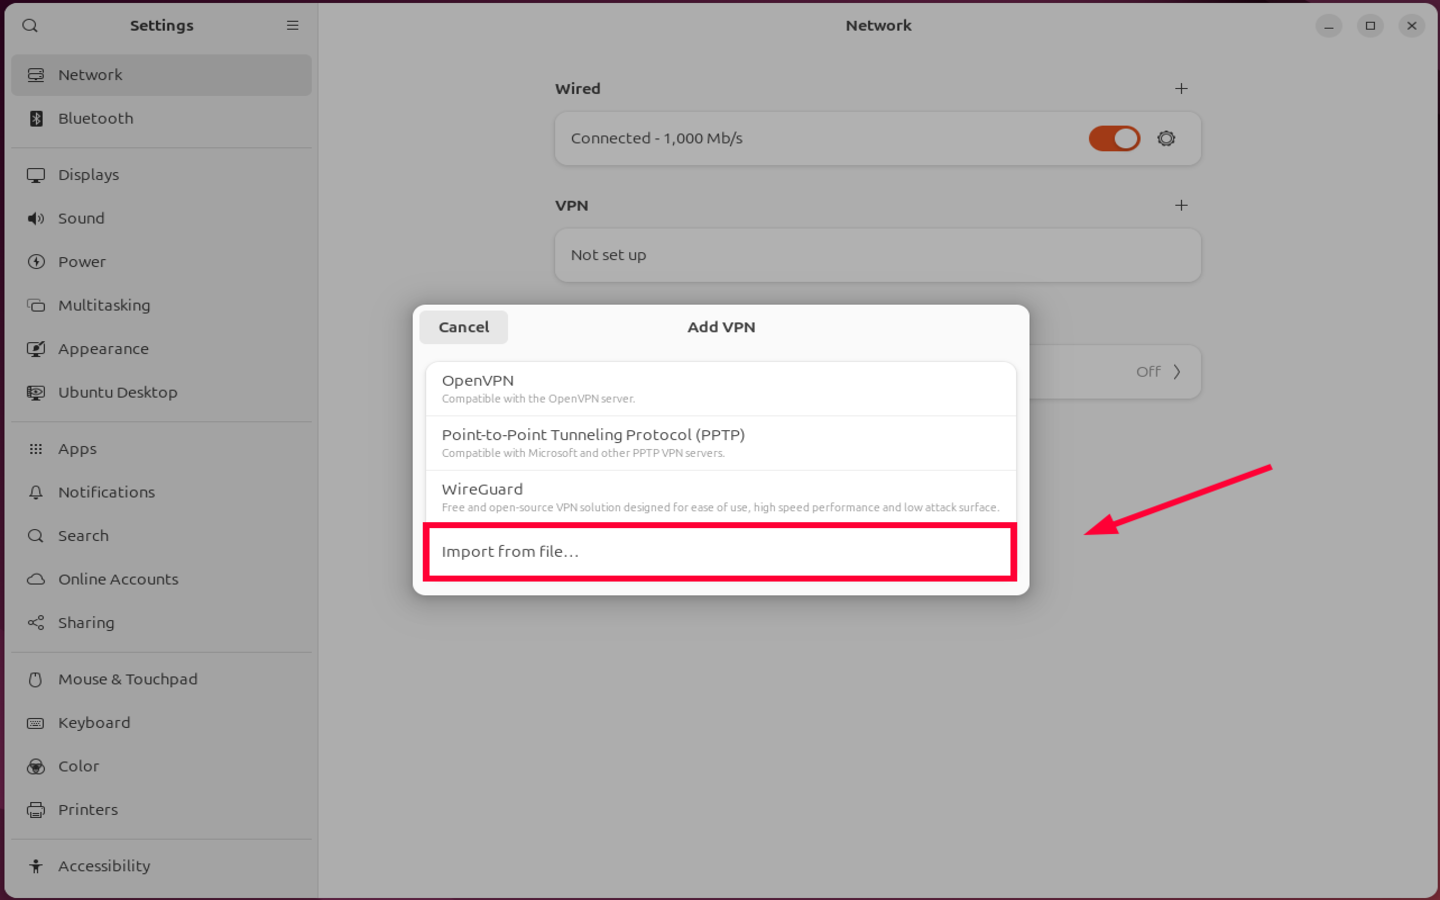
A pop-up menu with different connection channels will appear. Select the Import from file selection. This will help you navigate to the downloaded client file.
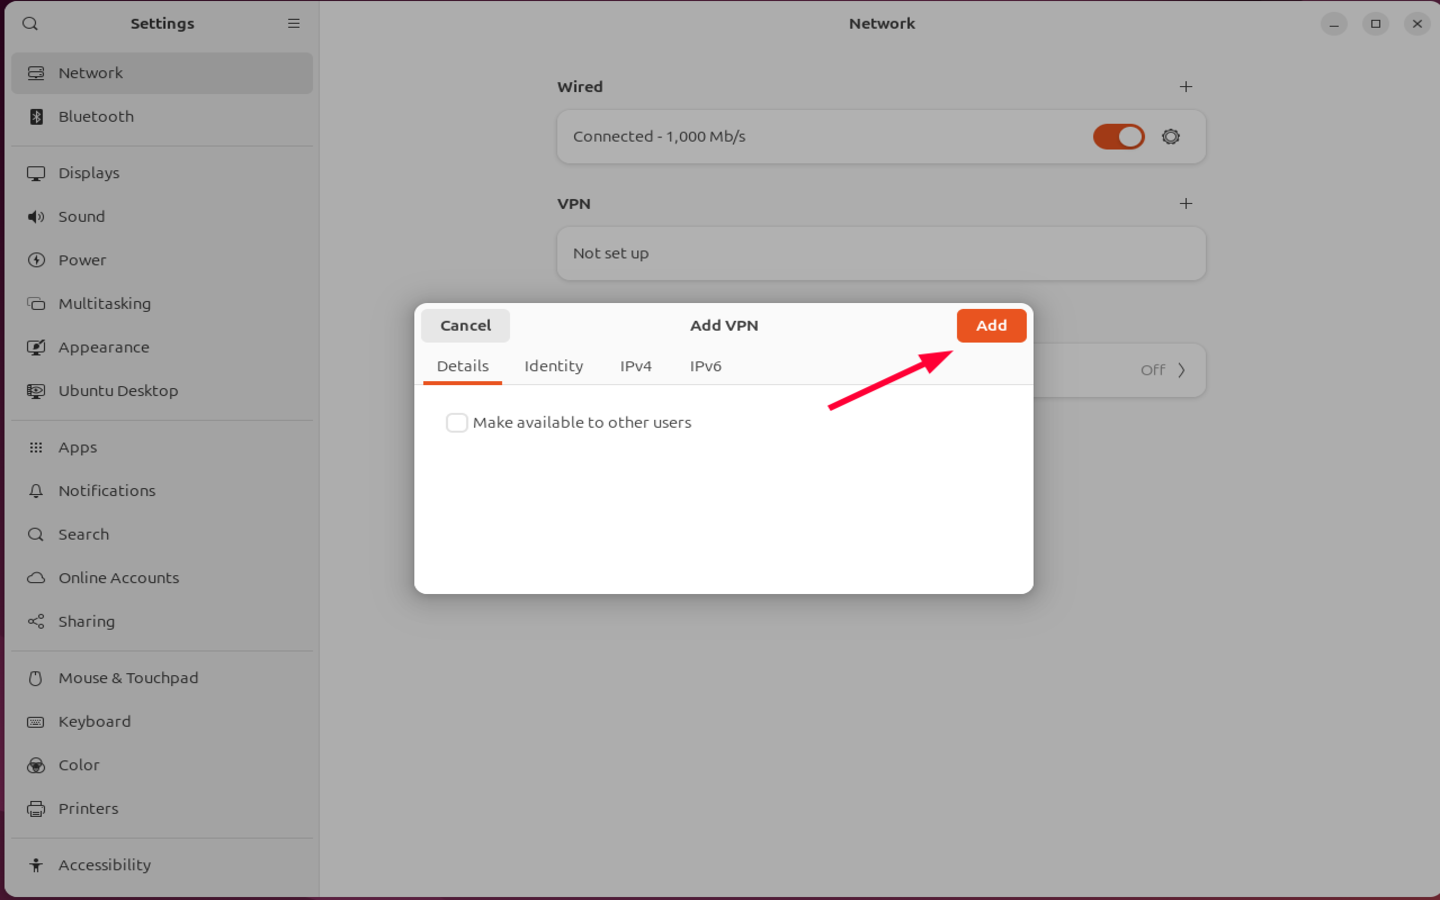
Once you have selected your .opvn file, hit the Add button on the pop-up window shown below.
Lastly, toggle on the VPN option to activate it.
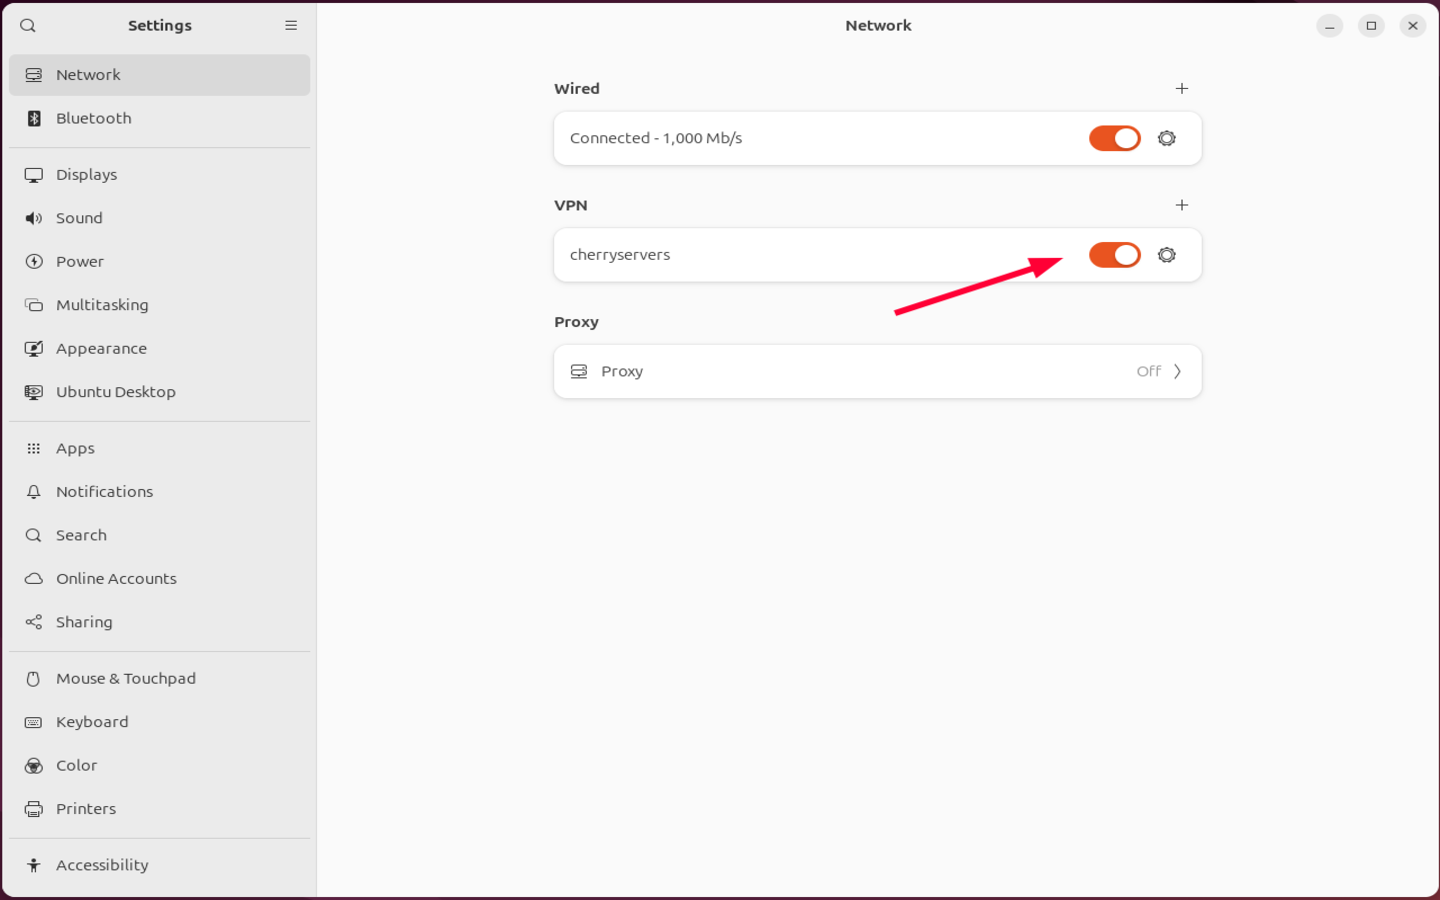
The VPN connection will be activated, and you can verify by clicking the network notification on the top right menu.
From the image below, you can see the VPN option is enabled the name of the VPN connection displayed.

Connect to OpenVPN from Windows
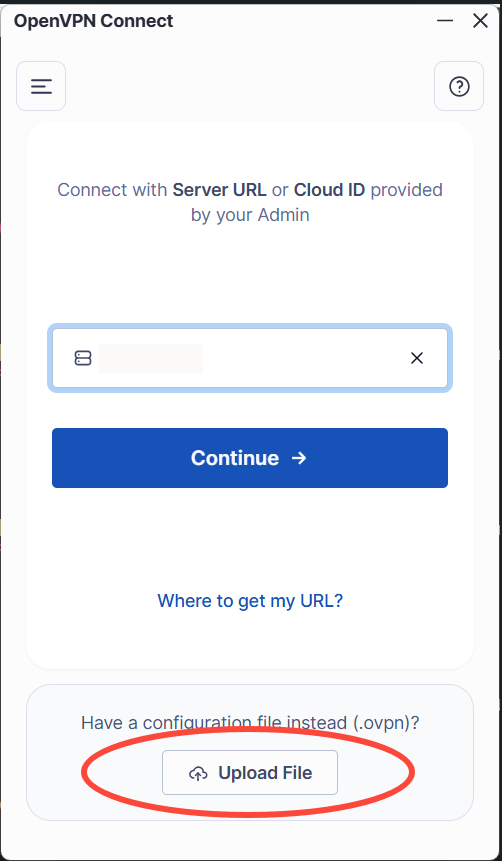
For Windows users, the connection is more intuitive than Linux. All you need to do is install a GUI client, which you can easily do by downloading the installer and running it. Once done, launch it.
Click on Upload File to choose the client file in .ovpn format.
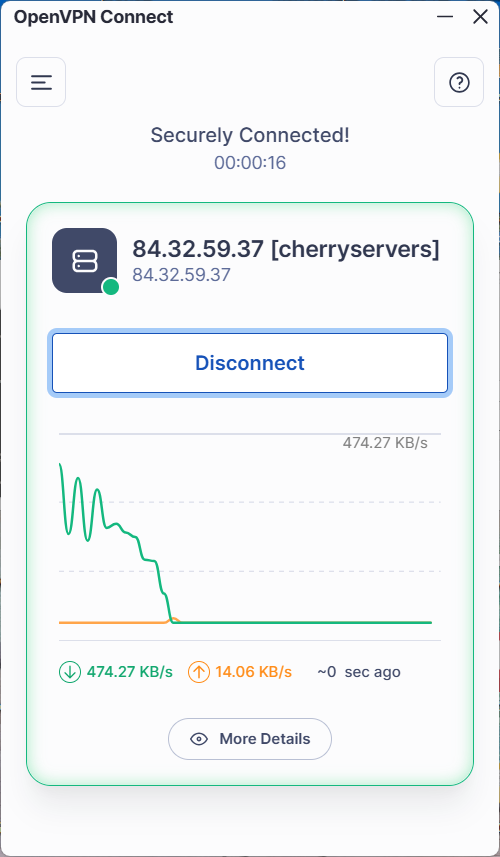
Once you have chosen the client file, click on Connect. Upon a successful connection, you should see a green outline with the server’s IP address displayed and bandwidth statistics.
You can click on the More Details button at the bottom to reveal connection details, including your private VPN IP, the server’s public IP, and the protocol.
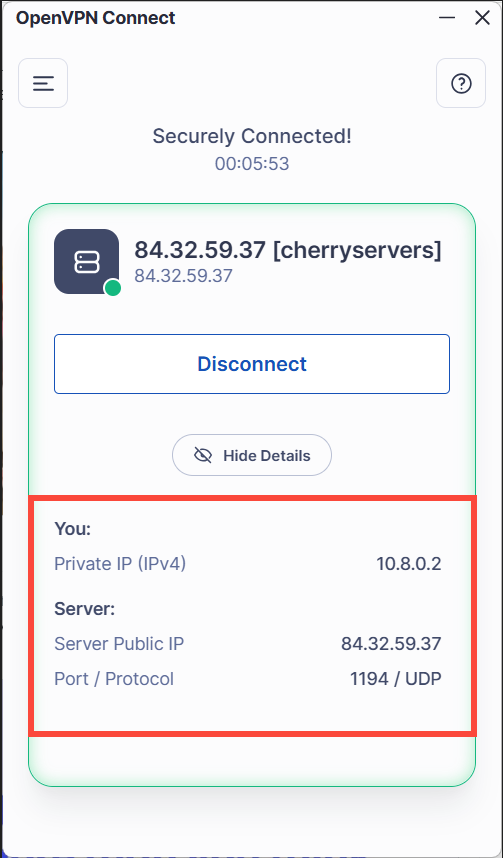
To turn off the VPN service, simply hit the Disconnect button.
#Step 6: List connected devices
One post-installation task you can perform is to view the connected devices. This is a recommended audit practice that provides visibility into users connected to the VPN.
To list clients, you need to view the status log file, which does not exist by default. As a workaround, you need to manually create it.
Therefore, proceed and open the OpenVPN server configuration file using your preferred editor. Here, we are using the nano text editor.
sudo nano /etc/openvpn/server/server.conf
Next, add the following entry at the bottom. This instructs OpenVPN to write logs in the specified file path, i.e., /var/log/openvpn-status.log.
status /var/log/openvpn-status.log
Save the changes and exit the file. Then restart the openVPN server to effect the changes.
sudo systemctl restart openvpn-server@server
You can now view connected client systems. Simply run the command:
``bash command cat /var/log/openvpn-status.log
This prints a bunch of output on the terminal. Here are some example entries:

```bash command
TITLE,OpenVPN 2.6.19 aarch64-unknown-linux-gnu [SSL (OpenSSL)] [LZO] [LZ4] [EPOLL] [PKCS11] [MH/PKTINFO] [AEAD] [DCO]
TIME,2026-03-16 14:27:31,1773664051
HEADER,CLIENT_LIST,Common Name,Real Address,Virtual Address,Virtual IPv6 Address,Bytes Received,Bytes Sent,Connected Since,Connected Since (time_t),Username,Client ID,Peer ID,Data Channel Cipher
CLIENT_LIST,cherryservers,102.185.80.48:43625,10.8.0.2,,4347,4538,2026-03-16 14:26:30,1773663990,UNDEF,0,0,AES-256-GCM
The output confirms that one device has connected to the VPN.
Additionally, you can check OpenVPN Logs with journalctl (Recommended) to track the VPN activity. To do this, run:
sudo journalctl -u openvpn-server@server
You can also view logs in real time by appending the -f option at the end:
sudo journalctl -u openvpn-server@server -f
Following logs in real time lets you view events, including moments when devices connect or disconnect from the server.
OpenVPN sometimes writes to the main system log. You can filter OpenVPN logs only as shown.
sudo grep openvpn /var/log/syslog
#Conclusion
If you have come this far, you should have a functional OpenVPN server running, ready to secure your internet traffic and ensure your online privacy.
As you have seen, setting up OpenVPN need not be complicated. The automated installer handles the heavy lifting, and within a few seconds, you have a fully configured and self-hosted VPN server.
From here, you can monitor logs and generate separate client profiles, instead of relying on a single .ovpn file. For added security, you can enforce public-key authentication and configure Fail2ban to mitigate brute-force attacks. Even better, you can enable AES-256-GCM encryption and enforce TLS 1.2 and later versions for faster speeds.
Check out our blog article for more server hardening tips.


