How to Install Docker on Ubuntu 20.04? | Step-by-step Tutorial


This step-by-step Docker tutorial will demonstrate how to install Docker on Ubuntu 20.04 server, as well as how to start Docker on Ubuntu. If you are looking to install Docker Compose on Ubuntu instead, check out our detailed Docker Compose guide.
Not using Ubuntu 20.04? Check our guide on How to Install Docker on Ubuntu 24.04.
#What is Docker?
Docker is an open-source platform that allows you to package and run an application in a loosely isolated environment called containers. This security and isolation enable you to execute many containers simultaneously on a given host.
#What is Docker container?
Containers are self-sufficient software units with their own application code, configuration, and dependencies. They provide you with a stable running environment that is easily portable to different hosts.
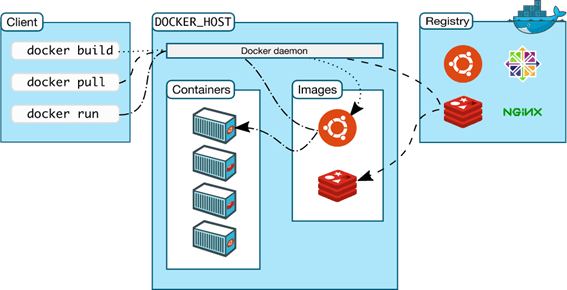
Docker uses a client-server architecture. The client talks to the Docker daemon, which does most of the work of building, running, and distributing containers.
The client and daemon may run on the same host, or you can connect a Docker client to a remote daemon. Client and daemon communication may be accomplished using REST API, UNIX sockets or a network interface.
With Docker you may manage the full lifecycle of your application development:
- Develop an application and its supporting software in a container.
- Use the container to test your application.
- Deploy the application to production as a container or a set of containers.
Ready to supercharge your Docker infrastructure? Scale effortlessly and enjoy flexible storage with Cherry Servers bare metal or virtual servers. Eliminate infrastructure headaches with free 24/7 technical support, pay-as-you-go pricing, and global availability.
#How to Install Docker on Ubuntu 20.04 in 6 Steps
Now that we know what Docker is and what it is used for, let’s dive into how to install Docker on Ubuntu 20.04 and how to start using it on Ubuntu in 6 steps to get you started.
#Step 1: Set-up prerequisite packages
First, install a few Docker prerequisites that will allow you to use SSL data transfer (apt-transport-https), add commonly used certificates (ca-certificates), manage PPA’s (software-properties-common), as well as download data from the Internet (curl).
sudo apt install apt-transport-https ca-certificates curl software-properties-common
Next, download the official Docker repository GPG key and add it to the apt-key trusted key manager:
curl -fsSL https://download.docker.com/linux/ubuntu/gpg | sudo apt-key add -
And add the repository of Docker stable version for Ubuntu 20.04 (focal) to APT sources list:
sudo add-apt-repository "deb [arch=amd64] https://download.docker.com/linux/ubuntu focal stable"
You may want to double check the installation source priority for docker-ce package to make sure it is going to be installed from your recently added software repository.
apt-cache policy docker-ce
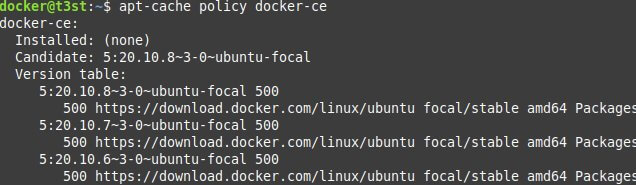
You should see a similar output with download.docker.com domain as the priority source. As of writing of this guide the current latest available docker version is 20.10.8~3-0.
#Step 2: Install Docker
Before installing any software, it is recommended to update the existing package list. Whether you are working locally, get the newest installation package requirements.
sudo apt update
It’s now time to install Docker Community Edition. It includes the Docker platform with full core features, but no commercial support, nor enterprise functionality which is most often not necessary for small and medium businesses.
sudo apt install docker-ce
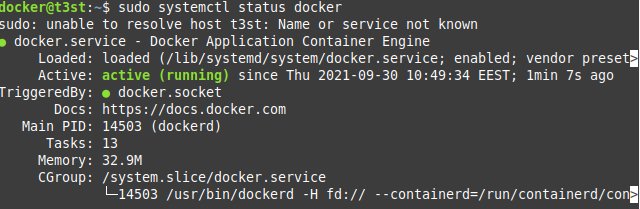
After installation Docker service should be up and running. You may double-check this by using systemctl status command, which is used to see whether a particular systemd process is active.
sudo systemctl status docker
If you successfully installed Docker, you would see a similar output with information about Docker being active.
#Step 3: Start Using Docker
Every Docker command needs to be run with superuser privileges, unless your Linux user belongs to the “docker” user group which is created by default upon Docker installation. Let’s use adduser command to add a docker user to the docker user group.
sudo adduser docker docker
When working with Docker it is very handy to have system-wide information at hand. With docker info command you can always refer to this information to check for the number of containers (running/paused/stopped), types of plugins (volumes, networking, logs), and many more.
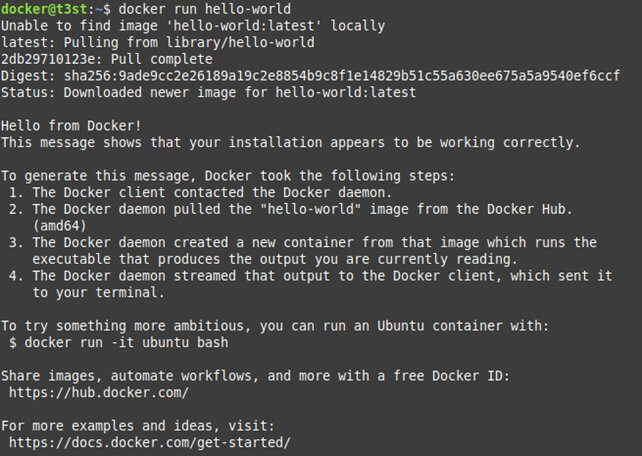
Let’s now run a demo container from the default testing image hello-world.
docker run hello-world
When you execute this command for the first time, docker run will look for the Docker image (a read-only template with specified instructions) named hello-world locally. If it is unable to find the image, it will look it up in the Docker Hub image repository. If the image is found, Docker will automatically download and run it in a container (a runnable instance of an image) for you.
A detailed explanation of what is happening under the hood is then displayed in your terminal.
You can see your locally available images by using the docker images command. There’s only hello-world image available locally right now, as it was automatically downloaded by the docker run.

You also have one stopped container that was created from the hello-world image. You may list all container logs with -a attribute (default only shows running containers).
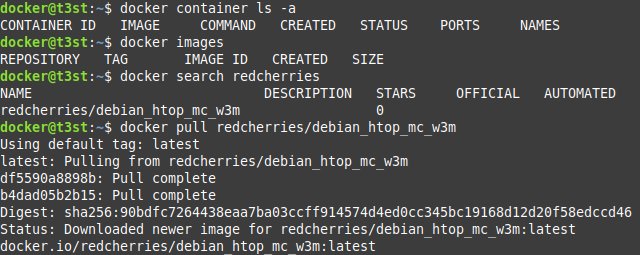
docker container ls -a
![]()
We can see the newly created container named exciting_taussig that stopped 3 minutes ago with an exit code 0.
Let’s now remove this unused container and double check if it has been removed successfully.
docker rm exciting_taussig
docker container ls -a

Only after removing the associated container you are allowed to remove the unused hello-world image. Do so, and double check if it has been removed successfully.
docker rmi hello-world
docker images

#Step 4: Run containers from images
Docker has an extensive image library called the Docker Hub where you may find thousands of Docker images that were created by official software vendors or 3rd parties.
For instance, let’s build an isolated Debian base environment on our Ubuntu host. First off, search Docker Hub for a debian image.
docker search debian

You can see that debian image is available, has 4020 stars on Docker Hub and comes from an official source.
Download this Docker image without automatically running a container from it. The latest version will be pulled by default.
docker pull debian

You can now run your Docker image and create a new container from it. Let’s create a detached (-d) container in interactive (-i) mode using a pseudo-terminal (-t). We will also bridge (--network="bridge") the container network with the host network, so we could access the Internet.
docker run -itd –network="bridge" debian
![]()
A random hexadecimal string is generated automatically as a unique identifier of the newly created container. Since we ran the container in the detached mode, there is no other output right now.
Feel free to double-check that your new container is up and running.
docker ps
![]()
We can see a container named interesting_wescoff created 4 seconds ago that is based on a debian image with a bash command passed to it by default and no mapped system ports.
Let’s stop the currently running container for now and check for active containers again.
docker container stop interesting_wescoff
docker ps

There are no active containers at this moment.
#Step 5: Manipulate active containers
If we were to use docker run at this point, it would automatically create a second container from the debian image. To start an already existing container we should use a different command.
docker container start interesting_wescoff

Next, we can try to open a command line shell on our running container in an interactive pseudo-terminal session. We need to target the running container and specify the full path to the bash command line utility.
docker exec -it interesting_wescoff /bin/bash

You can see from the terminal window that your hostname t3st has just been changed to a container identifier acf707828617 which means that you have successfully initiated an interactive session with the bash utility.
Unfortunately, there is no htop utility, so the later command had failed. Nevertheless, we have previously specified the –network="bridge" parameter, so we should have Internet connectivity in our Debian container and can install the htop utility ourselves.
apt update && apt install htop
After installation is complete, we can run the htop utility inside the debian container.
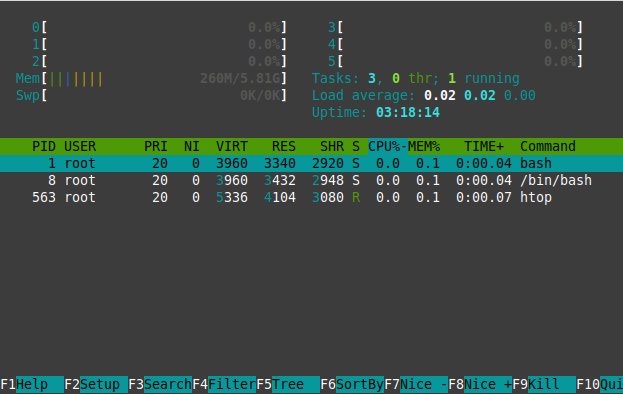
Let’s now close htop and type exit to leave the interactive session.
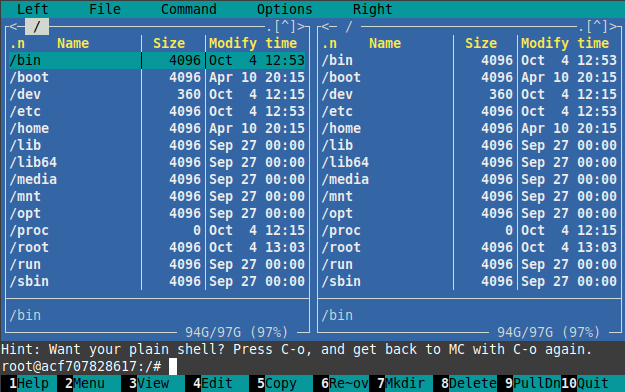
You can also use docker exec command without an active terminal session. Let’s now install w3m and mc utilities in a detached mode (-d). You should use the -y flag for apt to automatically agree to all installation prompts, if any.
docker exec -d interesting_wescoff apt install -y w3m mc
After running the command, we get no output from the container whatsoever.
However, after starting a command line shell on the container in an interactive mode and running apt install again, we can see that w3m and mc packages have been successfully installed.
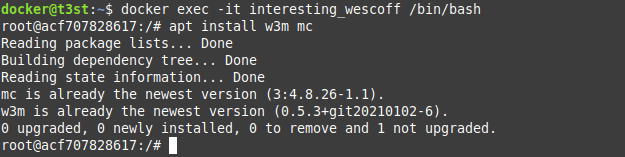
And are running properly.
#Step 6: Create new images and commit them to Docker Hub
Every change we made so far had only been applied to the interesting_wescoff container.
But what if you have frequently used software, and don’t want to install it anew every time you initialize a new docker container? What if you need to transfer your configuration to another machine to share your work with a friend or colleague?
As you may remember, Docker image is a read-only base template. Nevertheless, there’s a chance to make a new local image by using the docker commit command.
To commit all the changes that we’ve made to our container, we first need to get the container ID.
docker container ls -a
![]()
We can see that our container ID is acf707828617.
Now we can commit our container changes and make a local image by using the following pattern: docker commit [container_id] [repository_name]/[image_name].
We can also use -m operand to leave a comment and -a operand to specify the name of the author.
docker commit -m “Installed htop, w3m and mc” -a “redcherries” acf707828617 redcherries/debian_htop_mc_w3m

The docker commit made a local image with our implemented changes and assigned a unique SHA256 hash value to it.
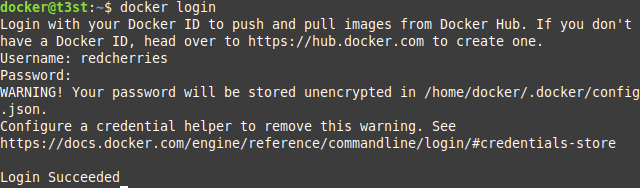
Let’s now try to share our image with the world. To do this you need a Docker Hub account, which you can get at https://hub.docker.com/signup.
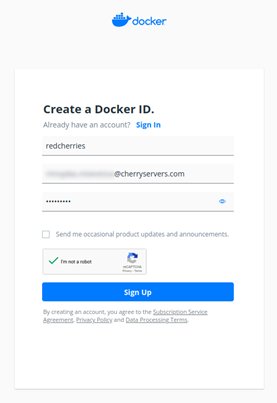
After creating an account, you should log-in to Docker Hub through your Docker client using your newly created username and password.
docker login
Earlier we used docker pull to download an image from the Docker Hub. To upload a docker image to the Docker Hub we need to use the docker push command in the following format: docker push [repository_name]/[image_name].
docker push redcherries/debian_htop_mc_w3m

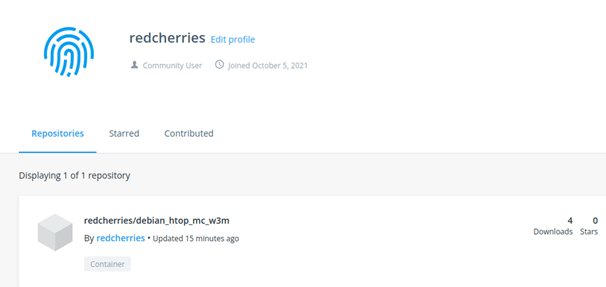
To check if our push was successful, search the Docker Hub for your repository.
docker search redcherries

You may also use the web interface to check your Docker Hub account:
Let’s now clear the host and use docker pull command to download the image from Docker Hub.
You may now run the downloaded container with docker run and test whether w3m is already installed.
![]()
Also read: How to uninstall Docker
#To Wrap up
Our article on how to install Docker on Ubuntu covers only the basic docker usage. Docker itself has an extensive documentation that you can access at https://docs.docker.com to expand your Docker knowledge and sharpen your skills.
Please refer to https://hub.docker.com in case you need to find out about a specific Docker image.