How to Install Kubernetes on Ubuntu 24.04: Step-by-Step


Kubernetes (K8s) is an open-source container orchestration platform that automates the deployment, scaling, and management of containerized applications. It handles high availability through automatic container restarts, supports auto-scaling, and manages resources efficiently across clusters.
In this tutorial, you will install Kubernetes on Ubuntu 24.04 using a master node and two worker nodes, initialize a cluster with Calico networking, and test it by deploying an Nginx application.
#Prerequisites
Here are the salient requirements for the installation of Kubernetes:
-
Minimum of 2 instances of Ubuntu 24.04. One will act as the master node and the remaining as the worker node. For this guide, we will work with two worker nodes.
-
SSH access to all the instances with sudo users configured.
-
Minimum of 2GB RAM and 2 vCPUs.
-
Minimum 20GB of free hard drive space.
Build and scale your self-managed Kubernetes clusters effortlessly with powerful Dedicated Servers — ideal for containerized workloads.
#Kubernetes lab setup
To demonstrate the installation of Kubernetes, we have a three-cluster setup comprising a master node and two worker nodes. You can have multiple worker nodes (Kubernetes can support up to 5000 nodes). Below is our cluster setup:
| Node | Name | IP Address |
|---|---|---|
| Node 1 | k8s-master-node |
10.168.253.4 |
| Node 2 | k8s-worker-node-1 |
10.168.253.29 |
| Node 3 | k8s-worker-node-2 |
10.168.253.10 |
Let us now dive in and install Kubernetes on Ubuntu 24.04.
#How to install Kubernetes on Ubuntu 24.04
Management of containerized applications/microservices at scale - especially across multiple cloud providers can be daunting and fraught with errors when done manually. The best approach is to leverage an orchestration tool. This is where Kubernetes comes in.
Originally developed by Google, Kubernetes has become a popular container management platform. It automates the deployment, scaling, and management of container applications at scale, eliminating bottlenecks associated with the manual management of container applications.
#Step 1: Configure hostnames (all nodes)
Start by updating the /etc/hosts files and specifying the IP addresses and hostnames for each node in the cluster. This will allow seamless communication between the master and worker nodes.
So, access the /etc/hosts file.
sudo nano /etc/hosts
Add the following entries. This will allow for hostname resolution. Replace the IP addresses and hostnames with your own.
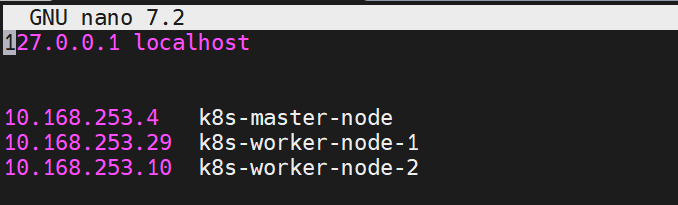
Save the changes and exit.
Next, modify the hostnames in each node.
For Kubernetes master node:
sudo hostnamectl set-hostname "k8s-master-node"
For worker node 1:
sudo hostnamectl set-hostname "k8s-worker-node-1"
For worker node 2:
sudo hostnamectl set-hostname "k8s-worker-node-2"
To effect the hostname changes, run:
sudo exec bash
To verify the hostname in each node, run the command:
hostname
In addition, ensure you can ping all the nodes in the setup from each node using the configured hostnames. The following example below shows the master node pinging the two worker nodes.
ping -c 3 k8s-worker-node-1
ping -c 3 k8s-worker-node-2
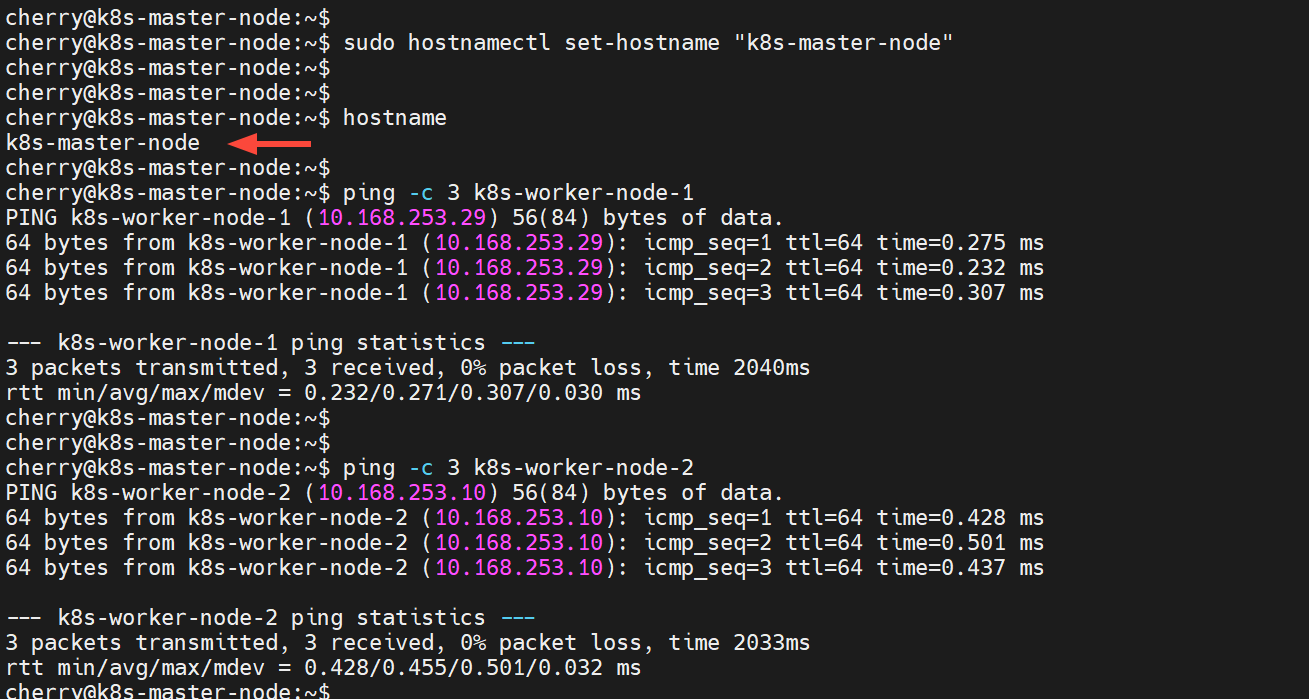
In the same vein, ensure the worker nodes can ping each other as well as the master node.
#Step 2: Disable swap space (all nodes)
Disabling swap space is a standard requirement for installing Kubernetes. The reason is that swap degrades performance since it's slower for the kernel to access it than RAM. Disabling it ensures consistent application performance without the unpredictability of swap usage.
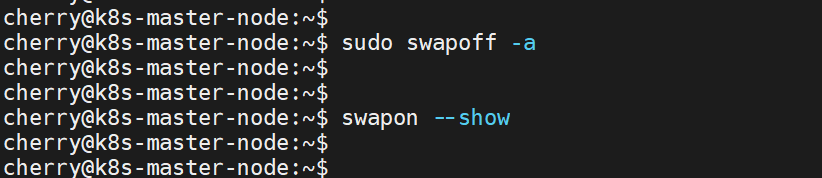
To disable swap on the nodes, run the command:
sudo swapoff -a
The command above disables swap temporarily. To persist the change upon a reboot, access the /etc/fstab file and comment out the swap entry by adding the # symbol before the swap entry.
To check whether the swap space has been disabled, run the command:
swapon --show
The output will be blank, indicating that the swap space has been disabled.
#Step 3: Load Containerd modules (all nodes)
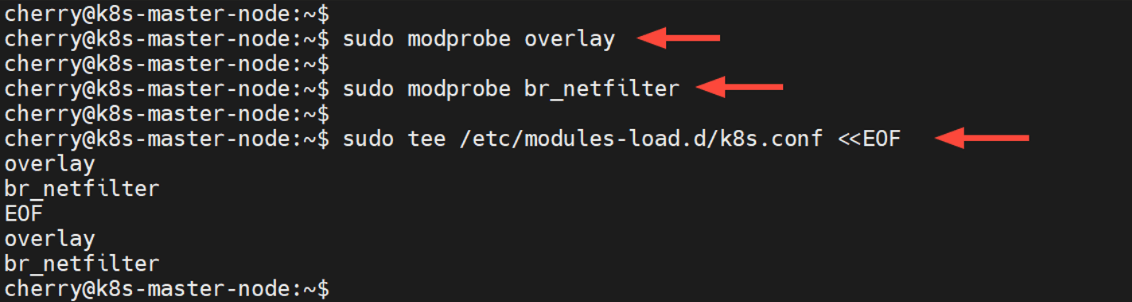
Containerd is the standard container runtime for Kubernetes. For the seamless running of this runtime, it is recommended that the overlay and br_netfilter kernel modules be loaded. To enable and load these modules, run the following commands:
sudo modprobe overlay
sudo modprobe br_netfilter
Create a configuration file as shown and specify the modules to load them permanently.
sudo tee /etc/modules-load.d/k8s.conf <<EOF
overlay
br_netfilter
EOF
#Step 4: Configure Kubernetes IPv4 networking (all nodes)
It's important to configure Kubernetes networking so that pods can communicate with each other and outside environments without a hitch.
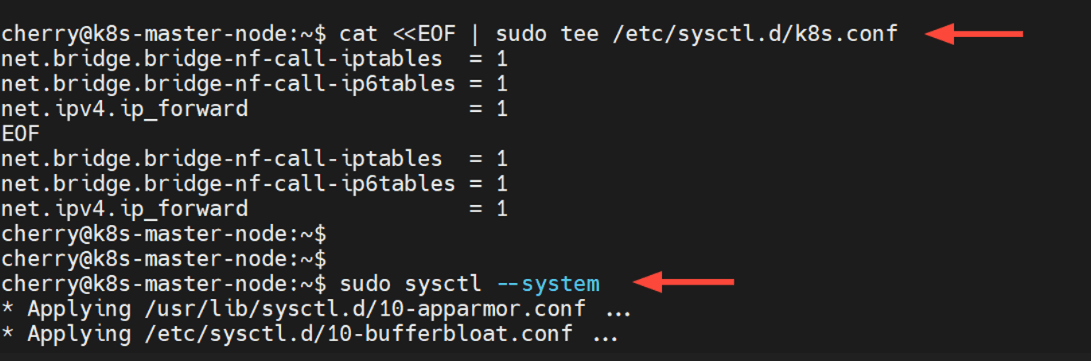
Create a Kubernetes configuration file in the /etc/sysctl.d/ directory.
sudo nano /etc/sysctl.d/k8s.conf
Add the following lines:
net.bridge.bridge-nf-call-iptables = 1
net.bridge.bridge-nf-call-ip6tables = 1
net.ipv4.ip_forward = 1
Save and exit. Then apply the settings by running the following command:
sudo sysctl --system
Also read: How to install Grub Customizer on Ubuntu
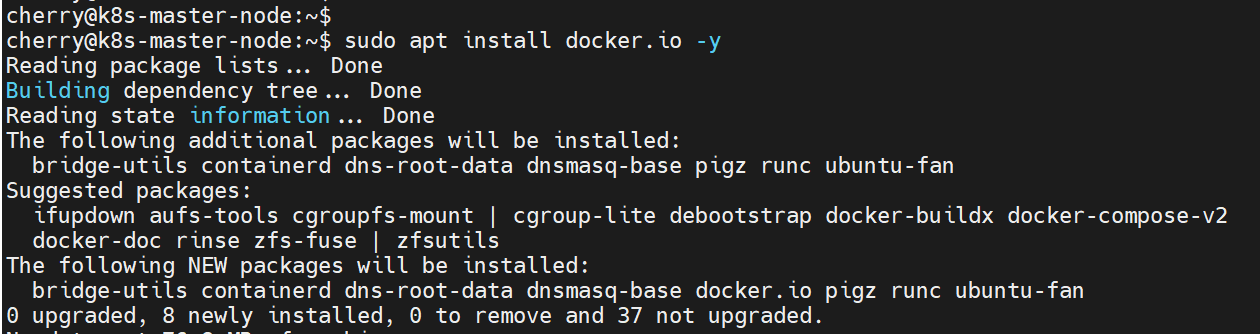
#Step 5: Install Docker (on all nodes)
In Kubernetes, Docker creates and manages containers on each node in the cluster while Kubernetes orchestrates the deployment, scaling, monitoring, and management of containerized applications. The two work in tandem to manage microservice applications at a large scale.
Ubuntu provides Docker from its default repositories. To install it, run the following commands on all nodes.
sudo apt update
sudo apt install docker.io -y
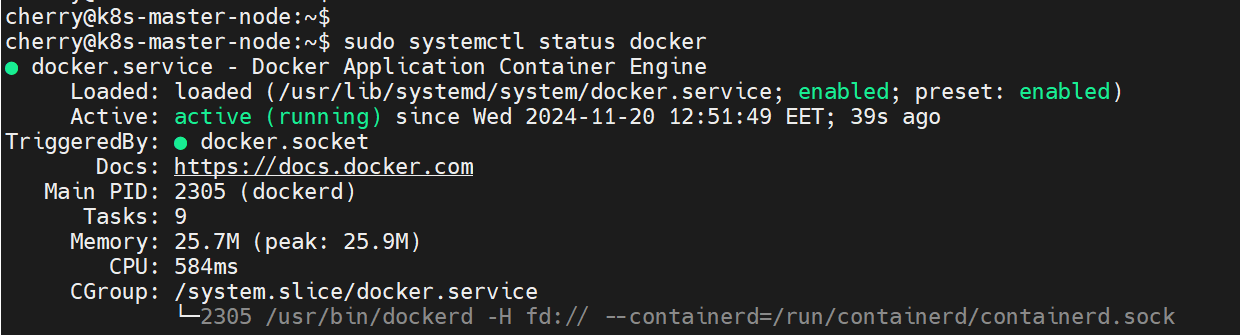
To verify if Docker is running, run:
sudo systemctl status docker
In addition, be sure to enable the Docker daemon to autostart on system startup or upon a reboot.
sudo systemctl enable docker
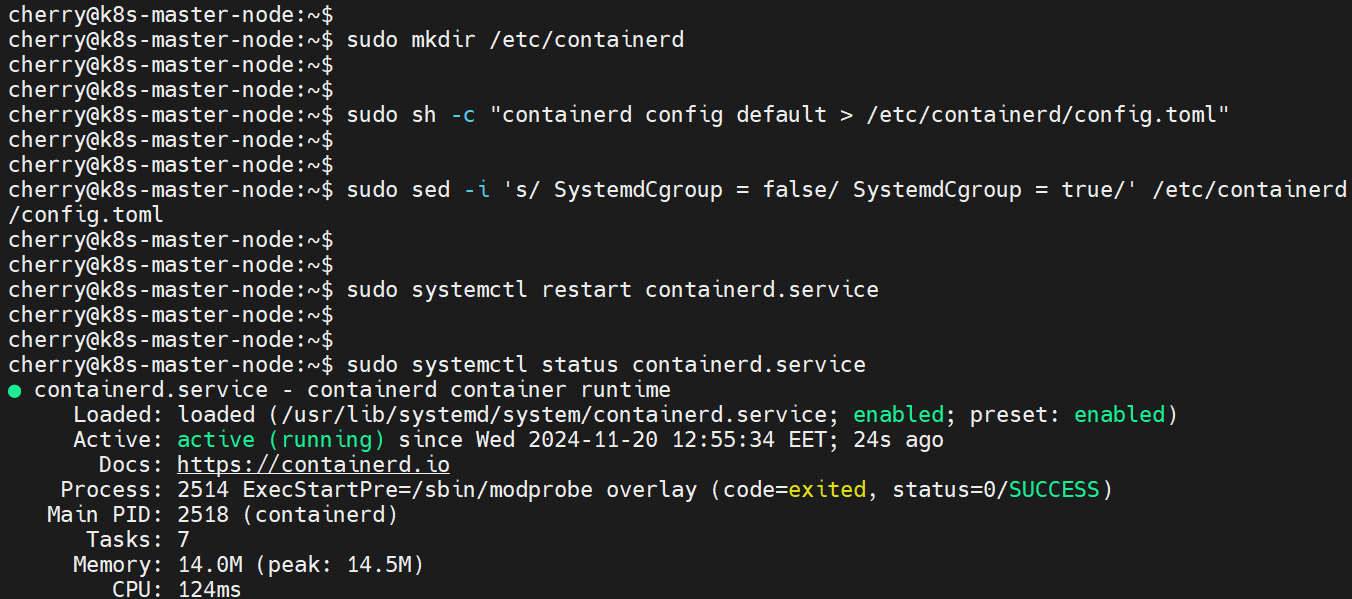
The installation of Docker also comes with containerd, a lightweight container runtime that streamlines the running and management of containers. As such, configure containerd to ensure it runs reliably in the Kubernetes cluster.
First, create a separate directory as shown.
sudo mkdir /etc/containerd
Next, create a default configuration file for containerd.
sudo sh -c "containerd config default > /etc/containerd/config.toml"
Update the SystemdCgroup directive by setting it to true as shown.
sudo sed -i 's/ SystemdCgroup = false/ SystemdCgroup = true/' /etc/containerd/config.toml
Next, restart the containerd service to apply the changes made.
sudo systemctl restart containerd.service
Be sure to verify that the containerd service is running as expected.
sudo systemctl status containerd.service
#Step 6: Install Kubernetes components (on all nodes)
The next step is to install Kubernetes. Currently, Kubernetes v1.35 is the latest stable version. Be sure to install the prerequisite packages on all nodes.
sudo apt-get install curl ca-certificates apt-transport-https -y
Add the Kubernetes GPG signing key.
curl -fsSL https://pkgs.k8s.io/core:/stable:/v1.35/deb/Release.key | sudo gpg --dearmor -o /etc/apt/keyrings/kubernetes-apt-keyring.gpg
Thereafter, add the official Kubernetes repository to your system.
echo "deb [signed-by=/etc/apt/keyrings/kubernetes-apt-keyring.gpg] https://pkgs.k8s.io/core:/stable:/v1.35/deb/ /" | sudo tee /etc/apt/sources.list.d/kubernetes.list
Once added, update the sources list for the system to recognize the newly added repository.
sudo apt update
To install Kubernetes, we will install three packages:
kubeadm: This is a command-line utility for setting up Kubernetes clusters. It automates setting up a cluster, streamlining container deployments, and abstracting any complexities within the cluster. With kubeadm you can initialize the control-plane, configure networking, and join a remote node to a cluster.
kubelet: This is a component that actively runs on each node in a cluster to oversee container management. It takes instructions from the master node and ensures containers run as expected.
kubectl: This is a CLI tool for managing various cluster components including pods, nodes, and the cluster. You can use it to deploy applications and inspect, monitor, and view logs.
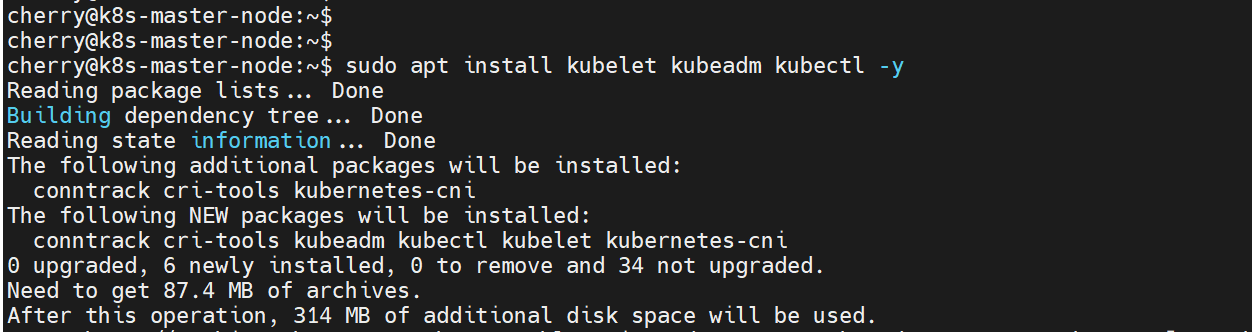
To install these salient Kubernetes components, run the following command:
sudo apt install kubelet kubeadm kubectl -y
#Step 7: Initialize Kubernetes cluster (on master node)
The next step is to initialize the Kubernetes cluster on the master node. This configures the master node as the control plane. To initialize the cluster, run the command shown. The --pod-network-cidr indicates a unique pod network for the cluster, in this case, the 10.10.0.0 network with a CIDR of /16.
sudo kubeadm init --pod-network-cidr=10.10.0.0/16

Towards the end of the output, you will be notified that your cluster was initialized successfully. You will then be required to run the highlighted commands as a regular user. The command for joining the nodes to the cluster will be displayed at the tail end of the output.
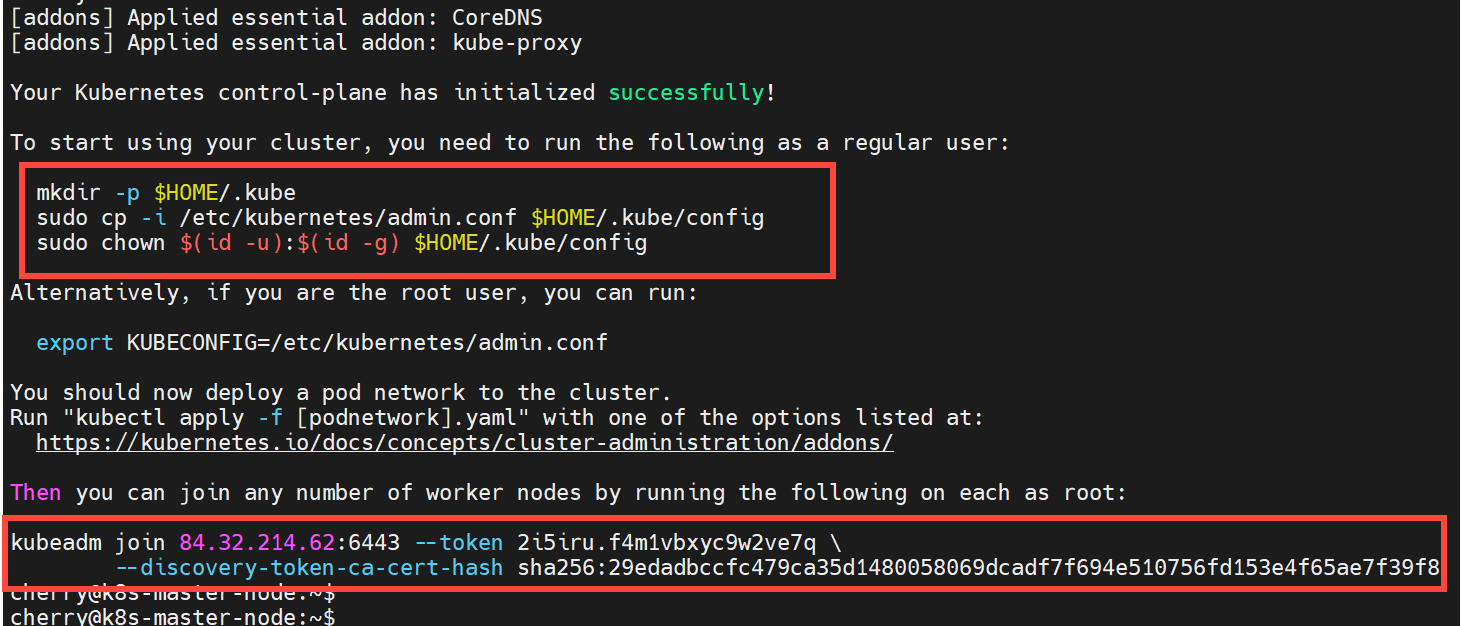
Therefore, run the commands as a regular user. Create a .kube directory in your home directory.
mkdir -p $HOME/.kube
Next, copy the cluster's configuration file to the .kube directory.
sudo cp -i /etc/kubernetes/admin.conf $HOME/.kube/config
Lastly, configure the ownership of the copied configuration file to allow the user to leverage the config file to manage the cluster.
sudo chown $(id -u):$(id -g) $HOME/.kube/config

#Step 8: Install Calico network add-on plugin
Developed by Tigera, Calico provides a network security solution in a Kubernetes cluster. It secures communication between individual pods as well as pods and external services. By auto-assigning IP addresses to pods, it ensures smooth communication between them.
With this in mind, deploy the Calico operator using the kubectl CLI tool.
kubectl create -f https://raw.githubusercontent.com/projectcalico/calico/v3.29.2/manifests/tigera-operator.yaml

Next, download Calico's custom-resources file using the curl command.
curl https://raw.githubusercontent.com/projectcalico/calico/v3.29.2/manifests/custom-resources.yaml -O

Update the CIDR defined in the custom-resources file to match the pod's network.
sed -i 's/cidr: 192\.168\.0\.0\/16/cidr: 10.10.0.0\/16/g' custom-resources.yaml
Then create resources defined in the YAML file.
kubectl create -f custom-resources.yaml

At this point, the master node, which acts as the control plane, is the only node that is available in the cluster. To verify this, run the command:
kubectl get nodes
This is the expected output:
OutputNAME STATUS ROLES AGE VERSION

k8s-master-node Ready control-plane 4m3s v1.35.4

#Step 9: Add worker nodes to the cluster (on worker nodes)
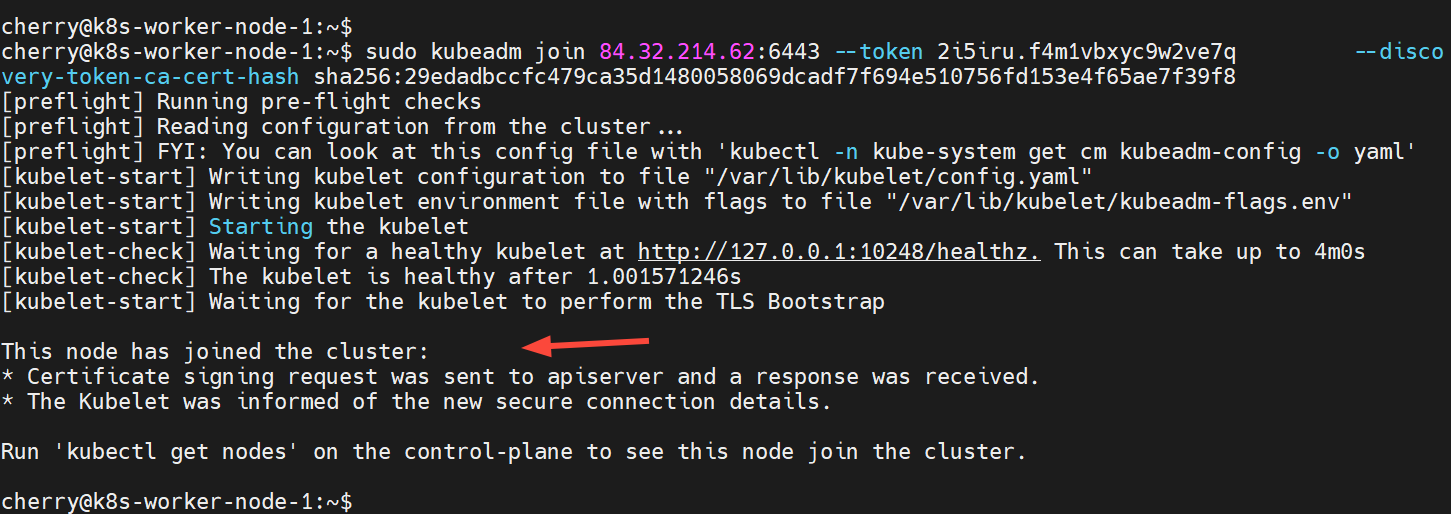
With the master node configured, the remaining step is to add the worker nodes to the cluster. To do this, run the kubeadm join command generated in Step 7 when initializing the cluster.
So head back to the worker nodes and run the kubeadm join command below in each node.
sudo kubeadm join 84.32.214.62:6443 --token 2i5iru.f4m1vbxyc9w2ve7q \
--discovery-token-ca-cert-hash sha256:29edadbccfc479ca35d1480058069dcadf7f694e510756fd153e4f65ae7f39f8
If all goes well, you should see the notification that the node has joined the cluster.
Do likewise to the other nodes. Below is the output for the second worker node.
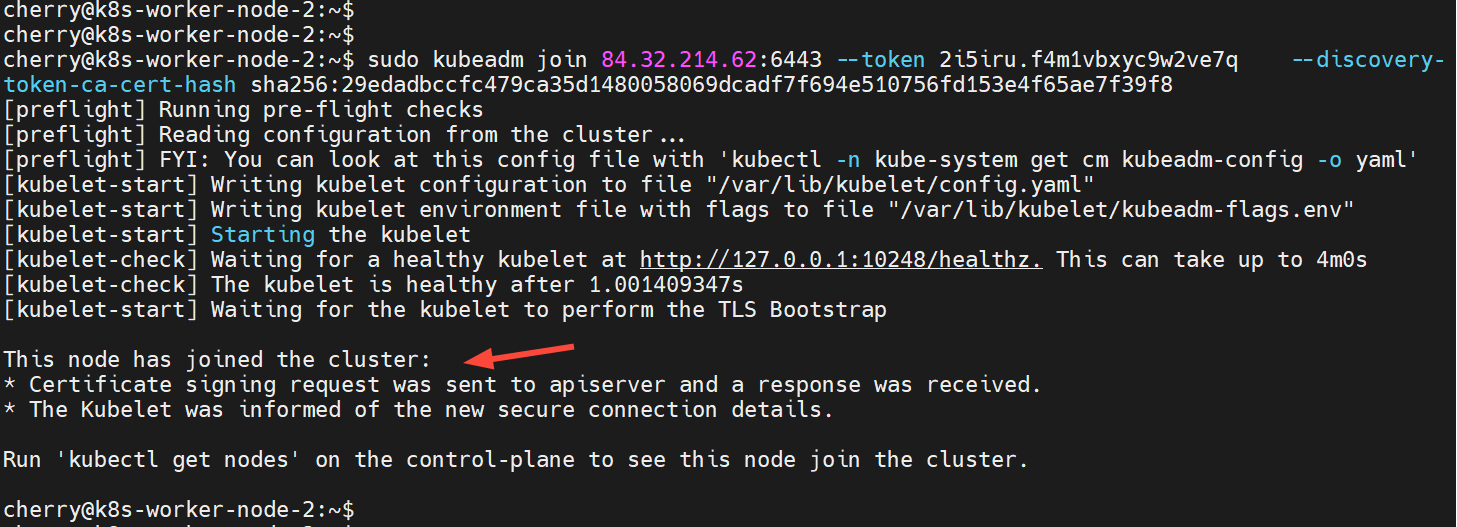
Now check the nodes in the cluster once again. This time around, you will see the worker nodes have joined the cluster.
kubectl get nodes

To check the pods in all namespaces, run the command:
kubectl get pods -A

#Step 10: Testing Kubernetes cluster
In this section, we will test out the functionality of the cluster by deploying an Nginx web application as a deployment across the worker nodes.
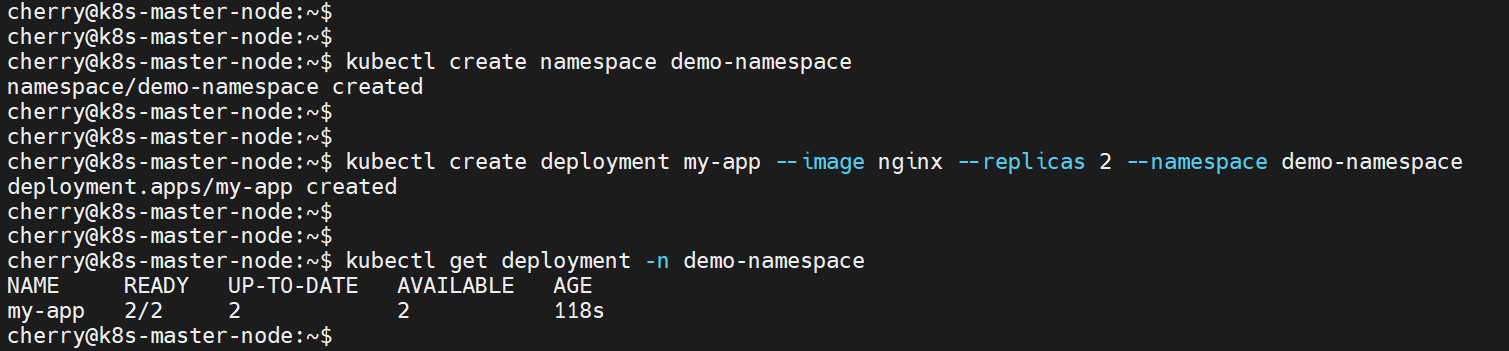
First, create a namespace to isolate the deployment. In this case, we are creating a namespace called demo-namespace.
kubectl create namespace demo-namespace
Next, create a deployment inside the namespace and specify the image name and replicas. Here, we have created a deployment called my-app from the nginx image and specified 2 replicas.
kubectl create deployment my-app --image nginx --replicas 2 --namespace demo-namespace
To verify the deployment in the namespace, run the command:
kubectl get deployment -n demo-namespace
Next, we will expose the deployment using the NodePort service and set it to run the application on port 80.
kubectl expose deployment my-app -n demo-namespace --type NodePort --port 80
To list the services in the namespace, run:
kubectl get svc -n demo-namespace
The output confirms that the NodePort service is running in our namespace.

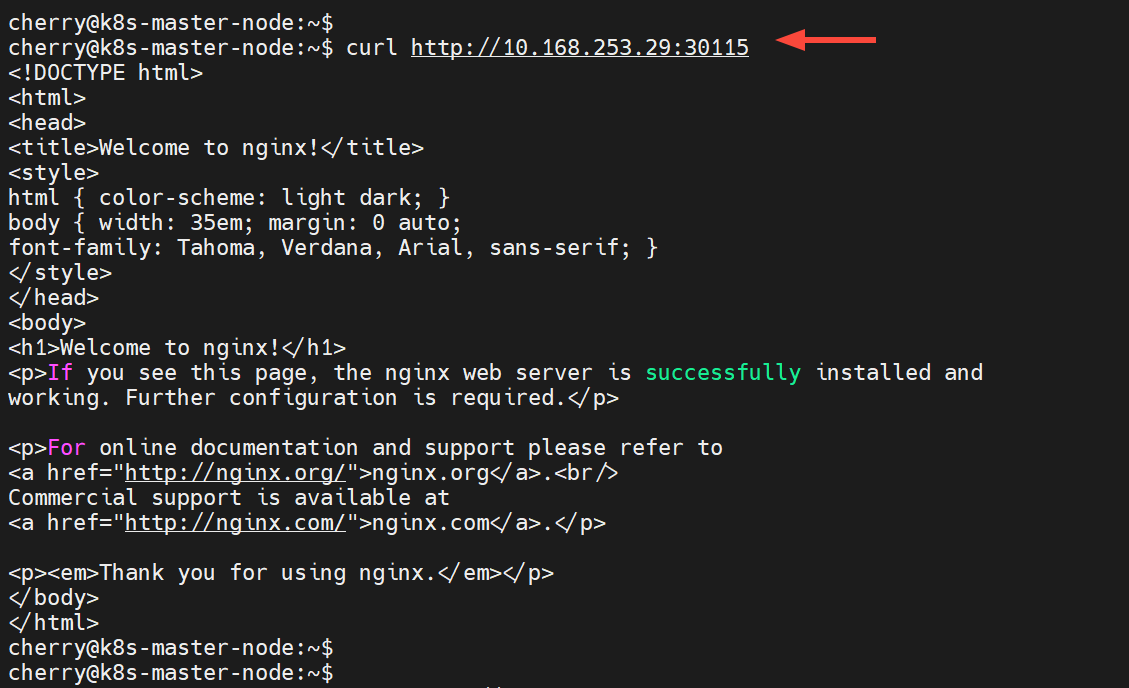
Let's test whether we can access the Nginx application from the worker nodes. To do this, use the curl command syntax as shown.
curl http://<any-worker-IP>:node-port
In our case, the command will be:
curl http://10.168.253.29:30115
The output confirms that we successfully sent an HTTP request to our application in the worker node and received an HTML page on the CLI. You should get the same response from the other node as well.
#How to upgrade Kubernetes to a newer version
Kubernetes releases minor versions roughly every four months, with patch updates in between. Running an outdated version means missing security fixes and eventually losing community support.
Always back up your etcd data and review the Kubernetes release notes for deprecations or breaking changes before starting an upgrade. The process follows a strict order: upgrade the control plane first, then each worker node one at a time.
On the master node, check available versions and upgrade kubeadm:
sudo apt update
sudo apt-cache madison kubeadm
sudo apt install -y kubeadm=1.35.3-1.1
Verify the upgrade plan and apply it:
sudo kubeadm upgrade plan
sudo kubeadm upgrade apply v1.35.3
Then upgrade kubelet and kubectl on the master node:
sudo apt install -y kubelet=1.35.3-1.1 kubectl=1.35.3-1.1
sudo systemctl daemon-reload
sudo systemctl restart kubelet
For each worker node, drain it from the master first. Draining safely evicts all pods from the node and marks it as unschedulable, so no new workloads land on it during the upgrade:
kubectl drain k8s-worker-node-1 --ignore-daemonsets --delete-emptydir-data
On the worker node, upgrade the packages. The kubeadm upgrade node command updates the local kubelet configuration to match the new version:
sudo apt install -y kubeadm=1.35.3-1.1
sudo kubeadm upgrade node
sudo apt install -y kubelet=1.35.3-1.1
sudo systemctl daemon-reload
sudo systemctl restart kubelet
Back on the master, uncordon the worker to allow pods to schedule on it again:
kubectl uncordon k8s-worker-node-1
Repeat for each worker node. Verify the cluster status after all nodes are upgraded:
kubectl get nodes
#How to reset and remove a Kubernetes cluster
You may need to tear down a cluster to start fresh after a failed setup or when decommissioning infrastructure. The kubeadm reset command reverses everything that kubeadm init or kubeadm join did on a node. Run it on each node, starting with the workers and finishing with the master:
sudo kubeadm reset -f
The reset command does not clean up iptables rules or CNI configuration files. Remove those manually to avoid networking conflicts if you plan to reinitialize the cluster later:
sudo rm -rf /etc/cni/net.d
sudo rm -rf $HOME/.kube
sudo iptables -F && sudo iptables -t nat -F && sudo iptables -t mangle -F
sudo iptables -X
To remove the Kubernetes packages entirely:
sudo apt purge -y kubeadm kubelet kubectl
sudo apt autoremove -y
#Troubleshooting common Kubernetes installation issues
Even with careful preparation, issues can arise during or after cluster setup. Here are the most common problems and how to fix them.
#Pod stuck in Pending state
A pod stays in Pending when the scheduler cannot find a node with enough resources. Check the pod events for details:
kubectl describe pod <pod-name> -n <namespace>
Look for messages about insufficient CPU, memory, or unschedulable nodes. If the cluster is new, confirm that the worker nodes have joined and are in the Ready state with kubectl get nodes. Pods will also remain Pending if no worker nodes exist and the master still has its default control-plane taint.
#Node shows NotReady
Run kubectl describe node <node-name> and check the Conditions section. Common causes include the kubelet service not running, containerd being stopped, or the CNI plugin failing to initialize. Verify and restart the affected services:
sudo systemctl restart kubelet
sudo systemctl restart containerd
If the node stays NotReady after restarting both services, check the kubelet logs for more specific errors:
sudo journalctl -u kubelet --no-pager -n 30
#Join token expired
The token generated by kubeadm init expires after 24 hours. Generate a new one from the master node:
kubeadm token create --print-join-command
Run the output command on the worker node to join the cluster.
#CoreDNS in CrashLoopBackOff
CoreDNS pods can enter a crash loop if they detect a DNS forwarding loop. On Ubuntu systems, /etc/resolv.conf often points to a local stub resolver (127.0.0.53), which creates a loop when CoreDNS tries to forward queries to it. Check the logs:
kubectl logs -n kube-system -l k8s-app=kube-dns
If you see "Loop detected," edit the CoreDNS ConfigMap and replace the forward . /etc/resolv.conf line with an external DNS server:
kubectl edit configmap coredns -n kube-system
Change the forward line to:
forward . 8.8.8.8 8.8.4.4
Save and exit. CoreDNS pods will restart automatically with the new configuration.
#Conclusion
In this tutorial, you learned how to set up a multi-node Kubernetes cluster on Ubuntu 24.04 with Calico networking, and how to maintain it through upgrades, resets, and common troubleshooting scenarios. You now have a working foundation for deploying containerized applications in development, staging, or production environments.
As your cluster grows, consider adding persistent storage with a CSI driver, setting up an Ingress controller for external traffic routing, and enforcing resource limits with LimitRange and ResourceQuota objects. For more on Kubernetes architecture and how to secure your Kubernetes cluster, check out our dedicated guides.
FAQs
What is the minimum hardware requirement for Kubernetes?
Each node needs at least 2 GB of RAM and 2 CPU cores. The master node requires more resources as the cluster grows. Storage depends on the number of pods and container images you run.
Can I run Kubernetes on a single node?
Yes. Run `kubeadm init` without adding worker nodes, then remove the control-plane taint so pods can schedule on the master: `kubectl taint nodes --all node-role.kubernetes.io/control-plane-`.
What is the difference between kubeadm, kubelet, and kubectl?
`kubeadm` bootstraps and manages the cluster lifecycle. `kubelet` runs on every node and manages containers. `kubectl` is the CLI tool for interacting with the cluster API to deploy apps and inspect resources.
How do I add a new worker node to an existing cluster?
Install kubeadm, kubelet, and kubectl on the new node, then run the `kubeadm join` command with a valid token. Generate a fresh token from the master with `kubeadm token create --print-join-command`.
Does Kubernetes require Docker?
No. Kubernetes deprecated Docker as a container runtime in v1.24. The default runtime is now containerd, which this tutorial installs alongside Docker. Containerd handles container execution directly without the Docker daemon. Docker is still useful for building container images locally, but Kubernetes no longer depends on it at runtime.
How do I check the status of all pods in a cluster?
Run `kubectl get pods -A` to list pods across all namespaces. Add `-o wide` for additional details like the node each pod runs on and its IP address.


