How to Install NVIDIA Drivers on Ubuntu 24.04: Step-by-Step Guide




NVIDIA's proprietary drivers provide GPU acceleration for CUDA-based machine learning, 3D rendering, scientific computing, and gaming on Ubuntu 24.04. Ubuntu ships with the open-source Nouveau driver by default, but it lacks the performance optimizations and CUDA support that the proprietary NVIDIA driver delivers.
Getting the right driver installed correctly matters because a wrong version or a conflict with Nouveau can leave you with a black screen or degraded performance. In this tutorial, you will install NVIDIA drivers using four different methods, update and switch between driver versions, uninstall drivers cleanly, and troubleshoot common installation problems.
#Prerequisites
Before installing NVIDIA drivers, make sure you have:
-
An Ubuntu 24.04 server instance. Ensure your instance has an NVIDIA GPU (e.g., GeForce, Quadro).
-
SSH access to the server instance. You also need a non-root user with sudo privileges to run administrative commands.
#Installing NVIDIA drivers on Ubuntu 24.04
Before installing the drivers, check that your system meets the prerequisites. Follow these steps to avoid conflicts. First, verify your GPU model. Next, prepare your environment. Finally, choose an installation method that fits your workflow. Options include graphical tools, manual builds, or CUDA-focused setups.
#Checking current driver status
Before installing new NVIDIA drivers, you must check your system's current state. This helps identify your graphics card and any existing drivers to prevent conflicts.
#Verifying GPU model
To identify your NVIDIA GPU, run this command in your terminal:
lspci | grep -i nvidia

This command searches for hardware entries named "NVIDIA." The lspci manual explains how it displays PCI device information.
#Looking for existing drivers
To check for existing drivers, run:
lsmod | grep nvidia
This command shows if any nvidia drivers are loaded in the kernel.
#Removing conflicting drivers
If you find the open-source nouveau driver, disable or remove it to prevent conflicts with the proprietary NVIDIA drivers. You can check for "nouveau" in /etc/modprobe.d or /lib/modprobe.d. If you suspect leftover drivers from older proprietary packages, uninstall them before installing new ones:
sudo apt remove --purge nvidia-*
Removing potential conflicts helps avoid system errors or black screens when you activate the new driver.
#Preparing your Ubuntu 24.04 environment
A well-prepared Ubuntu system helps avoid driver installation errors. Updating your packages, enabling the correct repositories, and verifying kernel compatibility ensure a smooth process.
#System update
Before installing new software, it is crucial to update your system. Run the following command:
sudo apt update && sudo apt upgrade -y
This command fetches the latest package lists and applies any available upgrades. The Ubuntu team encourages regular updates to patch security issues and align your kernel with the newest modules.
#Adding required repositories
You need the restricted and multiverse repositories to access proprietary driver packages, including NVIDIA drivers. Enable them with these commands:
sudo add-apt-repository restricted
sudo add-apt-repository multiverse
sudo apt update
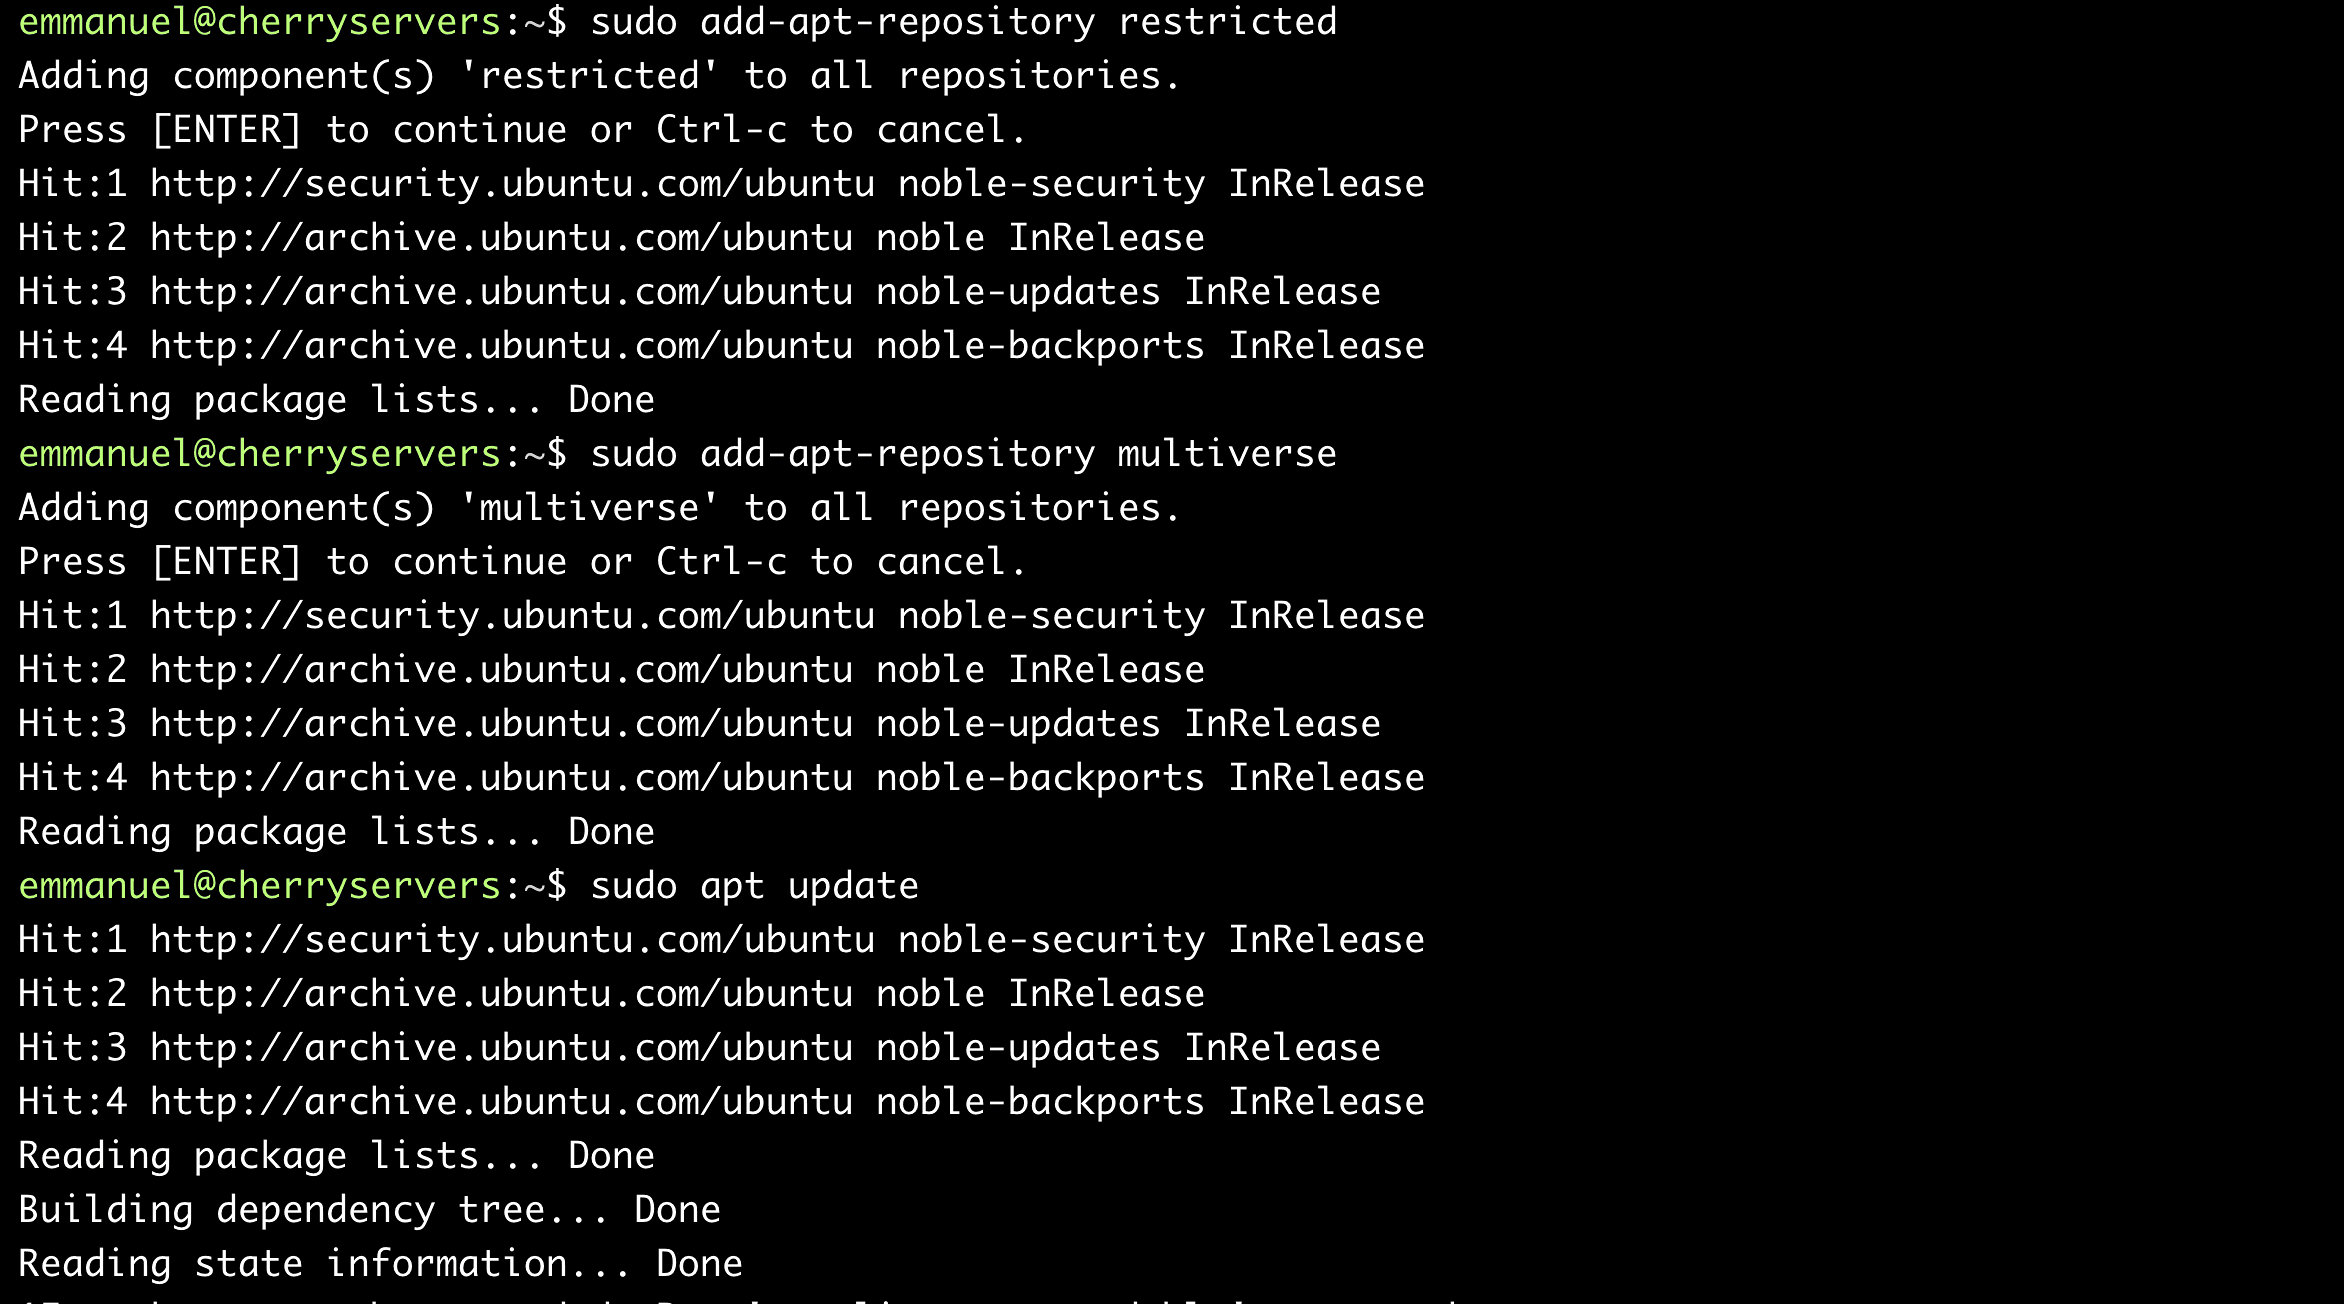
The Ubuntu documentation on repositories explains how restricted software resides in these channels. Once added, your system can access the proprietary GPU drivers.
#Kernel Compatibility
Check your kernel version:
uname -r
If you see an older or custom kernel, ensure it can handle the modules. Then, install build-essential:
sudo apt install build-essential linux-headers-$(uname -r)
build-essential compiles external modules, and linux-headers-$(uname -r) aligns with your kernel version. The Linux kernel building guide highlights how matching headers are crucial for creating stable third-party drivers.
#Installing NVIDIA drivers
Now that your system is ready, let's explore the best methods to install NVIDIA drivers on Ubuntu 24.04. Each approach caters to different needs, whether you prioritize simplicity, customization, or compatibility with tools like CUDA.
Follow the steps carefully to ensure a smooth installation process.
#Method 1: Using the Ubuntu drivers tool (recommended)
Ubuntu's built-in Software & Updates tool simplifies driver installation by automatically detecting your GPU and recommending the best drivers. This method ensures compatibility with your system's kernel and repositories, reducing the risk of conflicts.
1. Open software & updates
Launch the tool via the Ubuntu application menu or run:
software-properties-gtk
Navigate to the Additional Drivers tab.
2. Select a driver
The tool lists available NVIDIA drivers. Pick the driver you want (e.g., nvidia-driver-560):
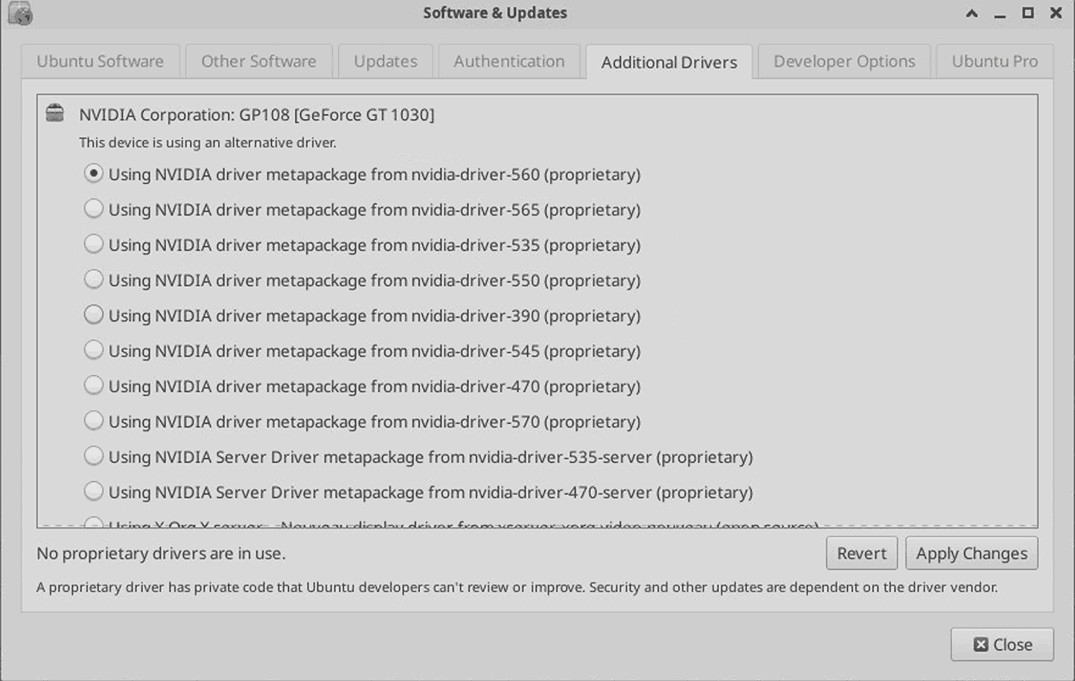
If no drivers appear, confirm the restricted and multiverse repositories are enabled.
3. Apply changes
Click Apply Changes to start the installation. The tool handles dependencies and configuration automatically.
4. Reboot your system
Restart your system to activate the driver:
sudo reboot
5. Verify installation
After rebooting, confirm the driver works by running:
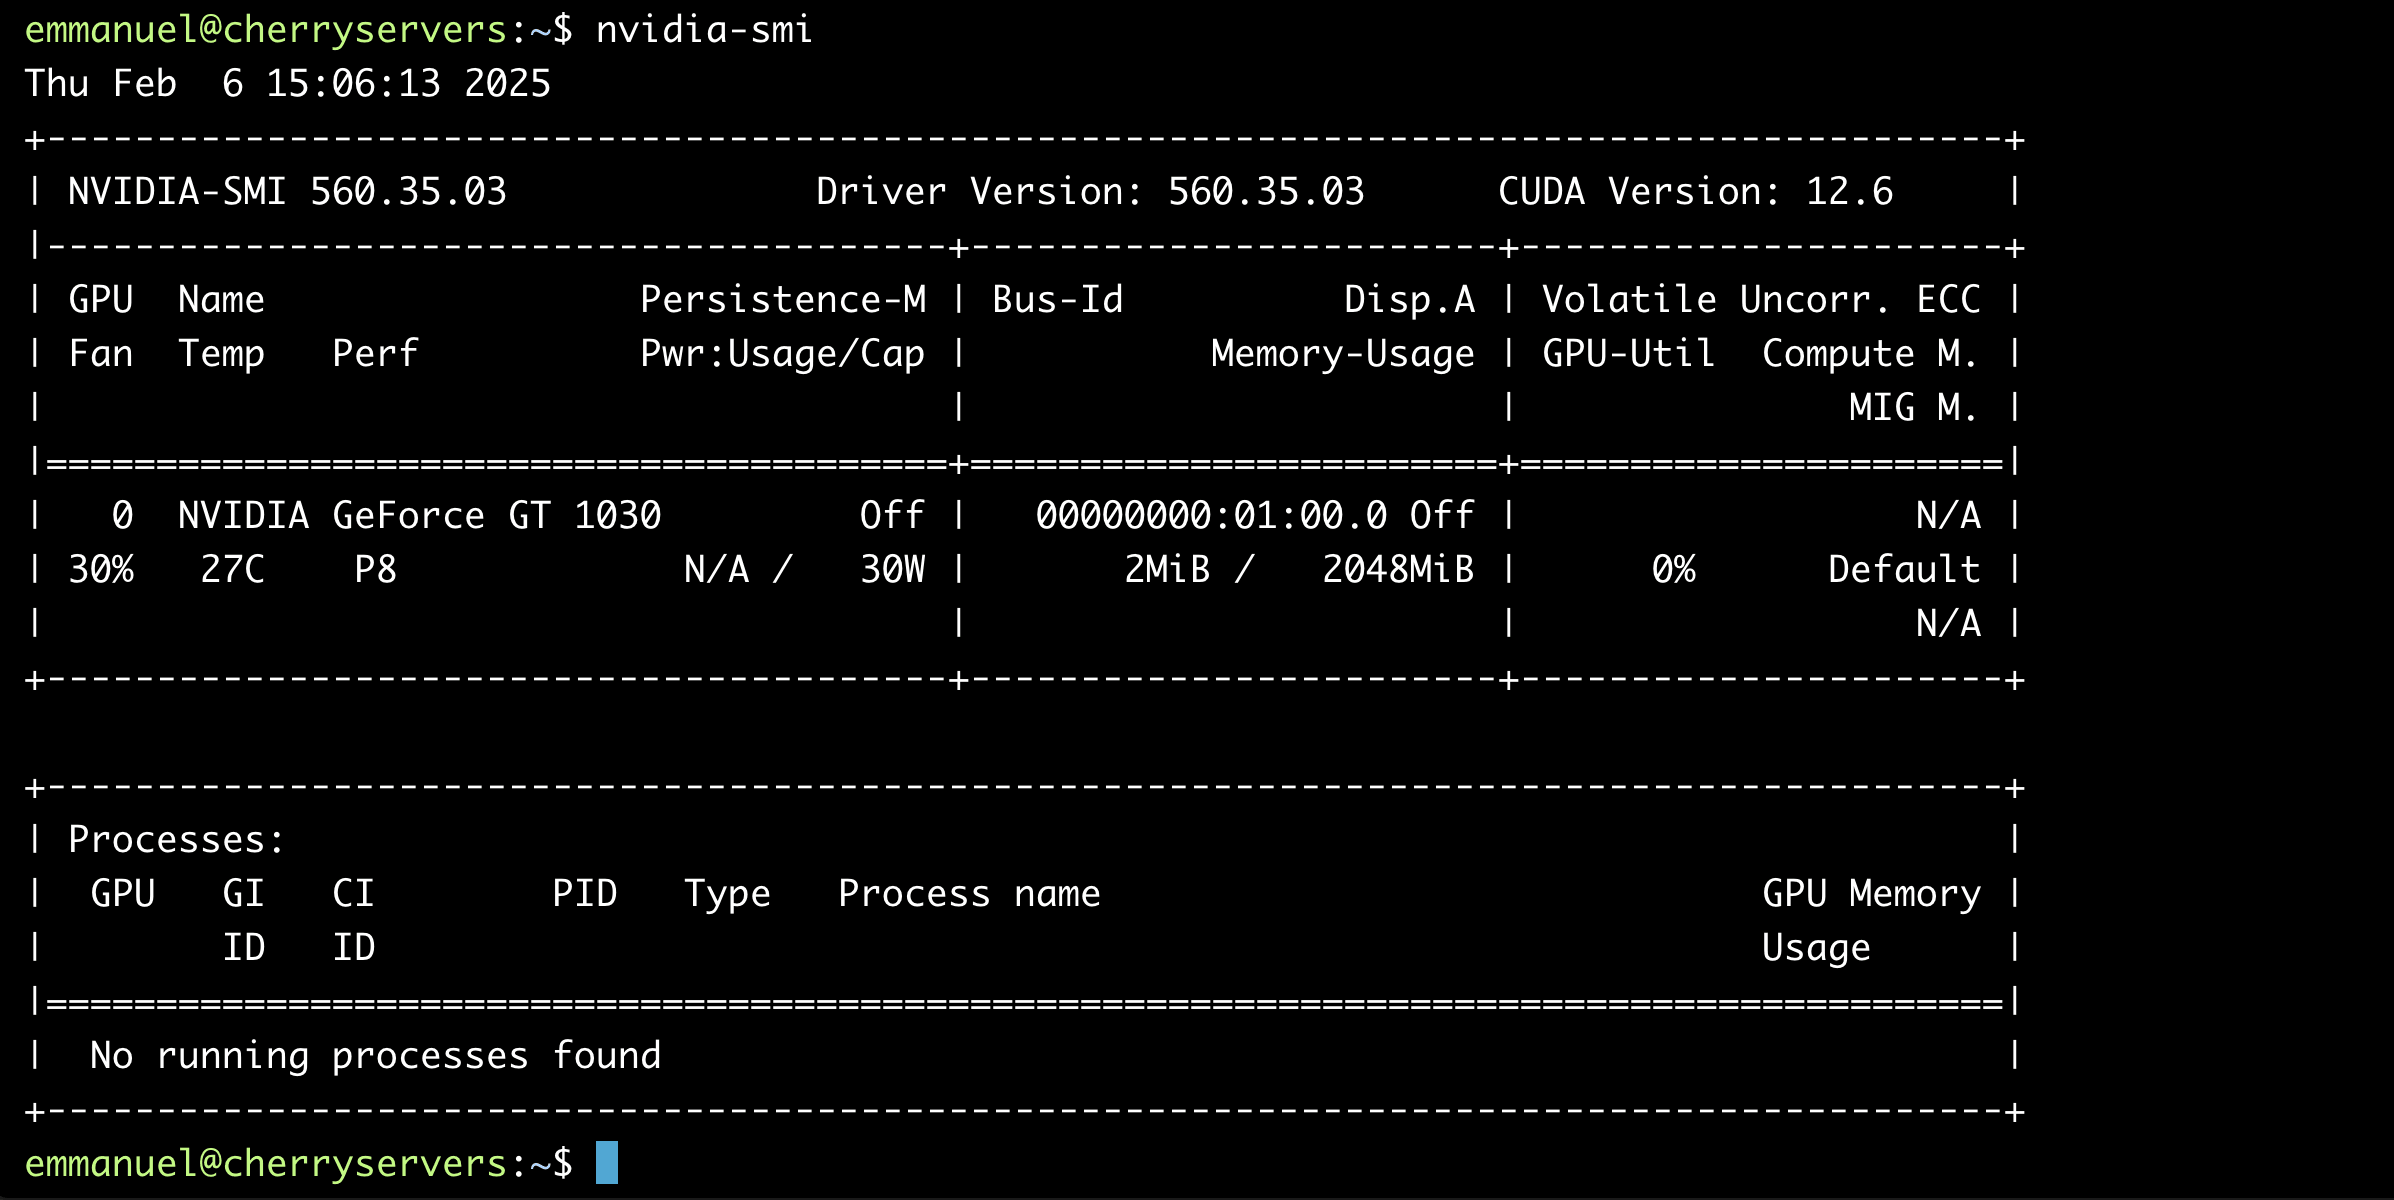
nvidia-smi
This command displays GPU details like driver version, memory usage, temperature, and more. For example:
#Method 2: Installing from the official NVIDIA website
Use this method if you need a specific driver version (e.g., for beta features) or have legacy hardware unsupported by Ubuntu's repositories. The manual installation offers flexibility but requires careful preparation.
1. Download the driver
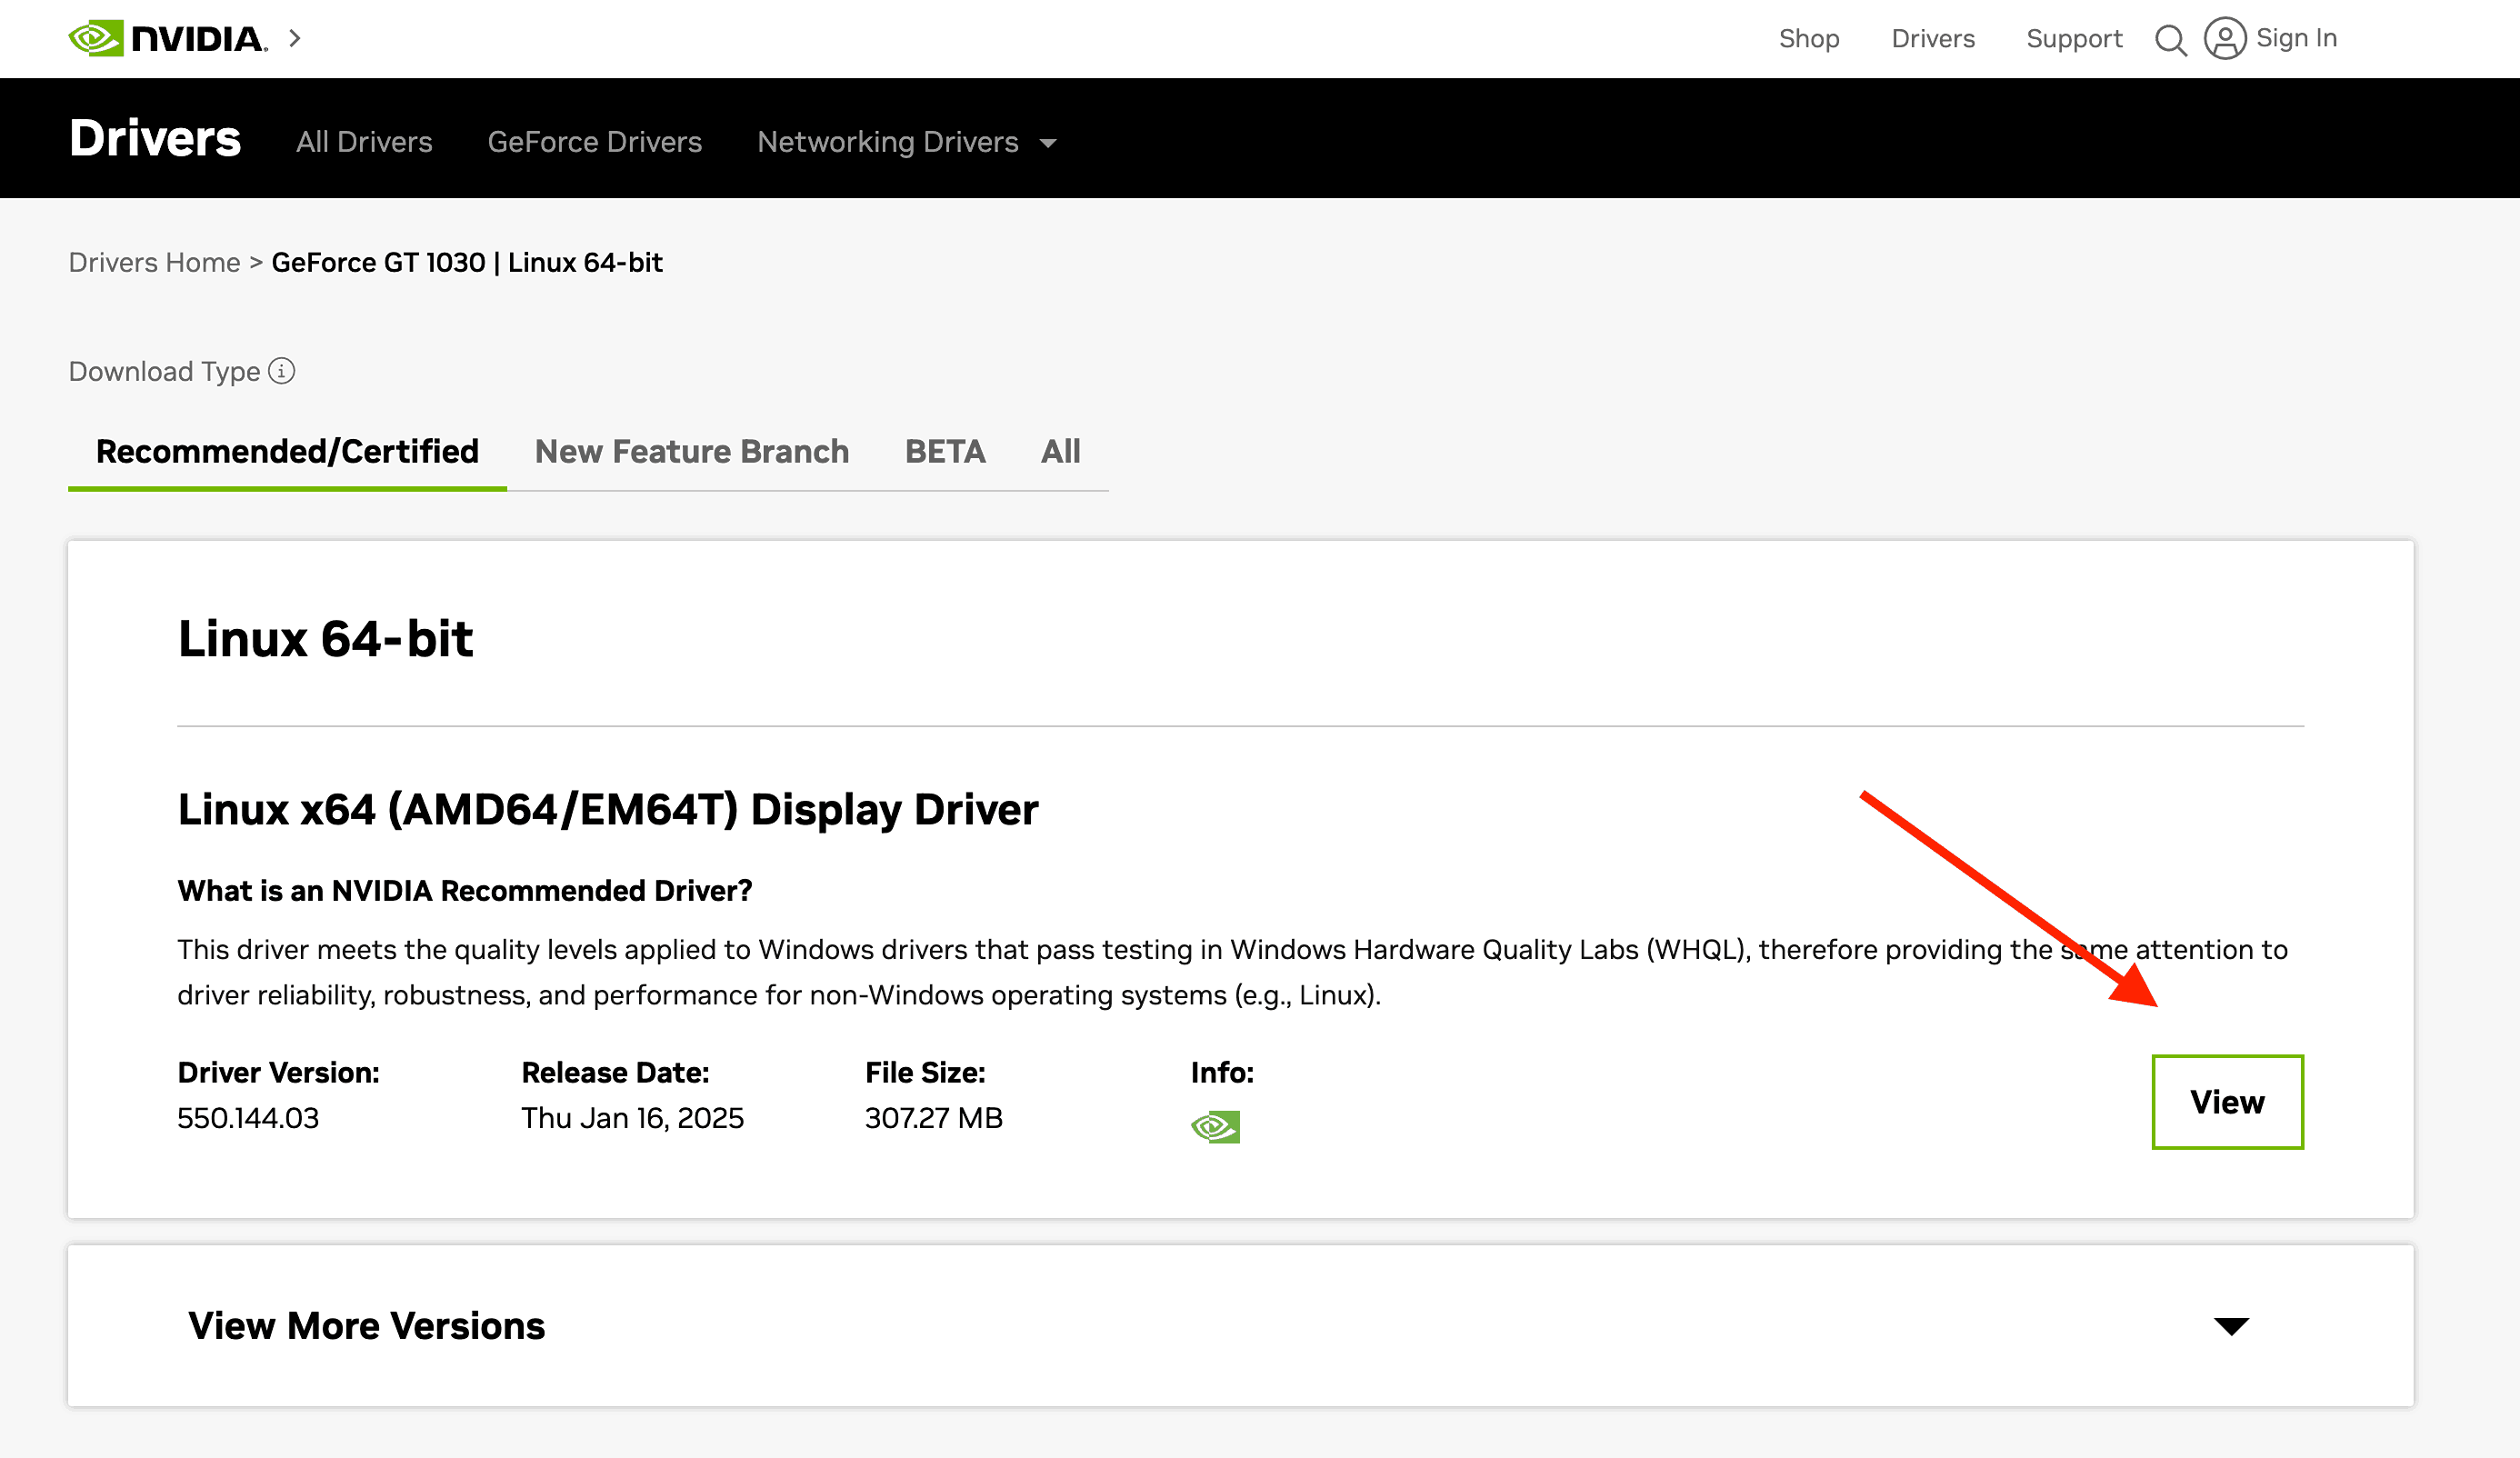
Visit the NVIDIA Driver Downloads page. Select your GPU model and operating system. For example, a GeForce GT 1030 user would choose GeForce > GeForce 10 Series > Geforce GT 1030:
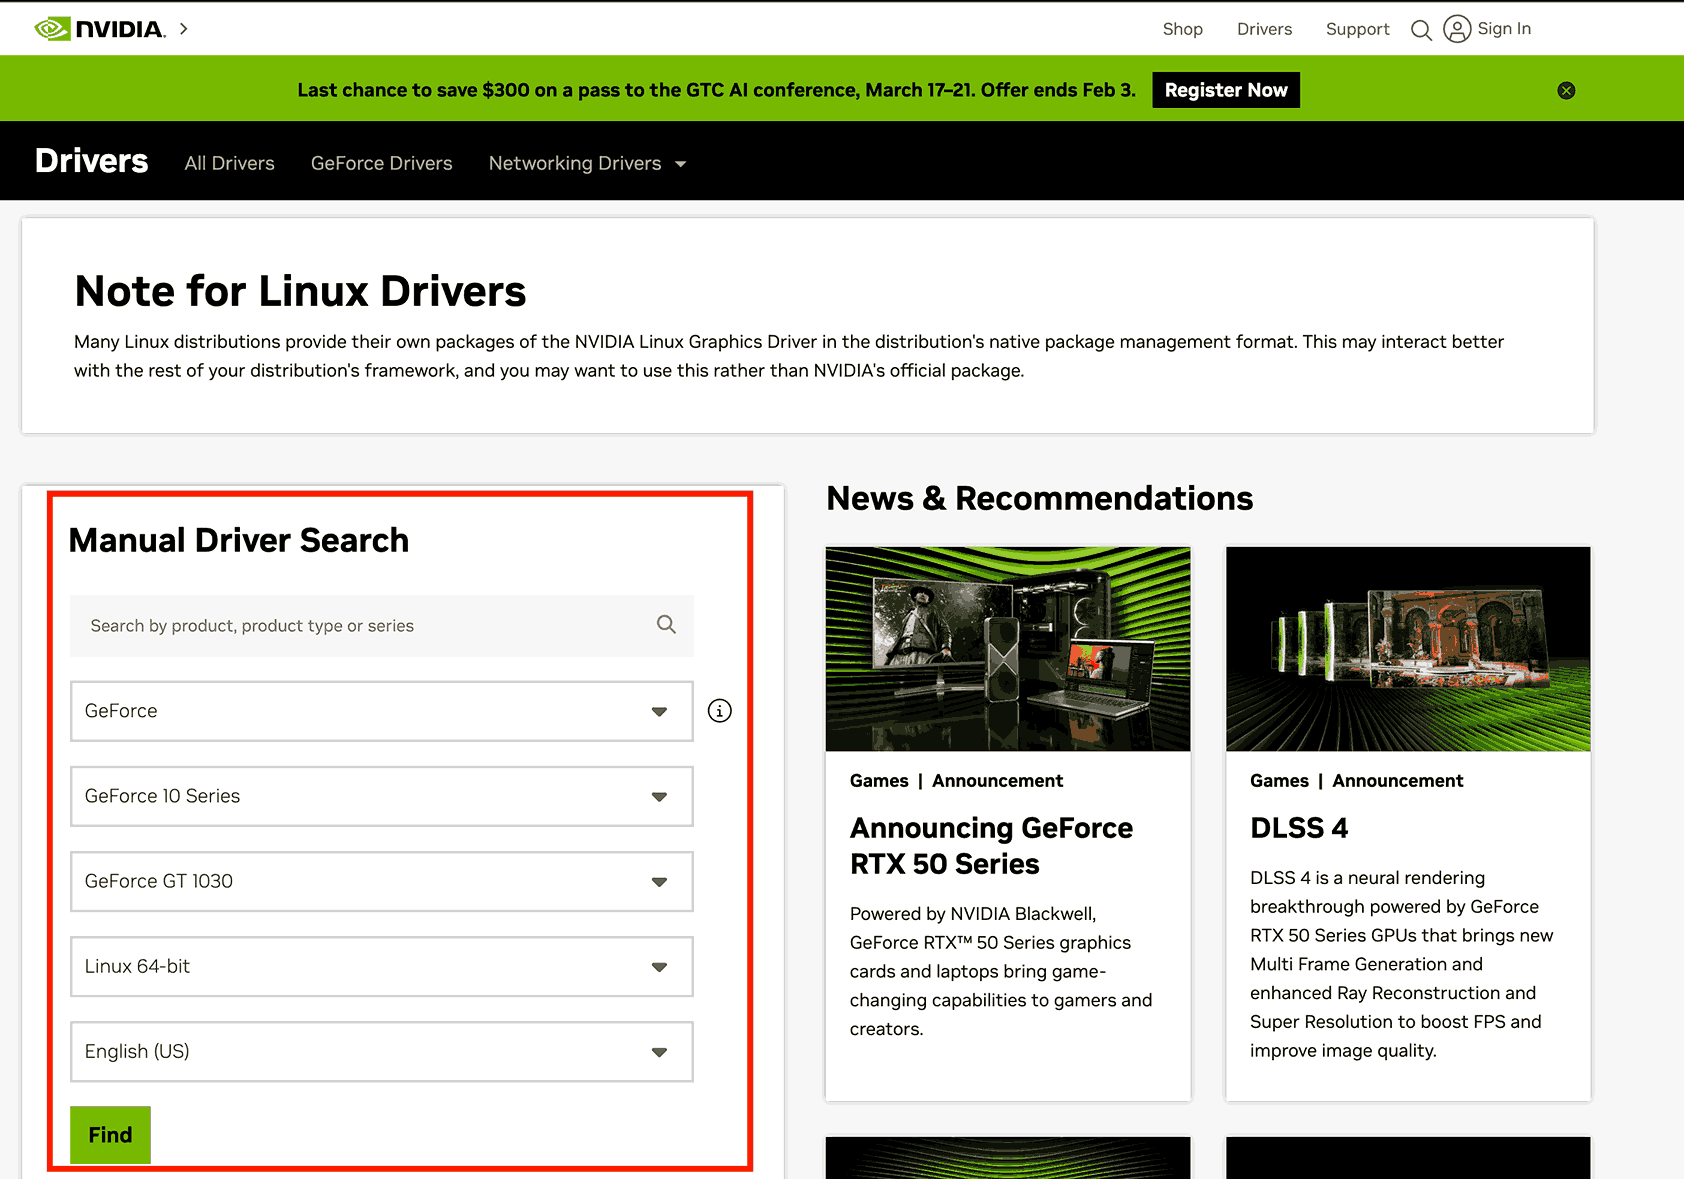
Click "View" as shown below:
Then click "Download":
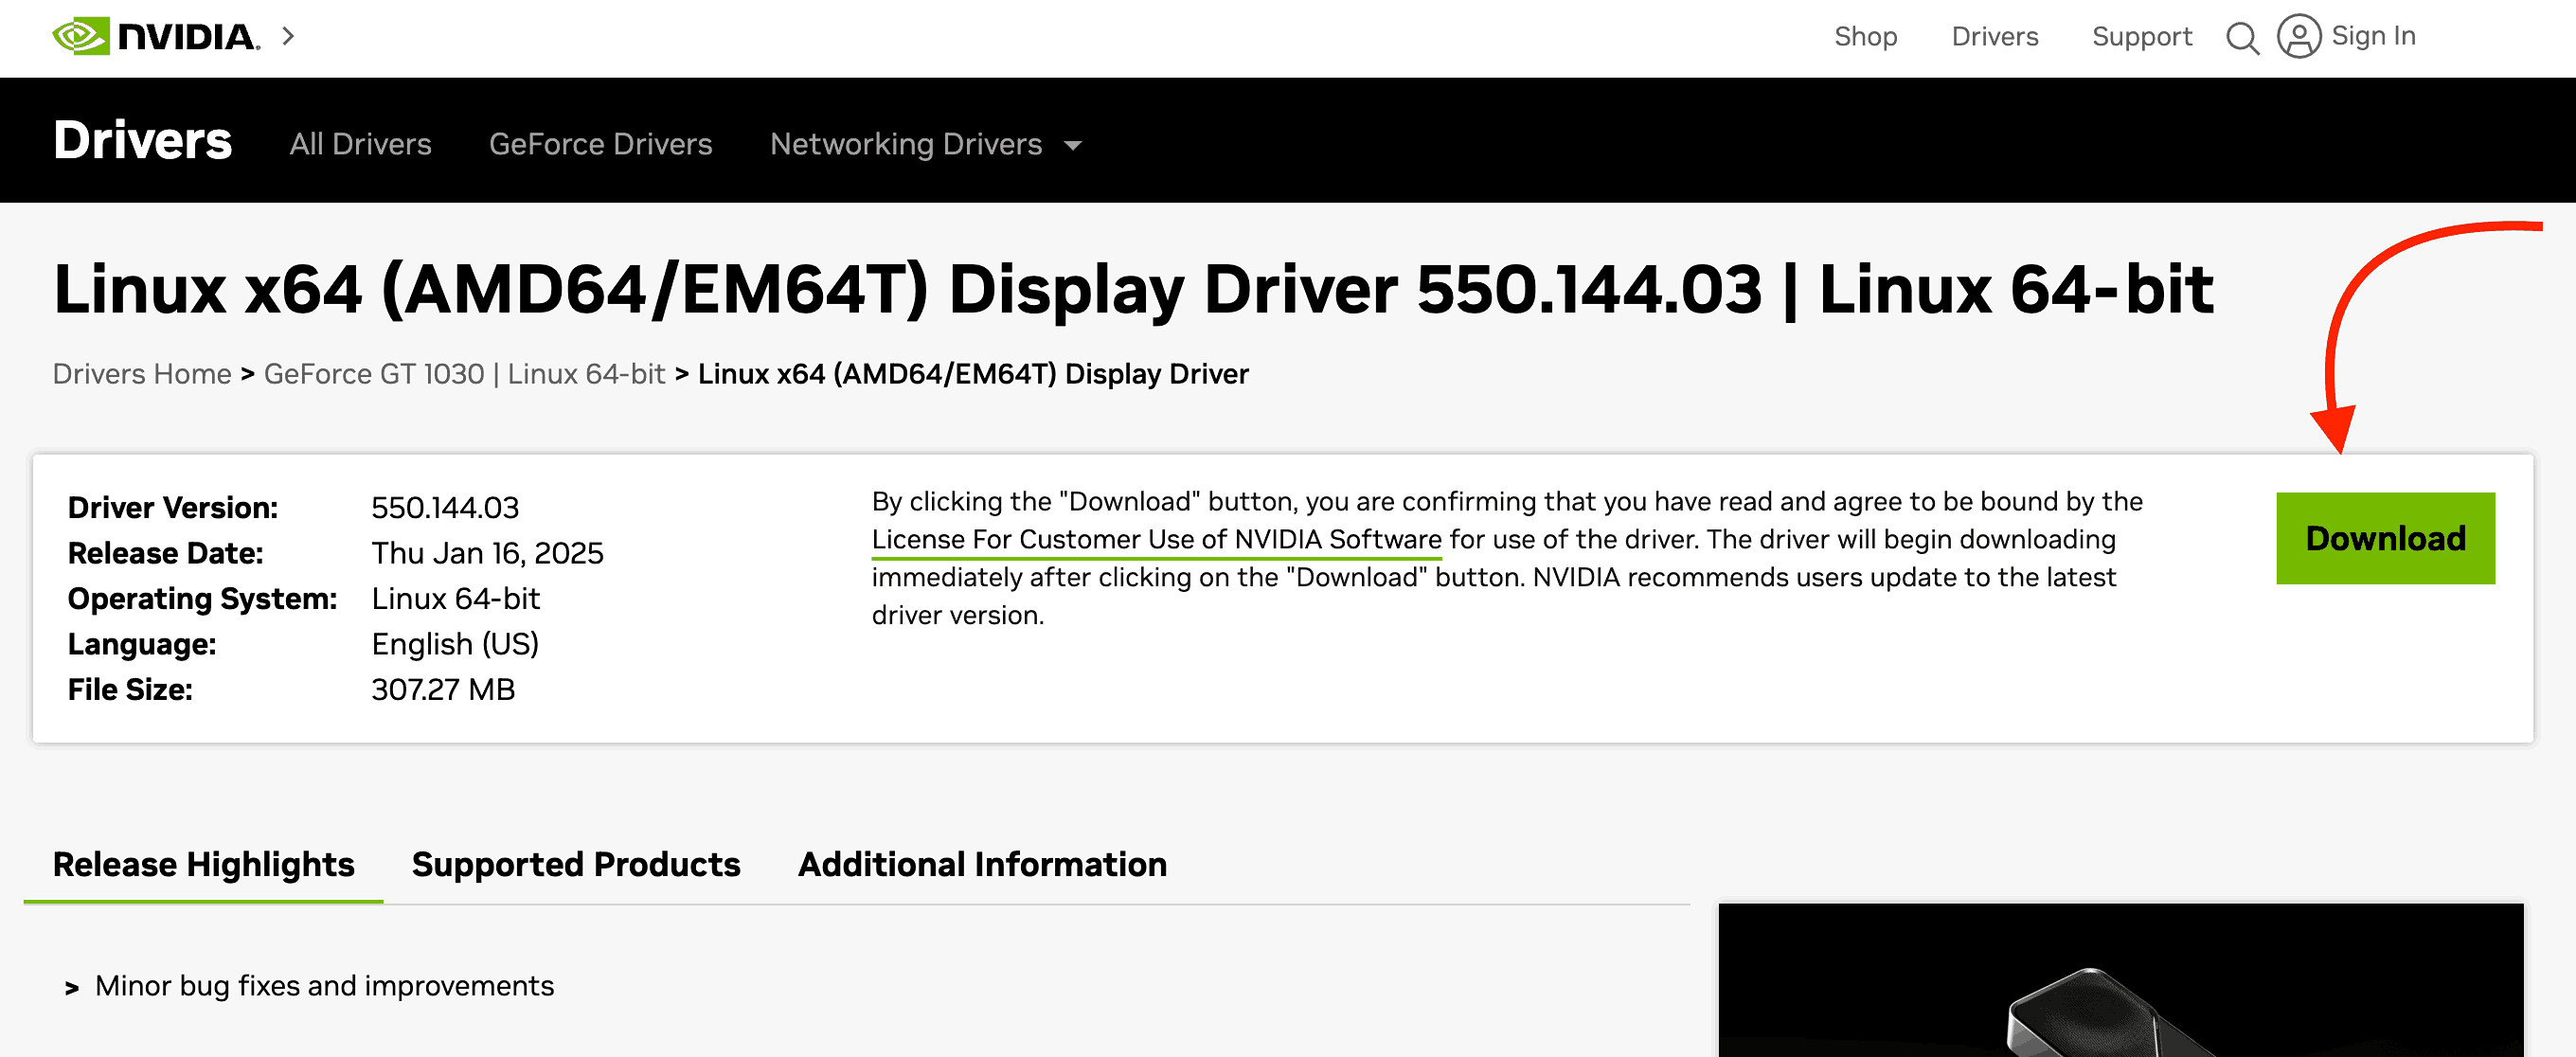
This will download an installer file. Similar to this: NVIDIA-Linux-x86_64-550.144.03.run.
2. Prepare your system
Disable Ubuntu's default open-source nouveau driver to prevent conflicts:
echo  "blacklist nouveau" | sudo tee /etc/modprobe.d/blacklist-nouveau.conf
echo  "options nouveau modeset=0" | sudo tee -a /etc/modprobe.d/blacklist-nouveau.conf
sudo update-initramfs -u
Then reboot the system.
3. Run the installer
Navigate to the directory containing the .run file. Look for a driver named NVIDIA-Linux-x86_64-550.144.03.run, run:
chmod +x NVIDIA-Linux-x86_64-550.144.03.run
sudo ./NVIDIA-Linux-x86_64-550.144.03.run
Follow the prompts to complete the installation. If asked, do not let the installer configure Xorg—Ubuntu handles this automatically.
4. Reboot and verify
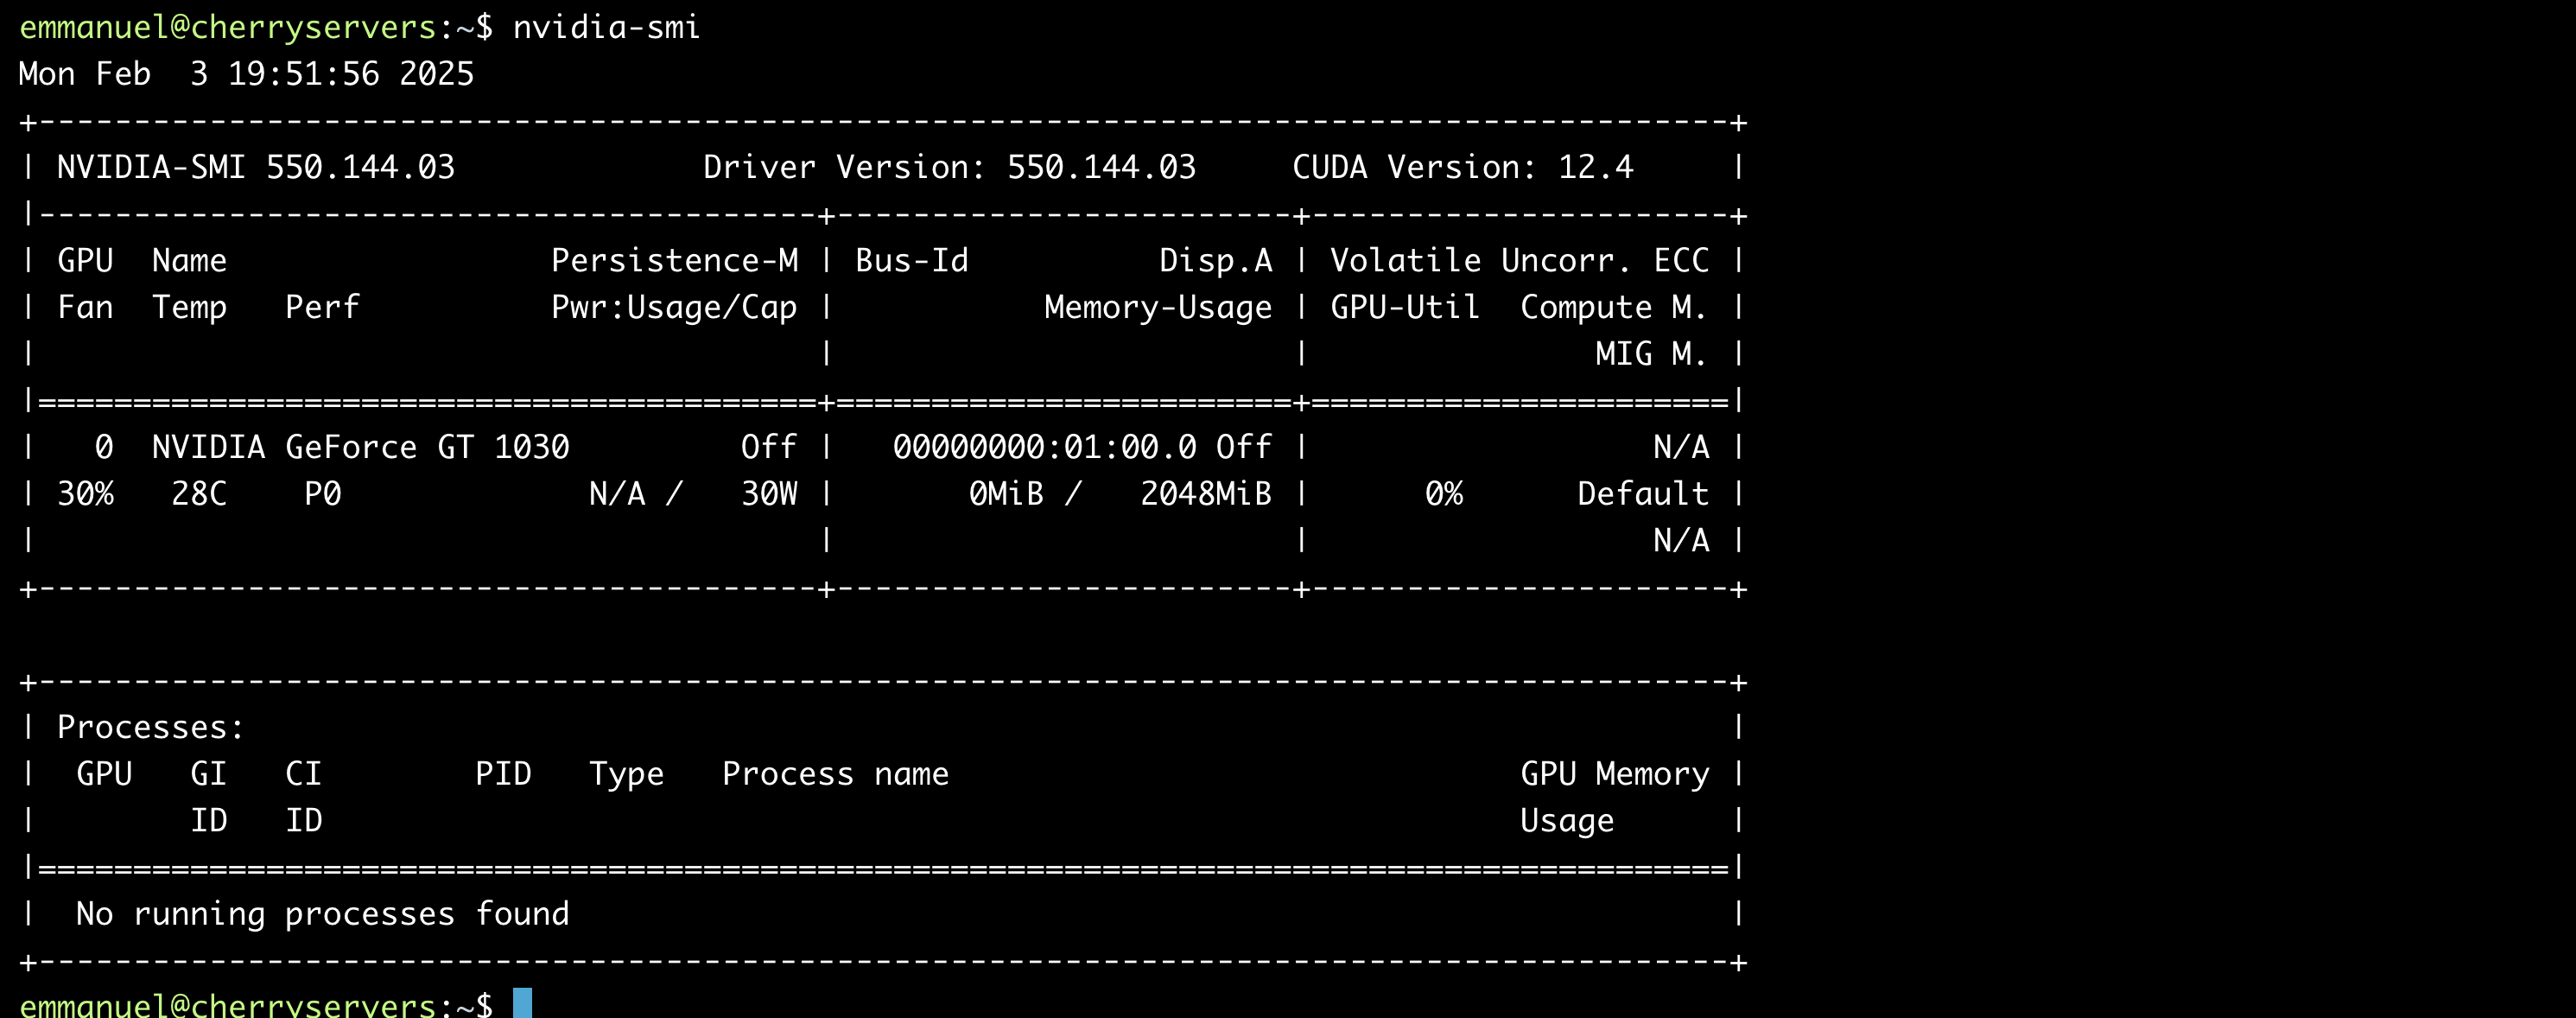
Restart your system and verify with the following:
nvidia-smi
#Method 3: Using the graphics drivers Personal Package Archive (PPA)
A Personal Package Archive (PPA) is a third-party repository hosted on Launchpad. The Ubuntu Community PPAs guide explains how they work.
The Graphics Drivers PPA provides newer NVIDIA drivers before they reach Ubuntu's official repositories. Use this for early access to performance optimizations or bug fixes.
1. Add the PPA
Add the repository and update your package list:
sudo add-apt-repository ppa:graphics-drivers/ppa
sudo apt update
2. Install the driver
For manual selection, list available versions first:
ubuntu-drivers devices
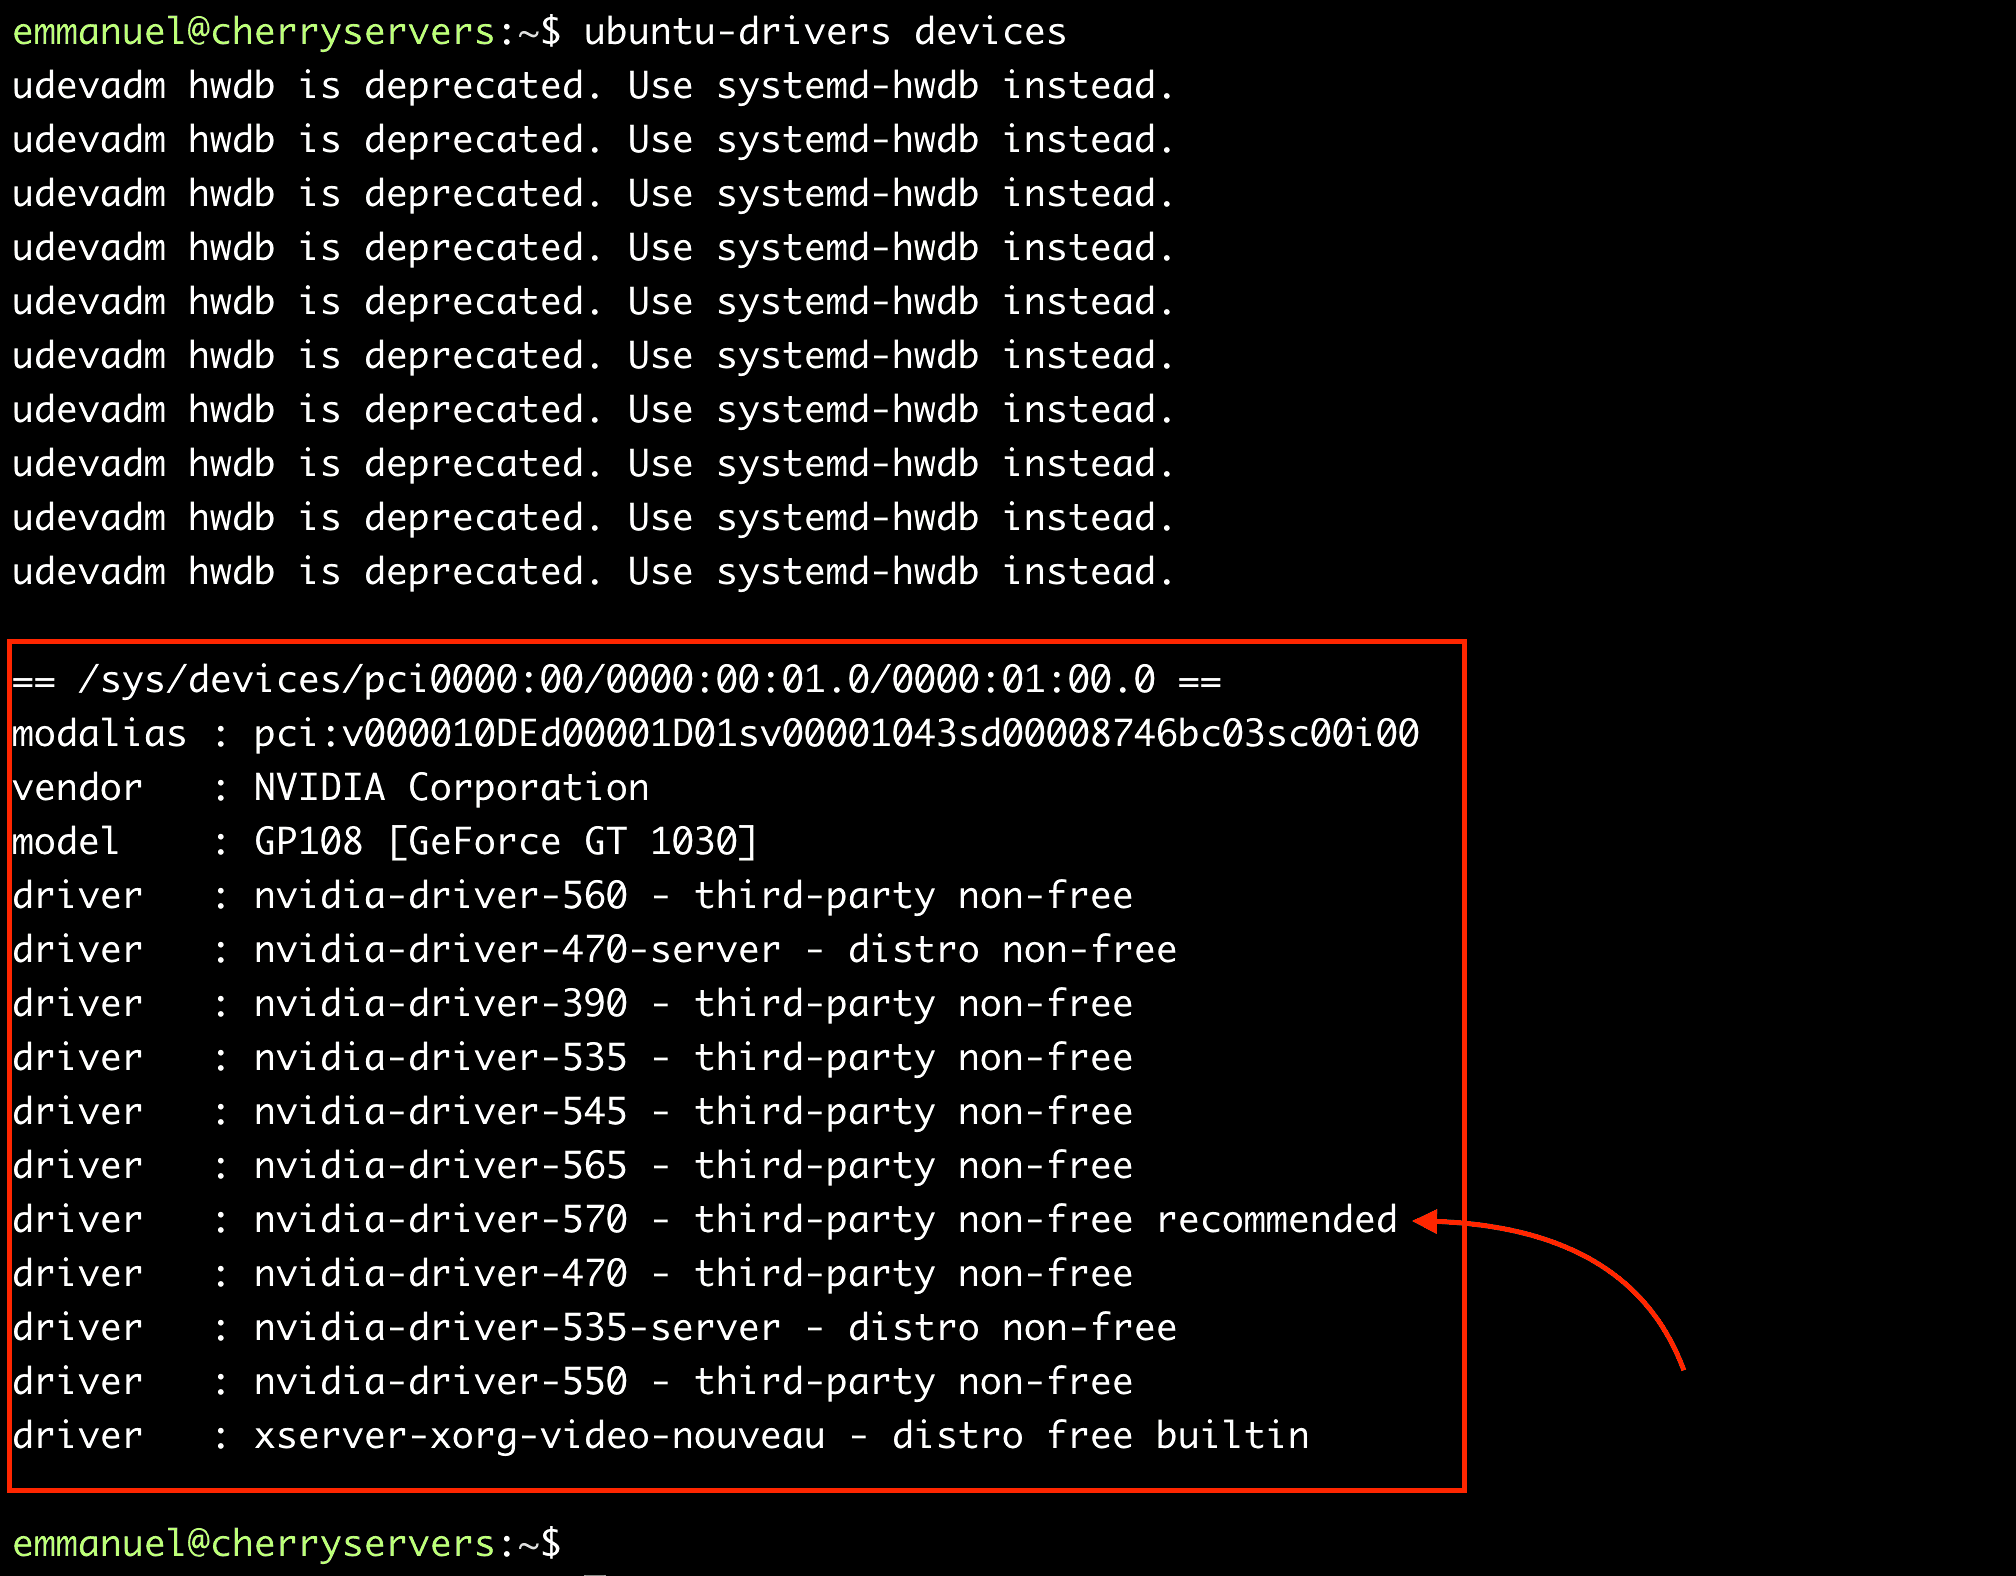
Then, install the specific version you want. However, we advise using the driver tagged recommended:
sudo apt install nvidia-driver-570
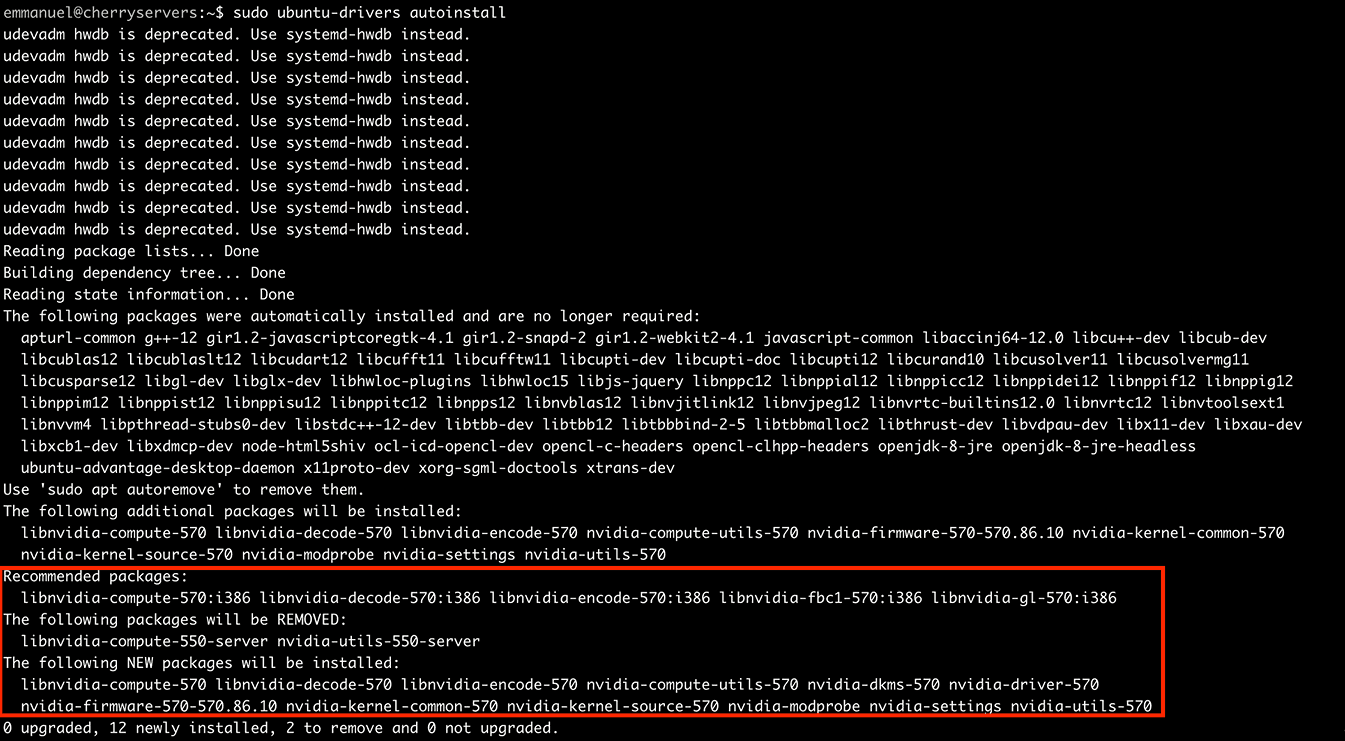
Additionally, you can use ubuntu-drivers to auto-install the recommended driver:
sudo ubuntu-drivers autoinstall
3. Reboot and verify
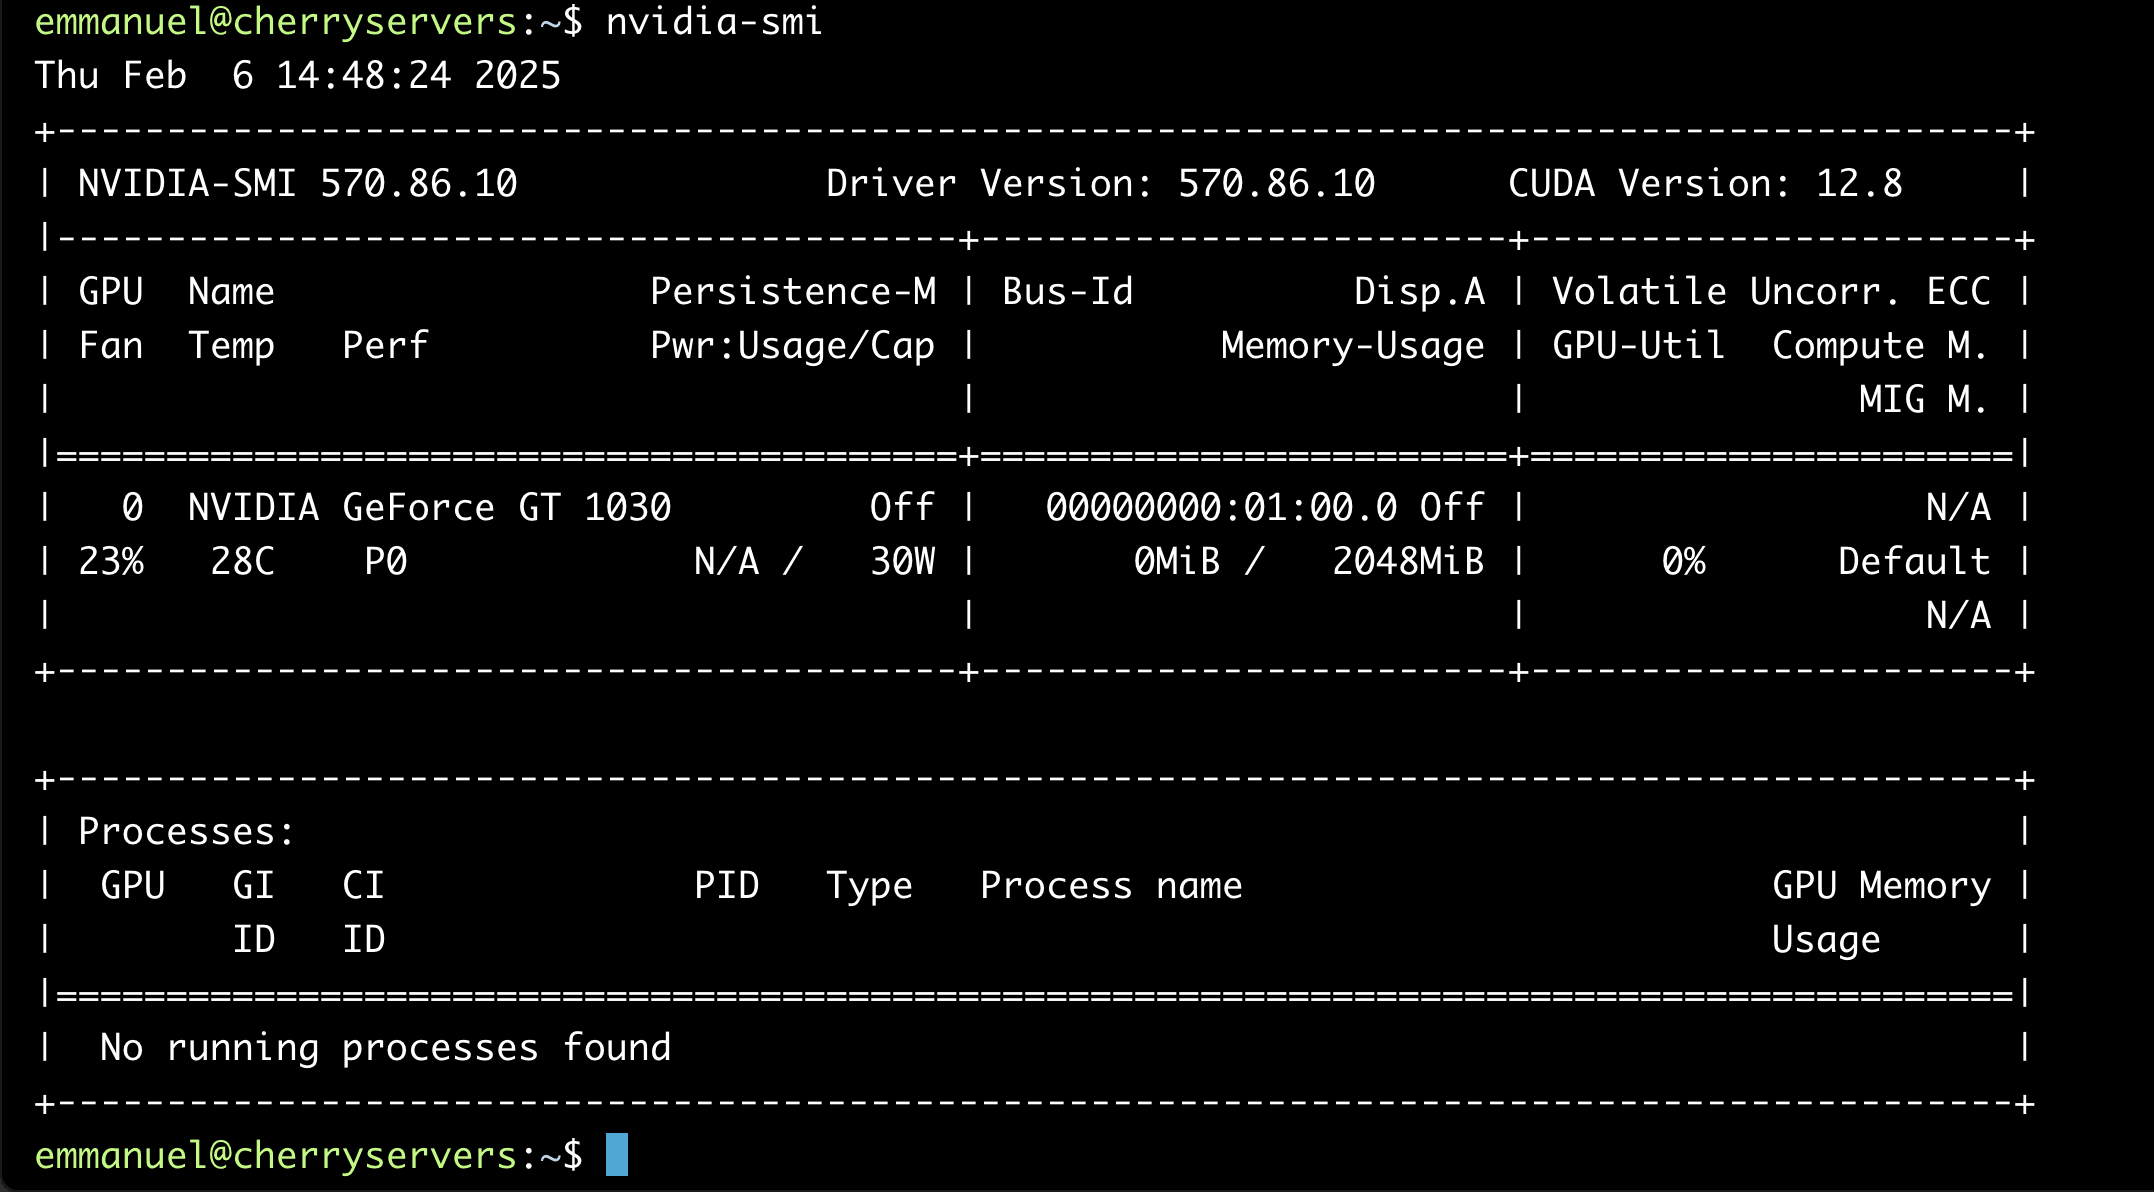
Restart your system and confirm with nvidia-smi:
Also read: How to check your Ubuntu version
#Method 4: Installing via CUDA PPA (for CUDA development)
CUDA (Compute Unified Device Architecture) accelerates AI and scientific computing workloads. You need to install the CUDA Toolkit and compatible drivers to use NVIDIA GPUs for machine learning or other heavy tasks. This method installs the toolkit from NVIDIA's official repository. This way, you get a supported and up-to-date driver package.
The commands below demonstrate the process using CUDA Toolkit 12.8. Visit the CUDA Toolkit Downloads page for the most recent installer URLs and version numbers. The workflow remains the same regardless of version.
Begin by downloading a pin file that helps prioritize the CUDA repository. Run the following command to fetch it:
wget https://developer.download.nvidia.com/compute/cuda/repos/ubuntu2404/x86_64/cuda-ubuntu2404.pin
Then, move the pin file to the correct directory so that it sets the proper priority:
sudo mv cuda-ubuntu2404.pin /etc/apt/preferences.d/cuda-repository-pin-600
Next, download the CUDA repository package from NVIDIA. For CUDA Toolkit 12.8, run:
wget https://developer.download.nvidia.com/compute/cuda/12.8.0/local_installers/cuda-repo-ubuntu2404-12-8-local_12.8.0-570.86.10-1_amd64.deb
Install this package with the following:
sudo dpkg -i cuda-repo-ubuntu2404-12-8-local_12.8.0-570.86.10-1_amd64.deb
Now, copy the keyring file so your system can verify the repository:
sudo cp /var/cuda-repo-ubuntu2404-12-8-local/cuda-*-keyring.gpg /usr/share/keyrings/
Update your package list to include the new repository:
sudo apt-get update
Install the CUDA Toolkit version 12.8 by running:
sudo apt-get -y install cuda-toolkit-12-8
For the driver installation, choose the version that suits your needs.
To install the open kernel module flavor, run the following:
sudo apt-get install -y nvidia-open
Or, if you need the legacy kernel module flavor, run:
sudo apt-get install -y cuda-drivers

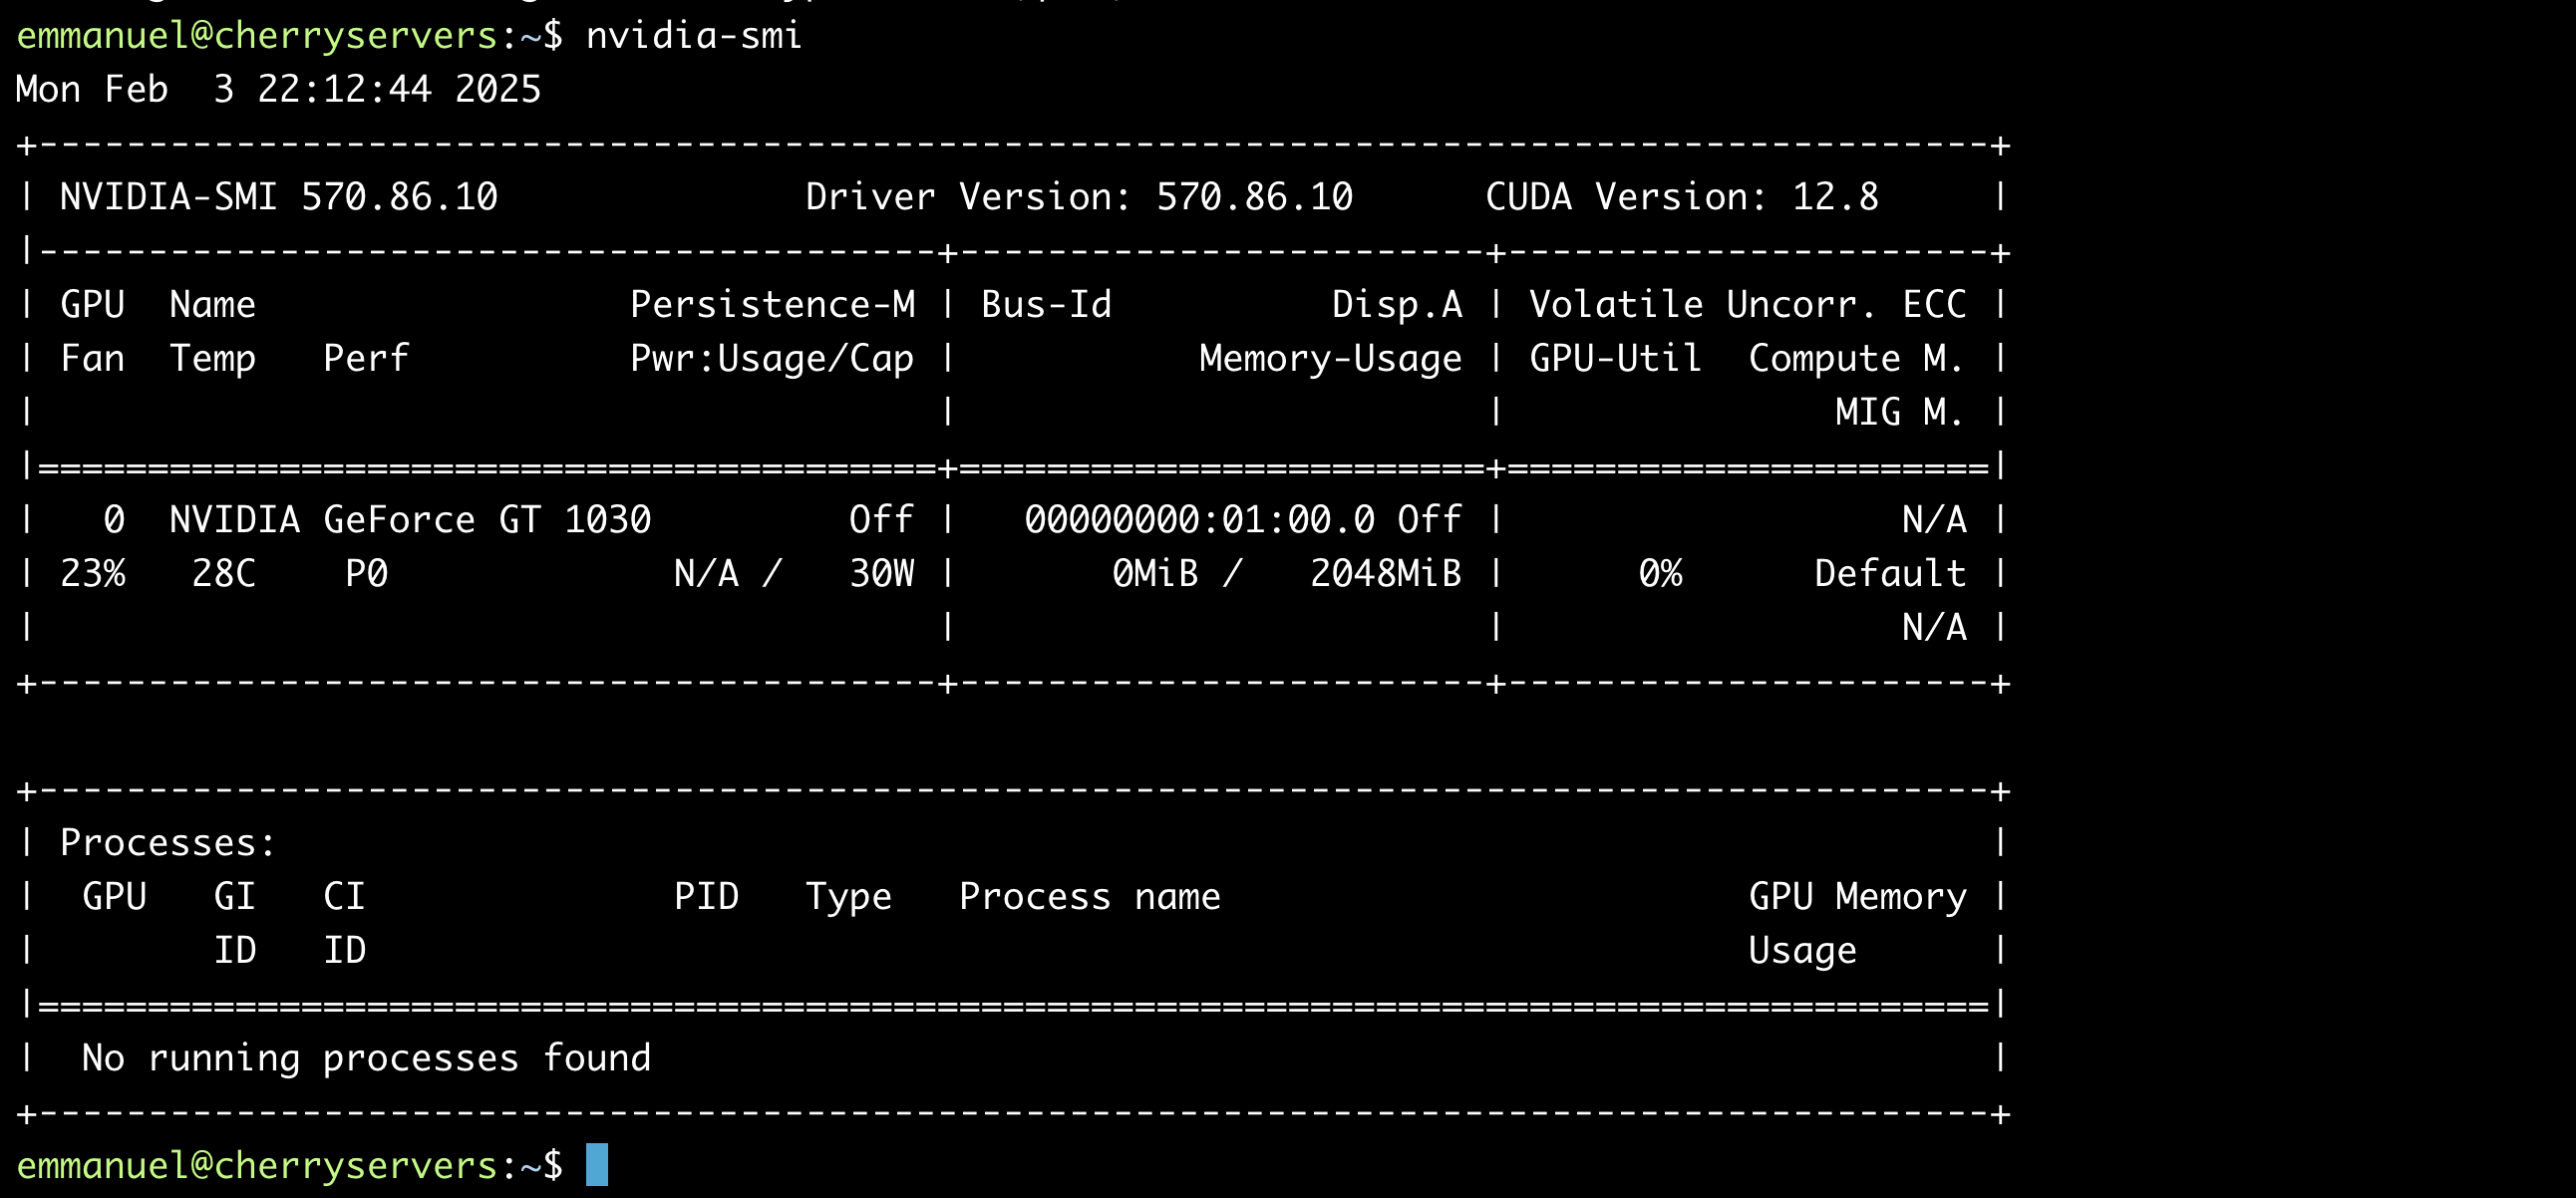
Next, verify the installation:
nvidia-smi
You can also verify CUDA with:
nvcc --version

Also read: AMD vs NVIDIA: Which is the Best GPU for a Server?
#How to update NVIDIA drivers to a newer version
NVIDIA releases driver updates regularly with performance improvements, bug fixes, and security patches. The update method depends on how you originally installed the driver.
#Update drivers installed via apt (repository or PPA)
Check your current driver version first:
nvidia-smi
The top-right corner of the output shows the installed driver version. Compare that against the latest available version in your repository:
apt list --upgradable 2>/dev/null | grep nvidia
If a newer package appears, run the upgrade:
sudo apt update
sudo apt upgrade
If a newer driver version is available in your configured repository, apt upgrade will pull it in. Reboot after the upgrade completes:
sudo reboot
Run nvidia-smi again to confirm the new version loaded correctly.
#Update drivers installed via .run file
For drivers installed manually from the NVIDIA website, download the latest .run file from the NVIDIA Driver Downloads page. Stop any running display manager, then run the new installer:
sudo systemctl stop gdm
sudo ./NVIDIA-Linux-x86_64-<new-version>.run
The installer will detect the existing driver and offer to overwrite it. Follow the prompts, then reboot.
#Update CUDA Toolkit drivers
For CUDA-installed drivers, refresh the NVIDIA repository and upgrade:
sudo apt-get update
sudo apt-get upgrade cuda-drivers
Always verify that the CUDA Toolkit and driver versions are compatible using the NVIDIA CUDA compatibility matrix.
#How to switch between NVIDIA driver versions
You may need to switch driver versions after a broken update or when testing compatibility with specific software. Ubuntu offers two driver flavors for most versions: the standard desktop driver (e.g., nvidia-driver-580) and the server driver (e.g., nvidia-driver-580-server).
Server drivers are tested for data center GPUs and long-term stability, while desktop drivers receive more frequent feature updates.
List all available NVIDIA driver packages on your system:
apt list --installed | grep nvidia-driver
Remove the current driver:
sudo apt remove --purge nvidia-driver-560
sudo apt autoremove
Replace 560 with your installed version. Then install the version you want:
sudo apt install nvidia-driver-580
Reboot and verify:
sudo reboot
nvidia-smi
If you use the Graphics Drivers PPA, you can also list all available versions with ubuntu-drivers devices and pick the one you need. Avoid mixing drivers from different sources (e.g., PPA and CUDA repository) on the same system, as package conflicts can break your display.
#How to uninstall NVIDIA drivers from Ubuntu
Removing NVIDIA drivers cleanly prevents leftover files from causing conflicts during future installations.
#Remove apt-installed drivers
Purge all NVIDIA packages and their configuration files:
sudo apt remove --purge '^nvidia-.*'
sudo apt remove --purge '^libnvidia-.*'
sudo apt autoremove
Verify the removal by checking for any remaining NVIDIA packages:
dpkg -l | grep -i nvidia
No packages should appear in the output. If you see entries marked rc (removed but config files remain), run sudo dpkg --purge followed by the package name to clean them up.
#Remove .run file installations
If you installed from a .run file, NVIDIA provides a built-in uninstaller:
sudo /usr/bin/nvidia-uninstall
If the uninstaller is missing, re-download the same .run file version and run it with the --uninstall flag:
sudo ./NVIDIA-Linux-x86_64-<version>.run --uninstall
#Re-enable the Nouveau driver (optional)
After removing NVIDIA drivers, you can restore the open-source Nouveau driver. Remove the blacklist file you created earlier:
sudo rm /etc/modprobe.d/blacklist-nouveau.conf
sudo update-initramfs -u
sudo reboot
Verify Nouveau loaded after reboot:
lsmod | grep nouveau
#Common installation issues and troubleshooting
Even with careful preparation, you might encounter issues during or after installing NVIDIA drivers. Below, we address frequent problems and provide actionable solutions to stabilize your system.
#Conflict with the Nouveau driver
Ubuntu's default open-source Nouveau driver can conflict with NVIDIA's proprietary driver, causing errors or startup failures. To resolve this, blacklist the Nouveau driver. Open a terminal and run:
sudo sh -c "echo 'blacklist nouveau\noptions nouveau modeset=0' > /etc/modprobe.d/blacklist-nouveau.conf"
sudo update-initramfs -u
Then, reboot your system.
This prevents Nouveau from loading, allowing the NVIDIA driver to take control of the GPU. For details, review the Linux kernel documentation on module management.
#DKMS build errors
DKMS (Dynamic Kernel Module Support) errors often occur if kernel headers or build tools are missing. Reinstall these components to fix compilation issues:
sudo apt install build-essential linux-headers-$(uname -r)
sudo apt reinstall nvidia-driver-560
Replace 560 with your driver version. Confirm success by running dkms status, which should list the NVIDIA module as installed.
#Black screen or low resolution after reboot
A black screen or low-resolution display typically indicates that Xorg failed to load the NVIDIA driver. To resolve this, switch to a terminal then regenerate Xorg's configuration:
sudo nvidia-xconfig
sudo systemctl restart gdm
Replace gdm with your display manager (e.g., lightdm). Check logs for errors using journalctl -b | grep -i nvidia. For advanced troubleshooting, consult Ubuntu's Xorg documentation.
#Recovering from partial installs
Interrupted installations can leave your system unbootable. Boot with the nomodeset parameter to bypass GPU issues:
-
At the GRUB menu, press
eto edit boot options. -
Add
nomodesetto the end of thelinuxline. -
Press
Ctrl+Xto boot.
Once logged in, purge NVIDIA packages and reinstall:
sudo apt purge nvidia-*
sudo apt install nvidia-driver-560
#Conclusion
In this tutorial, you learned how to install NVIDIA drivers on Ubuntu 24.04 through multiple methods, and how to update, switch between, and fully remove driver versions. You also worked through common issues such as Nouveau conflicts, DKMS build failures, and black-screen recovery.
Keep your driver on a single installation source to avoid package conflicts, and check for updates periodically to install security fixes and performance improvements. For GPU-accelerated workloads, explore Cherry Servers' dedicated GPU servers with pre-configured NVIDIA hardware and CUDA support.
FAQs
Which NVIDIA driver version should I install on Ubuntu 24.04
Run `ubuntu-drivers devices` to see the recommended driver for your GPU. The version tagged `recommended` offers the best stability for your hardware.
Can I use both NVIDIA and Nouveau drivers at the same time
No. The two drivers conflict with each other. Blacklist Nouveau before installing the proprietary NVIDIA driver, or your system may fail to boot or display correctly.
Do I need to reinstall NVIDIA drivers after a kernel update
If you installed via `apt`, DKMS rebuilds the kernel module automatically after each kernel update. You only need to reboot for the new module to load. Manual `.run` file installations do not use DKMS, so you must re-run the installer after every kernel change. A common symptom of a stale module is `nvidia-smi` reporting a driver/library version mismatch, which a reboot or reinstall resolves.
How do I check which NVIDIA driver is currently running
Run `nvidia-smi` in a terminal. The output header shows the driver version and CUDA version. You can also run `cat /proc/driver/nvidia/version` for the kernel module version.
Will installing NVIDIA drivers break my Wayland session
Recent NVIDIA drivers (535+) support Wayland on Ubuntu 24.04. GBM (Generic Buffer Manager) backend support landed in the 495 series, and subsequent releases have improved stability. If you experience session freezes or rendering glitches, switch to an X11 session from the GDM login screen as a fallback. GDM lets you select the session type before logging in by clicking the gear icon.
How do I install NVIDIA drivers on Ubuntu Server without a GUI
Use the `ubuntu-drivers` command-line tool: run `sudo ubuntu-drivers install` to auto-detect and install the recommended driver. You can also specify a version manually with `sudo apt install nvidia-driver-560`. No GUI or display manager is needed for headless GPU compute workloads.