How to Provision Bare Metal Servers with Terraform


Manually provisioning servers is slow and inconsistent. Whether you are dealing with that problem today or setting up bare metal infrastructure for the first time, Terraform lets you define your servers in code and provision them with a single command.
In this tutorial, you will learn how to provision bare metal servers with Terraform using Cherry Servers as the provider, though the same workflow applies to any Terraform-supported bare metal provider, such as Equinix Metal, phoenixNAP, or Hetzner.
#Prerequisites
This tutorial comprises hands-on demonstrations. To follow along, be sure you have the following in place:
-
A Cherry Servers account. Sign up for free if you do not have one.
-
Terraform v1.5.0 or later installed on your machine.
-
A basic familiarity with the command line.
If you have never written a Terraform configuration before, start with How to Create a Terraform Configuration: Beginner's Guide before continuing.
#Understanding How Terraform Provisions Infrastructure
Before writing any code, it helps to understand what Terraform actually does when it provisions a server. Terraform uses providers to interact with external platforms. A provider is a plugin that translates your configuration into API calls. When you define a server resource in Terraform, the provider sends the right API request to your cloud platform and waits for the server to come online.
Every Terraform workflow follows the same four steps:
-
Write configuration files in HashiCorp Configuration Language (HCL)
-
Init to download the provider plugin
-
Plan to preview what Terraform will create, modify, or destroy
-
Apply to execute the plan and provision the infrastructure
Terraform tracks everything it creates in a state file (terraform.tfstate). This file is how Terraform knows what already exists so it does not create duplicate resources on subsequent runs.
#How to Provision Bare Metal Servers with Terraform: Step-By-Step
Here, you'll go through the steps for provisioning a bare metal server with Terraform.
#Step 1: Verify Terraform installation
Start by verifying your Terraform installation:
terraform -version
You should see output like:
OutputTerraform v1.15.4
on windows_amd64
#Step 2: Set up your project directory
Next, create a project directory. A structured project directory keeps your configuration maintainable as it grows. Terraform does not require a specific layout, but separating variables, resources, and outputs into their own files is a widely adopted convention that prevents your code from becoming one large, unreadable block.
Create a directory to hold your Terraform configuration files:
mkdir terraform-bare-metal && cd terraform-bare-metal
You will create four files:
terraform-bare-metal/
├── main.tf # defines your infrastructure resources
├── provider.tf # Terraform provider configuration
├── variables.tf # defines input variables
└── outputs.tf   # defines what to display after provisioning
This separation keeps your configuration organized and makes it easier to update individual parts without touching unrelated code.
#Step 3: Generate SSH key pair for authentication
Next, generate a new SSH key pair by executing the following command in your terminal:
ssh-keygen -t ed25519
You will be prompted to specify a file to save the key. Press Enter to accept the default location (~/.ssh/id_ed25519). You can set a passphrase when prompted for added security.
OutputGenerating public/private ed25519 key pair.
Enter file in which to save the key (C:\Users\Username/.ssh/id_ed25519):
Enter passphrase (empty for no passphrase):
Enter same passphrase again:
Your identification has been saved in C:\Users\Username/.ssh/id_ed25519.
Your public key has been saved in C:\Users\Username/.ssh/id_ed25519.pub.
The key fingerprint is:
SHA256:xxxxxxxxxxxxxxxxxxxxxxxxxxxxxxxxxxxxxxxxxxx
The key's randomart image is:
+--[ED25519 256]--+
|           .*++.o|
|           E ... |
|         ...o..  |
|       ....o.+   |
|        S. .* .  |
|      . o. =+..  |
|       o+=.*oo.  |
|       o=*=.=o   |
|       .**=+ooo. |
+----[SHA256]-----+
This key pair is the authentication mechanism for accessing your provisioned servers. Your local machine uses the private key (id_ed25519) to authenticate, while the public key (id_ed25519.pub) gets placed on the server during provisioning. If you already have an existing key pair, you can use that instead.
#Step 4: Get your API credentials
Terraform authenticates with Cherry Servers using an API token. You generate this from the Cherry Servers portal.
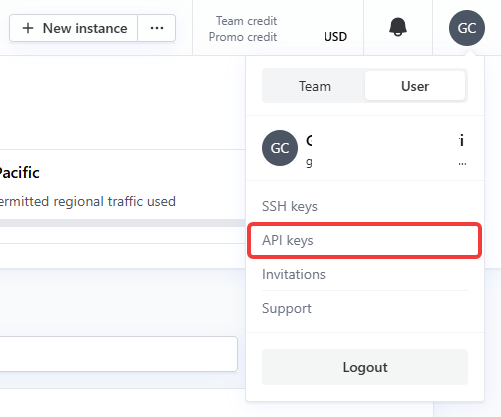
Log in to portal.cherryservers.com. Click your account name in the top-right corner, switch to the User tab, then click on API Keys.
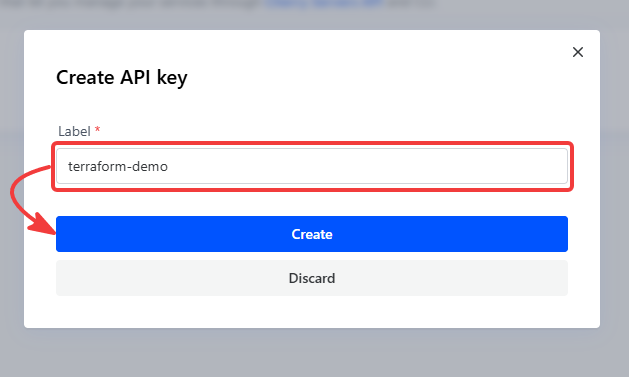
Click Create API key, enter a name like terraform-demo, and click Create. Copy the generated token. The portal will not show it again after you close this screen.
While you are in the portal, grab your project ID as well. Click on your project and look for the number displayed next to the project name at the top of the dashboard. You will need both values in the next step.
Store the API token in an environment variable. This keeps it out of your Terraform files and version control.
On Linux/macOS:
export CHERRY_AUTH_TOKEN="your_api_token_here"
To make this persistent across terminal sessions, add that line to your shell profile (~/.bashrc or ~/.zshrc).
On Windows Command Prompt:
set CHERRY_AUTH_TOKEN=your_api_token_here
set only applies to the current session. To make it persistent, use setx instead:
setx CHERRY_AUTH_TOKEN "your_api_token_here"
After running setx, open a new Command Prompt window for the change to take effect.
#Step 5: Configure the provider
This is where you define the provider block that tells Terraform which plugin to use and how to authenticate.
Create provider.tf and add the following:
terraform {
  required_providers {
    cherryservers = {
      source  = "cherryservers/cherryservers"
      version = "~> 1.0"
    }
  }
}

provider "cherryservers" {
  # Reads from the CHERRY_AUTH_TOKEN environment variable automatically.
  # You can also set it explicitly: api_token = var.cherry_api_token
}
The source field points to the provider in the Terraform Registry. The version constraint ~> 1.0 means Terraform accepts any 1.x release, which prevents unexpected breaking changes when the provider updates.
Because you set CHERRY_AUTH_TOKEN as an environment variable earlier, you do not need to hardcode the token here. Terraform picks it up automatically.
If you use a different bare metal provider such as Hetzner, OVHcloud, or Equinix Metal, you change this block to reference their provider.
#Step 6: Define the variables
Rather than hardcoding values directly into your resource blocks, you declare variables. Variables let you change configuration values without editing the main resource files.
Create variables.tf and add the following variable declarations:
variable "project_id" {
  description = "The Cherry Servers project ID where the server will be deployed"
  type        = string
  default     = "YOUR_PROJECT_ID"
}

variable "region" {
  description = "The region slug where the server will be deployed."
  type        = string
  default     = "LT-Siauliai"
}

variable "plan" {
  description = "The server plan slug."
  type        = string
  default     = "e5-1620v4"
}

variable "image" {
  description = "The OS image slug to install on the server"
  type        = string
  default     = "ubuntu_24_04_64bit"
}

variable "hostname" {
  description = "The hostname to assign to the server"
  type        = string
  default     = "bare-metal-01"
}

variable "ssh_public_key_path" {
  description = "Path to your local SSH public key file"
  type        = string
  default     = "~/.ssh/id_ed25519.pub"
}
You will pass the project_id at runtime. The other variables have sensible defaults, but you can override any of them. On Windows, you can substitute the tilde with your full path using forward slashes, for example "C:/Users/YourUsername/.ssh/id_ed25519.pub".
To find available plan slugs for Cherry Servers, check the plan list or query the API:
On Linux/macOS:
curl -H "Authorization: Bearer $CHERRY_AUTH_TOKEN" \
  "https://api.cherryservers.com/v1/plans?type[]=baremetal" | jq '.'
On Windows Command Prompt:
curl -s -H "Authorization: Bearer %CHERRY_AUTH_TOKEN%" ^
  "https://api.cherryservers.com/v1/plans?type[]=baremetal" ^
  | python -m json.tool
On Windows PowerShell:
Invoke-RestMethod -Uri "https://api.cherryservers.com/v1/plans?type[]=baremetal" `
  -Headers @{ Authorization = "Bearer $env:CHERRY_AUTH_TOKEN" } `
  | ConvertTo-Json -Depth 10
Look for the slug field in the response. Common bare metal plans include e5-1620v4, 2x-e5-2620v4, and 2x-e5-2650v4.
#Step 7: Define the resources
This is where you tell Terraform what to build. You will create two resources, an SSH key and a server.
Create main.tf and add the following:
# Upload your SSH public key to Cherry Servers.
# This lets you SSH into the server once it is provisioned.
resource "cherryservers_ssh_key" "my_key" {
  name       = "terraform-key"
  public_key = file(var.ssh_public_key_path)
}

# Provision the bare metal server.
resource "cherryservers_server" "bare_metal" {
  project_id  = var.project_id
  region      = var.region
  plan        = var.plan
  image       = var.image
  hostname    = var.hostname

  # Associate the SSH key so you can log in after provisioning.
  ssh_key_ids = [cherryservers_ssh_key.my_key.id]

  tags = {
    Environment = "development"
    ManagedBy   = "terraform"
  }
}
A few things to note here. The cherryservers_ssh_key resource uploads your local public key to Cherry Servers. When the server boots, Cherry Servers injects this key into the OS so you can log in as root. The cherryservers_server resource references the SSH key using cherryservers_ssh_key.my_key.id. This is a resource reference: Terraform reads the ID from the SSH key resource output and passes it to the server. Terraform also uses this reference to determine the correct order of operations; it creates the SSH key first, then the server. The tags block is optional but useful. Tags help you identify resources in the portal and across multiple deployments.
#Step 8: Define outputs
Outputs tell Terraform what information to display once provisioning is complete. Without an output block, you would have to log into the portal to find your server's IP address.
Create outputs.tf and add the following:
output "server_id" {
  description = "The unique ID of the provisioned server"
  value       = cherryservers_server.bare_metal.id
}

output "server_ip" {
  description = "The primary public IP address of the server"
  value       = [for ip in cherryservers_server.bare_metal.ip_addresses : ip.address if ip.type == "primary-ip"][0]
}

output "ssh_connection" {
  description = "The SSH command to connect to your server"
  value       = "ssh root@${[for ip in cherryservers_server.bare_metal.ip_addresses : ip.address if ip.type == "primary-ip"][0]}"
}
After provisioning, Terraform prints these values to your terminal. The server_ip output uses a for expression to filter the ip_addresses set returned by the provider, selecting the address where type == "primary-ip". The ssh_connection output gives you a ready-to-run command to connect to your server.
#Step 9: Initialize Terraform
Terraform needs to download the Cherry Servers provider plugin before you run any other command. The init command handles this. It scans the .tf files in your working directory for the required_providers block and downloads the correct plugin version into the .terraform/ directory.
Run the following command from inside your project directory:
terraform init
You will see output similar to this, confirming the provider was downloaded successfully. Note that the Cherry Servers provider is self-signed, not signed by HashiCorp directly. This is normal for community providers.
OutputInitializing provider plugins found in the configuration...
- Finding cherryservers/cherryservers versions matching "~> 1.0"...
- Installing cherryservers/cherryservers v1.5.2...
- Installed cherryservers/cherryservers v1.5.2 (self-signed, key ID F9A91E8216FC8E82)
Partner and community providers are signed by their developers.
If you'd like to know more about provider signing, you can read about it here:
https://developer.hashicorp.com/terraform/cli/plugins/signing

Initializing the backend...


Terraform has created a lock file .terraform.lock.hcl to record the provider
selections it made above. Include this file in your version control repository
so that Terraform can guarantee to make the same selections by default when
you run "terraform init" in the future.

Terraform has been successfully initialized!

You may now begin working with Terraform. Try running "terraform plan" to see
any changes that are required for your infrastructure. All Terraform commands
should now work.

If you ever set or change modules or backend configuration for Terraform,
rerun this command to reinitialize your working directory. If you forget, other
commands will detect it and remind you to do so if necessary.
This creates a .terraform directory with the provider plugin and a .terraform.lock.hcl file that pins the exact provider version. Commit .terraform.lock.hcl to version control. Do not commit the .terraform directory itself.
You must run init once before plan or apply. Re-run it if you add a new provider or change a provider version.
#Step 10: Validate the configuration
Before running a plan, validate your configuration files for syntax errors. This catches typos and misconfigured blocks before they reach the API.
To validate your configuration, run:
terraform validate
A valid configuration returns this:
OutputSuccess! The configuration is valid.
If Terraform returns an error, it tells you the exact file and line number to fix. Resolve any errors before moving on.
#Step 11: Preview execution plan
terraform plan shows you exactly what Terraform will create, modify, or destroy before touching any real infrastructure. This is a dry run; no resources are created yet.
Read the plan carefully before applying. Bare metal servers begin billing from the moment they are provisioned.
Run the following command, replacing YOUR_PROJECT_ID with your actual project ID from Step 4:
terraform plan
If you did not add a default project_id in variables.tf, pass it with a flag
terraform plan -var="project_id=YOUR_PROJECT_ID"
Terraform compares your configuration against the current state (empty, since nothing exists yet) and prints a plan like this:
OutputTerraform used the selected providers to generate the following execution plan. Resource actions are indicated with the following symbols:
  + create

Terraform will perform the following actions:

  # cherryservers_server.bare_metal will be created
  + resource "cherryservers_server" "bare_metal" {
      + allow_reinstall = false
      + hostname        = "bare-metal-01"
      + id              = (known after apply)
      + image           = "ubuntu_24_04_64bit"
      + ip_addresses    = (known after apply)
      + name            = (known after apply)
      + plan            = "e5-1620v4"
      + power_state     = (known after apply)
      + pricing         = (known after apply)
      + project_id      = xxxxxx
      + region          = "LT-Siauliai"
      + spot_instance   = false
      + ssh_key_ids     = [
          + (known after apply),
        ]
      + state           = (known after apply)
      + tags            = {
          + "Environment" = "development"
          + "ManagedBy"   = "terraform"
        }
    }

  # cherryservers_ssh_key.my_key will be created
  + resource "cherryservers_ssh_key" "my_key" {
      + created     = (known after apply)
      + fingerprint = (known after apply)
      + id          = (known after apply)
      + name        = "terraform-key"
      + public_key  = <<-EOT
            ssh-ed25519 AAAAC3NzaC1lZDI1NTE5AAAAIxxxxxxxxxxxxxxxxxxxxxxxxxxxxxxxxxxxxxxxxx
        EOT
      + updated     = (known after apply)
    }

Plan: 2 to add, 0 to change, 0 to destroy.

Changes to Outputs:
  + server_id      = (known after apply)
  + server_ip      = (known after apply)
  + ssh_connection = (known after apply)

───────────────────────────────────────────────────────────────────────────────────────────────────────────────────────────────────────────────────────────────────────

Note: You didn't use the -out option to save this plan, so Terraform can't guarantee to take exactly these actions if you run "terraform apply" now.
Confirm the plan slug, region, and OS image match what you intended before continuing. The (known after apply) values are dynamic; Terraform does not know them until the server actually gets created.
#Step 12: Provision the server
With the plan reviewed, you are ready to apply the configuration. Terraform creates the SSH key first, then uses its ID when creating the server. It determines this ordering automatically from the reference in the server resource block.
Run the following command:
terraform apply
Terraform prints the plan again and prompts you to confirm.
OutputDo you want to perform these actions?
  Terraform will perform the actions described above.
  Only 'yes' will be accepted to approve.

  Enter a value:
Type yes and press Enter.
Terraform provisions the SSH key immediately, then sends the server creation request to Cherry Servers. Bare-metal provisioning takes several minutes because the hardware is physically allocated and the OS is installed via network boot. Expect 10 to 15 minutes, depending on the plan and region. Terraform holds the connection open and waits.
When provisioning completes, Terraform displays your outputs:
OutputApply complete! Resources: 2 added, 0 changed, 0 destroyed.

Outputs:

server_id = "xxxxxx"
server_ip = "188.214.xxx.x"
ssh_connection = "ssh root@188.214.xxx.x"
Copy the server_ip value. You will use it in the next step.
After a successful apply, you can inspect the full state of your infrastructure at any time by running:
terraform show
This prints a human-readable version of the state, including resource IDs, IP addresses, tags, and every attribute Terraform tracks. Never delete the state file manually. If you are working in a team, store the state in a remote backend such as Terraform Cloud or an S3 bucket so everyone uses the same state.
Output# cherryservers_server.bare_metal:
resource "cherryservers_server" "bare_metal" {
    allow_reinstall = false
    hostname        = "bare-metal-01"
    id              = "xxxxxx"
    image           = "ubuntu_24_04_64bit"
    ip_addresses    = [
        {
            address        = "10.x.x.x"
            address_family = 4
            cidr           = "10.x.x.0/24"
            id             = "xxxxxxxx-xxxx-xxxx-xxxx-xxxxxxxxxxxx"
            type           = "private-ip"
        },
        {
            address        = "188.214.xxx.x"
            address_family = 4
            cidr           = "188.214.132.0/25"
            id             = "2de03464-a2d3-d7c9-8bab-badf10529bc2"
            type           = "primary-ip"
        },
    ]
    name            = "E5-1620v4"
    plan            = "e5-1620v4"
    power_state     = "on"
    pricing         = {
        currency = "USD"
        price    = 0.23000000417232513
    }
    project_id      = xxxxxx
    region          = "LT-Siauliai"
    spot_instance   = false
    ssh_key_ids     = [
        "xxxxx",
    ]
    state           = "active"
    tags            = {
        "Environment" = "development"
        "ManagedBy"   = "terraform"
    }
}


# cherryservers_ssh_key.my_key:
resource "cherryservers_ssh_key" "my_key" {
    created     = "2026-05-27T10:21:34+03:00"
    fingerprint = "xx:xx:xx:xx:xx:xx:xx:xx:xx:xx:xx:xx:xx:xx:xx:xx"
    id          = "xxxxx"
    name        = "terraform-key"
    public_key  = <<-EOT
        ssh-ed25519 AAAAC3NzaC1lZDI1NTE5AAAAIxxxxxxxxxxxxxxxxxxxxxxxxxxxxxxxxxxxxxxxxx
    EOT
    updated     = "2026-05-27T10:21:34+03:00"
}


Outputs:

server_id = "xxxxxx"
server_ip = "188.214.xxx.x"
ssh_connection = "ssh root@188.214.xxx.x"
#Step 13: Connect to the server
With the server running, connect to it using the SSH key you uploaded.
Run the following SSH command, replacing SERVER_IP with the value from your output:
ssh root@SERVER_IP -i ~/.ssh/id_ed25519
On Windows, use a forward-slash path:
ssh root@SERVER_IP -i C:/Users/YourUsername/.ssh/id_ed25519
The first time you connect, SSH will prompt you to confirm the server's fingerprint:
OutputThe authenticity of host '188.214.xxx.x (188.214.xxx.x)' can't be established.
ECDSA key fingerprint is SHA256:xxxxxxxxxxxxxxxxxxxxxxxxxxxxxxxxxxxxxxxxxxx.
Are you sure you want to continue connecting (yes/no/[fingerprint])?
Type yes and press Enter. SSH adds the server to your known_hosts file and will not prompt again for this IP.
Once connected, you will see the Ubuntu welcome screen and land at the root prompt:
Warning: Permanently added '188.214.xxx.x' (ECDSA) to the list of known hosts.
Welcome to Ubuntu 24.04.4 LTS (GNU/Linux 6.17.0-23-generic x86_64)

 * Documentation:  https://help.ubuntu.com
 * Management:     https://landscape.canonical.com
 * Support:        https://ubuntu.com/pro

 System information as of Wed May 27 07:51:08 AM UTC 2026

  System load:  0.02               Temperature:            33.5 C
  Usage of /:   4.8% of 228.04GB   Processes:              184
  Memory usage: 1%                 Users logged in:        0
  Swap usage:   0%                 IPv4 address for bond0: 188.214.xxx.x


Expanded Security Maintenance for Applications is not enabled.

44 updates can be applied immediately.
38 of these updates are standard security updates.
To see these additional updates run: apt list --upgradable

Enable ESM Apps to receive additional future security updates.
See https://ubuntu.com/esm or run: sudo pro status
Once connected, confirm you are on the right machine:
uname -a

hostname
OutputLinux bare-metal-01 6.17.0-23-generic #23~24.04.1-Ubuntu SMP PREEMPT_DYNAMIC Tue Apr 14 16:11:48 UTC 2 x86_64 x86_64 x86_64 GNU/Linux

bare-metal-01
Because you uploaded your SSH key during provisioning, no password is required. You are now logged in to a fresh bare metal server.
#Step 14: Update the server configuration
Terraform tracks your infrastructure in a state file. When you change your configuration and re-run apply, Terraform calculates only what changed and applies the difference. You do not need to reprovision the entire server for every change.
For example, to add a tag to identify the team that owns this server, update the tags block in main.tf:
tags = {
  Environment = "development"
  ManagedBy  = "terraform"
  Team        = "devops"
}
Run plan to see what changes:
terraform plan
Terraform shows only the tag change:
Outputcherryservers_ssh_key.my_key: Refreshing state... [id=xxxxx]
cherryservers_server.bare_metal: Refreshing state... [id=xxxxxx]

Terraform used the selected providers to generate the following execution plan. Resource actions are indicated with the following symbols:
  ~ update in-place

Terraform will perform the following actions:

  # cherryservers_server.bare_metal will be updated in-place
  ~ resource "cherryservers_server" "bare_metal" {
        id              = "xxxxxx"
        name            = "E5-1620v4"
      ~ pricing         = {
          ~ currency = "USD" -> (known after apply)
          ~ price    = 0.23000000417232513 -> (known after apply)
        } -> (known after apply)
      ~ tags            = {
            "Environment" = "development"
            "ManagedBy"   = "terraform"
          + "Team"        = "devops"
        }
        # (11 unchanged attributes hidden)
    }

Plan: 0 to add, 1 to change, 0 to destroy.

───────────────────────────────────────────────────────────────────────────────────────────────────────────────────────────────────────────────────────────────────────

Note: You didn't use the -out option to save this plan, so Terraform can't guarantee to take exactly these actions if you run "terraform apply" now.
Apply the change:
terraform apply
Only the tag updates. The server itself is not replaced.
OutputDo you want to perform these actions?
  Terraform will perform the actions described above.
  Only 'yes' will be accepted to approve.

  Enter a value: yes

cherryservers_server.bare_metal: Modifying... [id=xxxxxx]
cherryservers_server.bare_metal: Modifications complete after 6s [id=xxxxxx]

Apply complete! Resources: 0 added, 1 changed, 0 destroyed.

Outputs:

server_id = "xxxxxx"
server_ip = "188.214.xxx.x"
ssh_connection = "ssh root@188.214.xxx.x"
Tag updates are in-place changes. Terraform applies them without restarting or reprovisioning the server. Some changes do require server recreation, such as changing the plan, region, or image. Terraform flags these as destructive changes in the plan output. Always read the plan output carefully before confirming any destructive change.
#Step 15: Destroy the infrastructure
When you no longer need the server, run:
terraform destroy
Outputcherryservers_ssh_key.my_key: Refreshing state... [id=xxxxx]
cherryservers_server.bare_metal: Refreshing state... [id=xxxxxx]

Terraform used the selected providers to generate the following execution plan. Resource actions are indicated with the following symbols:
  - destroy

Terraform will perform the following actions:


  # cherryservers_server.bare_metal will be destroyed
  - resource "cherryservers_server" "bare_metal" {
      - allow_reinstall = false -> null
      - hostname        = "bare-metal-01" -> null
      - id              = "xxxxxx" -> null
      - image           = "ubuntu_24_04_64bit" -> null
      - ip_addresses    = [
          - {
              - address        = "10.x.x.x" -> null
              - address_family = 4 -> null
              - cidr           = "10.x.x.0/24" -> null
              - id             = "xxxxxxxx-xxxx-xxxx-xxxx-xxxxxxxxxxxx" -> null
              - type           = "private-ip" -> null
            },
          - {
              - address        = "188.214.xxx.x" -> null
              - address_family = 4 -> null
              - cidr           = "188.214.xxx.0/25" -> null
              - id             = "2de03464-a2d3-d7c9-8bab-badf10529bc2" -> null
              - type           = "primary-ip" -> null
            },
        ] -> null
      - name            = "E5-1620v4" -> null
      - plan            = "e5-1620v4" -> null
      - power_state     = "on" -> null
      - pricing         = {
          - currency = "USD" -> null
          - price    = 0.23000000417232513 -> null
        } -> null
      - project_id      = xxxxxx -> null
      - region          = "LT-Siauliai" -> null
      - spot_instance   = false -> null
      - ssh_key_ids     = [
          - "xxxxx",
        ] -> null
      - state           = "active" -> null
      - tags            = {
          - "Environment" = "development"
          - "ManagedBy"   = "terraform"
          - "team"        = "devops"
        } -> null
    }


  # cherryservers_ssh_key.my_key will be destroyed
  - resource "cherryservers_ssh_key" "my_key" {
      - created     = "2026-05-27T10:21:34+03:00" -> null
      - fingerprint = "xx:xx:xx:xx:xx:xx:xx:xx:xx:xx:xx:xx:xx:xx:xx:xx" -> null
      - id          = "xxxxx" -> null
      - name        = "terraform-key" -> null
      - public_key  = <<-EOT
            ssh-ed25519 AAAAC3NzaC1lZDI1NTE5AAAAIxxxxxxxxxxxxxxxxxxxxxxxxxxxxxxxxxxxxxxxxx
        EOT -> null
      - updated     = "2026-05-27T10:21:34+03:00" -> null
    }

Plan: 0 to add, 0 to change, 2 to destroy.

Changes to Outputs:
  - server_id      = "xxxxxx" -> null
  - server_ip      = "188.214.xxx.x" -> null
  - ssh_connection = "ssh root@188.214.xxx.x" -> null

Do you really want to destroy all resources?
  Terraform will destroy all your managed infrastructure, as shown above.
  There is no undo. Only 'yes' will be accepted to confirm.

  Enter a value:
Terraform lists every resource it will delete and prompts you to confirm:
OutputDo you really want to destroy all resources?
  Terraform will destroy all your managed infrastructure, as shown above.
  There is no undo. Only 'yes' will be accepted to confirm.

  Enter a value:
Type yes and press Enter. Terraform deprovisions the server, removes the SSH key from your account, and updates the state file to reflect that no resources exist. Cherry Servers stops billing you for the server.
Outputcherryservers_server.bare_metal: Destroying... [id=xxxxxx]
cherryservers_server.bare_metal: Destruction complete after 1s
cherryservers_ssh_key.my_key: Destroying... [id=xxxxx]
cherryservers_ssh_key.my_key: Destruction complete after 0s

Destroy complete! Resources: 2 destroyed.
This is particularly useful for short-lived environments such as staging or testing, where you provision a server, run your tests, and tear everything down.
#Step 16: Provision multiple servers
To provision several servers with the same configuration, add the count meta-argument to your server resource block. Terraform creates one instance of the resource for each count value.
Update the cherryservers_server resource block in main.tf as follows:
resource "cherryservers_server" "bare_metal" {
  count = 3

  project_id  = var.project_id
  region      = var.region
  plan        = var.plan
  image       = var.image
  hostname    = "bare-metal-0${count.index + 1}"

  ssh_key_ids = [cherryservers_ssh_key.my_key.id]

  tags = {
    Environment = "development"
    Index       = count.index
  }
}
Update outputs.tf to return the IP addresses of all servers:
output "server_ips" {
  description = "Primary IP addresses of all servers"
  value       = [for server in cherryservers_server.bare_metal : [for ip in server.ip_addresses : ip.address if ip.type == "primary-ip"][0]]
}
Run plan and apply:
terraform plan
terraform apply
The plan shows a clean 4 to add, 0 to change, 0 to destroy: three servers and one SSH key:
OutputTerraform used the selected providers to generate the following execution plan. Resource actions are indicated with the following symbols:
  + create

Terraform will perform the following actions:

  # cherryservers_server.bare_metal[0] will be created
  + resource "cherryservers_server" "bare_metal" {
      + allow_reinstall = false
      + hostname        = "bare-metal-01"
      + id              = (known after apply)
      + image           = "ubuntu_24_04_64bit"
      + ip_addresses    = (known after apply)
      + name            = (known after apply)
      + plan            = "e5-1620v4"
      + power_state     = (known after apply)
      + pricing         = (known after apply)
      + project_id      = xxxxxx
      + region          = "LT-Siauliai"
      + spot_instance   = false
      + ssh_key_ids     = [
          + (known after apply),
        ]
      + state           = (known after apply)
      + tags            = {
          + "Environment" = "development"
          + "Index"       = "0"
        }
    }

  # cherryservers_server.bare_metal[1] will be created
  + resource "cherryservers_server" "bare_metal" {
      + allow_reinstall = false
      + hostname        = "bare-metal-02"
      + id              = (known after apply)
      + image           = "ubuntu_24_04_64bit"
      + ip_addresses    = (known after apply)
      + name            = (known after apply)
      + plan            = "e5-1620v4"
      + power_state     = (known after apply)
      + pricing         = (known after apply)
      + project_id      = xxxxxx
      + region          = "LT-Siauliai"
      + spot_instance   = false
      + ssh_key_ids     = [
          + (known after apply),
        ]
      + state           = (known after apply)
      + tags            = {
          + "Environment" = "development"
          + "Index"       = "1"
        }
    }

  # cherryservers_server.bare_metal[2] will be created
  + resource "cherryservers_server" "bare_metal" {
      + allow_reinstall = false
      + hostname        = "bare-metal-03"
      + id              = (known after apply)
      + image           = "ubuntu_24_04_64bit"
      + ip_addresses    = (known after apply)
      + name            = (known after apply)
      + plan            = "e5-1620v4"
      + power_state     = (known after apply)
      + pricing         = (known after apply)
      + project_id      = xxxxxx
      + region          = "LT-Siauliai"
      + spot_instance   = false
      + ssh_key_ids     = [
          + (known after apply),
        ]
      + state           = (known after apply)
      + tags            = {
          + "Environment" = "development"
          + "Index"       = "2"
        }
    }

  # cherryservers_ssh_key.my_key will be created
  + resource "cherryservers_ssh_key" "my_key" {
      + created     = (known after apply)
      + fingerprint = (known after apply)
      + id          = (known after apply)
      + name        = "terraform-key"
      + public_key  = <<-EOT
            ssh-ed25519 AAAAC3NzaC1lZDI1NTE5AAAAIxxxxxxxxxxxxxxxxxxxxxxxxxxxxxxxxxxxxxxxxx
        EOT
      + updated     = (known after apply)
    }

Plan: 4 to add, 0 to change, 0 to destroy.

Changes to Outputs:
  + server_ips = [
      + (known after apply),
      + (known after apply),
      + (known after apply),
    ]

───────────────────────────────────────────────────────────────────────────────────────────────────────────────────────────────────────────────────────────────────────

Note: You didn't use the -out option to save this plan, so Terraform can't guarantee to take exactly these actions if you run "terraform apply" now.
After you apply, Terraform provisions all three servers in parallel. The apply output confirms all three completed:
Outputcherryservers_ssh_key.my_key: Creating...
cherryservers_ssh_key.my_key: Creation complete after 3s [id=xxxxx]
cherryservers_server.bare_metal[2]: Creating...
cherryservers_server.bare_metal[0]: Creating...
cherryservers_server.bare_metal[1]: Creating...
cherryservers_server.bare_metal[2]: Still creating... [00m10s elapsed]
........
cherryservers_server.bare_metal[2]: Still creating... [11m46s elapsed]
cherryservers_server.bare_metal[2]: Still creating... [11m56s elapsed]
cherryservers_server.bare_metal[2]: Still creating... [12m06s elapsed]
cherryservers_server.bare_metal[2]: Creation complete after 12m12s [id=xxxxxx]

Apply complete! Resources: 4 added, 0 changed, 0 destroyed.

Outputs:

server_ips = [
  "188.214.xxx.xx",
  "188.214.xxx.xx",
  "188.214.xxx.xx",
]
The output returns a list of all three primary IP addresses. count works the same way across all Terraform providers.
When you are done, destroy all three servers:
terraform destroy
Outputcherryservers_ssh_key.my_key: Refreshing state... [id=xxxxx]
cherryservers_server.bare_metal[0]: Refreshing state... [id=xxxxxx]
cherryservers_server.bare_metal[1]: Refreshing state... [id=xxxxxx]
cherryservers_server.bare_metal[2]: Refreshing state... [id=xxxxxx]

Terraform used the selected providers to generate the following execution plan. Resource actions are indicated with the following symbols:
  - destroy

Terraform will perform the following actions:

  # cherryservers_server.bare_metal[0] will be destroyed
  - resource "cherryservers_server" "bare_metal" {
      - hostname        = "bare-metal-01" -> null
      - id              = "xxxxxx" -> null
      - image           = "ubuntu_24_04_64bit" -> null
      - plan            = "e5-1620v4" -> null
      - project_id      = xxxxxx -> null
      - region          = "LT-Siauliai" -> null
      - state           = "active" -> null
      - tags            = {
          - "Environment" = "development"
          - "Index"       = "0"
        } -> null
        # (other attributes hidden)
    }

  # cherryservers_server.bare_metal[1] and bare_metal[2] will be destroyed
  # (same configuration as above with hostnames bare-metal-02 and bare-metal-03)

  # cherryservers_ssh_key.my_key will be destroyed
  - resource "cherryservers_ssh_key" "my_key" {
      - fingerprint = "xx:xx:xx:xx:xx:xx:xx:xx:xx:xx:xx:xx:xx:xx:xx:xx" -> null
      - id          = "xxxxx" -> null
      - name        = "terraform-key" -> null
        # (other attributes hidden)
    }

Plan: 0 to add, 0 to change, 4 to destroy.

Changes to Outputs:
  - server_ips = [
      - "188.214.xxx.xx",
      - "188.214.xxx.xx",
      - "188.214.xxx.xx",
    ] -> null

Do you really want to destroy all resources?
  Terraform will destroy all your managed infrastructure, as shown above.
  There is no undo. Only 'yes' will be accepted to confirm.

  Enter a value:
Outputcherryservers_server.bare_metal[1]: Destroying... [id=xxxxxx]
cherryservers_server.bare_metal[0]: Destroying... [id=xxxxxx]
cherryservers_server.bare_metal[2]: Destroying... [id=xxxxxx]
cherryservers_server.bare_metal[2]: Destruction complete after 1s
cherryservers_server.bare_metal[1]: Destruction complete after 1s
cherryservers_server.bare_metal[0]: Destruction complete after 1s
cherryservers_ssh_key.my_key: Destroying... [id=xxxxx]
cherryservers_ssh_key.my_key: Destruction complete after 1s

Destroy complete! Resources: 4 destroyed.
#Best Practices
-
Keep credentials out of code. Use environment variables (
CHERRY_AUTH_TOKEN) or a secrets manager. Never hardcode API tokens or private keys in.tffiles. -
Use a remote backend for team environments. The local
terraform.tfstatefile works fine when you are the only one managing infrastructure. For teams, configure a remote backend so everyone reads and writes the same state. -
Pin provider versions. The
version = "~> 1.0"constraint in your provider block prevents unexpected behavior when the provider releases breaking changes. -
Run
terraform planbefore everyapply. It costs nothing and prevents surprises. -
Tag your resources. Tags make it easy to identify what Terraform manages, which team owns a resource, and what environment it belongs to.
-
Commit your
.tffiles and.terraform.lock.hclto version control. Treat infrastructure code like application code: review it, test it, and track its history.
#Conclusion
In this tutorial, you learned how to provision bare metal servers with Terraform without touching a web portal. You set up a structured project, configured the Cherry Servers provider, uploaded an SSH key, provisioned a physical server, connected over SSH, and tore it all down with a single command.
The concepts carry over to any Terraform provider. The project structure, the init, plan, apply, and destroy workflow, variables, outputs, and cloud-init integration all work the same way whether you are deploying on Cherry Servers, AWS, Hetzner, or Equinix.
From here, you can extend this configuration with floating IPs, private networking, or remote state storage for team workflows. To combine Terraform with Ansible for post-provisioning configuration, see How to Use Ansible with Terraform. What bare metal workload are you planning to run with Terraform?
Also read:


