How to Set Up KVM Virtualization on Bare Metal


Managing multiple workloads on a single physical server without sacrificing performance can be a challenge. That is where KVM virtualization comes in. KVM (Kernel-based Virtual Machine) turns your bare metal server into a fully functional hypervisor, letting you run isolated virtual machines (VMs) directly on the hardware, without the overhead that comes with cloud-based virtualization.
In this tutorial, you will learn how to set up KVM virtualization on a bare metal server from scratch. By the end, you will have a working KVM environment with a running VM, configured networking, and performance tuning applied.
This demo uses Cherry Servers for the bare-metal server, but every step from the system update onward works identically on any bare-metal provider running Ubuntu.
#Prerequisites
This tutorial is a hands-on demonstration. To follow along, be sure you have the following:
-
A bare metal server running Ubuntu 22.04 or 24.04 LTS (64-bit). This must be a physical machine, not a VPS, with at least the following resources:
-
CPU: 64-bit processor with at least 4 cores
-
RAM: Minimum 4 GB (8 GB or more recommended)
-
Storage: At least 20 GB free disk space for the host OS and VMs
-
-
A CPU with hardware virtualization support (Intel VT-x or AMD-V), enabled in your server's BIOS/UEFI firmware. Most bare metal providers enable this by default. You will verify this in a later step.
-
Root or sudo access to the server, along with the server's IP address and root password. Your provider will send these in a confirmation email after the server is provisioned.
-
SSH access from your local machine.
-
A VNC client installed on your local machine, such as RealVNC viewer, TigerVNC, or Remmina. You will use this to access the VM's installer interface later in the tutorial.
#What Is KVM Virtualization?
Before commencing with the setup, it helps to understand what KVM is and how it works. KVM is a virtualization module built directly into the Linux kernel, first merged into the mainline kernel in 2007. When you enable KVM, Linux itself becomes the hypervisor. Each VM runs as a standard Linux process, with QEMU (Quick Emulator) providing the virtual hardware, network cards, disks, and so on, and the KVM module handling direct access to the physical CPU.
This design means there is no separate hypervisor layer sitting between your VMs and the hardware, which is why KVM delivers near bare-metal performance. Major cloud providers, including AWS and Google Cloud, run their virtual machines on KVM.
#KVM vs VMware, Hyper-V, and Proxmox
If you are evaluating hypervisors before committing to KVM, here is a quick comparison to help you decide.
KVM: KVM is open source, free, and built into the Linux kernel. It delivers excellent performance with no licensing costs. The trade-off is that it has no built-in GUI. You manage it through tools like virsh, virt-manager, or Cockpit. It is the best fit for Linux-focused teams who want full control without vendor lock-in.
VMware vSphere: VMware has long been the enterprise standard. It has a mature ecosystem, deep integration with backup and monitoring tools, and features like vMotion and vSAN. Since Broadcom's acquisition of VMware in 2024, the licensing model shifted from perpetual to subscription-based bundles, making it significantly more expensive. It remains a valid choice for large enterprises, but many teams are now re-evaluating it on cost grounds.
Microsoft Hyper-V: Hyper-V integrates tightly with Windows Server, Active Directory, and Azure. It works well in Windows-centric environments but struggles in mixed Linux or cloud-native setups. The free standalone Hyper-V Server was discontinued, so you now need a Windows Server license.
Proxmox VE: Proxmox VE is built on top of KVM and Debian Linux. It adds a web UI, LXC container support, clustering, and built-in backup, all for free. If you want KVM with a management interface and cluster tools out of the box, [Proxmox](http:// https://www.cherryservers.com/blog/how-to-install-proxmox-on-bare-metal) is worth evaluating. If you want a lean, fully scriptable stack, raw KVM with libvirt is the right choice.
#Why Run KVM on Bare Metal Instead of a VPS?
Running KVM on a VPS means running a hypervisor inside another hypervisor, which is called nested virtualization. Most VPS providers either disable this entirely or restrict it so heavily that the performance overhead makes it impractical for real workloads.
On a bare metal server, KVM runs directly on the physical hardware. This gives you:
-
Full, unrestricted access to CPU virtualization extensions (AMD-V or Intel VT-x).
-
Dedicated RAM, storage, and network bandwidth with no shared tenants.
-
The freedom to allocate as many vCPUs and as much RAM as the physical machine has.
-
No underlying hypervisor tax; your machine is the hypervisor.
Bare metal is the right choice for KVM when you need to run multiple production VMs, build a private cloud environment, or test infrastructure at scale.
#How to Set Up KVM Virtualization on Bare Metal
#Step 1: Provision your bare metal server
The first step is to get a bare metal server up and running with Ubuntu installed. Provision your server through your provider's portal, select Ubuntu 22.04 or 24.04 LTS as the operating system, and set a hostname.
On Cherry Servers, log in to portal.cherryservers.com, click Deploy new instance, select a dedicated server plan. Cherry Servers' dedicated server plans start at 32 GB RAM, which is more than enough for this tutorial and gives you plenty of headroom to run multiple VMs beyond the demo. Choose Ubuntu 22.04 or 24.04 LTS, set a hostname, and click Pay & Deploy. You'll receive your server details by email once provisioning completes in 15 to 30 minutes, and you should also see the details on the portal.
#Step 2: Connect to your server via SSH
With your server provisioned, the next step is to connect to it and set up a non-root user for day-to-day management. Running everything as root is not recommended.
Connect to your server using the IP address and root password from your provider's dashboard or confirmation email:
ssh root@SERVER_IP
Replace SERVER_IP with your server's actual IP address. On first login, type yes to accept the host key fingerprint.
OutputThe authenticity of host '5.199.172.29 (5.199.172.29)' can't be established.
ECDSA key fingerprint is SHA256:VYMHB80SC5HZ/ClL43wvtjSbhlcy+h/jnpMHhHOS5Xc.
Are you sure you want to continue connecting (yes/no/[fingerprint])? yes
Warning: Permanently added '5.199.172.29' (ECDSA) to the list of known hosts.
root@5.199.172.29's password:
Welcome to Ubuntu 24.04.3 LTS (GNU/Linux 6.14.0-37-generic x86_64)

 * Documentation:  https://help.ubuntu.com
 * Management:     https://landscape.canonical.com
 * Support:        https://ubuntu.com/pro

 System information as of Mon May  4 09:27:06 AM UTC 2026

  System load:  1.18               Temperature:            43.0 C
  Usage of /:   4.7% of 233.07GB   Processes:              265
  Memory usage: 2%                 Users logged in:        0
  Swap usage:   0%                 IPv4 address for bond0: 5.199.172.29


Expanded Security Maintenance for Applications is not enabled.

157 updates can be applied immediately.
104 of these updates are standard security updates.
To see these additional updates run: apt list --upgradable

Enable ESM Apps to receive additional future security updates.
See https://ubuntu.com/esm or run: sudo pro status
#Step 3: Create a non-root sudo user
If your provider logs you in as root, create a dedicated user with sudo privileges before proceeding. If your provider already gives you a non-root sudo user (many providers default to a user named ubuntu), skip this step.
Create a new user (replace user with your preferred username):
adduser user
You will be prompted to set a password and fill in optional details. Press Enter to skip the details.
Outputinfo: Adding user `demo-user' ...
info: Selecting UID/GID from range 1000 to 59999 ...
info: Adding new group `demo-user' (1001) ...
info: Adding new user `demo-user' (1001) with group `demo-user (1001)' ...
info: Creating home directory `/home/demo-user' ...
info: Copying files from `/etc/skel' ...
New password:
Retype new password:
passwd: password updated successfully
Changing the user information for demo-user
Enter the new value, or press ENTER for the default
        Full Name []:
        Room Number []:
        Work Phone []:
        Home Phone []:
        Other []:
Is the information correct? [Y/n] Y
info: Adding new user `demo-user' to supplemental / extra groups `users' ...
info: Adding user `demo-user' to group `users' ...
Add the user to the sudo group:
usermod -aG sudo user
Open a new terminal and test the new user login:
ssh user@SERVER_IP
Enter the password you set for the new user when prompted.
All subsequent steps in this tutorial assume you are logged in as this non-root sudo user.
#Step 4: Update the system
Before installing anything, update the package list and all installed packages to ensure you are working with the latest versions.
Run the following command to update and upgrade all packages:
sudo apt update && sudo apt upgrade -y
Outputoutput
Hit:1 http://repo.cherryservers.com/ubuntu noble InRelease
Hit:2 http://repo.cherryservers.com/ubuntu noble-updates InRelease
Hit:3 http://repo.cherryservers.com/ubuntu noble-backports InRelease
Hit:4 http://repo.cherryservers.com/ubuntu noble-security InRelease
Reading package lists... Done
Building dependency tree... Done
Reading state information... Done
150 packages can be upgraded. Run 'apt list --upgradable' to see them.
Reading package lists... Done
Building dependency tree... Done
Reading state information... Done
Calculating upgrade... Done
The following package was automatically installed and is no longer required:
  grub-pc-bin
Use 'sudo apt autoremove' to remove it.
The following NEW packages will be installed:
  linux-headers-6.8.0-111 linux-headers-6.8.0-111-generic linux-image-6.8.0-111-generic linux-modules-6.8.0-111-generic linux-modules-extra-6.8.0-111-generic
  linux-tools-6.8.0-111 linux-tools-6.8.0-111-generic
The following packages will be upgraded:
  apparmor base-files bind9-dnsutils bind9-host bind9-libs bsdextrautils bsdutils cloud-init coreutils curl eject fdisk fwupd gcc-14-base gir1.2-glib-2.0
  gir1.2-packagekitglib-1.0 inetutils-telnet initramfs-tools
...
With the system up to date, you are ready to verify that your CPU supports hardware virtualization before installing KVM.
#Step 5: Verify CPU virtualization support
KVM requires hardware virtualization extensions on your CPU (Intel VT-x or AMD-V). Before installing anything, confirm these extensions are present and active on your server.
Run the following command to check for virtualization support:
grep -Eoc '(vmx|svm)' /proc/cpuinfo
Any number greater than 0 means your CPU supports hardware virtualization.
Output32
For a more descriptive output, run:
lscpu | grep Virtualization
OutputVirtualization: VT-x
If both commands return no output, hardware virtualization is disabled in your server's BIOS/UEFI. Use your provider's IPMI or remote console access to enable Intel VT-x or AMD-V in the firmware settings, then reboot and repeat this step.
#Step 6: Install KVM and supporting packages
Now that your system is up to date and CPU virtualization is confirmed, install KVM along with the tools you will need to create and manage virtual machines.
Install all required packages in one command:
sudo apt install -y qemu-kvm libvirt-daemon-system libvirt-clients bridge-utils virt-manager virtinst cpu-checker
-
qemu-kvm: The QEMU emulator provides virtual hardware (disks, NICs) for each VM and works alongside the KVM kernel module. -
libvirt-daemon-system: The libvirt daemon manages VM lifecycle, networking, and storage on the host. -
libvirt-clients: Command-line tools, includingvirsh, the primary interface for managing VMs. -
bridge-utils: Tools for creating network bridges so VMs can communicate with the outside world. -
virt-manager: A graphical VM manager, useful when you connect to the server with X11 forwarding. -
virtinst: Providesvirt-install, the command-line tool for creating VMs. -
cpu-checker: Provides thekvm-okdiagnostic command for verifying KVM is functional.
OutputReading package lists... Done
Building dependency tree... Done
Note, selecting 'qemu-system-x86' instead of 'qemu-kvm'
The following NEW packages will be installed:
  bridge-utils cpu-checker qemu-system-x86 qemu-utils qemu-system-common
  qemu-system-data libvirt-daemon libvirt-daemon-system libvirt-clients
  libvirt0 virt-manager virt-viewer virtinst ovmf seabios swtpm ...
0 upgraded, 245 newly installed, 0 to remove and 0 not upgraded.
#Step 7: Verify KVM is functional
With the packages installed, verify KVM is fully functional. Run kvm-ok to confirm the KVM kernel module is loaded, and the /dev/kvm device is accessible:
kvm-ok
You should see:
OutputINFO: /dev/kvm exists
KVM acceleration can be used
Also, verify the KVM kernel module is loaded correctly:
lsmod | grep kvm
Outputkvm_intel             487424  0
kvm                  1425408  1 kvm_intel
irqbypass              12288  1 kvm
If the modules are not loaded, load them manually and persist them so they load on every boot:
# For AMD
sudo modprobe kvm_amd
echo 'kvm_amd' | sudo tee /etc/modules-load.d/kvm.conf

# For Intel
sudo modprobe kvm_intel
echo 'kvm_intel' | sudo tee /etc/modules-load.d/kvm.conf
With KVM installed and verified, the next step is to give your user the permissions needed to manage VMs without sudo.
#Step 8: Add your user to the libvirt and kvm groups
By default, managing VMs with virsh requires sudo. Adding your user to the libvirt and kvm groups gives you VM management access without needing to prefix every command with sudo.
Add your user to both groups:
sudo usermod -aG libvirt $USER
sudo usermod -aG kvm $USER
Log out and back in for the group changes to take effect:
exit
ssh user@server_ip
Verify both groups appear in your session:
groups $USER
You should see libvirt and kvm in the output alongside your other groups.
Outputdemo-user : demo-user sudo users kvm libvirt
#Step 9: Start and enable the libvirt daemon
The libvirt daemon (libvirtd) is the service that manages your VMs, networks, and storage pools. You need it running before you can create or control any VMs.
Start and enable the libvirt daemon to start automatically every time the server boots:
sudo systemctl start libvirtd
sudo systemctl enable libvirtd
Confirm the service is running:
sudo systemctl status libvirtd
Look for Active: active (running) in the output. Press q to exit.
Output● libvirtd.service - libvirt legacy monolithic daemon
     Loaded: loaded (/usr/lib/systemd/system/libvirtd.service; enabled; preset: enabled)
     Active: active (running) since Mon 2026-05-04 10:11:17 UTC; 39s ago
TriggeredBy: ● libvirtd.socket
             ● libvirtd-ro.socket
             ● libvirtd-admin.socket
       Docs: man:libvirtd(8)
             https://libvirt.org/
   Main PID: 31533 (libvirtd)
      Tasks: 22 (limit: 32768)
     Memory: 9.6M (peak: 12.2M)
        CPU: 467ms
     CGroup: /system.slice/libvirtd.service
             ├─31533 /usr/sbin/libvirtd --timeout 120
             ├─31645 /usr/sbin/dnsmasq --conf-file=/var/lib/libvirt/dnsmasq/default.conf --leasefile-ro --dhcp-script=/usr/lib/libvirt/libvirt_leaseshelper
             └─31646 /usr/sbin/dnsmasq --conf-file=/var/lib/libvirt/dnsmasq/default.conf --leasefile-ro --dhcp-script=/usr/lib/libvirt/libvirt_leaseshelper

May 04 10:11:17 kvm-host systemd[1]: Started libvirtd.service - libvirt legacy monolithic daemon.
May 04 10:11:17 kvm-host dnsmasq[31645]: started, version 2.90 cachesize 150
May 04 10:11:17 kvm-host dnsmasq[31645]: compile time options: IPv6 GNU-getopt DBus no-UBus i18n IDN2 DHCP DHCPv6 no-Lua TFTP conntrack ipset nftset auth cryptohash DN>
May 04 10:11:17 kvm-host dnsmasq-dhcp[31645]: DHCP, IP range 192.168.122.2 -- 192.168.122.254, lease time 1h
May 04 10:11:17 kvm-host dnsmasq-dhcp[31645]: DHCP, sockets bound exclusively to interface virbr0
May 04 10:11:17 kvm-host dnsmasq[31645]: reading /etc/resolv.conf
May 04 10:11:17 kvm-host dnsmasq[31645]: using nameserver 127.0.0.53#53
May 04 10:11:17 kvm-host dnsmasq[31645]: read /etc/hosts - 9 names
May 04 10:11:17 kvm-host dnsmasq[31645]: read /var/lib/libvirt/dnsmasq/default.addnhosts - 0 names
May 04 10:11:17 kvm-host dnsmasq-dhcp[31645]: read /var/lib/libvirt/dnsmasq/default.hostsfile
lines 1-27/27 (END)
Now confirm libvirt is accessible under your non-root user without sudo:
virsh list --all
Output Id   Name   State
--------------------
An empty list with no errors confirms that libvirt is working and your group membership from the previous step is active.
#Step 10: Verify the default storage pool
libvirt uses a default storage pool at /var/lib/libvirt/images/ to store VM disk images. Confirm it exists and is active:
virsh pool-list --all
Output Name   State   Autostart
---------------------------
If the default pool is missing or inactive, define and start it:
virsh pool-define-as default dir --target /var/lib/libvirt/images/
virsh pool-build default
virsh pool-start default
virsh pool-autostart default
Verify the pool is ready:
virsh pool-info default
OutputName:           default
UUID:           8e18e19e-e708-4842-b23f-96c67719dd4e
State:          running
Persistent:     yes
Autostart:      yes
Capacity:       233.07 GiB
Allocation:     12.19 GiB
Available:      220.88 GiB
virsh pool-list --all
OutputName      State    Autostart
-------------------------------
 default   active   yes
With the storage pool confirmed, move on to networking.
#Step 11: Configure networking for your VMs
By default, libvirt creates a default NAT network called default via the virbr0 bridge interface. VMs on this network can reach the internet through the host, but are not directly reachable from outside. This is fine for most demo and development setups.
Check that the default network is active:
virsh net-list --all
Output Name      State    Autostart   Persistent
--------------------------------------------
 default   active   yes         yes
If the default network is not active, start it and set it to autostart:
virsh net-start default
virsh net-autostart default
#Optional: Create a network bridge for public VM access
If you need your VMs to be directly reachable from the internet, for example if each VM needs its own public IP, you will need a network bridge instead of NAT.
First, find your server's main network interface:
ip link show
Output1: lo: <LOOPBACK,UP,LOWER_UP> mtu 65536 qdisc noqueue state UNKNOWN mode DEFAULT group default qlen 1000
    link/loopback 00:00:00:00:00:00 brd 00:00:00:00:00:00
2: eno1np0: <BROADCAST,MULTICAST,SLAVE,UP,LOWER_UP> mtu 1500 qdisc mq master bond0 state UP mode DEFAULT group default qlen 1000
    link/ether 3c:ec:ef:d0:4f:3c brd ff:ff:ff:ff:ff:ff
    altname enp81s0f0np0
3: eno2np1: <BROADCAST,MULTICAST,SLAVE,UP,LOWER_UP> mtu 1500 qdisc mq master bond0 state UP mode DEFAULT group default qlen 1000
    link/ether 3c:ec:ef:d0:4f:3c brd ff:ff:ff:ff:ff:ff permaddr 3c:ec:ef:d0:4f:3d
    altname enp81s0f1np1
4: bond0: <BROADCAST,MULTICAST,MASTER,UP,LOWER_UP> mtu 1500 qdisc noqueue state UP mode DEFAULT group default qlen 1000
    link/ether 3c:ec:ef:d0:4f:3c brd ff:ff:ff:ff:ff:ff
5: bond0.1924@bond0: <BROADCAST,MULTICAST,UP,LOWER_UP> mtu 1500 qdisc noqueue state UP mode DEFAULT group default qlen 1000
    link/ether 3c:ec:ef:d0:4f:3c brd ff:ff:ff:ff:ff:ff
6: virbr0: <NO-CARRIER,BROADCAST,MULTICAST,UP> mtu 1500 qdisc noqueue state DOWN mode DEFAULT group default qlen 1000
    link/ether 52:54:00:41:b7:51 brd ff:ff:ff:ff:ff:ff
Confirm which interface holds your server's IP:
ip addr
Output1: lo: <LOOPBACK,UP,LOWER_UP> mtu 65536 qdisc noqueue state UNKNOWN group default qlen 1000
    link/loopback 00:00:00:00:00:00 brd 00:00:00:00:00:00
    inet 127.0.0.1/8 scope host lo
       valid_lft forever preferred_lft forever
    inet6 ::1/128 scope host noprefixroute
       valid_lft forever preferred_lft forever
2: eno1np0: <BROADCAST,MULTICAST,SLAVE,UP,LOWER_UP> mtu 1500 qdisc mq master bond0 state UP group default qlen 1000
    link/ether 3c:ec:ef:d0:4f:3c brd ff:ff:ff:ff:ff:ff
    altname enp81s0f0np0
3: eno2np1: <BROADCAST,MULTICAST,SLAVE,UP,LOWER_UP> mtu 1500 qdisc mq master bond0 state UP group default qlen 1000
    link/ether 3c:ec:ef:d0:4f:3c brd ff:ff:ff:ff:ff:ff permaddr 3c:ec:ef:d0:4f:3d
    altname enp81s0f1np1
4: bond0: <BROADCAST,MULTICAST,MASTER,UP,LOWER_UP> mtu 1500 qdisc noqueue state UP group default qlen 1000
    link/ether 3c:ec:ef:d0:4f:3c brd ff:ff:ff:ff:ff:ff
    inet 5.199.172.29/25 brd 5.199.172.127 scope global bond0
       valid_lft forever preferred_lft forever
    inet6 fe80::3eec:efff:fed0:4f3c/64 scope link
       valid_lft forever preferred_lft forever
5: bond0.1924@bond0: <BROADCAST,MULTICAST,UP,LOWER_UP> mtu 1500 qdisc noqueue state UP group default qlen 1000
    link/ether 3c:ec:ef:d0:4f:3c brd ff:ff:ff:ff:ff:ff
    inet 10.188.100.45/24 brd 10.188.100.255 scope global bond0.1924
       valid_lft forever preferred_lft forever
    inet6 fe80::3eec:efff:fed0:4f3c/64 scope link
       valid_lft forever preferred_lft forever
6: virbr0: <NO-CARRIER,BROADCAST,MULTICAST,UP> mtu 1500 qdisc noqueue state DOWN group default qlen 1000
    link/ether 52:54:00:41:b7:51 brd ff:ff:ff:ff:ff:ff
    inet 192.168.122.1/24 brd 192.168.122.255 scope global virbr0
       valid_lft forever preferred_lft forever
Look at the output carefully. You will see one of two setups:
Single NIC: The public IP is assigned directly to a physical interface like enp3s0 or eno1. This is the simpler case.
Bonded interface: Two physical NICs (eno1np0, eno2np1) are bonded together into a logical interface like bond0, and the public IP is assigned to bond0. Some providers, including Cherry Servers, use this setup for redundancy and throughput. If you see SLAVE next to your physical NICs and a bond0 interface holding the public IP, you are on a bonded setup.
Option A: Single NIC Setup
This applies to servers where the public IP is assigned directly to a single physical interface.
Fix the Netplan file permissions before making any changes. Netplan requires config files to be readable only by root:
sudo chmod 600 /etc/netplan/*.yaml
Identify your Netplan configuration file:
ls /etc/netplan/
Edit whichever file configures your primary interface.
sudo nano /etc/netplan/config.yaml
Replace the file contents with the following, substituting your interface name for enp3s0:
network:
  version: 2
  ethernets:
    enp3s0:
      dhcp4: no
  bridges:
    br0:
      interfaces:
        - enp3s0
      dhcp4: true
Apply the configuration:
sudo netplan try
netplan try applies the config for 120 seconds and rolls back automatically if you do not confirm it, giving you a safety net if connectivity drops. Type yes to confirm if your SSH session stays alive.
Verify the bridge has an IP address:
ip addr show br0
Option B: Bonded Interface Setup (Cherry Servers and Similar Providers)
Cherry Servers' dedicated servers use a bonded interface (bond0) managed by a cloud-init-generated Netplan file (50-cloud-init.yaml), with the public IP statically assigned on bond0. Setting up a bridge means modifying that file directly to move the public IP from bond0 to br0, which sits on top of the bond.
Before proceeding: Open your provider's out-of-band management console (BMC/IPMI) and confirm you have access before touching any network config. netplan try does not support reverting bridge and bond custom parameters, so you will use netplan apply directly with no automatic rollback. If SSH drops, the BMC console is your only recovery path.
Back up the existing Netplan file before editing it:
sudo cp /etc/netplan/50-cloud-init.yaml /etc/netplan/50-cloud-init.yaml.bak
Fix permissions on all Netplan files:
sudo chmod 600 /etc/netplan/*.yaml
Edit 50-cloud-init.yaml directly:
sudo nano /etc/netplan/50-cloud-init.yaml
Replace the contents with the following. Substitute your actual values: NIC names, MAC addresses, public IP, prefix length, and gateway. All of these are visible in your original Netplan config file and in the ip addr output. For YOUR_DNS_1 and YOUR_DNS_2, use your provider’s nameservers (they are usually already listed in that same file under the nameservers block) or reliable public resolvers like 8.8.8.8 and 8.8.4.4 (Google) or 1.1.1.1 and 1.0.0.1 (Cloudflare):
network:
  version: 2
  ethernets:
    YOUR_NIC1_NAME:
      match:
        macaddress: "YOUR_NIC1_MAC"
      set-name: "enp1s0f0"
      mtu: 1500
    YOUR_NIC2_NAME:
      match:
        macaddress: "YOUR_NIC2_MAC"
      set-name: "YOUR_NIC2_NAME"
      mtu: 1500
  bonds:
    bond0:
      interfaces:
        - YOUR_NIC1_NAME
        - YOUR_NIC2_NAME
      macaddress: "YOUR_NIC1_MAC"
      mtu: 1500
      parameters:
        mode: "802.3ad"
        mii-monitor-interval: "100"
        up-delay: "0"
        down-delay: "0"
        lacp-rate: "slow"
        transmit-hash-policy: "layer3+4"
  bridges:
    br0:
      interfaces:
        - bond0
      addresses:
        - "YOUR_PUBLIC_IP/PREFIX"
      nameservers:
        addresses:
          - YOUR_DNS_1
          - YOUR_DNS_2
      routes:
        - to: default
          via: YOUR_GATEWAY_IP
      parameters:
        stp: false
        forward-delay: 0
      mtu: 1500
What this config does: bond0 becomes a plain bonded interface with no IP. br0 sits on top of it and takes ownership of the public IP, gateway, and nameservers. VMs attached to br0 will be on the same subnet as the host and reachable from the internet.
Fix permissions on the edited file:
sudo chmod 600 /etc/netplan/50-cloud-init.yaml
Apply the configuration:
sudo netplan apply
You may see a warning like:
Output['eno1np0', 'bond0', 'bond0.1924']
Cannot find unique matching interface for eno1np0
The NIC name in this warning will match the name of your first NIC as defined in your config. This is a cosmetic Netplan warning related to the match block when a NIC is already a bond member. It does not affect the outcome and can be safely ignored.
Verify the bridge has the public IP:
ip addr show br0
ip addr show bond0
ip route show
Output7: br0: <BROADCAST,MULTICAST,UP,LOWER_UP> mtu 1500 qdisc noqueue state UP group default qlen 1000
    link/ether 6e:23:0d:ee:dc:8e brd ff:ff:ff:ff:ff:ff
    inet 5.199.172.29/25 brd 5.199.172.127 scope global br0
       valid_lft forever preferred_lft forever
    inet6 fe80::6c23:dff:feee:dc8e/64 scope link
       valid_lft forever preferred_lft forever
Output4: bond0: <BROADCAST,MULTICAST,MASTER,UP,LOWER_UP> mtu 1500 qdisc noqueue master br0 state UP group default qlen 1000
    link/ether 3c:ec:ef:d0:4f:3c brd ff:ff:ff:ff:ff:ff
Outputdefault via 5.199.172.1 dev br0 proto static
5.199.172.0/25 dev br0 proto kernel scope link src 5.199.172.29
10.188.100.0/24 dev bond0.1924 proto kernel scope link src 10.188.100.45
192.168.122.0/24 dev virbr0 proto kernel scope link src 192.168.122.1 linkdown
Test connectivity from your local machine:
ping YOUR_PUBLIC_IP
OutputPinging 84.32.71.134 with 32 bytes of data:
Reply from 84.32.71.134: bytes=32 time=250ms TTL=46
Reply from 84.32.71.134: bytes=32 time=251ms TTL=46
Reply from 84.32.71.134: bytes=32 time=257ms TTL=46
Reply from 84.32.71.134: bytes=32 time=251ms TTL=46
Ping statistics for 84.32.71.134:
    Packets: Sent = 4, Received = 4, Lost = 0 (0% loss),
Approximate round trip times in milli-seconds:
    Minimum = 250ms, Maximum = 257ms, Average = 252ms
You should see replies with zero packet loss. Open a new terminal and confirm SSH still works before closing your existing session.
Once the bridge is confirmed working, use --network bridge=br0 instead of --network bridge=virbr0 when creating VMs that need public IP access.
#Step 12: Download a VM ISO
With storage and networking confirmed, the next step is to get the OS image you will install inside the VM. This tutorial uses Ubuntu Server 24.04 LTS. Note the emphasis on Server, not Desktop. The Desktop ISO ships with a full GNOME environment and weighs over 6 GB. Since you are accessing the VM over SSH on a headless server, none of that is useful. Ubuntu Server is lean, boots faster, and uses significantly less RAM inside the VM.
Before running the download command, check the current ISO filename at releases.ubuntu.com for your chosen Ubuntu version. Ubuntu ships point releases that update the filename, and an outdated URL returns a 404.
Option 1: Download directly on the server
sudo wget -P /var/lib/libvirt/images/ \
  https://releases.ubuntu.com/24.04/ubuntu-24.04.4-live-server-amd64.iso
Output--2026-05-04 12:56:35--  https://releases.ubuntu.com/24.04/ubuntu-24.04.4-live-server-amd64.iso
Resolving releases.ubuntu.com (releases.ubuntu.com)... 91.189.91.107, 185.125.190.40, 91.189.91.108, ...
Connecting to releases.ubuntu.com (releases.ubuntu.com)|91.189.91.107|:443... connected.
HTTP request sent, awaiting response... 200 OK
Length: 3405469696 (3.2G) [application/x-iso9660-image]
Saving to: ‘/var/lib/libvirt/images/ubuntu-24.04.4-live-server-amd64.iso’

ubuntu-24.04.4-live-server-amd64.iso      100%[=====================================================================================>]   3.17G  19.5MB/s    in 3m 52s

2026-05-04 13:00:29 (14.0 MB/s) - ‘/var/lib/libvirt/images/ubuntu-24.04.4-live-server-amd64.iso’ saved [3405469696/3405469696]
Option 2: Transfer from your local machine
If you already have the ISO on your local machine, transfer it to the server using scp. Run this from your local machine, not the server:
scp /path/to/ubuntu-24.04.4-live-server-amd64.iso user@server_ip:/var/lib/libvirt/images/
Once the ISO is in place, verify it:
sudo ls -lh /var/lib/libvirt/images/
Outputtotal 3.2G
-rw-r--r-- 1 root root 3.2G Feb 10 06:53 ubuntu-24.04.4-live-server-amd64.iso
With the ISO downloaded, you have everything you need to create your first VM.
#Step 13: Create a VM with KVM using virt-install
Now you will use virt-install to create a VM. This command pulls together all the resources you have set up: the storage pool, the network, and the ISO, and spins up a new virtual machine in one go.
Run the following command to create a VM named ubuntu-vm:
virt-install \
  --name ubuntu-vm \
  --ram 4096 \
  --vcpus 4 \
  --disk path=/var/lib/libvirt/images/ubuntu-vm.qcow2,size=40,bus=virtio \
  --os-variant ubuntu24.04 \
  --network bridge=virbr0,model=virtio \
  --graphics vnc,listen=0.0.0.0 \
  --console pty,target_type=serial \
  --cdrom /var/lib/libvirt/images/ubuntu-24.04.4-live-server-amd64.iso \
  --noautoconsole
-
--name ubuntu-vm: Sets the VM's name -
--ram 4096: Allocates 4 GB of RAM to the VM. -
--vcpus 4: Assigns 4 virtual CPUs. -
--disk path=...,size=40,bus=virtio: Creates a 40 GB QCOW2 disk using the virtio driver for best performance. -
--os-variant ubuntu24.04: Applies OS-specific optimizations. Runosinfo-query os | grep ubuntuto see all available variants -
--network bridge=virbr0,model=virtio: Attaches the VM to the default NAT network using the virtio driver. -
--graphics vnc,listen=0.0.0.0: Enables VNC access to the installer on all interfaces. -
--noautoconsole: Starts the VM without auto-attaching a console.
Verify the VM is running:
virsh list --all
Output Id   Name        State
---------------------------
 1    ubuntu-vm   running
The VM is running, but the OS installation is not complete yet. You will connect to it via VNC in the next step to finish the installation.
#Step 14: Connect via VNC to complete OS installation
The Ubuntu Server installer uses a text-based interface (TUI) navigable entirely by keyboard. Because you launched the VM with --graphics vnc, the installer's output is directed to a VNC display rather than a serial console. You will connect to it through a VNC client to complete the installation.
You could point a VNC client directly at your server's public IP and port, and it would work, but VNC traffic is unencrypted by default. On a bare metal server with a public IP, that means your keystrokes, including passwords you type during installation, travel over the network in plain text. Public IPs are also constantly scanned for open VNC ports. The safer approach is to tunnel VNC through SSH, which keeps all traffic inside an encrypted connection and exposes nothing on the public IP.
Find the VNC display port the VM is using:
virsh vncdisplay ubuntu-vm
The output will be :0 (port 5900) or :1 (port 5901):
Output:0
On your local machine, open an SSH tunnel to forward the VNC port. This binds the VNC port to 127.0.0.1 on your local machine so it never touches the public network:
ssh -L 5900:127.0.0.1:5900 user@server_ip -N
The -N flag keeps the tunnel open without opening a shell. The terminal will sit with no output, which is normal. Leave it open.
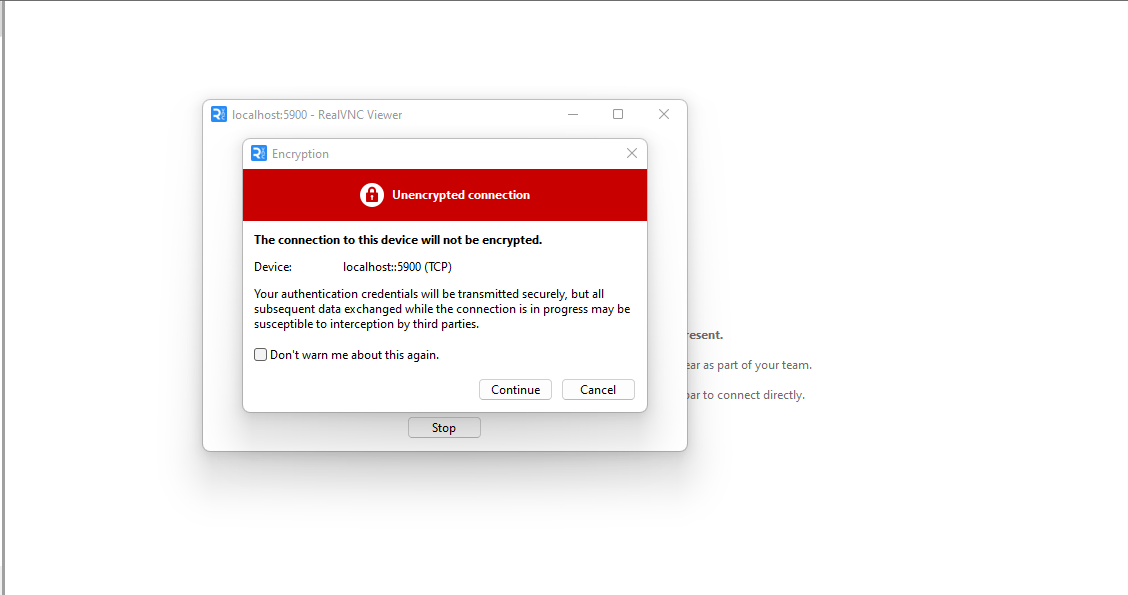
Open RealVNC Viewer, type localhost:5900 in the address bar, and press Enter.

RealVNC may warn that the connection is unencrypted. This is expected since the VNC protocol itself has no encryption, but the traffic is protected inside the SSH tunnel. Click Continue to proceed.
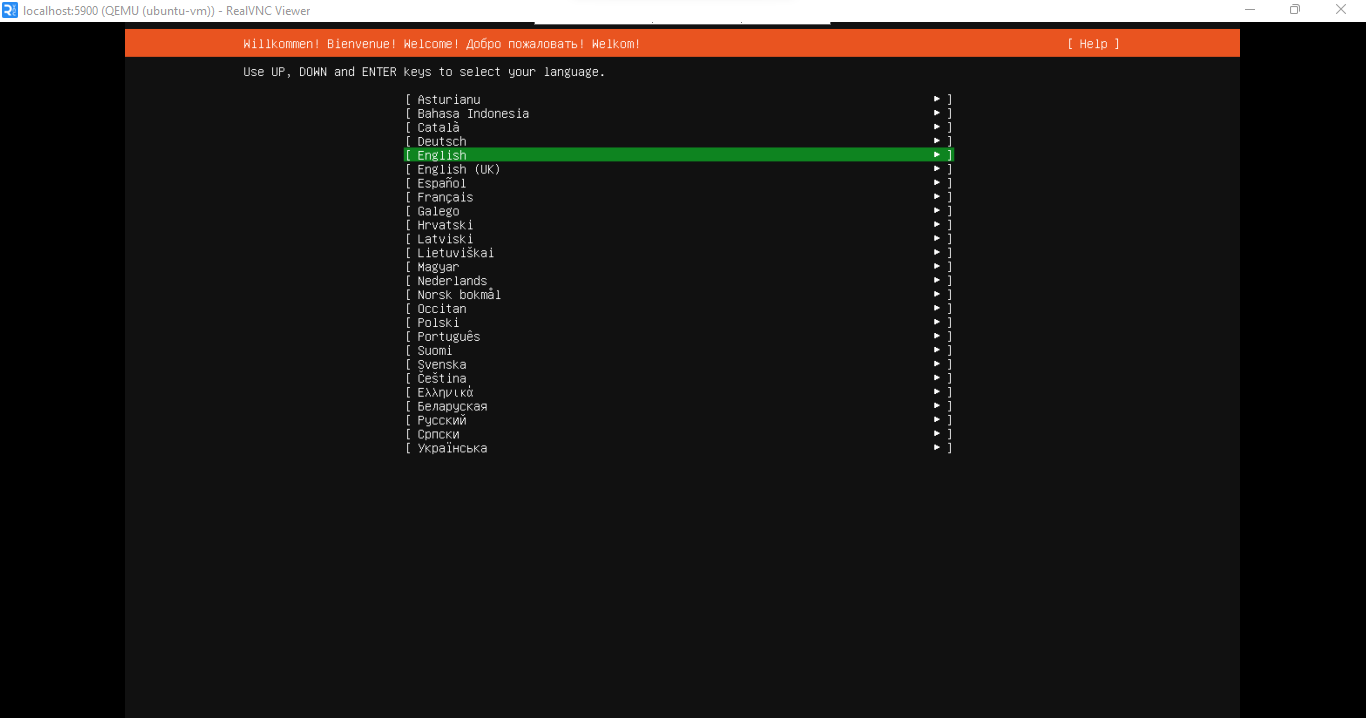
Work through the Ubuntu Server installer.
Select your preferred language and press Enter.
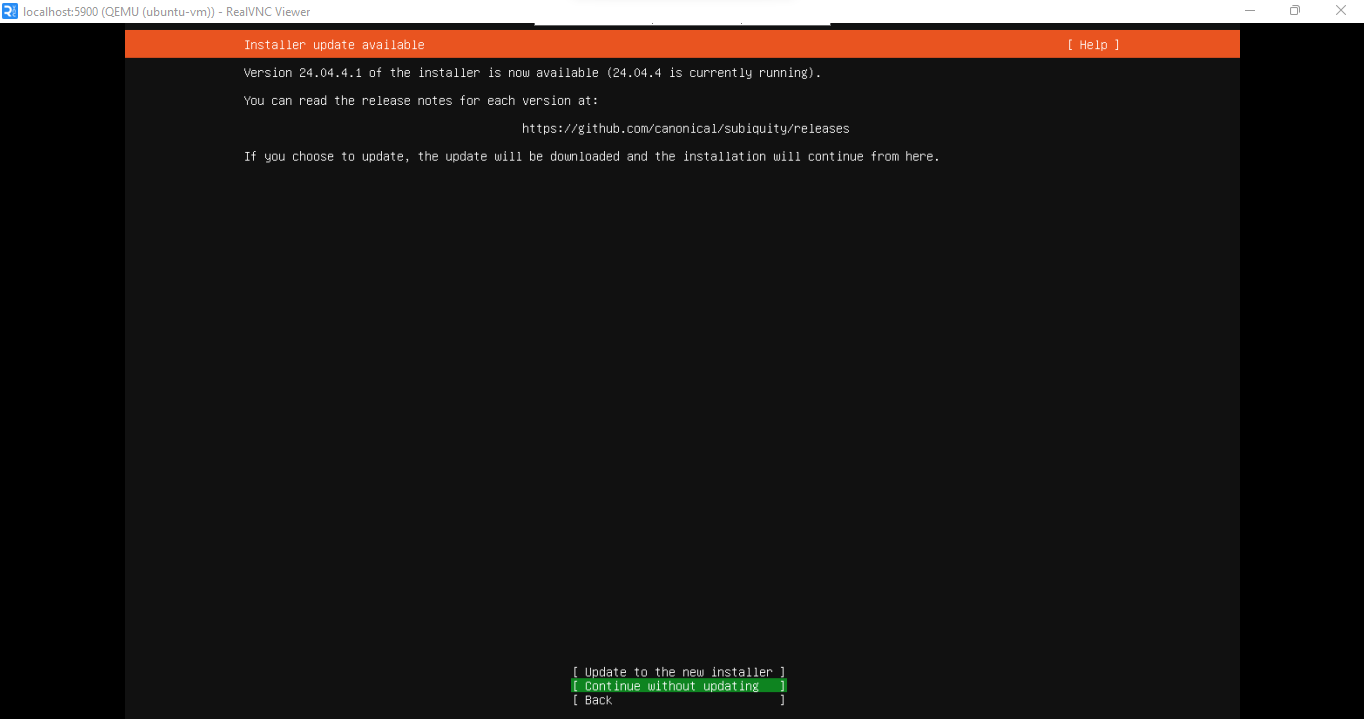
If a newer version of the installer is available, you will see the screen below. Select Continue without updating to save time.
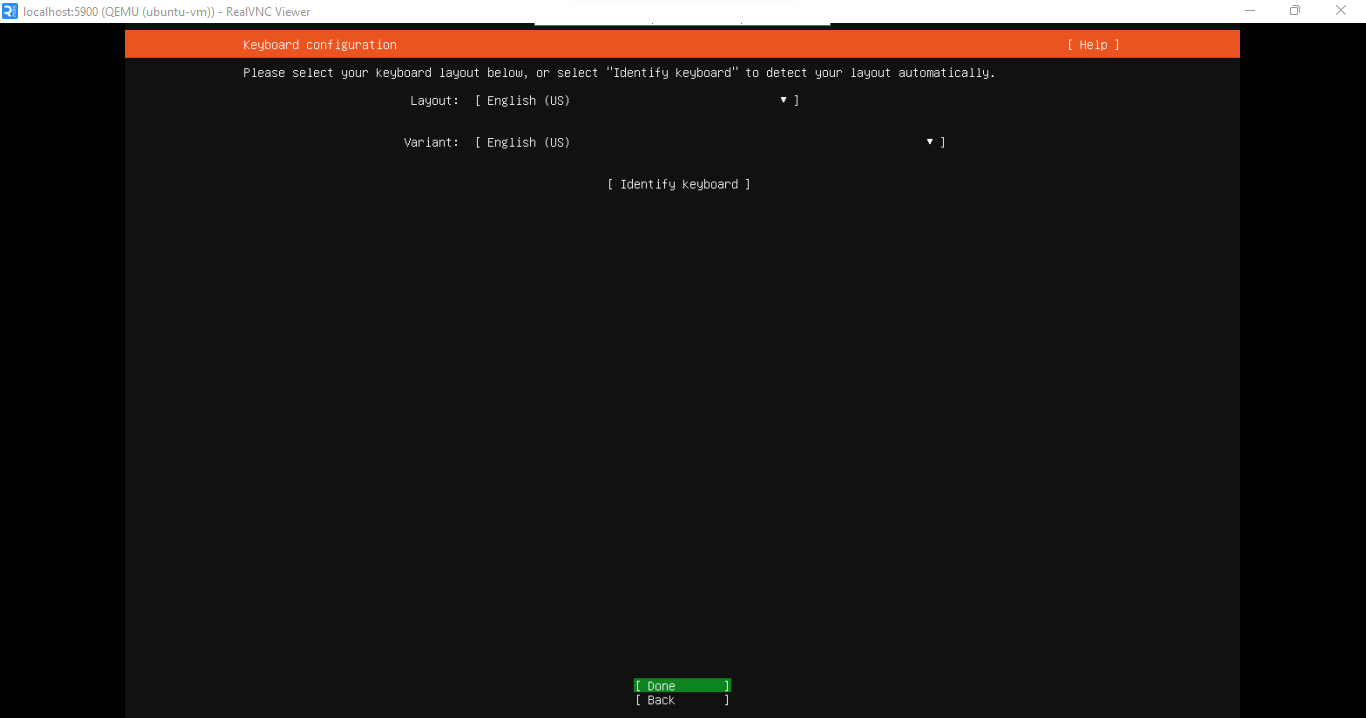
Next, select your keyboard layout and variant, then select Done.
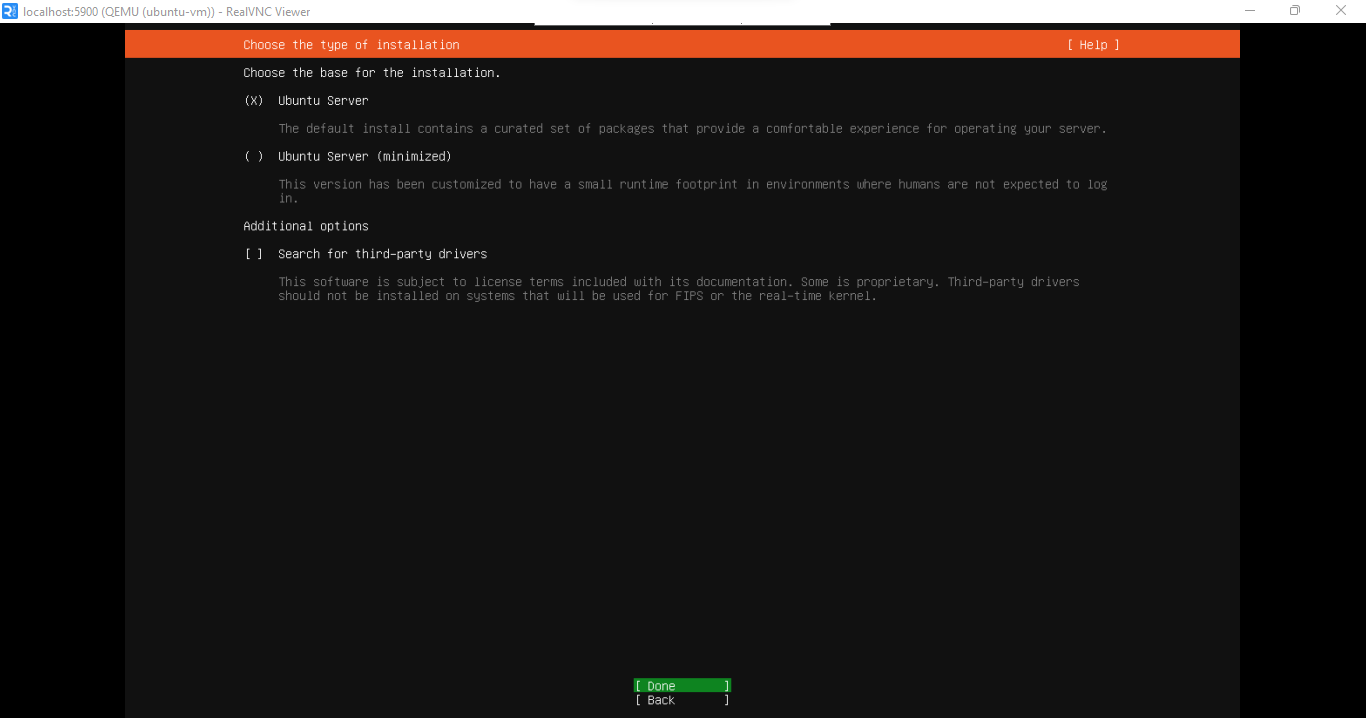
On the next screen, select Ubuntu Server (not minimized) and select Done.
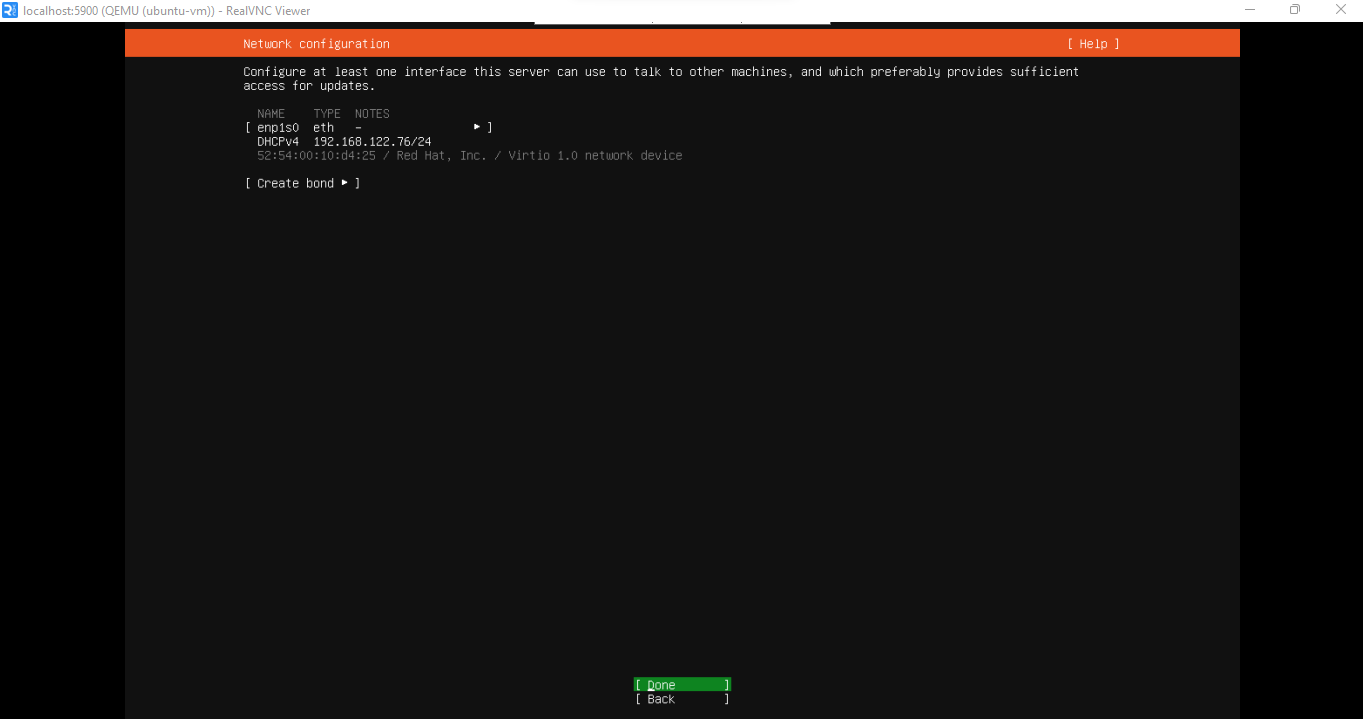
Next, confirm the virtio NIC (enp1s0) has a DHCPv4 address assigned, then select Done. The address shown (192.168.122.x) confirms the VM is connected to the libvirt NAT network.
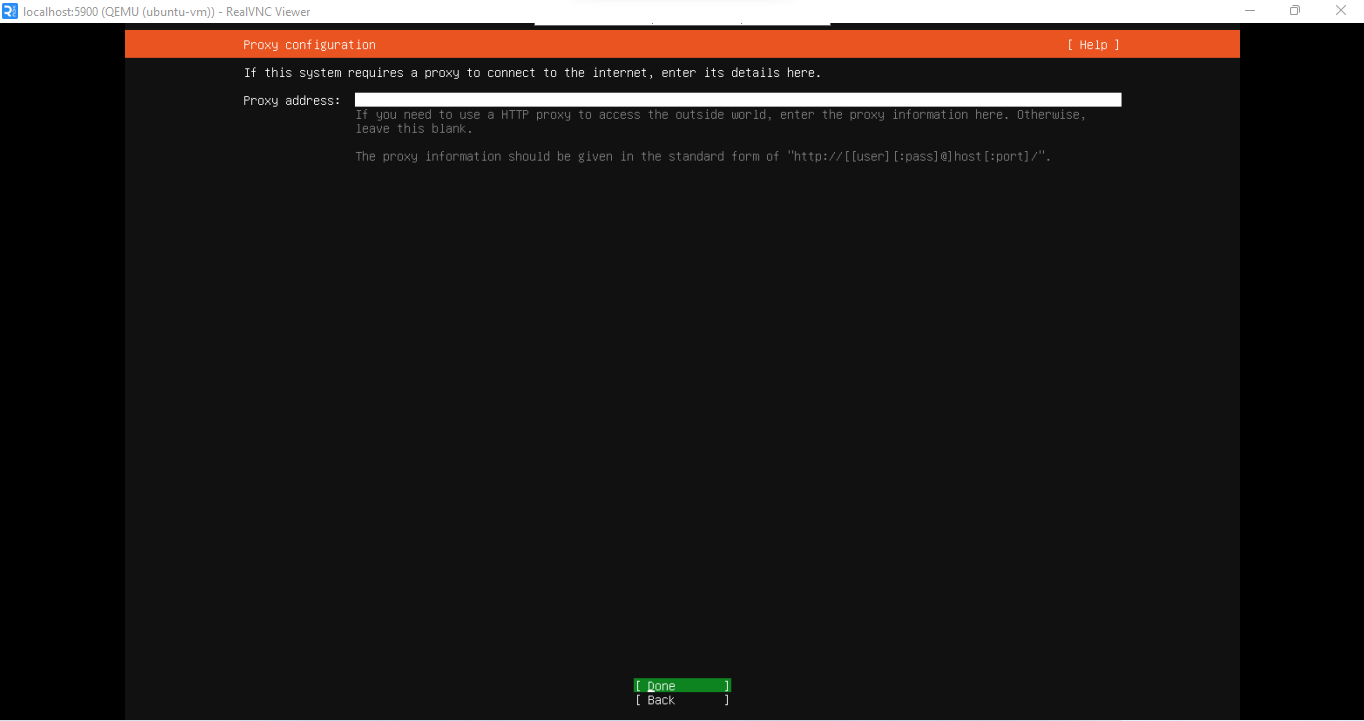
Leave this blank unless you have a proxy, then select Done.
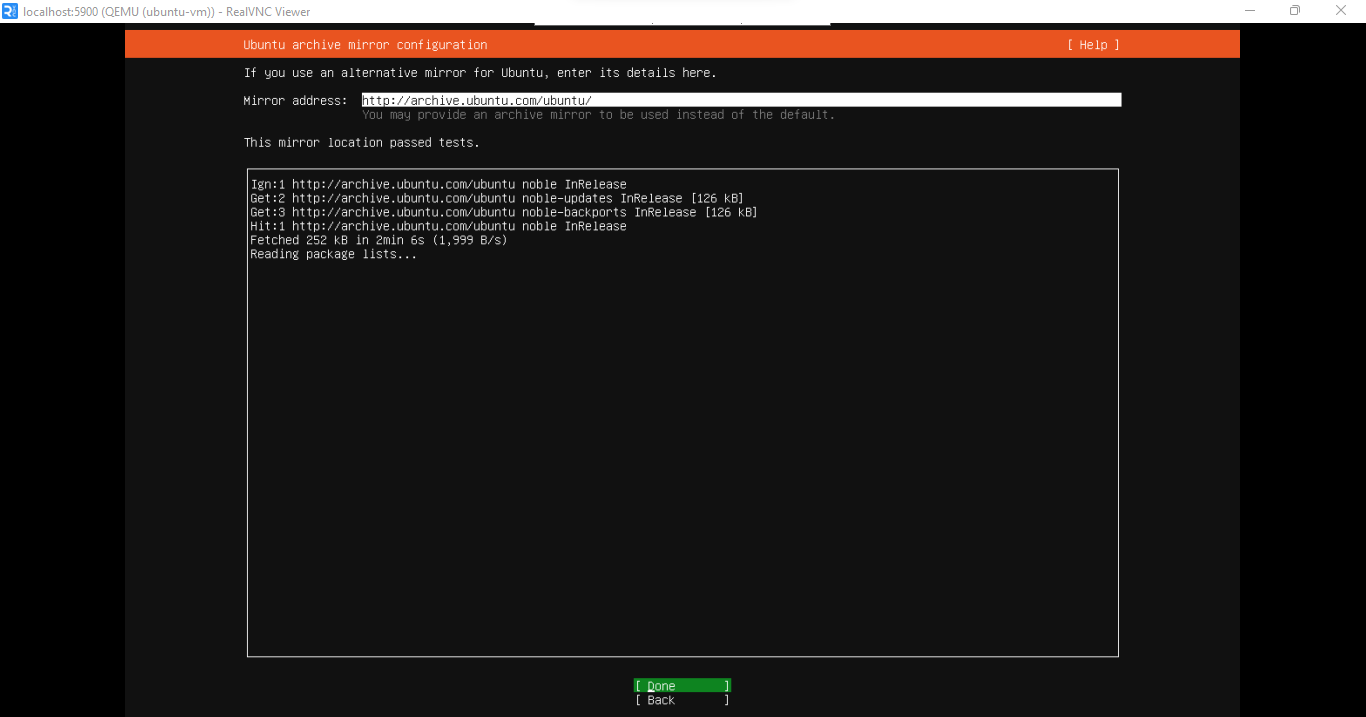
Next, leave the default Ubuntu archive mirror and wait for the mirror test to complete. Select Done once it shows the mirror passed.
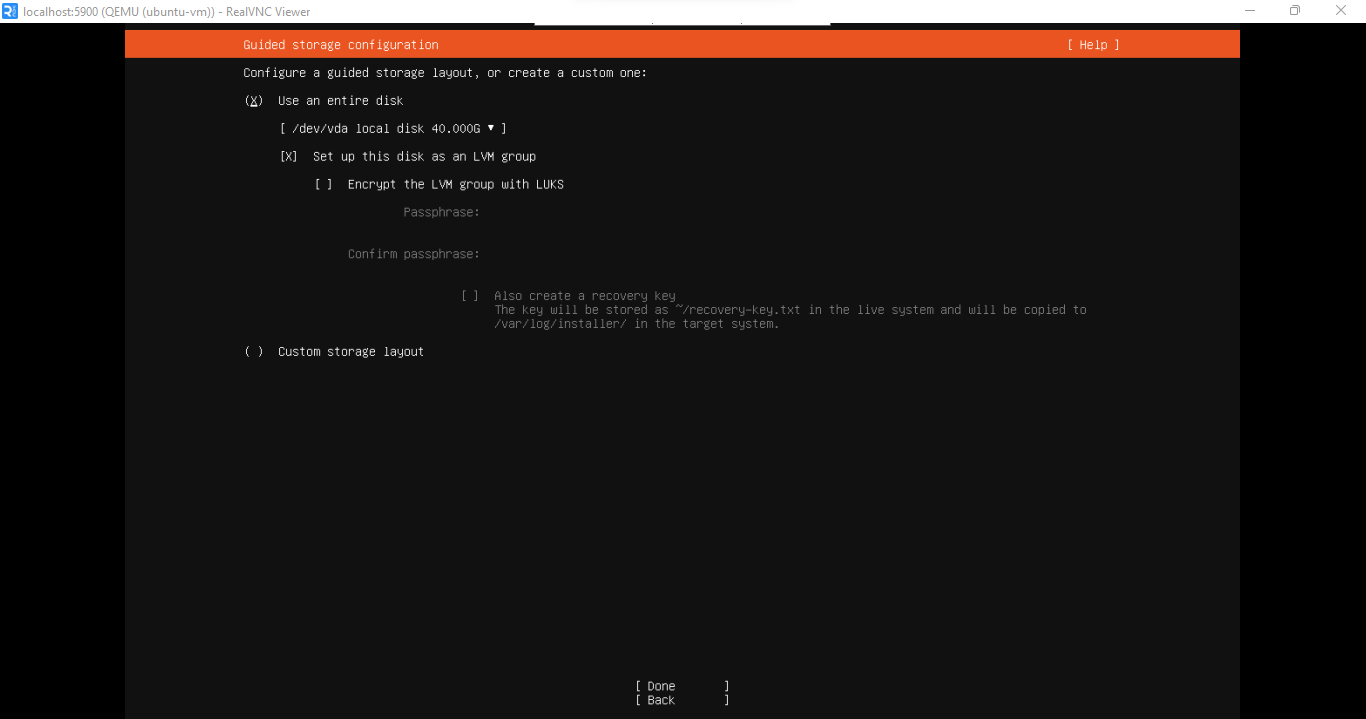
Next, for storage configuration, select Use an entire disk. Confirm /dev/vda is selected, and Set up this disk as an LVM group is checked. Leave encryption unchecked. Select Done.
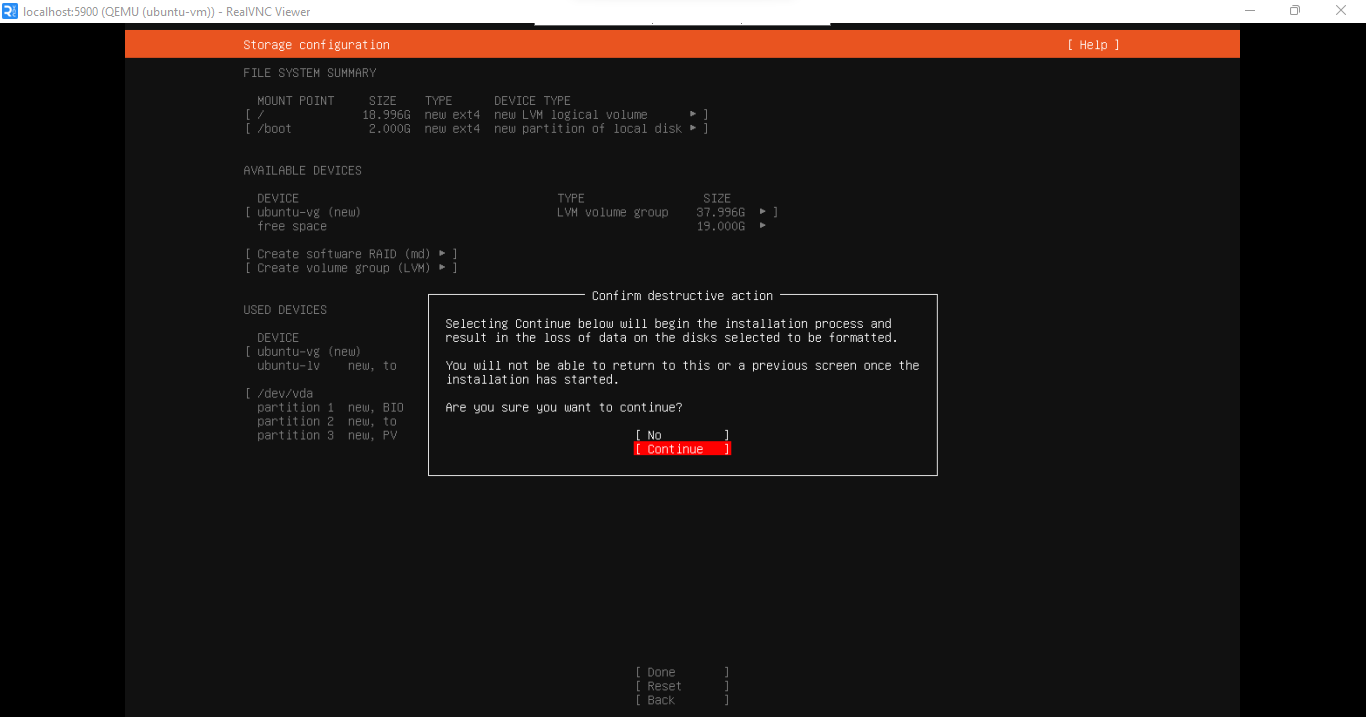
You will see a storage summary followed by a Confirm destructive action dialog. Review the layout and select Continue.
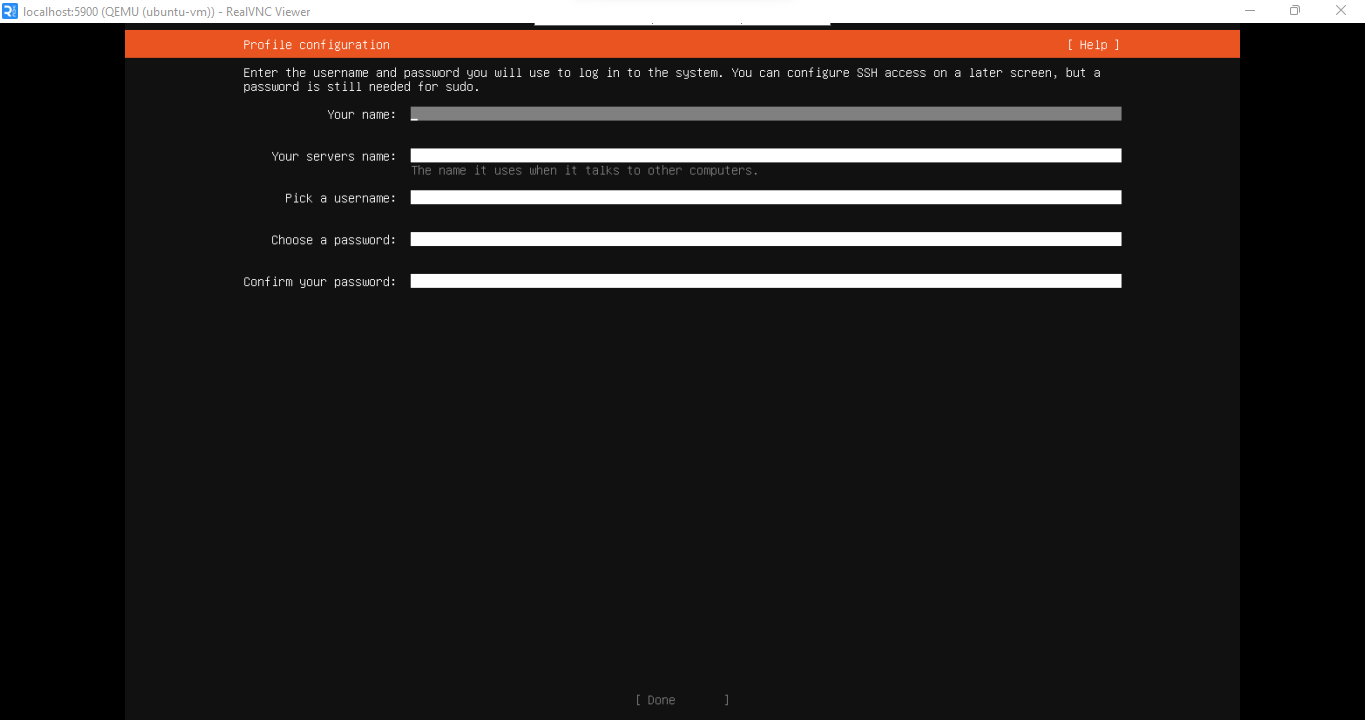
On the next screen, fill in your name, server name, username, and password. Remember these credentials; you will use them to SSH into the VM after installation.
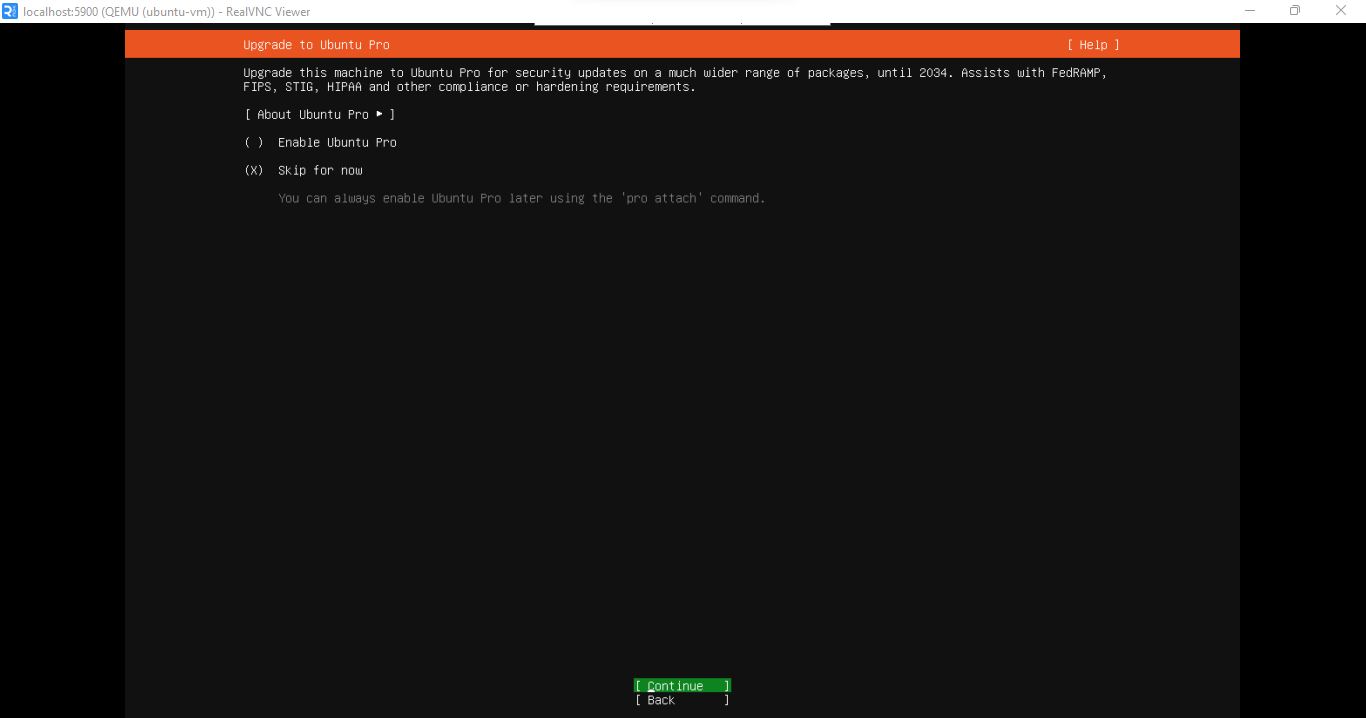
Next, for the option to upgrade to Ubuntu Pro, select Skip for now and select Continue.
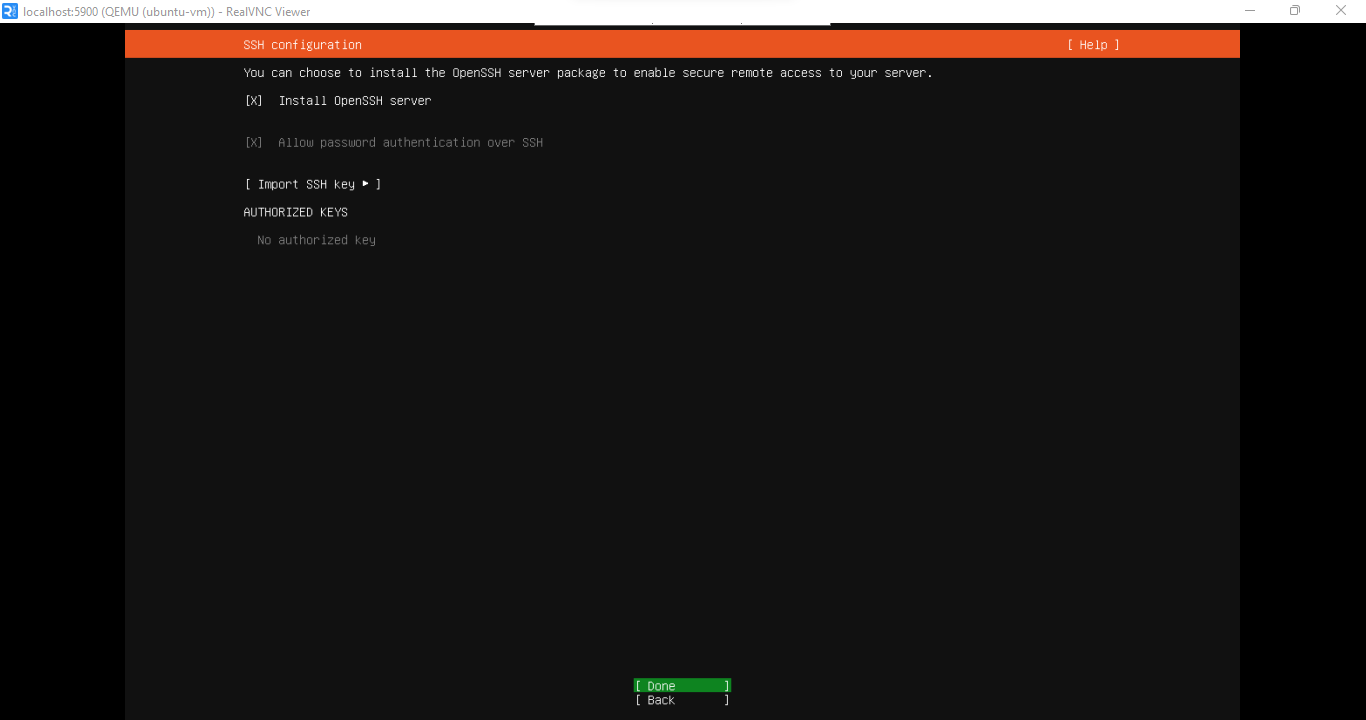
On the next screen, check the Install OpenSSH server option and confirm that Allow password authentication over SSH is enabled. This is how you will connect to the VM after installation. Select Done.
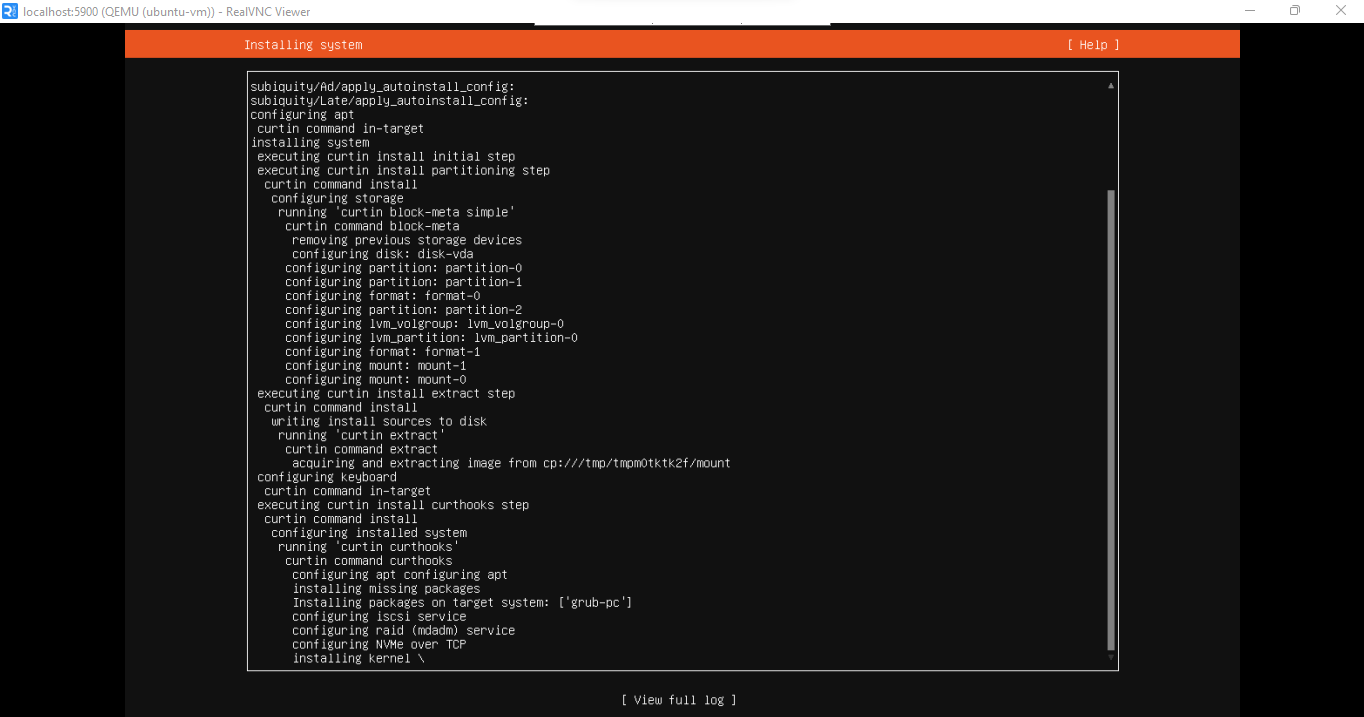
For the featured snaps screen, leave everything unchecked and select Done. The installer will now run. You will see the Installing system screen with a progress log.
When the installation finishes, the screen will display Installation complete! with a Reboot Now option. Select Reboot Now.
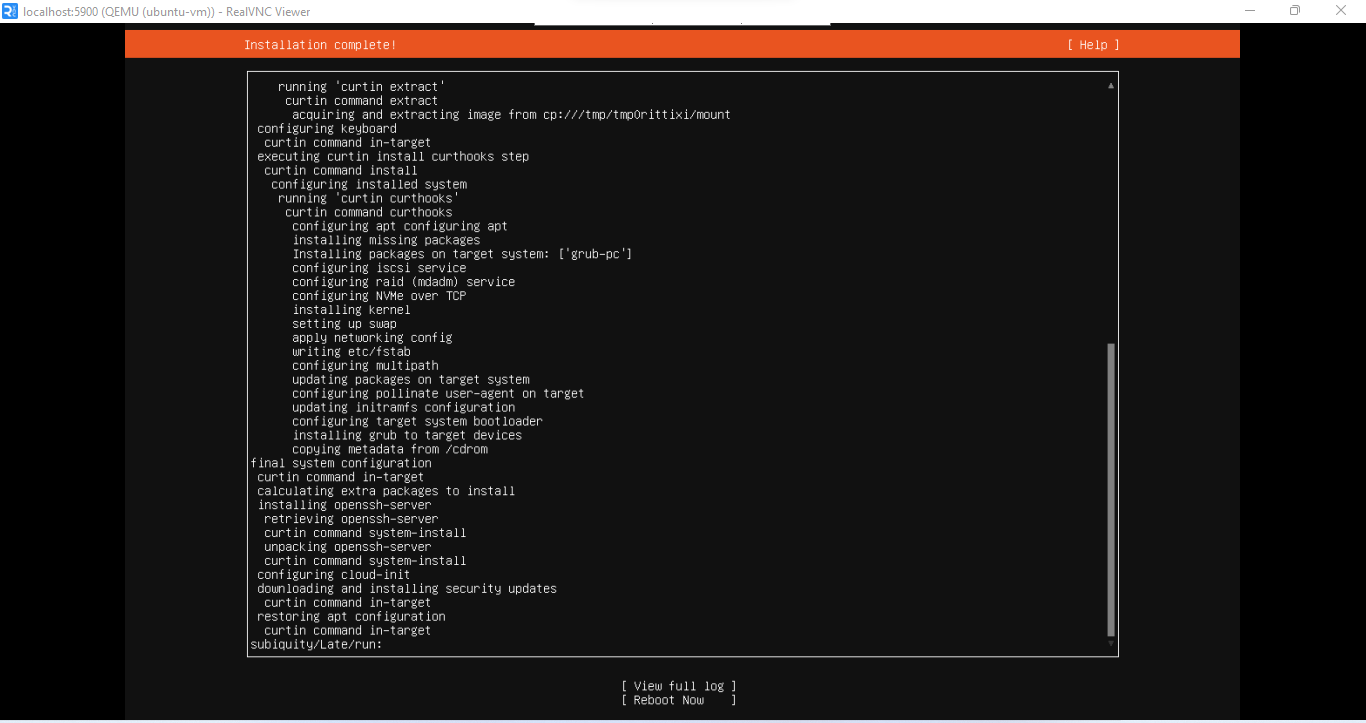
After the reboot, the VNC client will disconnect. This is normal, the VM is rebooting. A failed unmounting cdrom.mount message may also appear in the console. This is harmless.
The VM may show as shut off after the reboot completes. This is normal. You will start it manually with virsh start ubuntu-vm.
You can close the VNC client and the SSH tunnel terminal now. You will not need VNC again.
#Step 15: Connect to the VM via SSH
With the installation complete, connect to the VM directly from the host server.
Verify the VM is running:
virsh list --all
Output Id   Name        State
----------------------------
 -    ubuntu-vm   shut off
If it shows shut off, start it:
virsh start ubuntu-vm
Wait about 30 seconds for it to fully boot, then find the IP address the NAT network assigned to it:
virsh net-dhcp-leases default
Output Expiry Time           MAC address         Protocol   IP address          Hostname    Client ID or DUID
------------------------------------------------------------------------------------------------------------------------------------------------
 2026-05-04 19:52:34   52:54:00:10:d4:25   ipv4       192.168.122.76/24   ubuntu-vm   ff:56:50:4d:98:00:02:00:00:ab:11:a0:0e:85:11:62:af:69:5d
192.168.122.x is a private NAT address only reachable from the host server. You cannot SSH into the VM directly from your local machine using this address. SSH into the host server first, then SSH into the VM from there.
From the host server, connect to the VM using the username you set during installation:
ssh ubuntu@VM_IP_ADDRESS
Replace VM_IP_ADDRESS with the IP shown in the DHCP leases output. If you set up the network bridge in Step 11, the VM will have a public IP and you connect directly from your local machine.
OutputThe authenticity of host '192.168.122.76 (192.168.122.76)' can't be established.
ED25519 key fingerprint is SHA256:2CeJMQz41oubOf57FfwEz0jgyn/j923KzLmRa4dtOM8.
This key is not known by any other names.
Are you sure you want to continue connecting (yes/no/[fingerprint])? YES
Warning: Permanently added '192.168.122.76' (ED25519) to the list of known hosts.
demo-user@192.168.122.76's password:
Welcome to Ubuntu 24.04.4 LTS (GNU/Linux 6.8.0-111-generic x86_64)

 * Documentation:  https://help.ubuntu.com
 * Management:     https://landscape.canonical.com
 * Support:        https://ubuntu.com/pro

 System information as of Mon May  4 06:58:34 PM UTC 2026

  System load:  0.08               Processes:               157
  Usage of /:   34.8% of 18.53GB   Users logged in:         0
  Memory usage: 5%                 IPv4 address for enp1s0: 192.168.122.76
  Swap usage:   0%

Expanded Security Maintenance for Applications is not enabled.

35 updates can be applied immediately.
To see these additional updates run: apt list --upgradable

Enable ESM Apps to receive additional future security updates.
See https://ubuntu.com/esm or run: sudo pro status


The programs included with the Ubuntu system are free software;
the exact distribution terms for each program are described in the
individual files in /usr/share/doc/*/copyright.

Ubuntu comes with ABSOLUTELY NO WARRANTY, to the extent permitted by
applicable law.

To run a command as administrator (user "root"), use "sudo <command>".
See "man sudo_root" for details.

demo-user@ubuntu-vm:~$
#Step 16: Clean up the ISO
Once you have confirmed SSH access to the VM, the ISO is no longer needed. Exit the VM first:
exit
Outputlogout
Connection to 192.168.122.76 closed.
Then delete the ISO to free up disk space:
sudo rm /var/lib/libvirt/images/ubuntu-24.04.4-live-server-amd64.iso
Confirm the space has been reclaimed:
sudo df -h /var/lib/libvirt/images/
Finally, set the VM to start automatically when the host reboots so you do not have to start it manually every time:
virsh autostart ubuntu-vm
OutputDomain 'ubuntu-vm' marked as autostarted
#Step 17: Manage your VMs with virsh
virsh is your primary tool for managing VMs from the command line. Here are the commands you will use most often:
List all VMs (running and stopped):
virsh list --all
Start a VM:
virsh start ubuntu-vm
Gracefully shut down a VM:
virsh shutdown ubuntu-vm
Force stop a VM:
virsh destroy ubuntu-vm
Reboot a VM:
virsh reboot ubuntu-vm
View VM details:
virsh dominfo ubuntu-vm
Set VM to start automatically at host boot:
virsh autostart ubuntu-vm
Disable autostart:
virsh autostart ubuntu-vm --disable
Edit VM hardware configuration:
virsh edit ubuntu-vm
Take a snapshot:
virsh snapshot-create-as ubuntu-vm snap1 "Clean install snapshot"
List snapshots:
virsh snapshot-list ubuntu-vm
Revert to a snapshot:
virsh snapshot-revert ubuntu-vm snap1
Delete a VM and its storage:
virsh undefine ubuntu-vm --remove-all-storage
#KVM Performance Tuning Tips
KVM performs well out of the box, but a few targeted changes close the gap between VM and bare metal performance even further. These are particularly valuable for production workloads. The four areas covered here are virtio drivers, hugepages, host-passthrough CPU mode, and CPU pinning.
#Virtio drivers
Virtio is a paravirtualized driver standard built specifically for VMs. Instead of emulating a physical network card or disk controller, which requires the hypervisor to simulate real hardware, virtio drivers know they are running in a virtual environment and communicate with the hypervisor directly. This reduces overhead and significantly improves both disk and network throughput.
The virt-install command you ran earlier already uses bus=virtio for the disk and model=virtio for the network interface. Ubuntu includes virtio drivers by default, so no additional configuration is needed inside the VM.
#Hugepages
By default, Linux manages memory in 4 KB pages. Hugepages (2 MB or 1 GB) reduce the number of Translation Lookaside Buffer (TLB) misses the CPU has to handle, improving performance for memory-intensive workloads like databases.
Allocate 2 MB hugepages on the host. For a 4 GB VM, you need at least 2048 hugepages:
echo 2048 | sudo tee /sys/kernel/mm/hugepages/hugepages-2048kB/nr_hugepages
Persist this allocation across reboots:
echo 'vm.nr_hugepages = 2048' | sudo tee -a /etc/sysctl.conf
Then enable hugepages in the VM's XML configuration:
virsh edit ubuntu-vm
Find this line:
<vcpu placement='static'>4</vcpu>
Add the <memoryBacking> block directly above it:
<memoryBacking>
  <hugepages/>
</memoryBacking>
<vcpu placement='static'>4</vcpu>
Save and exit.
Shut down and restart the VM for the change to take effect:
virsh shutdown ubuntu-vm
virsh start ubuntu-vm
#host-passthrough CPU Mode
By default, KVM presents a generic virtual CPU to VMs. Switching to host-passthrough mode exposes the actual CPU's instruction set extensions directly to the VM, allowing the guest OS to use all features available on the physical hardware.
Before editing, check if virt-install already set this for you:
virsh dumpxml ubuntu-vm | grep -i cpu
If you see <cpu mode='host-passthrough'.../> in the output, it is already set and you can skip this step.
If not, open the VM configuration:
virsh edit ubuntu-vm
Find the <cpu> section and update it to:
<cpu mode='host-passthrough' check='none'/>
Restart the VM:
virsh shutdown ubuntu-vm
virsh start ubuntu-vm
Use host-passthrough when your VMs stay on this host. If you need to migrate VMs between hosts with different CPU models, keep the default CPU mode to maintain compatibility.
#CPU pinnning
By default, the Linux scheduler moves VM vCPUs between physical cores freely. For workloads sensitive to CPU cache locality like databases or real-time processing, this causes cache misses and latency spikes. CPU pinning assigns each vCPU to a fixed physical core so it always runs in the same cache context.
First, check your CPU's core layout:
lscpu --extended
Look at the CPU and CORE columns. If you see the same CORE number on two different CPU rows, your processor has hyperthreading enabled. Reserve cores 0 to 3 for the host OS and pin your VM to the remaining cores to avoid resource contention.
Pin each vCPU to a specific physical core. This example pins a 4-vCPU VM to cores 4 through 7. The --config flag makes the pinning persistent across reboots:
virsh vcpupin ubuntu-vm 0 4 --config
virsh vcpupin ubuntu-vm 1 5 --config
virsh vcpupin ubuntu-vm 2 6 --config
virsh vcpupin ubuntu-vm 3 7 --config
Verify the pinning is active and saved:
virsh vcpuinfo ubuntu-vm
virsh dumpxml ubuntu-vm | grep -A 10 vcpupin
vcpuinfo confirms the live state. dumpxml confirms it is written to the XML configuration and will survive reboots.
CPU pinning is optional for general-purpose VMs. Apply it when you need consistent, low-latency performance for workloads like databases or real-time processing.
#Conclusion
Setting up KVM on a bare metal server gives you a production-grade virtualization environment with near bare-metal performance, full control over your stack, and no licensing costs. In this tutorial, you provisioned a bare metal server, installed and configured KVM and libvirt, set up networking, created a VM using virt-install, completed the OS installation via VNC, and applied performance tuning with virtio drivers, hugepages, CPU pinning, and host-passthrough mode.
From here, you can add more VMs, define custom storage pools, take and restore snapshots.
Also read:
FAQs
Is KVM free to use?
Yes. KVM is part of the Linux kernel and licensed under the GPL. It has no licensing fees for commercial or production use.
Do I need nested virtualization on a bare metal server?
No. Nested virtualization means running a hypervisor inside a VM, which is what you do on a VPS. On a bare metal server, KVM runs directly on the physical hardware. You are the hypervisor. Nested virtualization is not relevant here.
What guest operating systems does KVM support?
KVM supports any OS that runs on x86-64 hardware. This includes Ubuntu, Debian, Rocky Linux, AlmaLinux, CentOS, Windows Server, FreeBSD, and more. Guest performance is best on Linux because virtio drivers are included by default.
How many VMs can I run on one bare metal machine?
It depends on your server's CPU, RAM, and storage, and on how much of each resource you allocate per VM. A server with 16 cores and 64 GB RAM can comfortably run 8 to 12 VMs at 2 vCPUs and 4 GB RAM each, leaving headroom for the host OS.
Can I use KVM to run Windows VMs?
Yes. KVM fully supports Windows Server and Windows 10/11 as guest operating systems. For best performance, install the virtio drivers for Windows inside the guest. The virtio-win ISO is available from the Fedora project and provides network, disk, and memory drivers for Windows guests.
What is the difference between KVM and QEMU?
KVM is the kernel module that handles hardware virtualization. QEMU is the user-space emulator that provides virtual hardware (network cards, disks, etc.) to each VM. In practice, they always work together. On Ubuntu, `qemu-kvm` is a transitional metapackage that pulls in `qemu-system-x86`, which includes both. The install output will note this substitution, which is expected. When people say "KVM", they usually mean the KVM and QEMU combination managed by libvirt.
What should I do if I lock myself out of SSH?
Use your provider's IPMI or remote console access to connect directly to the physical machine. This bypasses SSH entirely and lets you recover from misconfigured firewalls or network settings. Confirm your provider offers this before you need it; most bare metal providers include it by default.


