How to Install Docker on Ubuntu 26.04: Step-by-Step Guide




Docker has become one of the most important and widely used DevOps tools since its initial stable release in 2014. It has played a crucial role in simplifying software deployment and reproducibility, making it a must-have tool in CI/CD pipelines.
It was built to close the gap that existed between a developer's laptop and a production environment, solving the age-old "works on my machine" problem. It phased out a set of development practices introduced before 2014 that complicated software deployment. You can now write software, package it in containers alongside all its dependencies, and have peace of mind that it will run reliably regardless of the computing environment.
#Prerequisites
Before getting started, ensure you have the following :
-
A running Ubuntu 26.04 LTS instance. You can quickly deploy a VPS on Cherry Servers in just a few clicks
-
A user account with sudo privileges
-
An active SSH connection to your instance
#Installing Docker on Ubuntu 26.04
Ubuntu 26.04 supports Docker through two installation paths: the built-in Ubuntu repositories or Docker's official repository. This guide recommends the official repository, as it's more up-to-date and better maintained.
#Step 1: Remove conflicting packages
Before installing Docker, it's a good idea to remove any older or conflicting Docker-related packages that may have come from Ubuntu's default repositories.
for pkg in docker.io docker-doc docker-compose docker-compose-v2 \
  podman-docker containerd runc; do
  sudo apt-get remove -y $pkg
done
The command only removes Docker and Docker Compose, not your existing container data. To ensure you start on a clean slate, run the following command to delete all containers and related Docker files.
sudo rm -rf /var/lib/docker /var/lib/containerd
#Step 2: Installing Docker on Ubuntu
There are two distinct ways of installing Docker. Let's have a quick brush-through of each.
Method A: Installing from Ubuntu repositories
This is the quickest way to install Docker on your system. It installs Docker from Ubuntu's repositories. On the flip side, the installed version lags slightly behind the latest Docker release. Regardless, this version comes thoroughly tested.
Start by updating the local package index.
sudo apt update
Once the package index is refreshed, proceed and install Docker.
sudo apt install docker.io util-linux-extra -y
The command installs Docker, util-linux-extra, containerd (a high-level runtime for running containers), and a host of other dependencies required for Docker to run reliably.
The util-linux-extra package provides the newgrp command, which is required in post-installation configuration.
Method B: Official Docker repository (recommended)
This method installs Docker from Docker's own repository, providing the latest stable release, security patches, and all official plugins, including Buildx and Compose.
Start by updating the local package index and installing the prerequisite packages.
sudo apt update
sudo apt install ca-certificates curl
Now that we've got the prerequisites sorted, the next step is adding Docker's GPG key. Think of it as a handshake of trust. It confirms that whatever you're downloading actually comes from Docker's official repository and hasn't been tampered with along the way. Without it, there's no real way to know whether a package is the genuine article or something that's been compromised.
sudo install -m 0755 -d /etc/apt/keyrings
sudo curl -fsSL https://download.docker.com/linux/ubuntu/gpg \
  -o /etc/apt/keyrings/docker.asc
sudo chmod a+r /etc/apt/keyrings/docker.asc
The next crucial step is to add Docker's repository. This ensures you receive the latest stable releases rather than the older versions typically bundled in Ubuntu's default repositories. Combined with the GPG key, the repository ensures that every package you download carries a verified digital signature.
echo \
  "deb [arch=$(dpkg --print-architecture) signed-by=/etc/apt/keyrings/docker.asc] \
  https://download.docker.com/linux/ubuntu \
  $(. /etc/os-release && echo "$VERSION_CODENAME") stable" | \
  sudo tee /etc/apt/sources.list.d/docker.list > /dev/null
Next, update the local package index and install Docker.
sudo apt update
sudo apt install docker-ce docker-ce-cli containerd.io \
  docker-buildx-plugin docker-compose-plugin
#Step 3: Start and enable Docker
Docker auto-starts once installed. To confirm this, run the command:
sudo systemctl status docker
Outputdocker.service - Docker Application Container Engine
     Loaded: loaded (/usr/lib/systemd/system/docker.service; enabled; preset: enabled)
     Active: active (running) since Wed 2026-06-17 13:36:53 EEST; 14s ago
Look for Active: active (running) in the output. If not running, you can start it by issuing the command:
sudo systemctl start docker
If the service fails to start, inspect the logs with:
sudo journalctl -u docker --no-pager
#Step 4: Running Docker commands (without sudo)
By default, Docker requires root privileges. To run Docker commands as a regular user, add your account to the docker group:
sudo usermod -aG docker $USER
Next, apply the change in your current session without logging out:
newgrp docker
Verify that the user is now part of the Docker group.
groups $USER
#Step 5: Verify the installation
Check the installed Docker version:
docker --version
OutputDocker version 29.5.3, build d1c06ef
Run the official test container to confirm end-to-end functionality:
docker run hello-world
If everything went smoothly, you'll see a confirmation that Docker is up and running correctly. Let's now try something more ambitious and interesting.
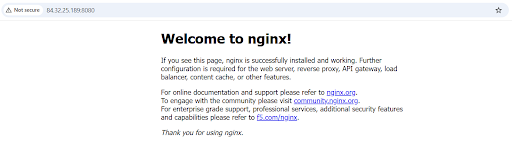
You can run an Nginx container in the background (effectively freeing the terminal) and expose it to the outside world using the -p option.
docker run -d -p 8080:80 nginx
Then open http://server-ip:8080 in your browser: you should see the Nginx welcome page.
#Step 6: Verify Docker Compose
If you used Method B, Docker Compose is already installed as a plugin. Verify it:
docker compose version
OutputDocker Compose version v5.1.4
Note the spaces in between: the modern plugin uses docker compose (not docker-compose with a hyphen).
#Step 7 — Essential Docker commands with examples
Now that Docker is running, here's a practical reference to the commands you'll use day-to-day, grouped by category.
Container management
Run a container from an image (pulls it automatically if not cached locally):
docker run nginx
Run it in the background (detached mode) as shown:
docker run -d -p 8080:80 --name my-nginx nginx
Here, the -d flag instructs Docker to run the container in the background, effectively freeing up the terminal. The -p option maps port 80 on the container to port 8080 on the server or host, making it accessible globally. The --name tag specifies the container name, in this case my-nginx. If not specified, a random auto-generated name will be assigned.
List running containers:
To list currently running containers, run the command:
docker ps
To list all containers, including stopped ones, run the command:
docker ps -a
Stop and remove a container:
To stop and remove a container, run the commands:
docker stop container_id
docker rm container_id
You can stop and remove the container in a single command:
docker rm -f container_id
You can also stop and remove containers using their container names. For example, for the Nginx container called my-nginx, you can stop and remove it by running:
docker stop my-nginx
docker rm my-nginx
** To run a throwaway interactive container** (removed automatically on exit):
You can interactively access a container using the -it flags and later remove it automatically upon exit using the --rm option.
docker run --rm -it ubuntu /bin/bash
Image management
Pull an image from Docker Hub:
To pull an image, for example, ubuntu with a tag 24.04, run the command:
docker pull ubuntu:24.04
List locally cached images:
To view existing images on your system, run:
docker images
Build an image from a Dockerfile in the current directory, tagging it myapp:1.0:
The following command builds a Docker image in the present directory and tags it myapp:1.0.
docker build -t myapp:1.0 .
Remove an image:
To remove the image, issue the command:
docker rmi myapp:1.0
Tag an image for pushing to a registry:
docker tag myapp:1.0 yourusername/myapp:1.0
Push an image to Docker Hub:
Once ready with your image, you can push it to Docker Hub as shown.
docker push yourusername/myapp:1.0
Inspecting containers
Let’s see how to inspect Docker containers:
View real-time logs from a running container:
docker logs my-nginx
Follow (tail) logs as they stream using the -f option:
docker logs -f my-nginx
Open an interactive shell inside a running container:
docker exec -it my-nginx /bin/bash
To exit the shell, simply run:
exit
Inspect detailed container metadata (network, mounts, environment variables, etc.):
docker inspect my-nginx
Get just the container's IP address:
docker inspect -f '' my-nginx
Monitor real-time CPU, memory, and network usage:
docker stats
Volumes
Volumes persist data beyond the container's lifecycle — essential for databases and file storage.
Create a named volume:
The following command creates a volume named mydata.
docker volume create mydata
Mount a volume when running a container:
docker run -d -v mydata:/var/lib/mysql --name mydb mysql:8
The command starts a new container in the background using the -d option. It then mounts the mydata Docker volume to a specified path inside the container - /var/lib/mysql - where MySQL stores its data files. Without this, all database data would be lost the moment the container stops.
The --name flag assigns the container a human-readable name (mydb) instead of Docker's random auto-generated name. This lets you reference it easily with commands like docker stop mydb or docker logs mydb.
Lastly, mysql:8 is the image to use. In this case, Docker pulls the official MySQL image from Docker Hub and pins it to the MySQL 8.x major version.
Mount a host directory into a container (bind mount):
docker run -d -v /home/user/app:/app --name myapp node:20
The command runs a new container in detached mode (in the background) using the -v option. The /home/user/app directory on your host machine is mapped to the /app directory inside the container.
Any file changes in either location are instantly reflected in both. The container reads and writes directly to your host filesystem — no copying involved.
The --name flag names the container myapp for easier reference.
The node:20 flag indicates the image to run is Node.js version 20 from Docker Hub.
List all volumes:
To list Docker volumes, run the docker volume ls command:
docker volume ls
Remove a volume:
To remove a volume, use the docker volume rm command followed by the volume name. The command shown removes a volume called mydata.
docker volume rm mydata
Networks
List networks:
docker network ls
Create a custom bridge network (containers on the same network can communicate by name):
docker network create my-network
Run a container on a specific network:
docker run -d --network my-network --name api myapp:1.0
Connect a running container to a network:
To connect the container named my-nginx to a created network called my-network, run:
docker network connect my-network my-nginx
Inspect network details:
To check detailed information about a network, run:
docker network inspect my-network
Docker Compose
Docker Compose is used to define and run multi-container applications from a docker-compose.yml file.
Start all services (builds images if needed):
To launch services from a Dockerfile, run the command:
docker compose up -d
View logs for all services:
docker compose logs -f
Scale a service to 3 replicas:
docker compose up -d --scale web=3
Stop and remove all services, networks, and volumes:
docker compose down -v
Cleanup
Unused containers, images, and volumes accumulate over time and consume disk space.
Remove all stopped containers:
docker container prune
Remove all unused images:
docker image prune -a
Remove all unused volumes:
docker volume prune
Remove everything unused in one command (containers, networks, images, build cache):
docker system prune -a
Warning:
docker system prune -aremoves all images not currently used by a container, including cached layers. Run with care on production machines.
#Troubleshooting
Having trouble running Docker? Here are the most common Docker troubleshooting tips specific to Ubuntu 26.04, drawn from real-world issues reported since the release:
#1. Permission Denied on the Docker Socket
This is usually a result of running Docker as a user with insufficient permissions. Often, the user is not part of the docker group or not a sudo user or both.
The simplest avenue to resolving this issue is to add the logged-in user to the Docker group:
sudo usermod -aG docker $USER
Next, run the following command to effect the changes
newgrp docker
#2. Docker service not starting
When the Docker service fails to start, the issue usually stems from one of several causes: misconfigured settings, insufficient system resources, permission errors, or conflicts with other installed software. The following tips can help identify and resolve the problem.
Check the Docker Service Status
Start by checking the current status of the Docker service.
sudo systemctl status docker
If something is wrong, you will see error messages in the output. A good place to start troubleshooting a service failure is by inspecting the logs.
sudo journalctl -u docker.service
Common Docker failure causes include a conflicting containerd installation or a missing kernel module. Re-run the step to remove the conflicting packages if needed.
Ensure Docker service is enabled
Another cause of service failure could be that Docker was not configured to start automatically at system startup. To fix this, enable the service to launch automatically.
sudo systemctl enable docker
sudo systemctl start docker
Confirm the daemon is running.
sudo systemctl status docker
If the service was previously disabled, Docker should be up and running.
Containerd issues
Docker relies on containerd, a high-level container runtime that runs containers. If it runs into any issues, Docker fails to start.
Start by checking its status.
sudo systemctl status containerd
Consider restarting it to fix any underlying issues, such as the daemon "freezing". Along the same lines, restart Docker as well.
sudo systemctl restart containerd
sudo systemctl restart docker
You can also monitor logs in real time to help pinpoint the issue.
sudo journalctl -u containerd -f --no-pager
And that's it! Docker is up and running on your Ubuntu 26.04 machine.
Ready to supercharge your Docker infrastructure? Scale effortlessly and enjoy flexible storage with Cherry Servers bare metal or virtual servers. Eliminate infrastructure headaches with free 24/7 technical support, pay-as-you-go pricing, and global availability.
#Conclusion
From here, the real fun begins. Docker opens the door to a whole new way of building and running software. You can spin up containers, experiment with different environments, and ship applications without the usual "it works on my machine" headaches, whether you're working on a local development environment or managing production workloads. With the troubleshooting tips covered in this guide, you're also better equipped to handle issues that may arise along the way.