How to Deploy a Docker Container on Kubernetes: Step-by-Step Guide




Docker and Kubernetes work together to package an application once and run it reliably anywhere. Docker wraps an application and its dependencies into a container, and Kubernetes schedules, scales, and heals those containers across a cluster of machines.
This guide takes a container from a Dockerfile to a running workload on Kubernetes. You will build an image, push it to Docker Hub, deploy it with a YAML manifest, expose it through a Service, and then scale and update it.
#Prerequisites
Before you get down to deploying a Docker container on Kubernetes, make sure that you have the following:
-
Docker is required on your local machine to be able to build and manage container images.
-
You have the Kubernetes (kubectl) command-line tool installed to talk to your Kubernetes cluster.
-
You have Minikube (or any other Kubernetes cluster) installed if you are running Kubernetes locally.
-
A place to store your Docker images when you create them, such as a container registry (e.g., Docker Hub).
Ready to supercharge your Docker infrastructure? Scale effortlessly and enjoy flexible storage with Cherry Servers bare metal or virtual servers. Eliminate infrastructure headaches with free 24/7 technical support, pay-as-you-go pricing, and global availability.
Docker and Kubernetes solve two different problems that fit together. Docker packages an application into a portable container, while Kubernetes runs and manages those containers across a cluster.
#Docker
Docker is a platform that allows developers to create, deploy, and manage applications in containers. Containers are an example of a unit or piece of software that includes code, runtime, system tools, system libraries, and settings that guarantee the required operating environment for the application so it runs consistently on many environments, including development machines, testing servers, and production hosts, among others.
It is then possible to move these applications onto another server or even to the cloud without facing major problems related to compatibility.
The client-server architecture of Docker allows the Docker client to interact with the Docker daemon. With Docker, Docker clients interact with the Docker daemon to manage images, containers, and networks. Docker images represent a form of template used for creating containers. Docker images are reusable, can be shared across projects, and are used successfully.
Also read: How to Run Docker on Bare Metal Cloud
#Kubernetes
Kubernetes is an open-source platform that automates the deployment, scaling, and operation of containerized applications over clusters of containers. The orchestration and management of several containers simultaneously are allowed through creating an easy way in which complex applications will be deployed and managed.
Kubernetes uses a control plane to manage the cluster, and containers run on worker nodes. Among its most important features are self-healing, load balancing, and service discovery that aid in an application's reliability at runtime.
You can create a powerful and flexible platform for building and deploying containerized applications by combining Docker and Kubernetes. Docker provides the building blocks, while Kubernetes handles orchestration and management. Utilizing a Docker manager further streamlines container deployment and enhances overall efficiency.
Also read: How to Deploy Kubernetes on Bare Metal
#Deploying a Docker container on Kubernetes
The instructions below show you how to deploy a Docker container on Kubernetes.
#Create a Docker image
We will create a Docker image, push it to a container registry, create a Kubernetes deployment, and reveal the application. In this guide, we will deploy a basic Nginx web server.
Firstly, create a directory and navigate into it.
mkdir nginx-k8s
cd nginx-k8s
Inside this directory, create a Dockerfile.
nano Dockerfile
Add the following lines:
FROM nginx:latest
COPY ./index.html /usr/share/nginx/html/index.html
Create a custom index.html file:
nano index.html
Add the sample code as shown below:
<!DOCTYPE html>
<!DOCTYPE html>
<html>
<head>
    <title>Hello Kubernetes</title>
</head>
<body>
    <h1>We have successfully deployed Nginx container on Kubernetes!</h1>
</body>
</html>
Next, you need to build the Docker image. Use the below docker command to build the image:
docker build -t my-nginx-k8s:1.0 .
Output[+] Building 2.3s (7/7) FINISHED

=> [internal] load build definition from Dockerfile 0.0s

=> => transferring dockerfile: 109B 0.0s

=> [internal] load metadata for docker.io/library/nginx:latest 1.1s

=> [1/2] FROM docker.io/library/nginx:latest 0.0s

=> [internal] load build context 0.0s

=> => transferring context: 152B 0.0s

=> [2/2] COPY ./index.html /usr/share/nginx/html/index.html 0.1s

=> exporting to image 0.1s

=> => naming to docker.io/library/my-nginx-k8s:1.0 0.0s
#Push Docker image to DockerHub
To deploy your Docker image on Kubernetes, it needs to be accessible to Kubernetes nodes. You can push it to a container registry like Docker Hub.
If you are pushing to Docker Hub, tag the image using the command below. Note that you need to replace "demo042" with your Docker Hub name.
docker tag my-nginx-k8s:1.0 demo042/my-nginx-k8s:1.0
Now log in to Docker Hub.
docker login
Using web-based login
To sign in with credentials on the command line, use docker login -u <username>
OutputUSING WEB-BASED LOGIN

i Info → To sign in with credentials on the command line, use 'docker login -u <username>'

Your one-time device confirmation code is: MQVS-SPSD

Press ENTER to open your browser or submit your device code here: https://login.docker.com/activate

Waiting for authentication in the browser…
Docker prints a URL and a one-time code. Open the URL in a browser, enter the code, and confirm the login. Once you authorize the device, the terminal reports success.
OutputWARNING! Your credentials are stored unencrypted in '/root/.docker/config.json'.

Configure a credential helper to remove this warning. See

https://docs.docker.com/go/credential-store/

Login Succeeded
Finally, push the image to Docker Hub using the below command:
docker push demo042/my-nginx-k8s:1.0
OutputThe push refers to repository [docker.io/demo042/my-nginx-k8s]

d4dcde3aeeed: Pushed

57b3fbf43092: Pushed

6376488be516: Pushed

41c9f6f90940: Pushed

80fa08b690ad: Pushed

7cd23d4b744b: Pushed

72c03230f136: Pushed

4cc393bf6581: Pushed

c5a7565de4cf: Pushed

1.0: digest: sha256:f9938f98659de9050981c4435781cb817fa81398f58453fdd6dbf02d5d0a9a11 size: 856
You can check your Docker Hub repository to confirm the image was pushed successfully.
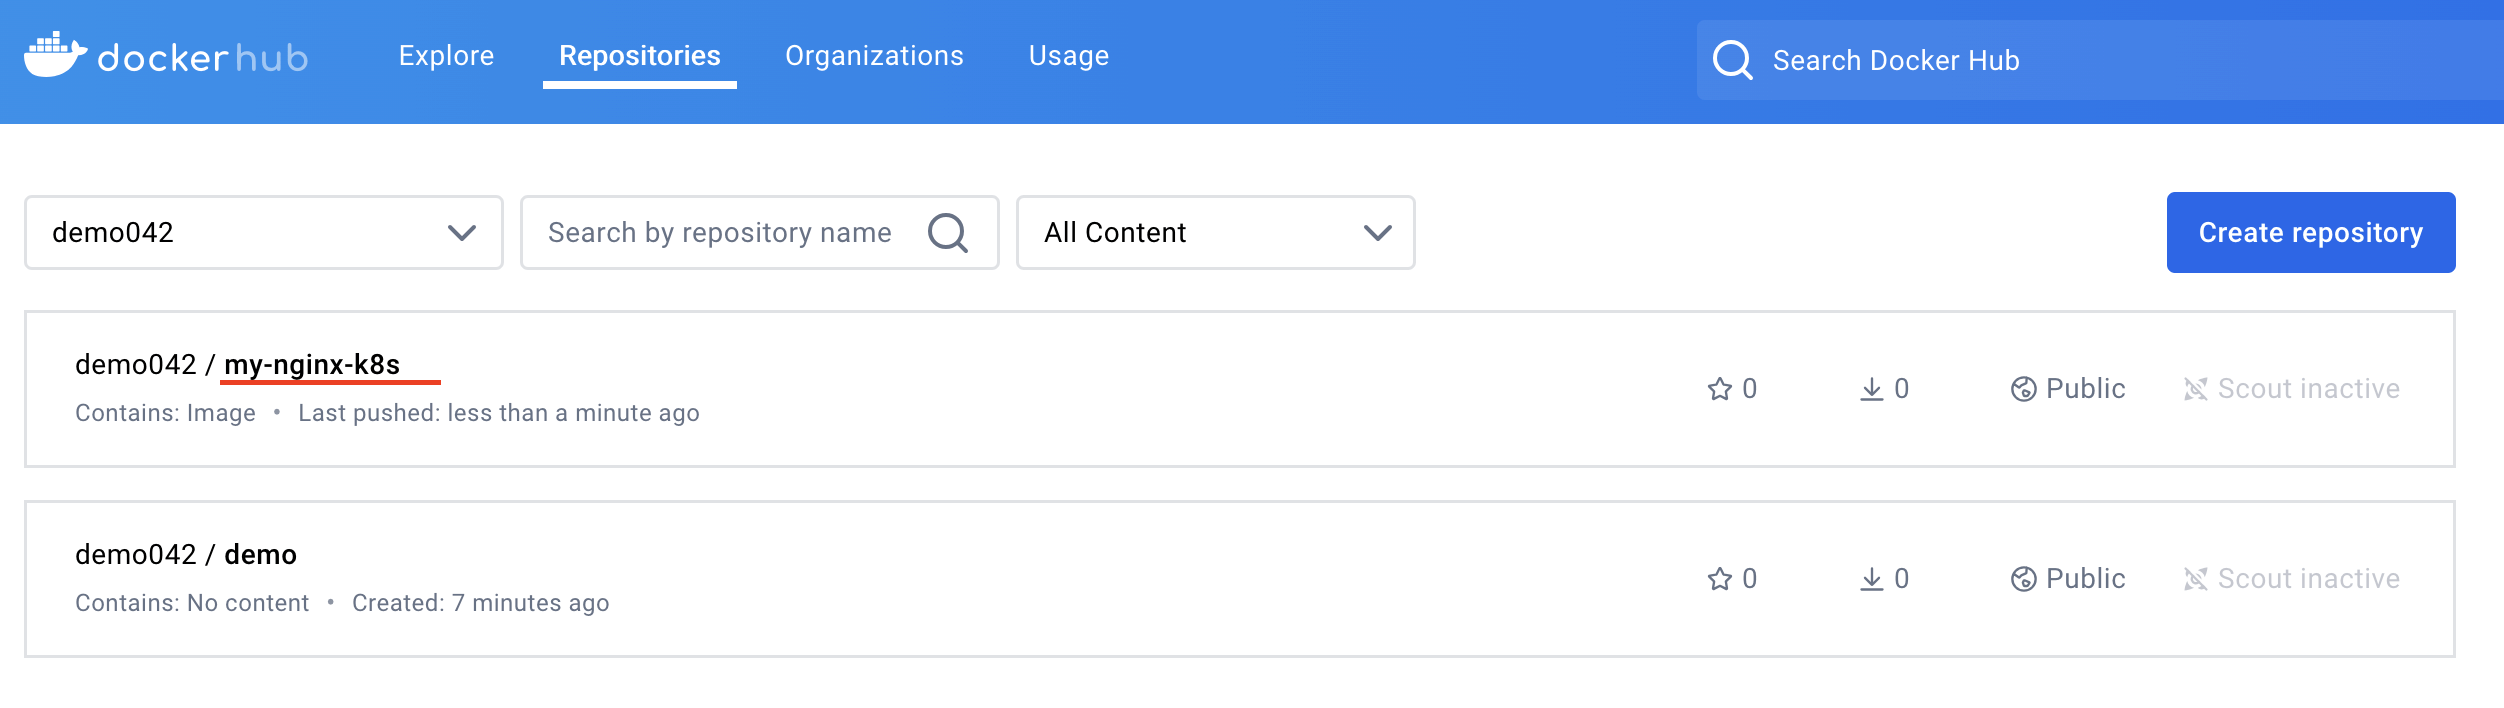
This repository is public, so Kubernetes can pull the image without credentials. For a private repository, you would create a pull secret and reference it in the deployment, as described in the troubleshooting section.
It's time to deploy the Docker container on Kubernetes using the image we just created.
Also read: How to install Docker on Ubuntu 24.04
#Configure Kubernetes YAML files
Follow the steps below to deploy a Docker container on Kubernetes using a YAML file.
Create a YAML file for the deployment. Use a text editor to create a YAML file that defines the deployment configuration. Specify the desired number of replicas, the image name, and any necessary environment variables or labels.
For example, name it nginx-deployment.yaml:
nano nginx-deployment.yaml
and add the deployment definition:
apiVersion: apps/v1
kind: Deployment
metadata:
  name: nginx-deployment
spec:
  replicas: 3
  selector:
    matchLabels:
      app: nginx
  template:
    metadata:
      labels:
        app: nginx
    spec:
      containers:
      - name: nginx
        image: demo042/my-nginx-k8s:1.0
        ports:
        - containerPort: 80
#Deploy the Docker container on Kubernetes
Deploy the application in your Kubernetes cluster using the kubectl command-line tool. Run the following command to apply the nginx-deployment.yaml file:
kubectl apply -f nginx-deployment.yaml
Outputdeployment.apps/nginx-deployment created
Check the status of the deployment to ensure that the desired number of pods are running:
kubectl get deployments
OutputNAME             READY UP-TO-DATE AVAILABLE AGE
nginx-deployment 3/3   3          3         149m
You need to find the name of the Pod you want to access. Use the following command to list all running Pods:
kubectl get pods
OutputNAME                              READY STATUS  RESTARTS AGE
nginx-deployment-78ff4fb5f5-fmp8p 1/1   Running 0        114s
nginx-deployment-78ff4fb5f5-rwqlz 1/1   Running 0        115s
nginx-deployment-78ff4fb5f5-whfmr 1/1   Running 0        113s
To access a Kubernetes pod on your browser, you can route traffic from your machine to a specific Pod in your Kubernetes cluster. This process is called port forwarding.
We will now use the kubectl port-forward command to connect a local port on our device with the port of the pod. The general format is:
kubectl port-forward <pod-name> <local-port>:<pod-port>
Where you run this command and where your browser is determine how you reach the pod.
If Kubernetes runs on your local machine, forward port 8080 to port 80 in the Nginx pod:
kubectl port-forward nginx-deployment-78ff4fb5f5-fmp8p 8080:80 &
By default, the forward binds to localhost, so this works when the browser is on the same machine as the cluster.
OutputForwarding from 127.0.0.1:8080 -> 80
Forwarding from [::1]:8080 -> 80
If the cluster runs on a remote server, such as a VPS, localhost points at the server rather than your computer, so that forward is not reachable from your browser. Bind the forward to all interfaces instead by adding the --address 0.0.0.0 flag:
kubectl port-forward --address 0.0.0.0 pod/nginx-deployment-78ff4fb5f5-fmp8p 8080:80 &
OutputForwarding from 0.0.0.0:8080 -> 80
The forward now listens on all interfaces, so you can reach it at the server's public IP address. Make sure your firewall or provider security group allows port 8080.
#Access the deployed application
Once the port is forwarded, open a web browser to reach the pod. On a local cluster, go to http://localhost:8080. On a remote server, use the server's public IP, for example, http://<server-ip>:8080.

You should see your Nginx welcome message that was configured in the YAML file.
Also read: How to Run Docker on Bare Metal Cloud
#Expose the deployment with a Service
Port forwarding is convenient for a quick test, but it only lasts as long as the command runs and routes to a single pod. To expose the deployment for real, create a Service. A Service gives your pods a stable address and load-balances traffic across all of them.
The simplest option that works on any cluster is a NodePort Service, which opens a port on every node. Create a file named nginx-service.yaml:
apiVersion: v1
kind: Service
metadata:
  name: nginx-service
spec:
  type: NodePort
  selector:
    app: nginx
  ports:
  - port: 80
    targetPort: 80
Apply it:
kubectl apply -f nginx-service.yaml
Find the assigned node port:
kubectl get service nginx-service
NAME          TYPE     CLUSTER-IP  EXTERNAL-IP PORT(S)      AGE
nginx-service NodePort 10.98.111.7 <none>      80:32408/TCP 10s
Open http://<node-ip>:32408 in a browser, using the IP of any node to reach the application.
For a single external IP instead of a node port, use a Service of type LoadBalancer. On a managed cloud, this provisions a load balancer automatically. On bare metal, install MetalLB first so the Service receives an address; our guide to deploying Kubernetes on bare metal covers that setup.
#Scale and update the deployment
Once the deployment runs, you can scale and update it without downtime.
To change the number of replicas, use kubectl scale. The following command runs five pods:
kubectl scale deployment nginx-deployment --replicas=5
To roll out a new version, update the image. Kubernetes replaces pods gradually, so the application stays available:
kubectl set image deployment/nginx-deployment nginx=demo042/my-nginx-k8s:2.0
Watch the rollout progress:
kubectl rollout status deployment/nginx-deployment
If something goes wrong, roll back to the previous version:
kubectl rollout undo deployment/nginx-deployment
#Troubleshooting common deployment issues
A few errors come up often when deploying containers to Kubernetes. The fixes below cover the most common ones.
A pod stuck in ImagePullBackOff or ErrImagePull means Kubernetes cannot pull the image. Check the image name and tag for typos, and confirm the tag exists in your registry. If the repository is private, create a pull secret with kubectl create secret docker-registry and reference it under imagePullSecrets in the pod spec.
A pod in CrashLoopBackOff starts and then exits repeatedly. View the logs with kubectl logs <pod-name> to see why the container is failing, and use kubectl describe pod <pod-name> for events such as failed health checks or a missing ConfigMap.
If kubectl port-forward drops the connection, the target pod was likely replaced. Run kubectl get pods to get the current pod name, then start port forwarding again with the new name.
#Conclusion
You have taken a container from a Dockerfile all the way to a running workload on Kubernetes: building the image, pushing it to Docker Hub, deploying it, and exposing it through a Service. Along the way, you also scaled the deployment and rolled out a new version.
From here, look at adding readiness and liveness probes, resource limits, and a ConfigMap or Secret for your application's settings. When you are ready to run this on production hardware, our guide to deploying Kubernetes on bare metal walks through building a cluster on Cherry Servers' dedicated servers.
FAQs
Can you run Docker containers on Kubernetes?
Yes. Kubernetes runs any image that follows the Open Container Initiative (OCI) standard, which includes images built with Docker. You package the app as an image, push it to a registry, and reference it in a Deployment.
Do you still need Docker to run Kubernetes?
No. Kubernetes removed the Docker runtime shim in version 1.24 and now uses a container runtime such as containerd. You can still use Docker on your workstation to build images; the cluster runs them through its own runtime.
How do you deploy a Docker image to Kubernetes?
Push the image to a registry such as Docker Hub, then create a Deployment that references the image. Apply it with `kubectl apply -f`, and expose it with a Service so it is reachable.
What is the difference between a Pod and a Deployment?
A Pod is the smallest unit that runs one or more containers, while a Deployment manages a set of identical Pods and keeps the desired number running. Deployments also handle rolling updates and rollbacks.
How do you expose a deployment in Kubernetes?
Create a Service. A NodePort Service opens a port on every node, and a LoadBalancer Service provides a single external IP address, which requires MetalLB on bare metal.
Where can I host a Kubernetes cluster?
You can run a cluster on any infrastructure with enough CPU, memory, and storage. Cherry Servers' dedicated servers offer single-tenant bare-metal servers for self-managed clusters, with the option to add nodes as you grow.