How to Install n8n on Ubuntu 24.04 Using Docker


You need to automate repetitive tasks across multiple apps and services, but coding complex integrations from scratch takes too much time. n8n solves this problem. It's an open-source workflow automation platform that connects APIs, databases, and services through visual workflows without requiring programming expertise. A self-hosted n8n setup on Ubuntu 24.04 gives you complete control over your data, eliminates monthly subscription fees, and provides unlimited workflow executions.
This n8n Docker installation guide walks you through deploying a complete workflow automation environment on Ubuntu using Docker Compose, with PostgreSQL for reliable data storage and Caddy for automatic HTTPS certificates.
#Prerequisites
-
Ubuntu 24.04 LTS server (1 vCPU, 2GB RAM minimum; 2 vCPU, 4GB RAM recommended).
-
A non-root user with sudo privileges.
-
A valid domain name pointing to your server IP (Recommended for SSL).
Note: If you do not have a domain, you can follow the "With server IP" steps to access n8n via http://YOUR_SERVER_IP, but the connection will not be encrypted.
- Basic Linux command line knowledge
#Installing n8n on Ubuntu 24.04 Using Docker
This section walks you through preparing your Ubuntu server and installing Docker. You then deploy n8n alongside PostgreSQL for storage and Caddy for automated SSL certificates.
#Step 1: Update system packages
After connecting to your Ubuntu server via SSH, start by updating and upgrading your Ubuntu 24.04 server. This ensures you have the latest security patches and software versions before beginning the installation.
sudo apt update && sudo apt upgrade -y
OutputHit:1 http://archive.ubuntu.com/ubuntu noble InRelease
Get:2 http://archive.ubuntu.com/ubuntu noble-updates InRelease [126 kB]
Get:3 http://archive.ubuntu.com/ubuntu noble-backports InRelease [126 kB]
Get:4 http://security.ubuntu.com/ubuntu noble-security InRelease [126 kB]
Get:5 http://archive.ubuntu.com/ubuntu noble/universe amd64 Packages [15.0 MB]
Get:6 http://archive.ubuntu.com/ubuntu noble/universe Translation-en [5982 kB]
Get:7 http://archive.ubuntu.com/ubuntu noble/universe amd64 Components [3871 kB]
Get:8 http://security.ubuntu.com/ubuntu noble-security/main amd64 Packages [1448 kB]
Get:9 http://archive.ubuntu.com/ubuntu noble/universe amd64 c-n-f Metadata [301 kB]
Get:10 http://archive.ubuntu.com/ubuntu noble/multiverse amd64 Packages [269 kB]
------
#Step 2: Install essential packages
Install the packages needed for secure HTTPS connections and for verifying software packages.
sudo apt install -y apt-transport-https ca-certificates curl gnupg
OutputReading package lists... Done
Building dependency tree... Done
Reading state information... Done
ca-certificates is already the newest version (20240203).
ca-certificates set to manually installed.
curl is already the newest version (8.5.0-2ubuntu10.6).
curl set to manually installed.
gnupg is already the newest version (2.4.4-2ubuntu17.4).
gnupg set to manually installed.
The following NEW packages will be installed:
  apt-transport-https
0 upgraded, 1 newly installed, 0 to remove and 0 not upgraded.
Need to get 3970 B of archives.
-------
#Step 3: Install Docker and Docker Compose
Now install Docker from the official Docker repository to get the latest stable version.
First, create the keyrings directory and download Docker's signing key:
sudo install -m 0755 -d /etc/apt/keyrings
sudo curl -fsSL https://download.docker.com/linux/ubuntu/gpg -o /etc/apt/keyrings/docker.asc
sudo chmod a+r /etc/apt/keyrings/docker.asc
This key verifies the authenticity of Docker packages.
Next, add the official Docker repository to your system:
# Add the repository to Apt sources:
sudo tee /etc/apt/sources.list.d/docker.sources <<EOF
Types: deb
URIs: https://download.docker.com/linux/ubuntu
Suites: $(. /etc/os-release && echo "${UBUNTU_CODENAME:-$VERSION_CODENAME}")
Components: stable
Signed-By: /etc/apt/keyrings/docker.asc
EOF
OutputTypes: deb
URIs: https://download.docker.com/linux/ubuntu
Suites: noble
Components: stable
Signed-By: /etc/apt/keyrings/docker.asc
Now, update package lists and install Docker packages:
sudo apt update
sudo apt install docker-ce docker-ce-cli containerd.io docker-buildx-plugin docker-compose-plugin
OutputReading package lists... Done
Building dependency tree... Done
Reading state information... Done
The following NEW packages will be installed:
  containerd.io docker-buildx-plugin docker-ce docker-ce-cli docker-ce-rootless-extras docker-compose-plugin libslirp0 pigz slirp4netns
0 upgraded, 9 newly installed, 0 to remove and 0 not upgraded.
...
Created symlink /etc/systemd/system/multi-user.target.wants/docker.service → /usr/lib/systemd/system/docker.service.
Created symlink /etc/systemd/system/sockets.target.wants/docker.socket → /usr/lib/systemd/system/docker.socket.
With Docker installed, add your current user to the docker group to run Docker commands without sudo:
sudo usermod -aG docker $USER
To apply changes immediately, run:
newgrp
To start running Docker commands without invoking sudo, restart the shell session as shown:
su - $USER
Now, verify the installation by running the following commands:
docker --version
docker compose version
OutputDocker version 29.2.1, build a5c7197
Docker Compose version v5.0.2
#Step 4: Create n8n project directory
Now, you need to create a directory to store N8n’s configuration and persistent data. This makes management and backups easier.
Create the main directory and set ownership:
sudo mkdir -p /opt/n8n
sudo chown -R $USER:$USER /opt/n8n
cd /opt/n8n
Then create the local storage folder:
mkdir local-files
This folder is where n8n will read/write local files. Since the n8n container runs as user ID 1000, this folder must be writable by that specific ID. To set permissions, run:
sudo chown -R 1000:1000 local-files
sudo chmod -R 755 local-files
#Step 5: Configure the environment variables
Next, create a .env file to store sensitive configuration details like passwords and encryption keys. For a full list of available configuration options, check the n8n environment variables documentation.
First, generate a secure encryption key for n8n:
openssl rand -base64 32
Outputv9vFACFKaR/+vijyH0Uqpv8xW1zWRtCsR8NnPAHvu9U=
Store the encryption key securely. Losing it means you lose access to saved credentials.
Now, create the .env file using the nano text editor:
nano .env
Paste the configuration that matches your setup:
Option A: With domain (Recommended)
DOMAIN_NAME=example.com
SUBDOMAIN=n8n

N8N_PROTOCOL=https
N8N_PORT=5678
N8N_ENCRYPTION_KEY=REPLACE_WITH_BASE64_KEY

# Secure Cookie: Must be true for HTTPS
N8N_SECURE_COOKIE=true
NODE_ENV=production

# Timezone: Sets both n8n scheduler and container system time
GENERIC_TIMEZONE=America/New_York
TZ=America/New_York

POSTGRES_USER=n8n
POSTGRES_PASSWORD=YOUR_SECURE_PASSWORD
POSTGRES_DB=n8n

SSL_EMAIL=user@example.com
Replace these values with your actual values:
-
DOMAIN_NAME: Your registered domain (e.g, site.com) -
SUBDOMAIN: Subdomain for n8n (e.g, n8n or app) -
N8N_ENCRYPTION_KEY: Paste your generated encryption key -
POSTGRES_PASSWORD: Create a strong database password -
GENERIC_TIMEZONEandTZ: Your timezone -
SSL_EMAIL: Your email for SSL certificate notifications
Option B: With server IP
If you're using your server’s IP without a domain, use this configuration:
N8N_HOST=YOUR_SERVER_IP
N8N_PORT=5678
N8N_PROTOCOL=http
N8N_ENCRYPTION_KEY=REPLACE_WITH_YOUR_GENERATED_KEY
N8N_SECURE_COOKIE=false
NODE_ENV=production
GENERIC_TIMEZONE=YOUR_TIMEZONE # e.g, America/New_York
TZ=YOUR_TIMEZONE
POSTGRES_USER=n8n
POSTGRES_PASSWORD=YOUR_SECURE_PASSWORD
POSTGRES_DB=n8n
Press CTRL+X, then Y, then Enter to save the file and exit.
#Step 6: Set up Docker Compose
With the .env file ready, go on to create the docker-compose.yml file. This file tells Docker how to run n8n, the PostgreSQL database, and the Caddy web server together.
Create the docker-compose.yml file:
nano docker-compose.yml
Paste the configuration that matches your setup:
Option A: With domain
services:
  postgres:
    image: postgres:16-alpine
    container_name: n8n-postgres
    restart: unless-stopped
    environment:
      - POSTGRES_USER=${POSTGRES_USER}
      - POSTGRES_PASSWORD=${POSTGRES_PASSWORD}
      - POSTGRES_DB=${POSTGRES_DB}
    volumes:
      - db_data:/var/lib/postgresql/data
    healthcheck:
      test: ["CMD-SHELL", "pg_isready -h localhost -U ${POSTGRES_USER} -d ${POSTGRES_DB}"]
      interval: 5s
      timeout: 5s
      retries: 10
    networks:
      - n8n-network

  n8n:
    image: docker.n8n.io/n8nio/n8n
    container_name: n8n
    restart: unless-stopped
    environment:
      # Database Connection
      - DB_TYPE=postgresdb
      - DB_POSTGRESDB_HOST=postgres
      - DB_POSTGRESDB_PORT=5432
      - DB_POSTGRESDB_DATABASE=${POSTGRES_DB}
      - DB_POSTGRESDB_USER=${POSTGRES_USER}
      - DB_POSTGRESDB_PASSWORD=${POSTGRES_PASSWORD}
      # App Configuration
      - N8N_HOST=${SUBDOMAIN}.${DOMAIN_NAME}
      - WEBHOOK_URL=${N8N_PROTOCOL}://${SUBDOMAIN}.${DOMAIN_NAME}/
      - N8N_PORT=${N8N_PORT}
      - N8N_PROTOCOL=${N8N_PROTOCOL}
      - NODE_ENV=${NODE_ENV}
      - N8N_ENCRYPTION_KEY=${N8N_ENCRYPTION_KEY}
      - N8N_SECURE_COOKIE=${N8N_SECURE_COOKIE}
      - GENERIC_TIMEZONE=${GENERIC_TIMEZONE}
      - TZ=${TZ}
    volumes:
      - n8n_data:/home/node/.n8n
      - ./local-files:/files
    depends_on:
      postgres:
        condition: service_healthy
    networks:
      - n8n-network

  caddy:
    image: caddy:2-alpine
    container_name: caddy
    restart: unless-stopped
    ports:
      - "80:80"
      - "443:443"
      - "443:443/udp"
    environment:
      - DOMAIN_NAME=${DOMAIN_NAME}
      - SUBDOMAIN=${SUBDOMAIN}
      - SSL_EMAIL=${SSL_EMAIL}
    volumes:
      - caddy_data:/data
      - caddy_config:/config
      - ./Caddyfile:/etc/caddy/Caddyfile:ro
    depends_on:
      - n8n
    networks:
      - n8n-network

volumes:
  caddy_data:
  caddy_config:
  db_data:
  n8n_data:

networks:
  n8n-network:
    driver: bridge
-
Postgres: The database service. It includes a
healthcheckto ensure it is fully ready before n8n tries to connect. -
n8n: The main application. It connects to the database and mounts
./local-filesso you can read/write files on the host. -
Caddy: The web server. It opens ports 80 (HTTP) and 443 (HTTPS) to the public. It manages SSL certificates and securely routes traffic to n8n.
Option B: With server IP
services:
  postgres:
    image: postgres:16-alpine
    container_name: n8n-postgres
    restart: unless-stopped
    environment:
      - POSTGRES_USER=${POSTGRES_USER}
      - POSTGRES_PASSWORD=${POSTGRES_PASSWORD}
      - POSTGRES_DB=${POSTGRES_DB}
    volumes:
      - db_data:/var/lib/postgresql/data
    healthcheck:
      test: ["CMD-SHELL", "pg_isready -h localhost -U ${POSTGRES_USER} -d ${POSTGRES_DB}"]
      interval: 5s
      timeout: 5s
      retries: 10
    networks:
      - n8n-network

  n8n:
    image: docker.n8n.io/n8nio/n8n
    container_name: n8n
    restart: unless-stopped
    environment:
      - DB_TYPE=postgresdb
      - DB_POSTGRESDB_HOST=postgres
      - DB_POSTGRESDB_PORT=5432
      - DB_POSTGRESDB_DATABASE=${POSTGRES_DB}
      - DB_POSTGRESDB_USER=${POSTGRES_USER}
      - DB_POSTGRESDB_PASSWORD=${POSTGRES_PASSWORD}
      - N8N_HOST=${N8N_HOST}
      - WEBHOOK_URL=http://${N8N_HOST}:${N8N_PORT}/
      - N8N_PORT=${N8N_PORT}
      - N8N_PROTOCOL=http
      - NODE_ENV=${NODE_ENV}
      - N8N_ENCRYPTION_KEY=${N8N_ENCRYPTION_KEY}
      - N8N_SECURE_COOKIE=false
      - GENERIC_TIMEZONE=${GENERIC_TIMEZONE}
      - TZ=${TZ}
    volumes:
      - n8n_data:/home/node/.n8n
      - ./local-files:/files
    depends_on:
      postgres:
        condition: service_healthy
    networks:
      - n8n-network

  caddy:
    image: caddy:2-alpine
    container_name: caddy
    restart: unless-stopped
    ports:
      - "80:80"
    volumes:
      - caddy_data:/data
      - caddy_config:/config
      - ./Caddyfile:/etc/caddy/Caddyfile:ro
    depends_on:
      - n8n
    networks:
      - n8n-network

volumes:
  caddy_data:
  caddy_config:
  db_data:
  n8n_data:

networks:
  n8n-network:
    driver: bridge
Press CTRL+X, then Y, then Enter to save the file and exit.
#Step 7: Create the Caddyfile for reverse proxy and SSL
Caddy's configuration is defined in a Caddyfile. This file instructs Caddy to act as a reverse proxy for your n8n instance and to automatically handle SSL certificate provisioning.
Create the Caddyfile:
nano Caddyfile
Paste the configuration that matches your setup:
Option A: With domain
{
    email {$SSL_EMAIL}
}

{$SUBDOMAIN}.{$DOMAIN_NAME} {
    reverse_proxy n8n:5678
}
Option B: With server IP
:80 {
    reverse_proxy n8n:5678
}
Press CTRL+X, then Y, then Enter to save the file and exit.
#Step 8: Start n8n with Docker Compose
With your configuration in place, you can now launch your n8n instance using Docker Compose.
To start the containers in the background, run:
docker compose up -d
Output[+] up 42/42
 ✔ Image docker.n8n.io/n8nio/n8n Pulled                                                                                                        49.0s
 ✔ Image postgres:16-alpine      Pulled                                                                                                        11.3s
 ✔ Image caddy:2-alpine          Pulled                                                                                                        6.0ss
 ✔ Network n8n_n8n-network       Created                                                                                                       0.1s
 ✔ Volume n8n_caddy_data         Created                                                                                                       0.0s
 ✔ Volume n8n_caddy_config       Created                                                                                                       0.0s
 ✔ Volume n8n_db_data            Created                                                                                                       0.0s
 ✔ Volume n8n_n8n_data           Created                                                                                                       0.0s
 ✔ Container n8n-postgres        Healthy                                                                                                       6.5s
 ✔ Container n8n                 Created                                                                                                       0.1s
 ✔ Container caddy               Created                                                                                                       0.1s
The first time you start n8n, it might take a few minutes while Docker downloads images and sets everything up.
Once the setup is done, verify the containers are running:
docker ps
You should see three containers (n8n, n8n-postgres, caddy) with the status Up.
OutputCONTAINER ID   IMAGE                     COMMAND                  CREATED         STATUS                   PORTS                                                                                                                             NAMES
b22218119e7a   caddy:2-alpine            "caddy run --config …"   4 minutes ago   Up 4 minutes             0.0.0.0:80->80/tcp, [::]:80->80/tcp, 0.0.0.0:443->443/tcp, [::]:443->443/tcp, 0.0.0.0:443->443/udp, [::]:443->443/udp, 2019/tcp   caddy
f2742d7d1542   docker.n8n.io/n8nio/n8n   "tini -- /docker-ent…"   4 minutes ago   Up 4 minutes             5678/tcp                                                                                                                          n8n
855be615ab2f   postgres:16-alpine        "docker-entrypoint.s…"   4 minutes ago   Up 4 minutes (healthy)   5432/tcp                                                                                                                          n8n-postgres
#Step 9: Configure firewall
Allow HTTP and HTTPS traffic through the firewall while maintaining SSH access.
Run these commands to allow SSH, HTTP, and HTTPS:
sudo ufw allow 22
sudo ufw allow 80
sudo ufw allow 443
OutputRules updated
Rules updated (v6)
Rules updated
Rules updated (v6)
Rules updated
Rules updated (v6)
Enable the firewall if it isn't already active:
sudo ufw enable
OutputCommand may disrupt existing SSH connections. Proceed with operation (y|n)? y
Firewall is active and enabled on system startup
Confirm the firewall status:
sudo ufw status verbose
OutputStatus: active
Logging: on (low)
Default: deny (incoming), allow (outgoing), deny (routed)
New profiles: skip

To                         Action      From
--                         ------      ----
22                         ALLOW IN    Anywhere
80                         ALLOW IN    Anywhere
443                        ALLOW IN    Anywhere
22 (v6)                    ALLOW IN    Anywhere (v6)
80 (v6)                    ALLOW IN    Anywhere (v6)
443 (v6)                   ALLOW IN    Anywhere (v6)
#Step 10: Access n8n via your browser
Open your browser and navigate to your n8n domain or http://your_server_ip if you’re accessing it using just your server IP address:
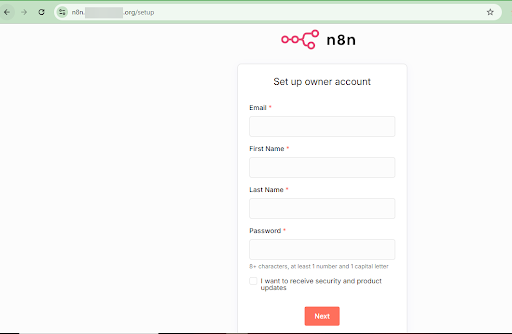
On your first visit to n8n, you’ll be prompted to create an Admin/owner account. Just fill in your email, name, and password as guided on the screen.
#Managing your n8n instance
Now that your instance is running, here are the essential commands to manage it.
#How to stop n8n
To stop the application, run this command inside your n8n directory:
docker compose down
This command stops and removes the running container, but no worries, your data is safely stored in the n8n data folder.
#How to upgrade n8n
Keep your n8n installation up to date with the latest features and security patches.
View your current n8n version:
docker exec n8n n8n --version
Check for available updates on the n8n releases page.
Navigate to your n8n directory:
cd /opt/n8n
Pull the latest images:
docker compose pull
Then restart the stack:
docker compose up -d
Clean up old images to save disk space(Optional):
docker image prune -f
#Conclusion
You now have a fully functional n8n instance running on Ubuntu 24.04 with Docker, PostgreSQL, and automatic HTTPS. Your workflows and credentials are stored securely in a dedicated database with proper encryption. Take the next step by creating your first workflow to automate a repetitive task that saves you at least 30 minutes daily. Explore n8n's node library to connect the services you use daily and reclaim hours of manual work.
Deploy your self-hosted n8n instance on a robust Ubuntu server from Cherry Servers and take full control of your workflows, data, and costs. Get started with Cherry Servers today!


