How to Start Portainer [Portainer Docker Tutorial]

![How to Start Portainer [Portainer Docker Tutorial]](/v3/img/containers/blog_main/docker.jpg/760bd6b92773a18fcc1d6c0a7ffe7236/docker.jpg?id=1739046670)


When deploying and working with Docker containers, Docker CLI is the de facto approach for most users. Portainer is a perfect alternative. In this Portainer Docker tutorial, I will first explain what Portainer is and what it is used for, and then demonstrate how to use it. I'll show how to start Portainer, stop and access it, and how you can deploy containers on the Portainer webUI.
#Portainer and Docker
Docker CLI is a fast and efficient tool for building and deploying containerized applications and managing Docker resources. As such, the Docker CLI is a household name for most developers and command-line enthusiasts.
However, not all users fancy running commands on the terminal. Mastering Docker commands can be intimidating, especially for beginners. In addition, working on the CLI can present a host of challenges when handling some advanced Docker features.
Ready to supercharge your Docker infrastructure? Scale effortlessly and enjoy flexible storage with Cherry Servers bare metal or virtual servers. Eliminate infrastructure headaches with free 24/7 technical support, pay-as-you-go pricing, and global availability.
A few GUI tools have been developed to address the complexities of managing containers using the Docker CLI. One of the most widely used GUI tools for managing containerized applications is the Docker Desktop client. This is an efficient tool for building, deploying, and sharing containerized applications. However, the Docker desktop has its shortcomings, which include the inability to manage clusters and the fact that it's mostly used for local deployments.
Portainer is the perfect alternative to the Docker desktop client.
#What is Portainer?
Portainer is a lightweight GUI management tool for Docker containers. It provides an intuitive and feature-rich web UI that simplifies container management tasks including deploying, scaling, and monitoring Docker containers without running Docker commands.
With Portainer, you can manage all resources associated with your Docker environment: from containers and images to volumes, networks, events, and user management - all from a centralized web UI.
In addition to being a front-end to Docker, Portainer can manage containerized applications on Kubernetes, Docker Swarm, and Azure ACI.
Portainer comes in two editions: Portainer CE ( Community Edition ) and Portainer BE ( Business Edition ).
Portainer CE is open-source and free to install. It's a popular option for home lab users, especially those learning the ropes of container management. It simplifies the deployment and management of container-native applications without the added cost of investing in a cloud provider or container runtime.
Portainer Business Edition (BE) is a commercial offering that provides various features for large organizations and businesses. Exclusive features provided by the Business Edition include GitOps automation, Role-Based Access Control (RBAC), registry management, and disaster recovery, to mention a few.
#What is Portainer used for?
Portainer is used to deploy and monitor containers and other resources in your Docker environment with simple point-and-click operations thanks to its user-friendly web UI.
Portainer lets users run management tasks such as stopping and starting containers, restarting, and deleting containers. In addition to managing Docker containers, you can perform a host of other operations related to your Docker environment, including:
-
Pulling and managing images from multiple repositories;
-
Creating and managing volumes, secrets, networks, and services;
-
Managing users and authentication;
-
Registry management;
-
Configuring fine-grained access controls with RBAC (Role-Based Access Control);
-
Monitoring logs and events.
And many more.
#Getting Started with Portainer and Docker
Portainer is a containerized web application that is available on Docker Hub. For demonstration purposes, we will install Portainer CE ( Community Edition ). But first, to follow this Portainer Docker tutorial, ensure that you have the following prerequisites:
-
Docker installed on your system. Check out our guide on how to install Docker on Ubuntu 22.04 LTS.;
-
Basic knowledge of Docker commands.
#1. How to set up Portainer
To get off the ground, let’s set up Portainer. You need to deploy the Portainer web app as a Docker container. Before you do so, it’s recommended to create an external volume for persistent storage of the container data. The volume will store Portainer data and preserve it in case of any eventuality.
To create a Docker volume for external storage, run the Docker volume command as shown. Here, portainer_data is the name of the volume.
Docker volume create portainer_data

Next, run the following command to create a Portainer CE Docker container.
Docker run -d -p 9000:9000 --name portainer_ce --restart always -v /var/run/Docker.sock:/var/run/Docker.sock -v portainer_data:/data portainer/portainer-ce:latest
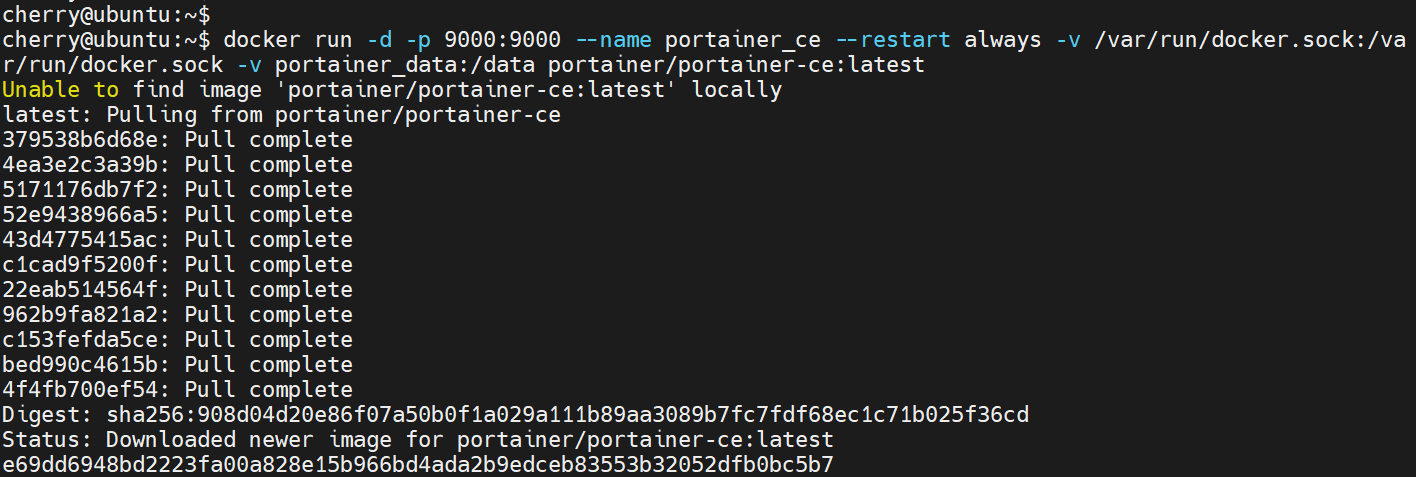
The command above creates a Docker container called portainer-ce with the --name flag and runs it in detached mode using the -d option. It also maps port 9000 on the container to port 9000 on the Docker host or server. This port binding provides access to the Portainer web GUI. The -v option mounts the Docker.sock UNIX socket on which the Docker daemon listens to the portainer_data volume for data persistence. This persistence ensures the preservation of data even when the Portainer container is stopped or removed.
Where is Portainer data stored?
By default, Portainer data is stored in the _data directory located in the /var/lib/Docker/volumes/volume_name/ path where volume_name is a unique alphanumeric number that identifies the volume. You can verify this using the ls command.
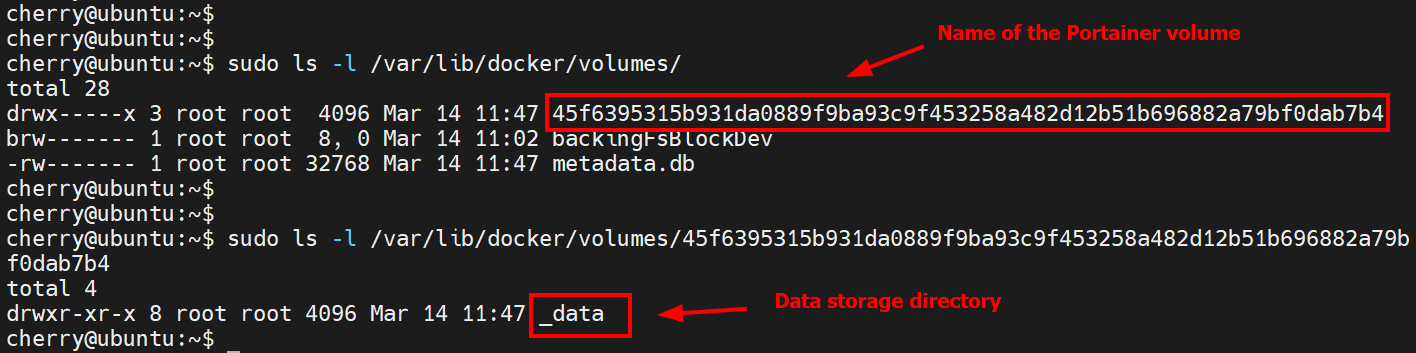
When a persistent volume is specified during the creation of the Portaner container, such as in our case, the _data directory is mounted in the path of the persistent volume. In this example, the _data directory is located in the /var/lib/Docker/volumes/portainer_data path.

#3. How to start Portainer
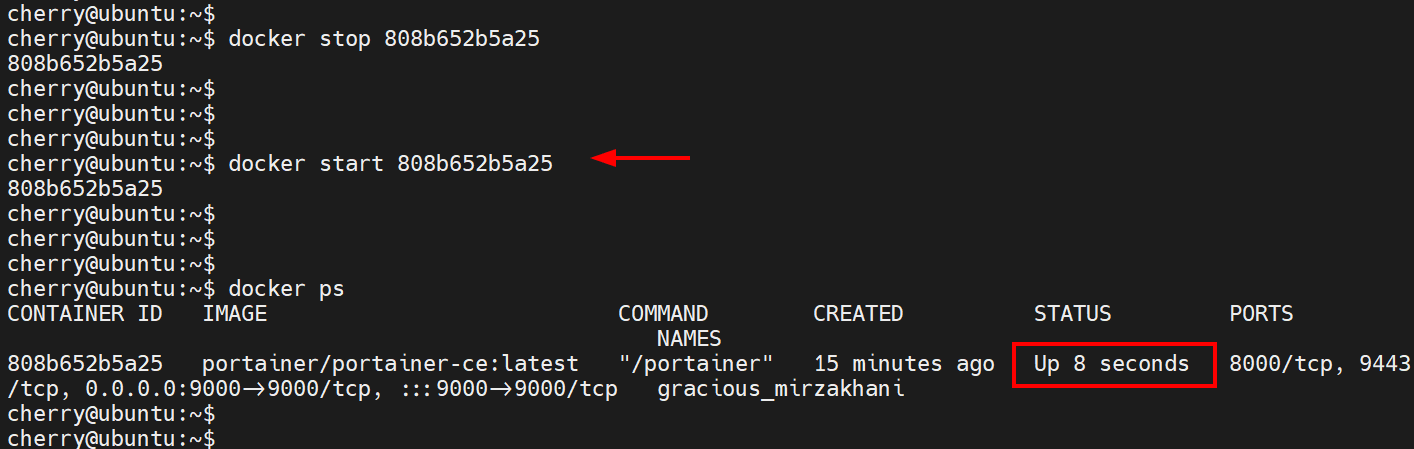
Now, let’s see how to start Portainer. When the Portainer container is created, Portainer starts and runs silently in the background. To confirm this, run the Docker ps command to list the currently running containers.
Docker ps

As you can see, the container is running. If you stop the container using the Docker stop command, you can start it using the Docker start command followed by the container ID.
Docker start container_ID
To verify that the container is running, you can list running containers by invoking the Docker ps command.
Docker ps
#4. How to stop Portainer
To stop Portainer, run the Docker stop command followed by the Portainer container ID.
Docker stop container_ID
Once again, you can verify that the container is stopped by listing currently running containers.
Docker ps

This time around, you can see that no currently running containers are listed, a testament to the fact that Portainer is stopped and, hence, not running.
#5. How to access Portainer
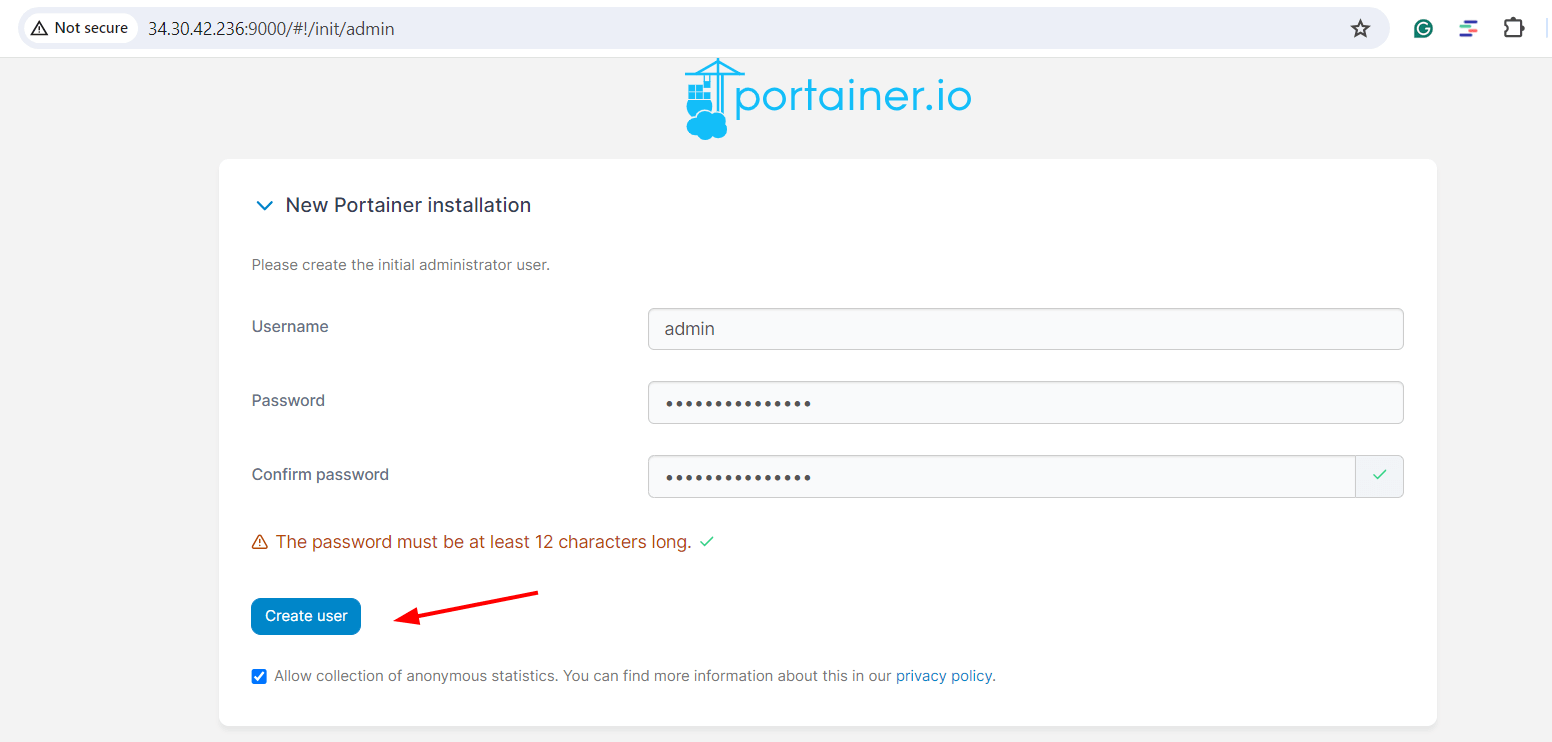
With Portainer installed, head over to your web browser and access the following URL.
http://server-ip:9000
The Portainer UI will come to view your browser. First, you will be prompted to create an administrative user, which will also be the login user. The username is already predefined as admin. So provide a strong password and confirm it. Then click Create user to create the administrative user.
NOTE
Sometimes, you might see a ‘timeout’ screen as shown. This shows that Portainer has experienced an issue and has consequently timed out for security purposes.
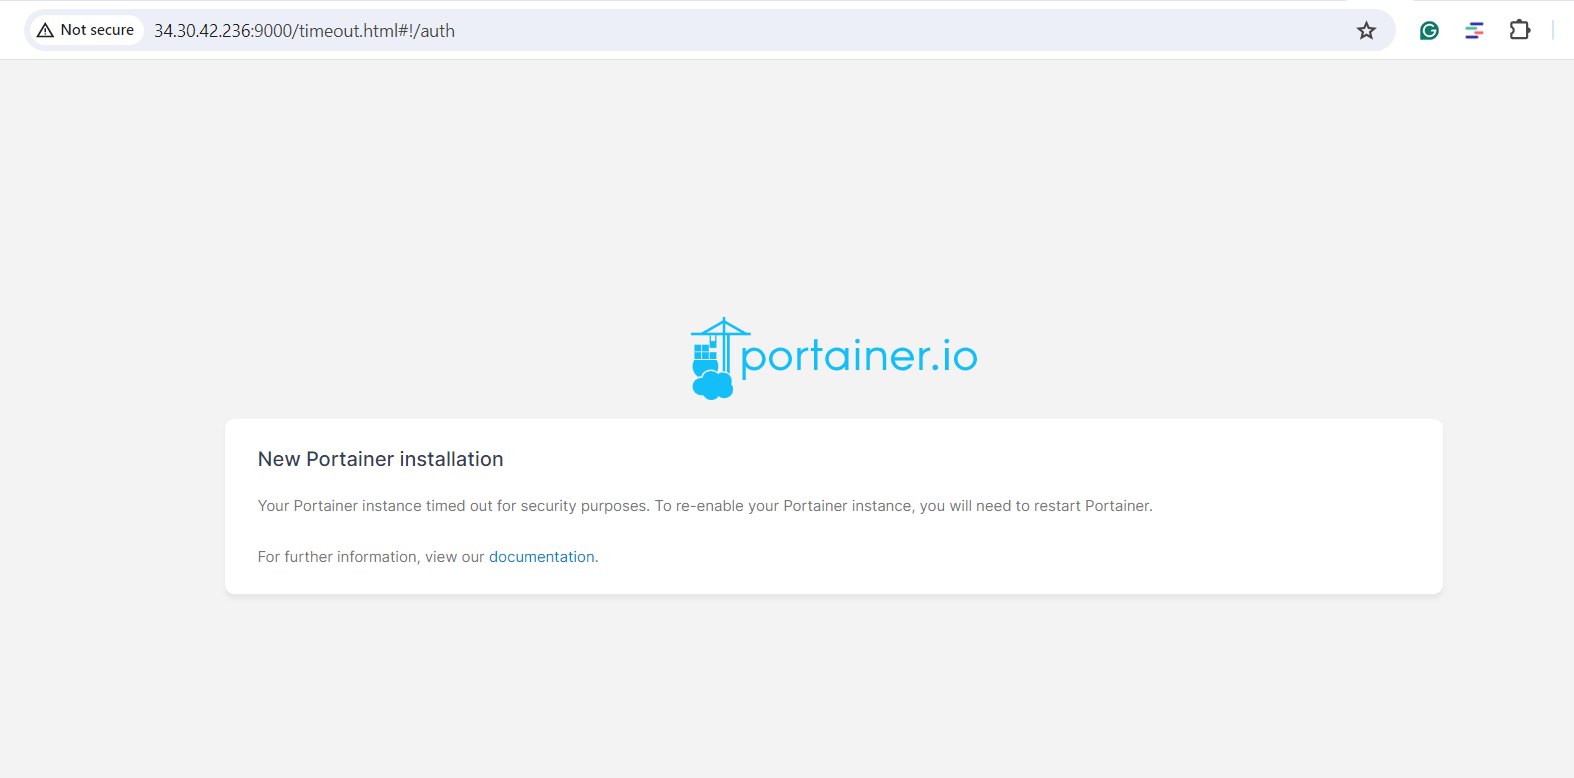
To address the issue, simply restart the Portainer container.
Docker restart container_ID
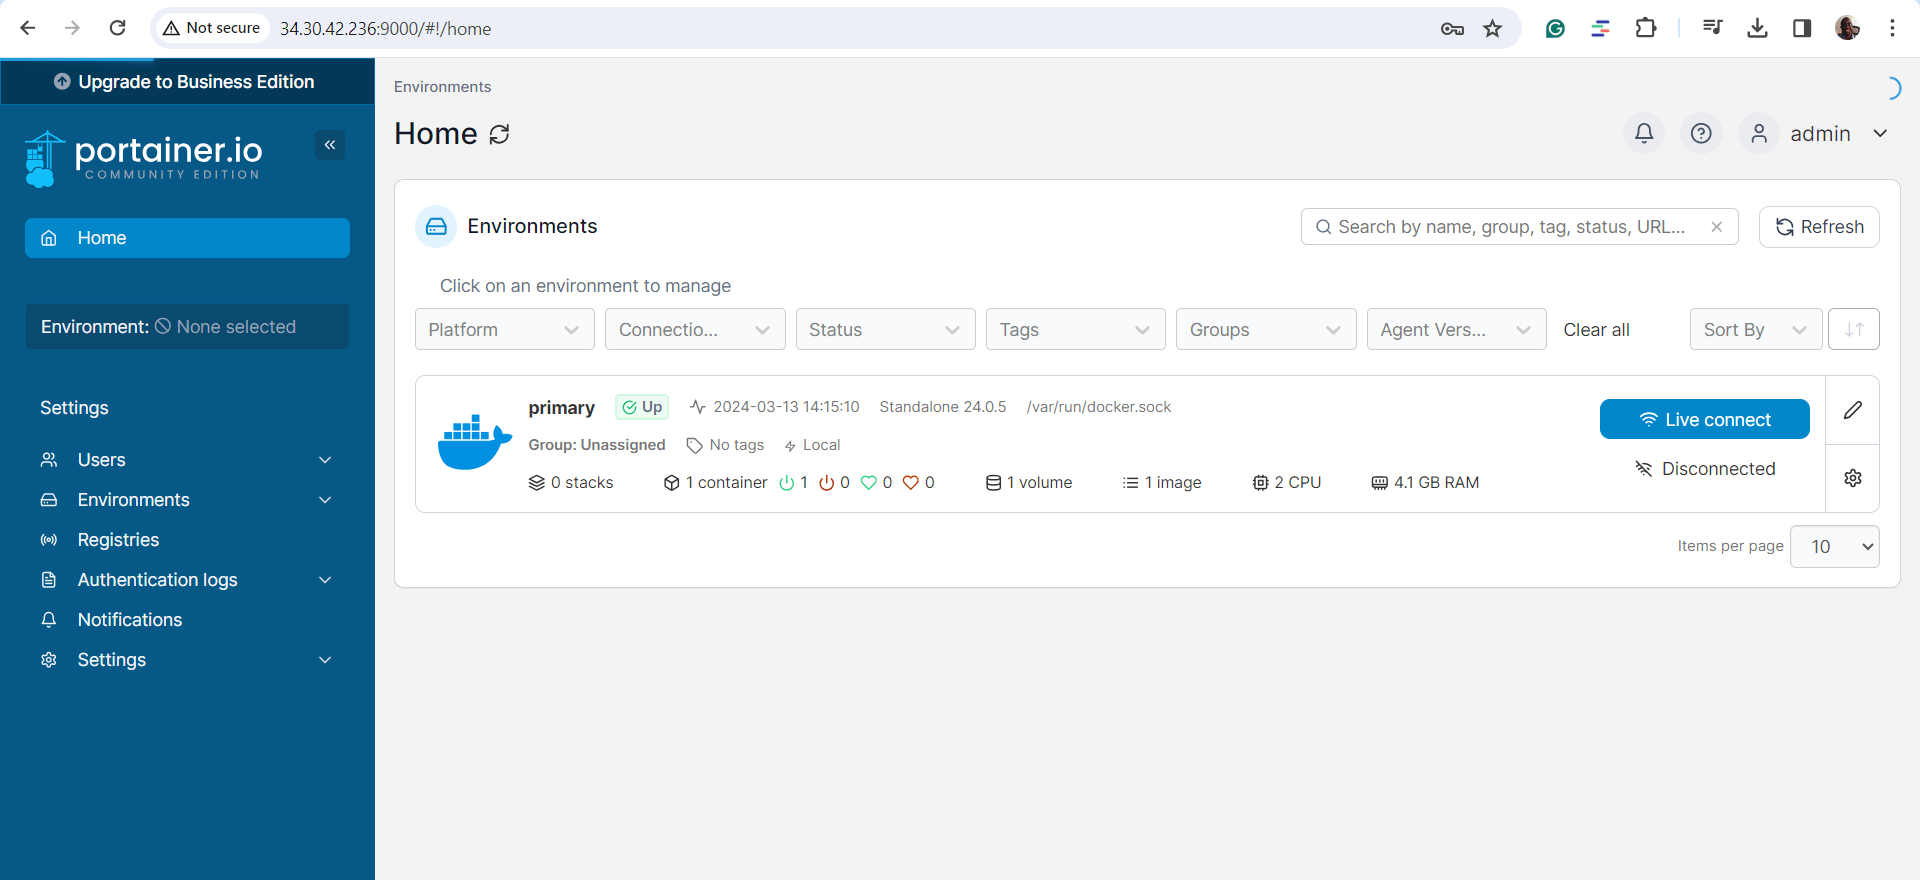
Once logged in, you will be guided to the home page, which provides an overview of your Docker environment, including the status of the Docker host, number of containers, images, volumes, and system metrics such as CPU and RAM.
#How to create a container with Portainer
The goal of Portainer is to simplify the provision and management of Docker resources. As a bonus exercise, let’s see how you can create a container using Portainer. For demonstration purposes, we will create a Nginx container and map port 80 on the container to port 8080 on the Docker host.
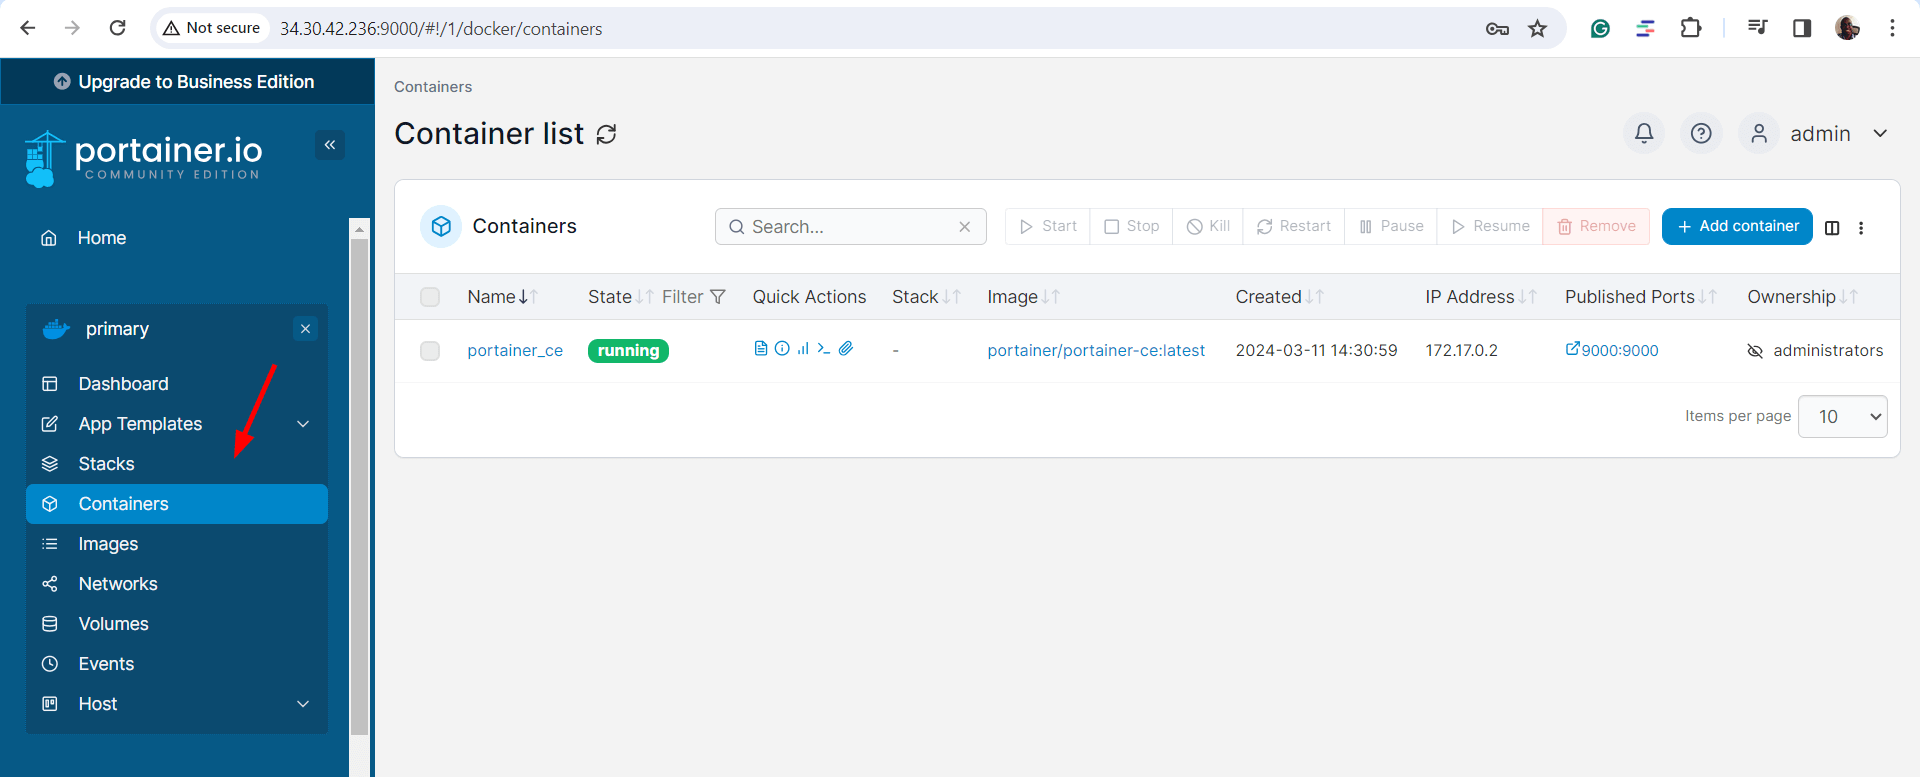
First, click the Containers section on the left sidebar. This will list the containers in your Docker environment. Currently, there's only one container—the portainer container.
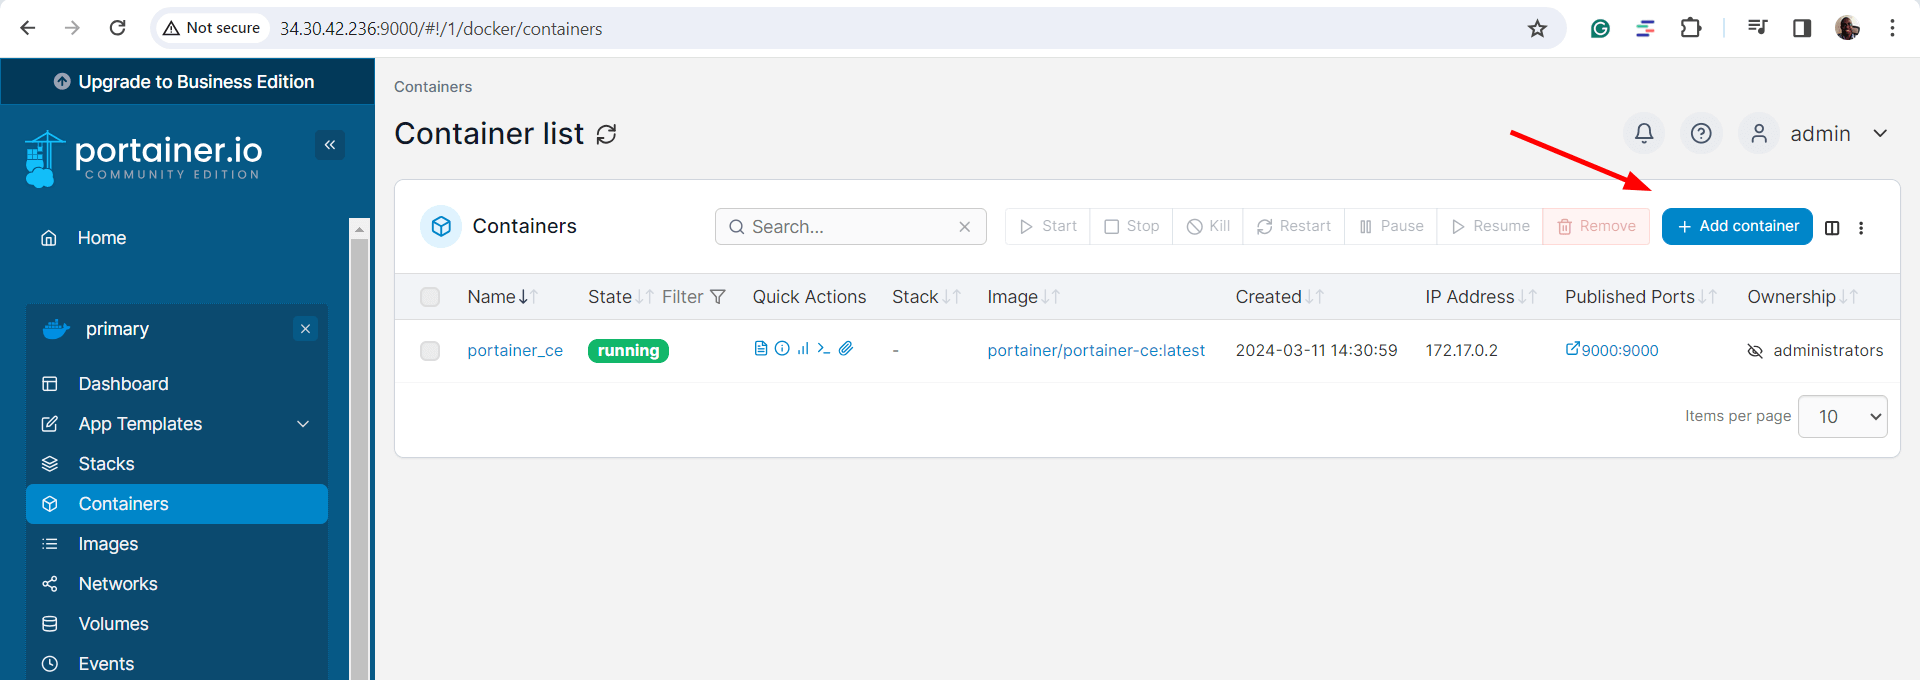
To proceed, click the Add Container button.
In the next step, fill in the container details. Be sure to specify the container name and image from which the container will be created. By default, Portainer is configured to use the Docker hub registry.
Since we are exposing Nginx to external users, you need to click Publish a new network port and specify the host and container port as 8080 and 80 respectively.
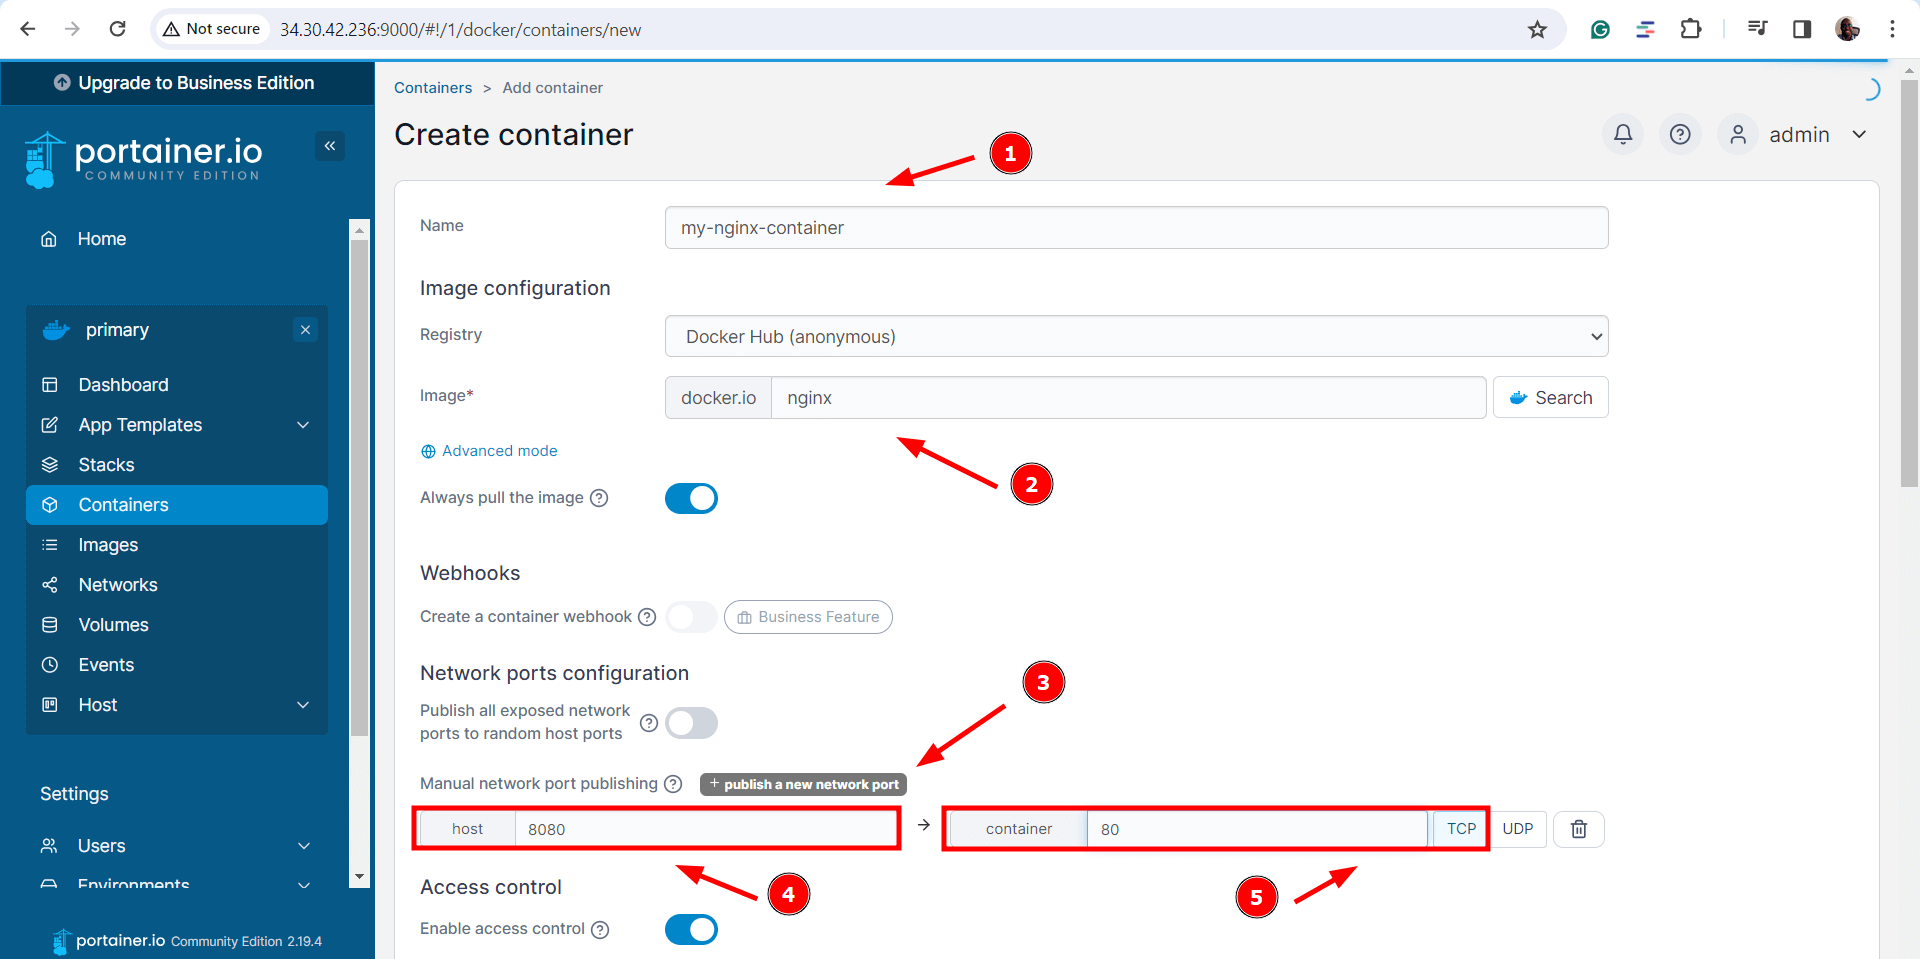
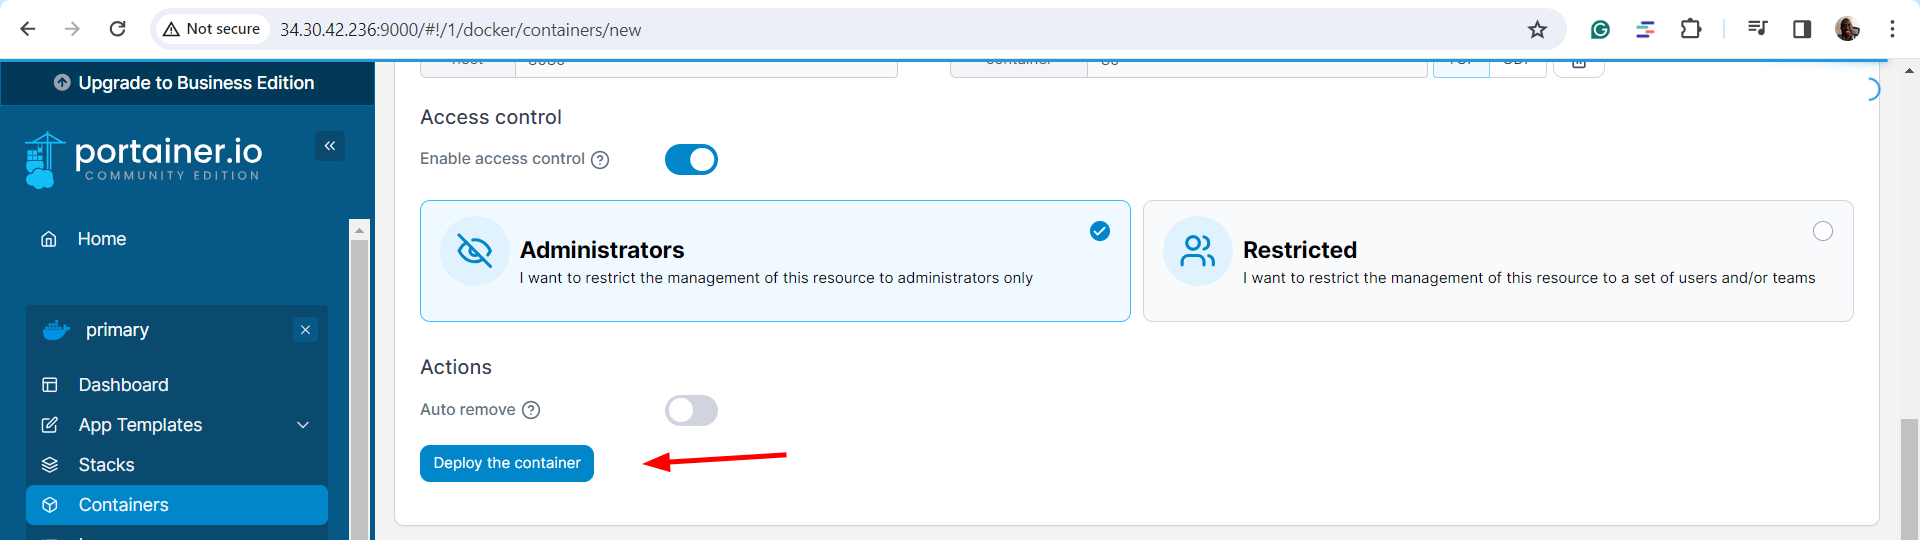
Finally, click the Deploy the container button.
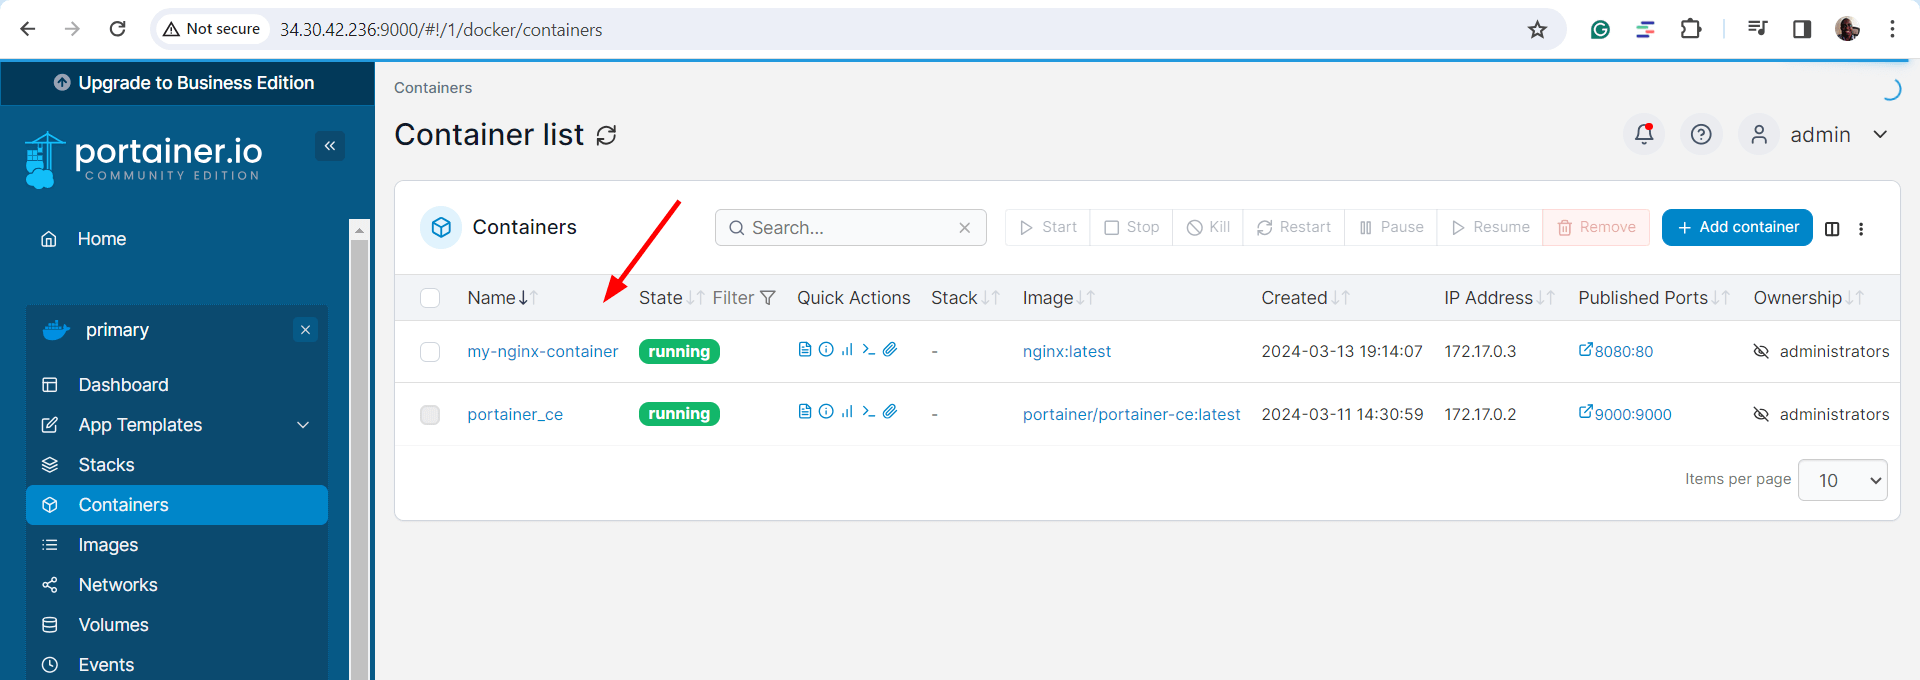
The newly created container will appear in the Container list section.
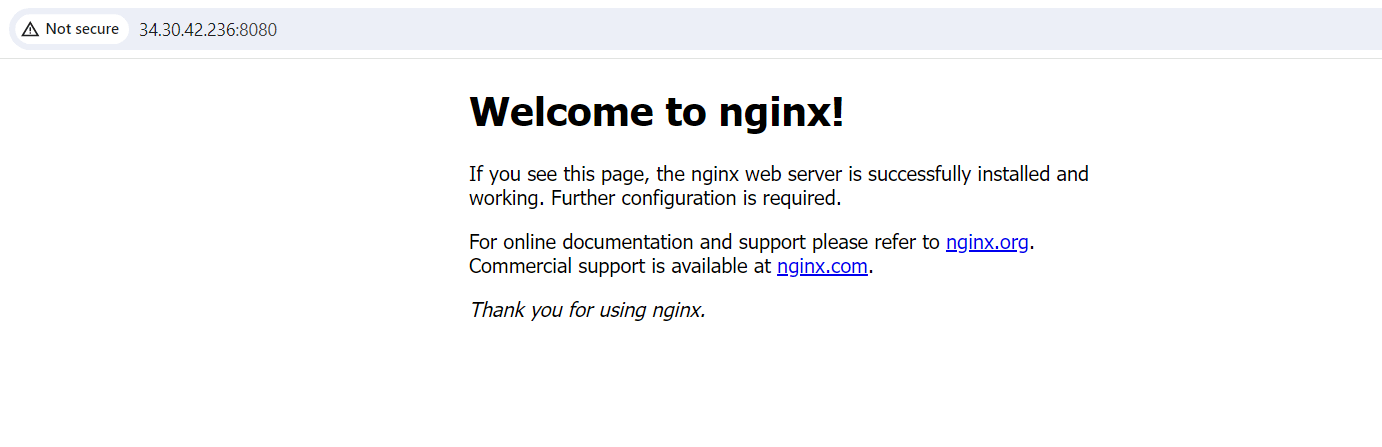
Next, head over to the browser and visit the following URL
http://server-ip:8080
The Nginx default welcome page will be displayed. This is a confirmation that the Nginx container is running as expected with the specified port mappings.
#Conclusion
In this tutorial, you have learned how to use Portainer. I demonstrated how to start Portainer, stop, and access Portainer. You have also gone one step further, accessed the Portainer UI, and deployed containers on the Portainer webUI.


