How to Install KVM on Ubuntu 24.04: Step-By-Step


KVM (Kernel-based Virtual Machine) is a Type 1 hypervisor built into the Linux kernel. It turns any Linux server into a virtualization host capable of running multiple isolated virtual machines with near-native performance. KVM relies on hardware virtualization extensions (Intel VT-x or AMD-V) and pairs with QEMU for hardware emulation and libvirt for management.
In this tutorial, you will install KVM on Ubuntu 24.04, verify hardware support, configure networking, and create virtual machines using both the virt-manager GUI and the virt-install command line.
#What is KVM?
The Kernel-based Virtual Machine (KVM) is a virtualization solution embedded in the Linux kernel that transforms Linux into a Type 1 hypervisor, directly interacting with hardware systems without the need for an operating system layer as Type 2 hypervisors require.
Integrating processor extensions such as Intel VT-x or AMD-V into its operation enables KVM to virtualize hardware components and create environments for hosting operating systems and their associated applications and services. It is beneficial for developers and system administrators looking to efficiently manage and operate multiple operating systems within a single computing environment.
#What is KVM used for?
KVM allows you to run various operating systems as virtual machines. It's widely used for server virtualization, development environments, and testing setups that require isolated instances. Because it leverages Linux's capabilities, KVM offers native performance levels, making it a preferred choice for both local and cloud-based virtualization.
#Prerequisites
Make sure you have an Ubuntu 24.04 operating system, with the following requirements to proceed with this tutorial;
-
64-bit processor with hardware virtualization support, like Intel VT x or AMD V.
-
4 GB of RAM
-
Storage: At least 20 GB of free disk space
#How to install KVM on Ubuntu 24.04
Installing KVM is relatively straightforward and takes a few commands to be ready to use on Ubuntu, so let's dive right in. Follow the steps below to install KVM on the Ubuntu 24.04 system.
#Step 1: Verify hardware virtualization support
KVM relies on hardware virtualization extensions (Intel VT or AMD-V) to provide efficient performance. This support is enabled in the CPU and system firmware for KVM functionality to be active. The following steps below show how you can do this.
#1. Check virtualization support
Use the lscpu command to confirm if your CPU supports virtualization. You should see either "vmx" (Intel) or "svm" (AMD) flag in the output.
lscpu | grep -E 'vmx|svm'
If the output includes "vmx" or "svm", your CPU supports virtualization. If not, KVM cannot run on your system.
#2. Enable virtualization in BIOS/UEFI
If virtualization isn't enabled, reboot and access BIOS/UEFI settings (usually by pressing keys like F2, F10, or Delete during startup). Locate virtualization options under CPU configuration and enable Intel VT or AMD-V.
#Step 2: Install KVM and required packages
Once hardware support is verified, install KVM and additional packages, such as libvirt for VM management and virt-manager for a graphical interface.
sudo apt update
sudo apt install -y qemu-kvm libvirt-daemon-system libvirt-clients bridge-utils virt-manager
-
qemu-kvm: Installation of the KVM module and tools. -
libvirt-daemon-systemandlibvirt-clients: Handle virtualization management services. -
bridge-utils: Helps configure networking for VMs. -
virt-manager: a GUI to manage virtual machines. This is not a compulsory addition for your virtual machine to work, but you might want to add this if needed.
#Step 3: Verify the KVM installation
Confirm that KVM is installed correctly and the modules are loaded.
#1. List VMs
Check the list of all the active and inactive virtual environments:
sudo virsh list --all

#2. Check KVM status
Use the following commands to ensure KVM is active:
sudo systemctl status libvirtd
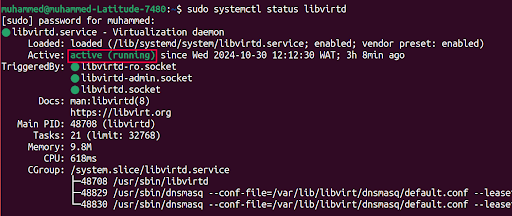
If libvirtd is running, KVM is properly set up.
#3. Verify module loading
Confirm the presence of the KVM modules:
lsmod | grep kvm
The image above shows that my system has 'kvm' and 'kvm_intel' listed as loaded modules which means that KVM is set up and ready to be used.
#Step 4: Add user to KVM and Libvirt groups
To manage virtual machines without root privileges, add your user to the kvm and libvirt groups.
sudo usermod -aG kvm,libvirt $USER
newgrp libvirt
This grants your user permission to run VMs without elevated privileges. Log out and log back in to activate group membership changes.
#Step 5: Configure networking for virtual machines
A networking setup allows VMs to connect to the network or the internet. By default, KVM provides Network Address Translation (NAT), which is suitable for most basic setups.
#1. Understanding network modes
KVM supports several network modes—NAT, bridged, and isolated.
-
NAT: Allows VMs to access the internet through the host but isolates them from external networks.
-
Bridged: Connects VMs directly to the host's network, making them accessible to external devices.
#2. Verify NAT configuration
The default NAT network configuration for KVM can be verified by checking the default network in libvirt:
sudo virsh net-list --all

If it shows as inactive, start it:
sudo virsh net-start default
sudo virsh net-autostart default
This ensures NAT networking for your virtual machines.
#Step 6: Launch Virt-Manager and create a virtual machine
Virt-Manager offers a straightforward GUI to create and manage virtual machines. In this step, you will learn how to create an Ubuntu 24.04 VM using the virt-Manager tool. Download the Ubuntu 24.04 Server ISO first, or use an ISO you already have locally.
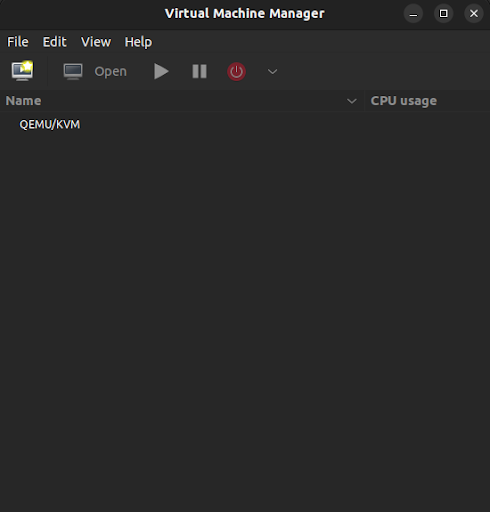
#1. Open Virt-Manager
Launch it via the terminal or application menu:
sudo virt-manager
Note: The virt-manager command won't work if you are using a virtual machine because it requires access to a graphic display.
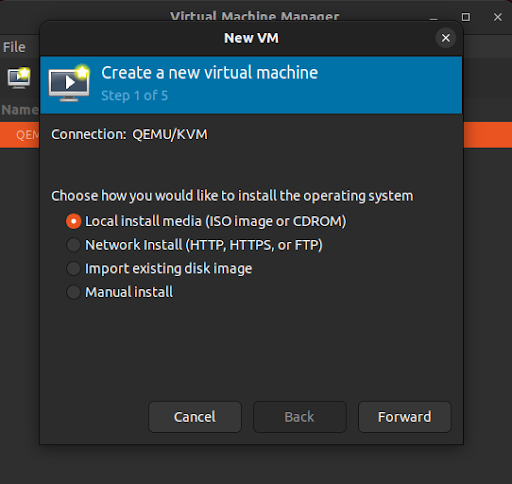
#2. Create a new virtual machine
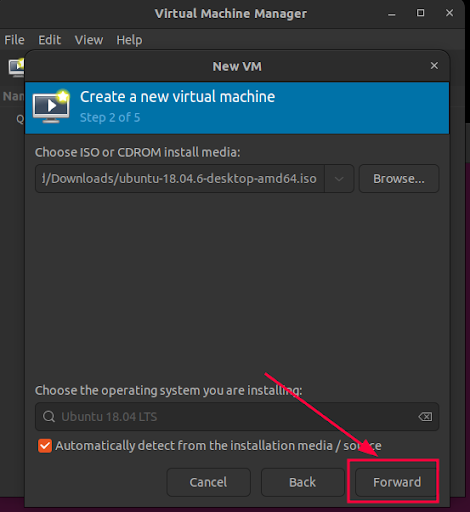
- Click "File" > "New Virtual Machine" to start the VM creation wizard.
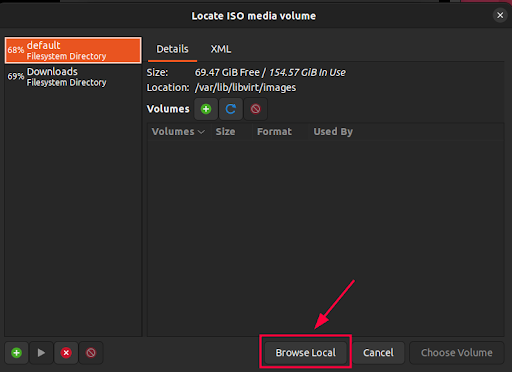
- Click "Browse…" to locate ISO media volume
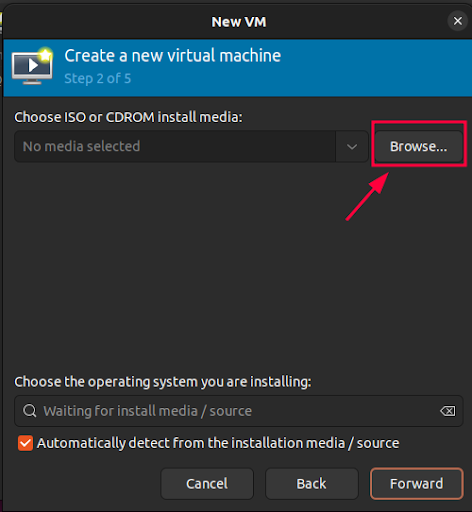
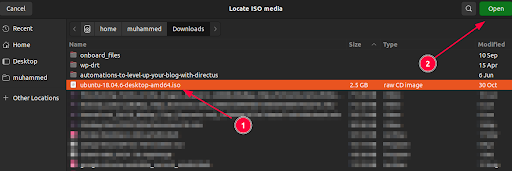
- Click "Browse Local" and choose a local ISO file.
- Open the file you have selected
- Click "Foward" button to go to the next step.
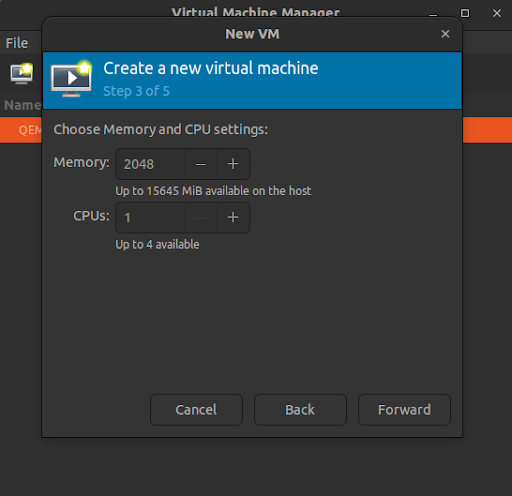
- Allocate appropriate resources. Generally, 1-2 GB RAM and 1 CPU core are adequate for simple setups.
- Allocate virtual disk space, ideally more than 20 GB for a general-purpose OS.
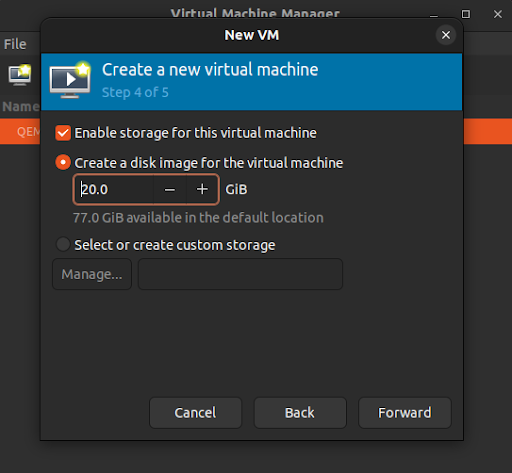
- Click on finish to start the creation process
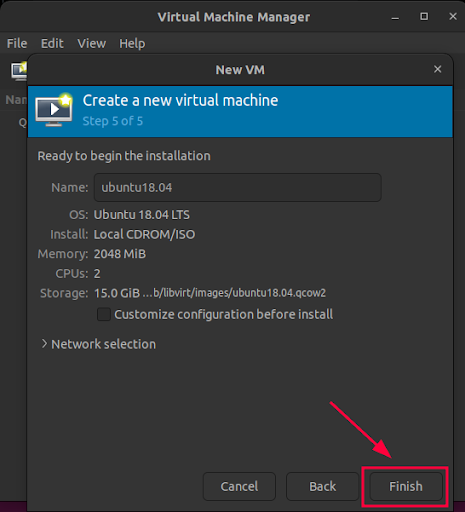
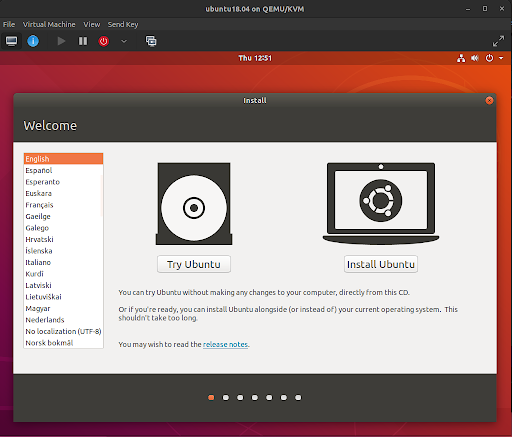
A window to continue the installation of the operating system will be provided after some time.
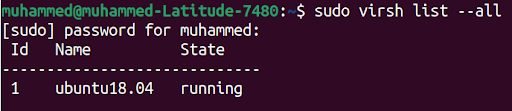
After the virtual machine is created, you should see it on your list of virtual machines.
sudo virsh list --all
#How to create a VM from the command line (virt-install)
On headless servers without a desktop environment, virt-install is the standard way to create virtual machines. It accepts all VM parameters as command-line flags and works over an SSH session.
First, download an Ubuntu 24.04 Server ISO to your server:
wget -P /var/lib/libvirt/images/ https://releases.ubuntu.com/24.04/ubuntu-24.04.2-live-server-amd64.iso
Create a VM with 2 CPU cores, 4 GB RAM, and a 20 GB disk:
sudo virt-install \
  --name ubuntu2404-vm \
  --ram 4096 \
  --vcpus 2 \
  --disk path=/var/lib/libvirt/images/ubuntu2404-vm.qcow2,size=20,format=qcow2 \
  --os-variant ubuntu22.10 \
  --cdrom /var/lib/libvirt/images/ubuntu-24.04.2-live-server-amd64.iso \
  --network network=default \
  --graphics vnc,listen=0.0.0.0 \
  --noautoconsole
Here is what the key flags mean: --name sets the VM name, --ram and --vcpus allocate memory and CPU cores, --disk creates a 20 GB QCOW2 disk image, --os-variant optimizes settings for Ubuntu 22.10, --cdrom points to the ISO, and --noautoconsole prevents the installer from trying to open a graphical console on a headless server.
After running the command, connect to the VM's VNC console from your local machine using a VNC client pointed at the server's IP address. Complete the Ubuntu installation through the VNC session, then reboot the VM.
Verify the VM is running:
sudo virsh list --all
#How to set up bridged networking
NAT works for basic setups, but production VMs often need their own IP addresses on the host network. A network bridge connects VMs directly to the physical network, making them accessible from other machines on the LAN.
Create a Netplan configuration for the bridge. Open or create a file in /etc/netplan/:
sudo nano /etc/netplan/01-bridge.yaml
Add the following configuration, replacing ens18 with your actual network interface name:
network:
  version: 2
  ethernets:
    ens18:
      dhcp4: false
  bridges:
    br0:
      interfaces:
        - ens18
      dhcp4: true
Apply the configuration:
sudo netplan apply
Verify the bridge is active:
ip addr show br0
The bridge should now have an IP address. When creating new VMs, use --network bridge=br0 instead of --network network=default to attach them to the bridged network.
#How to clone, snapshot, and delete VMs
#Clone a VM
Create an exact copy of an existing VM. The source VM must be shut down first:
sudo virsh shutdown ubuntu2404-vm
sudo virt-clone --original ubuntu2404-vm --name ubuntu2404-clone --auto-clone
#Create and revert snapshots
Snapshots save the VM's current state so you can roll back later. Create a snapshot:
sudo virsh snapshot-create-as ubuntu2404-vm --name "before-update" --description "Snapshot before system update"
List all snapshots for a VM:
sudo virsh snapshot-list ubuntu2404-vm
Revert to a snapshot:
sudo virsh snapshot-revert ubuntu2404-vm "before-update"
Delete a snapshot you no longer need:
sudo virsh snapshot-delete ubuntu2404-vm "before-update"
#Delete a VM
Remove a VM and its associated disk storage:
sudo virsh destroy ubuntu2404-vm
sudo virsh undefine ubuntu2404-vm --remove-all-storage
The destroy command forces the VM to stop immediately. The undefine --remove-all-storage command removes the VM definition and deletes its disk files.
If you get the error: "Requested operation is not valid: cannot undefine domain with nvram", run the command:
virsh --connect qemu:///system undefine --nvram ubuntu2404-vm
#How to uninstall KVM from Ubuntu
If you no longer need KVM, remove all related packages and clean up configurations.
Stop the libvirt service:
sudo systemctl stop libvirtd
sudo systemctl disable libvirtd
Remove KVM and related packages:
sudo apt purge qemu-kvm libvirt-daemon-system libvirt-clients bridge-utils virt-manager
sudo apt autoremove
Remove the user from KVM and libvirt groups:
sudo deluser $USER kvm
sudo deluser $USER libvirt
Optionally, delete the default storage pool and VM images:
sudo rm -rf /var/lib/libvirt/images/
#Troubleshooting common KVM issues
#"Cannot access storage file" permission error
Libvirt runs as the libvirt-qemu user and needs read/write access to VM disk images. Fix the permissions:
sudo chown libvirt-qemu:kvm /var/lib/libvirt/images/your-vm.qcow2
Alternatively, move your disk images to /var/lib/libvirt/images/, which has the correct ownership by default.
#libvirtd fails to start
Check the service logs for details:
sudo journalctl -u libvirtd --no-pager -n 30
A common cause is another virtualization tool (like VirtualBox) holding a lock on /dev/kvm. Stop the conflicting service and restart libvirtd.
#VMs have no network connectivity
Verify the default NAT network is active:
sudo virsh net-list --all
If the default network shows as inactive, start it with sudo virsh net-start default. Also, confirm the VM is attached to the correct network by checking its configuration with sudo virsh dumpxml vm-name | grep -A5 interface.
#"KVM not available" despite CPU support
The CPU may support virtualization, but the BIOS/UEFI setting could be disabled. Reboot the server, enter BIOS/UEFI settings, and enable Intel VT-x or AMD-V under the CPU configuration section. After rebooting, verify with lscpu | grep -E 'vmx|svm'.
#Managing KVM virtual machines
For command-line management, KVM provides several utilities to control VM states.
#1. Start a VM
sudo virsh start <vm-name>
#2. Stop a VM
sudo virsh shutdown <vm-name>
#3. Pause and Resume
You can suspend a VM's state and resume it later.
sudo virsh suspend <vm-name>
sudo virsh resume <vm-name>
These commands allow for easy virtual machine management directly from the terminal.
#Conclusion
In this tutorial, you installed KVM on Ubuntu 24.04, verified hardware virtualization support, and configured both NAT and bridged networking. You created virtual machines using the virt-manager GUI and the virt-install command line, managed them with cloning and snapshots, and removed KVM when no longer needed.
For a deeper comparison with other hypervisors, see our guide on KVM vs. VMware vs. Hyper-V. For additional configuration options and performance tuning, check out the official KVM documentation and Libvirt's user guide.
FAQs
What is the difference between KVM and VirtualBox?
KVM is a Type 1 hypervisor built into the Linux kernel with near-native performance. VirtualBox is a Type 2 hypervisor that runs on top of a host OS. KVM suits server and production workloads; VirtualBox is easier to set up for desktop testing.
Can I run KVM inside a virtual machine?
Yes, if the outer hypervisor supports nested virtualization. On an Intel host, load the module with `sudo modprobe -r kvm_intel && sudo modprobe kvm_intel nested=1`. Nested KVM is useful for testing but carries a performance penalty compared to running on bare metal.
How much RAM does KVM need?
KVM itself uses very little memory. The host needs enough RAM for its own OS (1-2 GB minimum) plus the combined RAM allocated to all running VMs. For example, running three VMs with 4 GB each requires at least 14 GB total on the host.
Can I run Windows VMs on KVM?
Yes. KVM supports Windows guests. Use `--os-variant win10` or `--os-variant win11` with `virt-install`, and install the VirtIO drivers during Windows setup for better disk and network performance.
What is the difference between virsh and virt-manager?
`virsh` is a command-line tool that works on headless servers and supports scripting. `virt-manager` is a graphical interface. Both use libvirt as the backend and manage the same VMs.
How do I access a KVM VM remotely?
Use VNC or SPICE viewers for graphical access, or `virsh console vm-name` for serial console access. You can also SSH directly into the VM once it has a network connection.


