How to Generate and Add an SSH Key to the Cherry Servers Client Portal
SSH (Secure Shell) keys are a highly secure method for accessing remote servers without the need for traditional passwords. When generating an SSH key pair, it creates two cryptographic keys: a public key and a private key. These keys allow for secure, passwordless authentication, enhancing security and simplifying server management. Some of the benefits of using SSH include:
- Stronger security - SSH keys offer robust protection against brute-force and password- guessing attacks, eliminating the need to expose server access through weak or reused credentials.
- Seamless authentication - once configured, SSH keys enable direct access to your server without the need to enter a password each time. This is particularly useful for frequent server access, streamlining your workflow.
- Scalable and flexible access - SSH keys are ideal for managing multiple servers. A single public key can be deployed across multiple instances, offering centralized and consistent authentication.
- Compatibility across systems - SSH keys are supported across all major operating systems, including Linux, macOS, and Windows, ensuring seamless integration and management.
When the SSH key pair is generated, the private key must remain securely on your local machine, while the public key can either be added to the Cherry Servers client portal for automated deployments, or manually inserted directly onto the server for immediate access.
Adding the SSH key to the Cherry Servers client portal allows it to be linked with your servers, ensuring that deployed servers are immediately accessible without a password, and helps protect against brute-force attacks while simultaneously minimizing the risk of password-related vulnerabilities.
#SSH Key Types
There are a range of key types to consider when creating an SSH key, each with their own strengths and use cases. Understanding these key types helps you select the most appropriate one for your server setup.
- RSA (Rivest–Shamir–Adleman)
- Key length options - 2048, 3072, and 4096 bits;
- Security level - strong but less secure than newer algorithms at the same key length;
- Compatibility - RSA is the most widely supported SSH key type and is compatible with all SSH clients and servers.
- ED25519 (Edwards-curve Digital Signature Algorithm)
- Key length - fixed at 256 bits;
- Security level - high security with a much shorter key length; more efficient and faster than RSA;
- Compatibility - supported by most modern SSH clients and servers (OpenSSH 6.5+).
- ECDSA (Elliptic Curve Digital Signature Algorithm)
- Key length options - 256, 384, and 521 bits;
- Security level - stronger per bit compared to RSA but slightly weaker than ED25519 for the same key size;
- Compatibility - supported by most SSH servers, but less common than RSA.
- DSA (Digital Signature Algorithm)
- Key length: fixed at 1024 bits;
- Security level: weak by modern standards, considered deprecated, and not recommended;
- Compatibility: supported but disabled by default in many modern OpenSSH implementations.
#Instructions to Generate and Add SSH Keys
#Step 1: Generate Your SSH Key
-
Open your terminal.
- Use Command Prompt (CMD) or PowerShell on Windows.
- On Linux or macOS, simply open your default terminal application.
-
Generate the SSH key pair.
- To generate a new key, enter the following command:
ssh-keygen -t ed25519- If you prefer RSA, you can use this command:
ssh-keygen -t rsa -b 4096 -
Choose the file location.
The example shown here is for a Windows system. You will be prompted to specify where to save the key. Press "ENTER" to accept the default location ~/.ssh/id_ed25519 or ~/.ssh/id_rsa. You should see an output similar to:
Output
Microsoft Windows [Version 10.0.20348.169] (c) Microsoft Corporation. All rights reserved. C:\Users\Cherry>ssh-keygen -t ed25519 Generating public/private ed25519 key pair. Enter file in which to save the key (C:\Users\Cherry/.ssh/id_ed25519): -
OPTIONAL - Set a passphrase. For an additional layer of security, you can secure your SSH key with a passphrase. If you would prefer not to, press "ENTER" twice to skip this step.
Output
Created directory 'C:\Users\Cherry/.ssh'. Enter passphrase (empty for no passphrase): -
SSH key generation complete. After completing the steps, you will see an output that looks similar to this:
Output
Your identification has been saved in C:\Users\Cherry/.ssh/id_ed25519. Your public key has been saved in C:\Users\Cherry/.ssh/id_ed25519.pub. The key fingerprint is: SHA256:5Ih/1NLOPFMRxbtwLSvCMU7ITM1CCVe1Q9sumWCAia0 cherry@s246012 The key's randomart image is: +--[ED25519 256]--+ | o.=++.oo oo| | . +.o.+. + o| | . =o.+ . .o| | E .+.+= +.oo| | S++o+ =oo| | = .+o.=.o| | . .o..*.| | .o| | o| +----[SHA256]-----+
This confirms that both your public key (.pub file) and private key have been created.
#Step 2 Add Your SSH Key to the Cherry Servers Client Portal
Never share or upload your private key (id_ed25519 or id_rsa). The private key must stay on your local machine. Only the public key (ending with .pub) should be uploaded to the Cherry Servers client portal or inserted into the server. Exposing your private key can compromise server access.1.
-
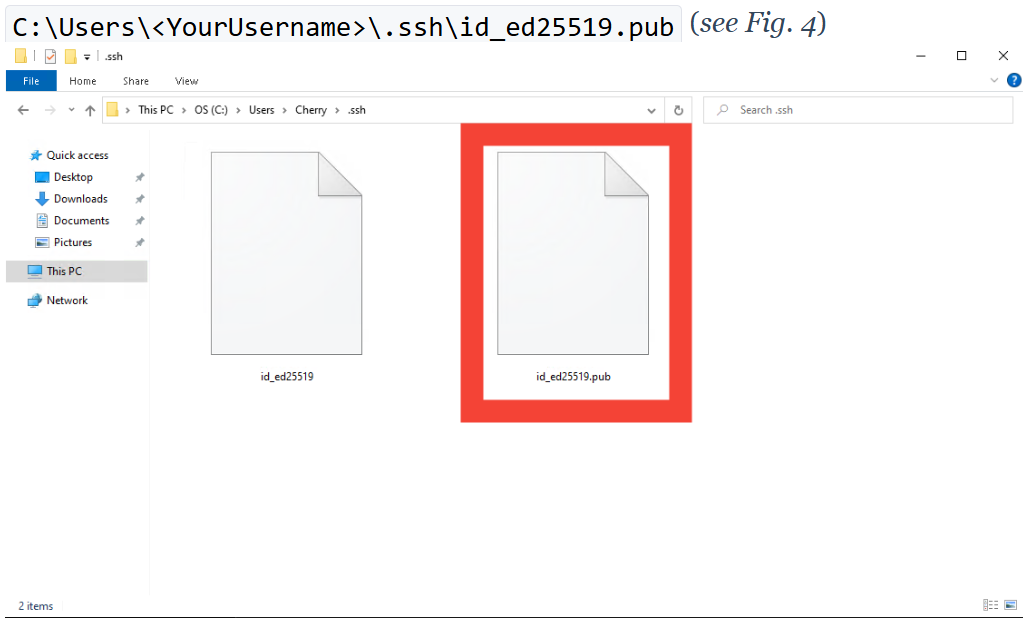
Locate your public key.
- On Windows, it is usually stored in:
C:\Users<YourUsername>.ssh\id_ed25519.pub

- On Linux or macOS:
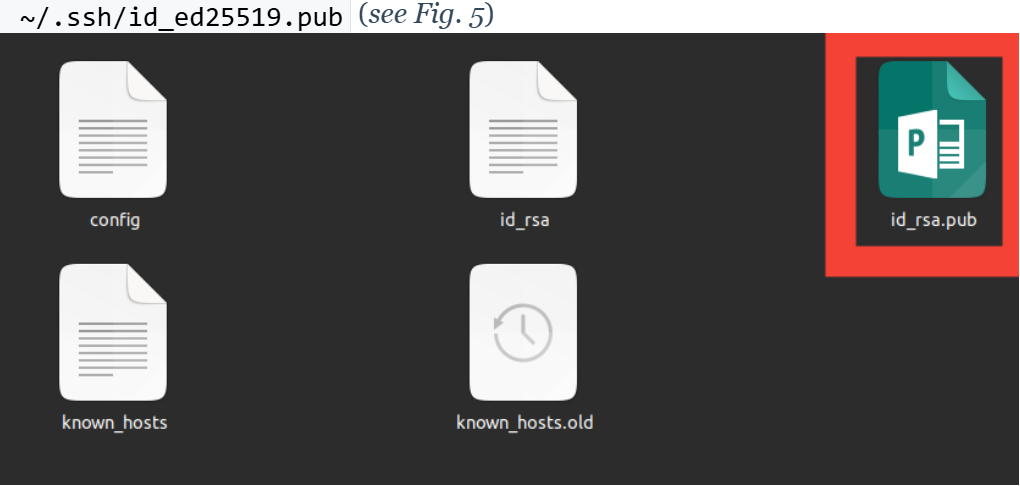
~/.ssh/id_ed25519.pub

- On Windows, it is usually stored in:
C:\Users<YourUsername>.ssh\id_ed25519.pub
-
Open the public key file. You may use any text editor to do this.

-
Copy the key contents.
Highlight the entire key string and copy it to your clipboard. The key starts with "ssh-ed25519" or "ssh-rsa" and ends with your machine's name.
-
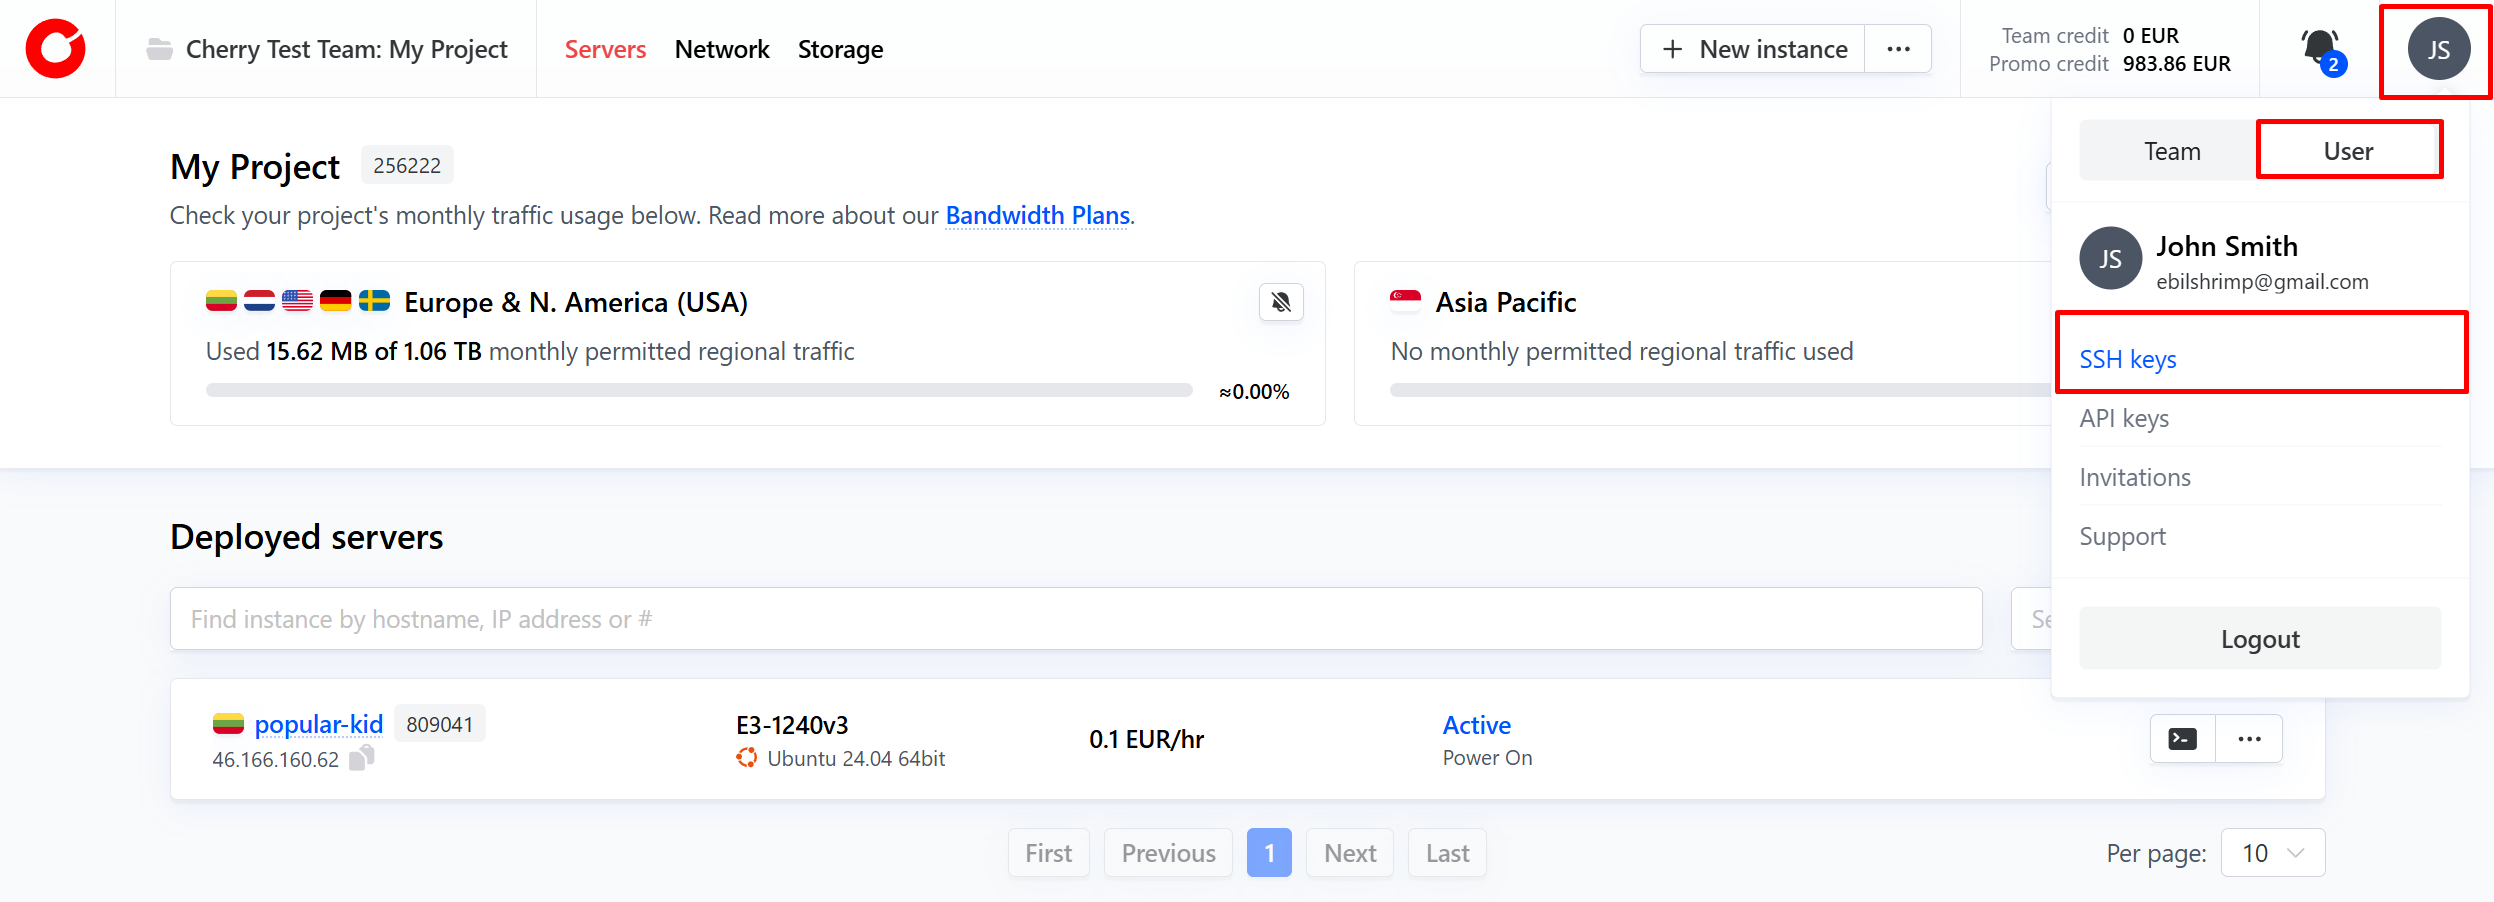
Navigate to Cherry Servers client portal.
- Open your web browser and go to the Cherry Servers client portal.
- Log in using your account credentials.
- Click on your user icon in the top-right corner of the home page. Switch to the user tab and select SSH keys from the menu.

-
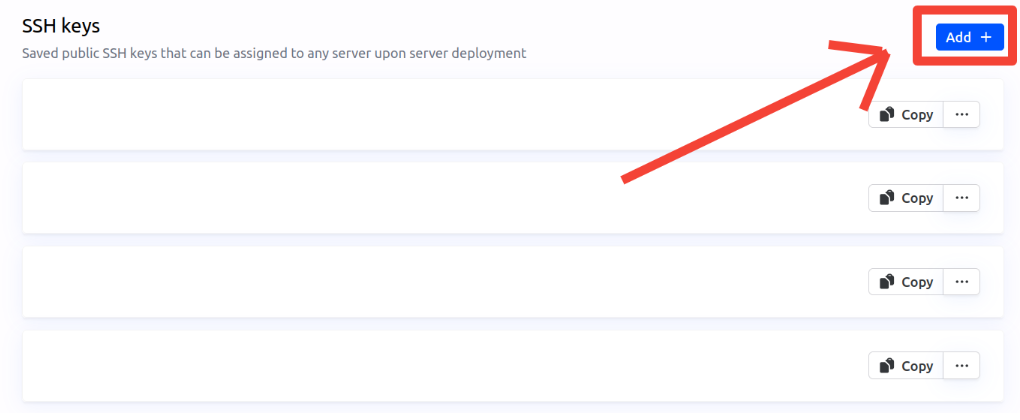
Add the SSH key.
- Click the blue "Add +" button to create a new SSH key entry.

- In the pop-up window, provide a name (label) for your key, this helps you manage multiple keys later. Paste your copied public key into the "Key" field. Click "Add" to save it.

- Once successful, you’ll see a confirmation message.
- Click the blue "Add +" button to create a new SSH key entry.


#Select Your SSH Key During Server Deployment or Rebuild
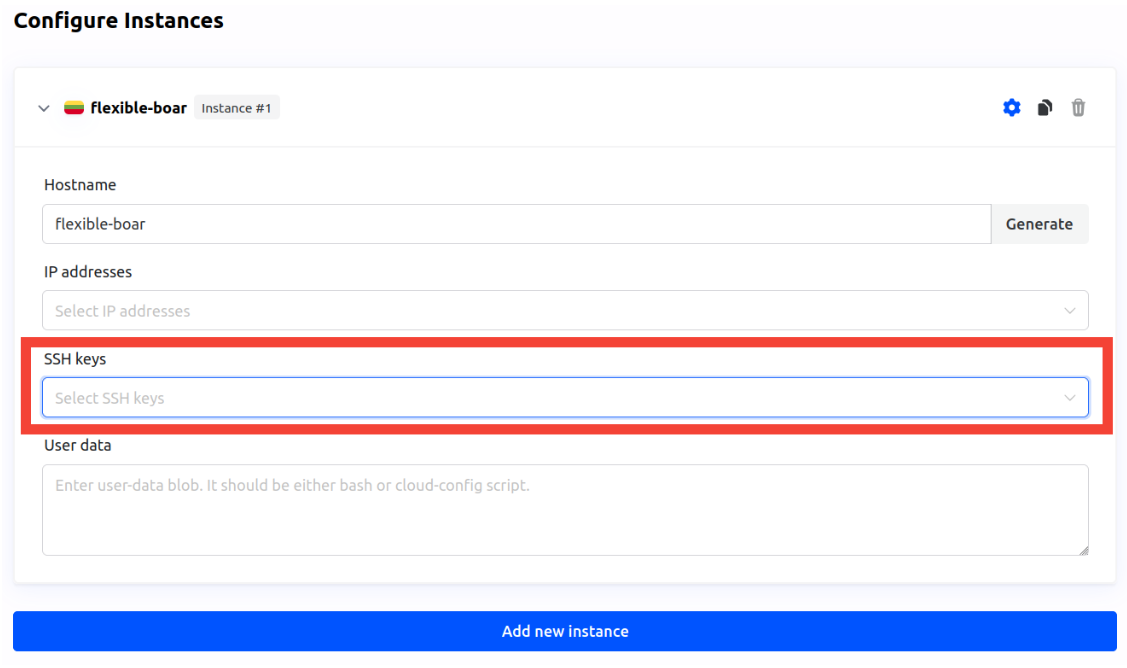
On Server Deployment.
- When ordering a new server, you will be prompted to select an SSH key during the configuration step. This ensures that your SSH key will be automatically added to the server, allowing secure access without a password.

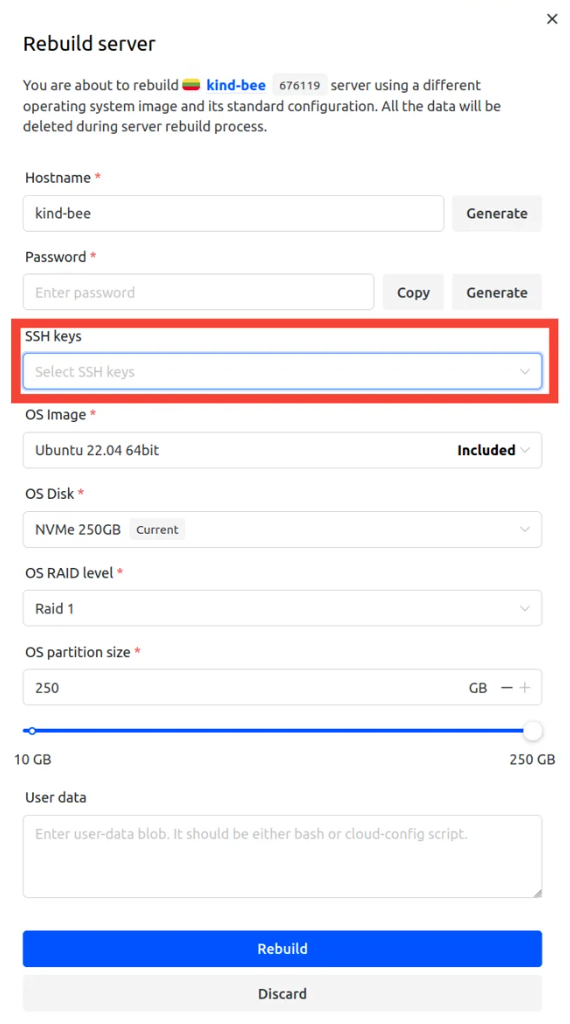
On Server Rebuilt.
-
The same SSH key selection is also available when rebuilding a server. This is useful when reinstalling the operating system or resetting your server configuration.

-
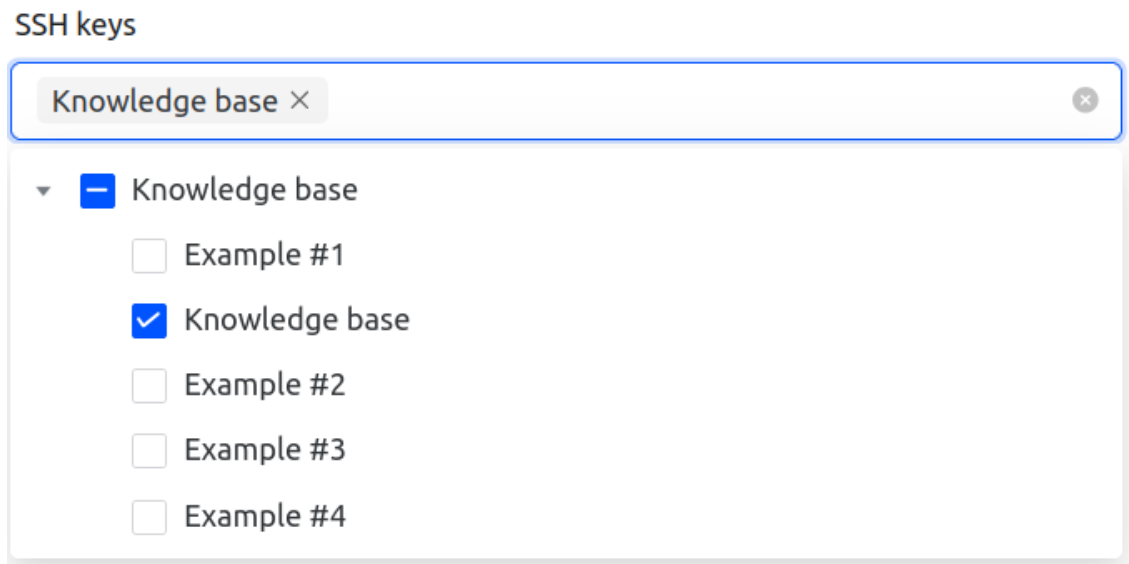
Select your SSH key.
From the drop-down menu labeled SSH keys, choose the key you previously added to the Cherry Servers client portal.

-
Access after deployment or rebuild.
Once the process completes, you'll be able to connect via SSH using your private key without needing to enter a password manually.
#Step 4: Manually Add Your SSH Key to a Running Server (if Missed During Deployment)
If you forgot to select your SSH key during deployment, it is still possible to add it manually.
-
Copy your public key to the server.
- For Windows:
type .\.ssh\id_ed25519.pub | ssh root@<Server's IP> "cat >> .ssh/authorized_key"- For Linux/MacOS:
ssh-copy-id -i ~/.ssh/id_ed25519.pub root@<Server's IP> -
Authenticate.
You will be prompted to enter your server password. This only happens once to add the key. Windows example:
Output
C:\Users\Cherry>type ..ssh\id_ed25519.pub | ssh root@5.199.173.2 "cat >> .ssh/authorized_key" The authenticity of host '5.199.173.2 (5.199.173.2)' can't be established. ECDSA key fingerprint is SHA256:Sc2HNOIbimcDiUU2DvraFUvaaDFwvdRMpx0sMzM/Occ. Are you sure you want to continue connecting (yes/no/[fingerprint])? yes Warning: Permanently added '5.199.173.2' (ECDSA) to the list of known hosts. root@5.199.173.2's password:Linux example:
Output
root@welcomed-snake:~# ssh-copy-id -i ~/.ssh/id_ed25519.pub root@5.199.173.2 /usr/bin/ssh-copy-id: INFO: Source of key(s) to be installed: "/root/.ssh/id_ed25519.pub" The authenticity of host '5.199.173.2 (5.199.173.2)' can't be established. ED25519 key fingerprint is SHA256:SXxRWgBXiu4j73/Jhvvy7u+PiwTZxzd3+YTsPYswEvw. This key is not known by any other names Are you sure you want to continue connecting (yes/no/[fingerprint])? yes /usr/bin/ssh-copy-id: INFO: attempting to log in with the new key(s), to filter out any that are already installed /usr/bin/ssh-copy-id: INFO: 1 key(s) remain to be installed -- if you are prompted now it is to install the new keys root@5.199.173.2's password: Number of key(s) added: 1 Now try logging into the machine, with: "ssh 'root@5.199.173.2'" and check to make sure that only the key(s) you wanted were added. -
Test your SSH login.
Now, you should be able to SSH into the server without a password:
ssh root@<Server's IP>
#Step 5: Troubleshooting Common SSH Issues
If you're unable to connect to your server using SSH, there are a few common causes and quick fixes that may resolve the problem:
-
Host key verification failed. This would appear on Windows as:
Output
C:\Users\Cherry>ssh root@5.199.173.2 @@@@@@@@@@@@@@@@@@@@@@@@@@@@@@@@@@@@@@@@@@@@@@@@@@@@@@@@@@@ @ WARNING: REMOTE HOST IDENTIFICATION HAS CHANGED! @ @@@@@@@@@@@@@@@@@@@@@@@@@@@@@@@@@@@@@@@@@@@@@@@@@@@@@@@@@@@ IT IS POSSIBLE THAT SOMEONE IS DOING SOMETHING NASTY! Someone could be eavesdropping on you right now (man-in-the-middle attack)! It is also possible that a host key has just been changed. The fingerprint for the ECDSA key sent by the remote host is SHA256:4rvGCePqU5e6SPukhMGORddy1OGuJm91oVzP2r9Ccl8. Please contact your system administrator. Add correct host key in C:\Users\Cherry/.ssh/known_hosts to get rid of this message. Offending ECDSA key in C:\Users\Cherry/.ssh/known_hosts:1 ECDSA host key for 5.199.173.2 has changed and you have requested strict checking. Host key verification failed.Or on Linux as:
Output
root@welcomed-snake:~# ssh root@5.199.173.2 @@@@@@@@@@@@@@@@@@@@@@@@@@@@@@@@@@@@@@@@@@@@@@@@@@@@@@@@@@@ @ WARNING: REMOTE HOST IDENTIFICATION HAS CHANGED! @ @@@@@@@@@@@@@@@@@@@@@@@@@@@@@@@@@@@@@@@@@@@@@@@@@@@@@@@@@@@ IT IS POSSIBLE THAT SOMEONE IS DOING SOMETHING NASTY! Someone could be eavesdropping on you right now (man-in-the-middle attack)! It is also possible that a host key has just been changed. The fingerprint for the ED25519 key sent by the remote host is SHA256:1actcCzNNFegFZyKYY2YC9pUGfgYuC7XR/rNtxrak04. Please contact your system administrator. Add correct host key in /root/.ssh/known_hosts to get rid of this message. Offending ECDSA key in /root/.ssh/known_hosts:3 remove with: ssh-keygen -f '/root/.ssh/known_hosts' -R '5.199.173.2' Host key for 5.199.173.2 has changed and you have requested strict checking. Host key verification failed.This error often appears after a server is rebuilt. Your system detects that the server's SSH fingerprint has changed. To fix it, remove the old host key from your known host's file:
- On Windows use:
ssh-keygen -f .\.ssh\known_hosts -R <Server's IP>Which will yield:
Output
C:\Users\Cherry>ssh-keygen -f ..ssh\known_hosts -R 5.199.173.2 Host 5.199.173.2 found: line 1 ..ssh\known_hosts updated. Original contents retained as ..ssh\known_hosts.old- On Linux/macOS:
ssh-keygen -f ~/.ssh/known_hosts -R <Server's IP>Which will yield:
Output
root@welcomed-snake:~# ssh-keygen -f ~/.ssh/known_hosts -R 5.199.173.2 Host 5.199.173.2 found: line 1 Host 5.199.173.2 found: line 2 Host 5.199.173.2 found: line 3 /root/.ssh/known_hosts updated. Original contents retained as /root/.ssh/known_hosts.old -
Permission denied (publickey). This usually means the server doesn’t recognize your SSH public key. Check the following:
- Ensure your public key is added to the server's ~/.ssh/authorized_keys file.
- If using the Cherry Servers client portal, verify that the correct SSH key is attached to your server deployment or rebuild configuration.
-
SSH connection timeout. If your terminal hangs or fails to connect, consider the following checks:
- Make sure your firewall allows incoming connections on Port 22.
- Confirm you're using the correct IP address for the server.
- Verify that the server is fully provisioned and online. For additional troubleshooting steps and access related issues, refer to our official guide on how to connect to your server and troubleshoot access issues.