How to Assign Floating IPs in AlmaLinux, RockyLinux, CloudLinux, and CentOS
A floating IP address helps handle requests to various services or applications on the same server. While a management IP address provides a fixed address for each server, floating IP addresses can be moved from one server to another as needed.
This guide will explain how to set up a floating IP address on your server by editing the network interfaces configuration file using “NetworkManager”. Before you get started, please ensure that you have root access to the server in order to carry out the steps outlined below.
If your server contains critical data, it is advised that you configure the floating IP manually as outlined in steps 4 and 5.
#Instructions to Assign IP Addresses to Your Servers
#Step 1: Access the Client Portal
- Log in to your client portal.
- Click on the "Network" button at the top of the menu bar.

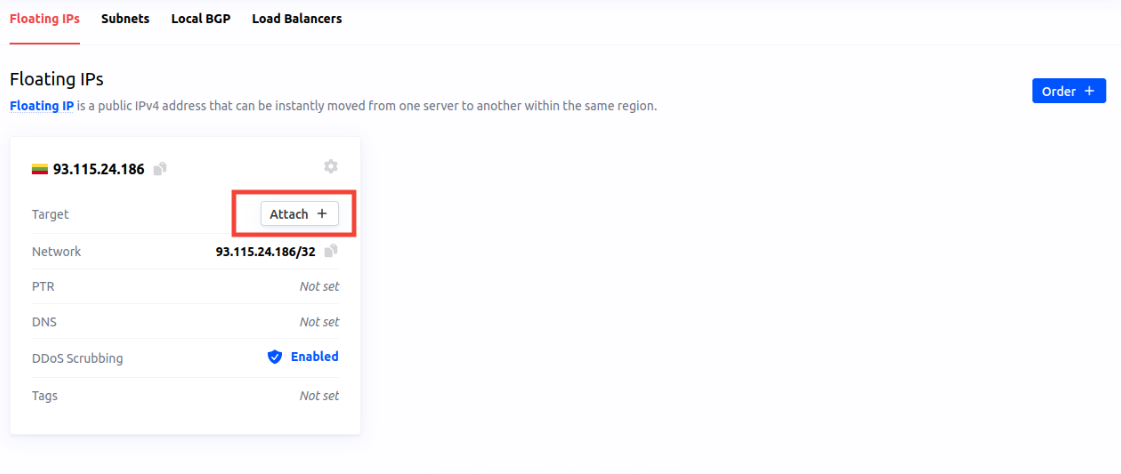
#Step 2: Verify Your Floating IP Address
- In the "Network" section, confirm that a floating IP address is linked to an instance.
- Assign it using the "Attach +".

#Step 3: Identify Your Primary Network Interface
- Use the “ip route” command to find the primary network interface. This will show the default route, which includes the primary network interface (e.g., eth0, bond0):
You should see it in this line:
ip route show defaultOutput
[root@new-kb-vps /]# ip route show default default via 192.168.0.1 dev eth0 proto static metric 100
#Step 4: Configure the Floating IP Address Manually
- OPTIONAL - Install the “nano” text editor if you prefer it over “vi”, which is pre-installed.
You can do this by running:
sudo dnf install nano - Change the directory to the network-scripts directory with the command:
cd /etc/sysconfig/network-scripts/ - Identify the appropriate configuration file for your network interface (e.g., ifcfg-eth0):
It should appear in this output line:
lsOutput
[root@new-kb-vps network-scripts]# ls ifcfg-eth0 ifcfg-eth1 readme-ifcfg-rh.txt - Edit the identified network interface configuration file:
or use “vi”:
sudo nano ifcfg-eth0sudo vi ifcfg-eth0 - Under the current configuration, add your new floating IP address using the /32 subnet notation (e.g., 93.115.24.186/32). This should be added below your primary IP address.
Created by cloud-init automatically, do not edit. AUTOCONNECT_PRIORITY=120 BOOTPROTO=none DEFROUTE=yes DEVICE=eth0 DNS1=8.8.8.8 DNS2=8.8.4.4 GATEWAY=192.168.0.1 HWADDR=54:52:00:10:d9:c7 IPADDR=5.199.168.117 NETMASK=255.255.255.255 ONBOOT=yes TYPE=Ethernet USERCTL=no Floating IP configuration IPADDR1=93.115.24.186 NETMASK1=255.255.255.255 - Save the changes:
- In “nano” : Press Ctrl + X, Y, and Enter to save.
- In “vi” : Press Esc, type :wq, and press Enter to save and exit.
- Restart the networking service to apply the changes with command:
sudo systemctl restart NetworkManager
#Step 5: Verify Configuration Persistence
- Verify your IP addresses. Run the following script to do so:
You should see your primary and floating IP address above IP4.GATEWAY:
nmcli device show eth0Output
[root@new-kb-vps network-scripts]# nmcli device show eth0 GENERAL.DEVICE: eth0 GENERAL.TYPE: ethernet GENERAL.HWADDR: 54:52:00:10:D9:C7 GENERAL.MTU: 1500 GENERAL.STATE: 100 (connected) GENERAL.CONNECTION: System eth0 GENERAL.CON-PATH: /org/freedesktop/NetworkManager/ActiveConnection/2 WIRED-PROPERTIES.CARRIER: on IP4.ADDRESS[1]: 93.115.24.186/32 IP4.ADDRESS[2]: 5.199.168.117/32 IP4.GATEWAY: 192.168.0.1 IP4.ROUTE[1]: dst = 0.0.0.0/0, nh = 192.168.0.1, mt = 100 IP4.ROUTE[2]: dst = 192.168.0.1/32, nh = 0.0.0.0, mt = 100 IP4.DNS[1]: 8.8.8.8 IP4.DNS[2]: 8.8.4.4 IP6.ADDRESS[1]: fe80::5652:ff:fe10:d9c7/64 IP6.GATEWAY: -- IP6.ROUTE[1]: dst = fe80::/64, nh = ::, mt = 256 - Test connectivity by running this command, and replacing the IP address, (5 93.115.24.186) with your own:
Check that your IP address responds.
ping -c 5 93.115.24.186
Your Floating IP is now successfully set up and will persist through any reboots.
Was this article helpful?
Thanks for the feedback!