How to Assign Floating IP Addresses in Debian
A floating IP address helps handle requests to various services or applications on the same server. While a management IP address provides a fixed address for each server, floating IP addresses can be moved from one server to another as needed.
This guide applies to dedicated bare metal servers running Debian 12, as well as VPS and VDS servers running Debian 11, and will explain how to set up a floating IP address on your by editing the network interfaces configuration file using “Network Manager”.
VPS and VDS servers running Debian 12 use “netplan” to assign floating IPs. These users should instead follow the instructions found in our other guide on how to assign floating IP addresses.
In all cases, ensure that you have root access to the server in order to carry out the steps outlined below.
If your server contains critical data, it is advisable to configure the floating IP manually as outlined in steps 3-5.
#Instructions to Assign Floating IP Addresses in Debian OS4
#Step 1: Access the Client Portal
- Log in to your client portal.
- Click on the "Network" button at the top of the menu bar.

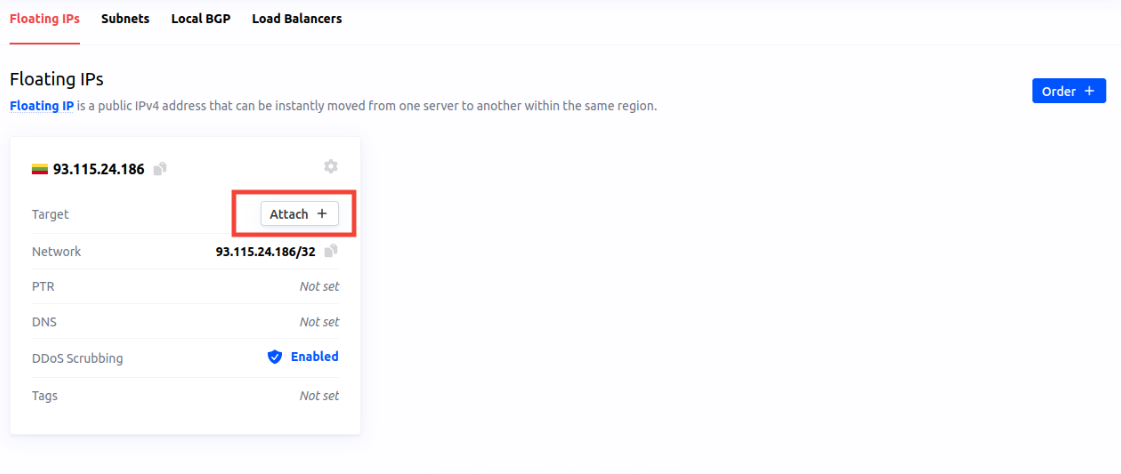
#Step 2: Verify Your Floating IP Address
- In the "Network" section, confirm that a floating IP address is linked to an instance.
- Assign it using the "Attach +" button.

- Step 3: Disable “Cloud-init” for Network Configuration To ensure that your network configuration changes are persistent and not overwritten by “Cloud-init”, disable “Cloud-init’s” network configuration.
- Create a configuration file to disable “Cloud-inits” network configuration using command:
This should return an output that looks similar to this:
echo "network: {config: disabled}" | sudo tee /etc/cloud/cloud.cfg.d/99-disable-network-config.cfgOutput
root@test-kb-new:~# echo "network: {config: disabled}" | sudo tee /etc/cloud/cloud.cfg.d/99-disable- network-config.cfg network: {config: disabled}
#Step 4: Identify Your Network Interface Name
Use the “ip route” command to find the primary network interface.
ip route show default
You should see it listed like this:
Outputroot@test-kb-vps:~# ip route show default
default via 192.0.2.1 dev eth0 onlink
#Step 5: Configure the Floating IP Address Manually
- Edit the network interfaces configuration file using:
sudo nano /etc/network/interfaces.d/50-cloud-init - Under the current configuration, add your new floating IP address using the /32 subnet notation. Here is a version using our example of 93.115.24.186/32).
# This file is generated from information provided by the datasource. Changes # to it will not persist across an instance reboot. To disable cloud-init's # network configuration capabilities, write a file # /etc/cloud/cloud.cfg.d/99-disable-network-config.cfg with the following: # network: {config: disabled} auto lo iface lo inet loopback auto ens4 iface ens4 inet static address 10.168.195.12/24 auto eth0 iface eth0 inet static address 5.199.168.73/32 dns-nameservers 8.8.8.8 8.8.4.4 gateway 192.0.2.1 iface eth0 inet static address 93.115.24.186/32 - Save the changes, to do this:
- Press Ctrl + X to exit.
- Press Y to confirm you want to save the changes.
- Press Enter to finalize the save. Restart the networking service to apply the changes:
sudo systemctl restart networking
#Step 6: Verify Configuration Persistence
- Verify your IP addresses by running the following command, and ensure that both your primary and floating IP addresses are listed:
You should see a similar listing to that under eth:0:
ip addr showOutput
root@test-kb-new:/etc/network/interfaces.d# ip addr show 1: lo: <LOOPBACK,UP,LOWER_UP> mtu 65536 qdisc noqueue state UNKNOWN group default qlen 1000 link/loopback 00:00:00:00:00:00 brd 00:00:00:00:00:00 inet 127.0.0.1/8 scope host lo valid_lft forever preferred_lft forever inet6 ::1/128 scope host valid_lft forever preferred_lft forever 2: eth0: <BROADCAST,MULTICAST,UP,LOWER_UP> mtu 1500 qdisc pfifo_fast state UP group default qlen 1000 link/ether 54:52:00:b5:40:6a brd ff:ff:ff:ff:ff:ff altname enp0s3 altname ens3 inet 5.199.168.73/32 brd 5.199.168.73 scope global eth0 valid_lft forever preferred_lft forever inet 93.115.24.186/32 brd 93.115.24.186 scope global eth0 valid_lft forever preferred_lft forever inet6 fe80::5652:ff:fe5b:406a/64 scope link valid_lft forever preferred_lft forever 3: ens4: <BROADCAST,MULTICAST,UP,LOWER_UP> mtu 1500 qdisc pfifo_fast state UP group default qlen 1000 link/ether 52:54:00:c2:d6:07 brd ff:ff:ff:ff:ff:ff altname enp0s4 inet 10.168.195.12/24 brd 10.168.195.255 scope global ens4 valid_lft forever preferred_lft forever inet6 fe80::5054:ff:fec2:d607/64 scope link valid_lft forever preferred_lft forever - Test connectivity with this command. Replace the IP address with your own and check that the floating IP address responds correctly:
ping -c 5 93.115.24.186
Your floating IP address has been successfully assigned and will persist through any reboots.