How to Create and Attach Elastic Block Storage (EBS) Volume to a Linux Server
Elastic Block Storage (EBS) is a high-availability, software-defined block storage solution designed for persistent data workloads. It is well suited for cloud native applications, private or public cloud environments, and Kubernetes clusters. EBS volumes support up to 5TB in size, delivering up to 500 IOPS.
Volumes are managed through the Cherry Servers Client Portal and can be dynamically attached to any dedicated server in the same region. After attachment, Linux users can configure the volume using an automated Bash script that sets up the necessary network interfaces and iSCSI connectivity.
Configuration involves creating a file system, typically ext4, mounting the volume to a directory, such as /mnt/ebs, and making the mount persistent by adding it to /etc/fstab with the _netdev option. The EBS volume will then become available for use within the Linux environment without any required reboot.
Please note that EBS is currently only supported on dedicated bare metal servers in the Lithuania data center.
#Instructions to Attach EBS Volumes
#Step 1: Create a new Elastic Block Storage volume
To begin using Elastic Block Storage on your Linux server, you must first create a new volume from the Cherry Servers Client Portal. This volume will later be attached to your server and mounted within the Linux environment.
- Log in to your Cherry Servers Client Portal using your account credentials.
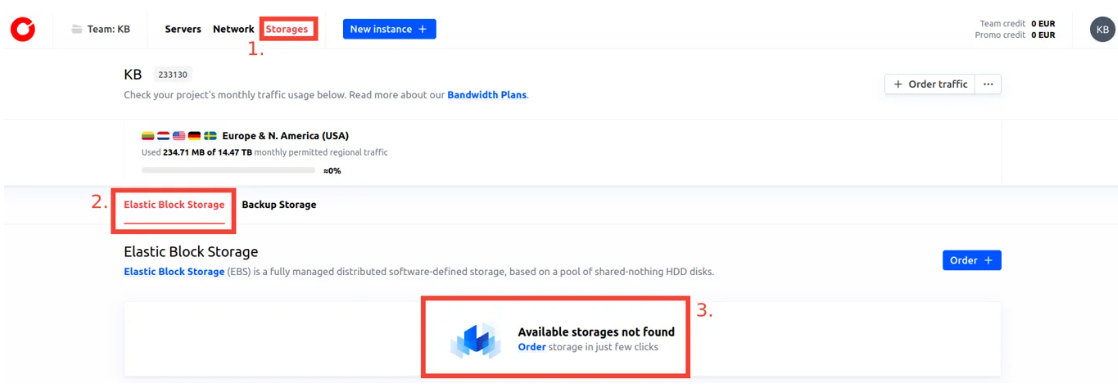
- In the top navigation menu, click on the Storages tab inside your active projectand navigate to the Elastic Block Storage section.
If you have not created any volumes yet, an empty storage view will be shown with an option to order your first volume.

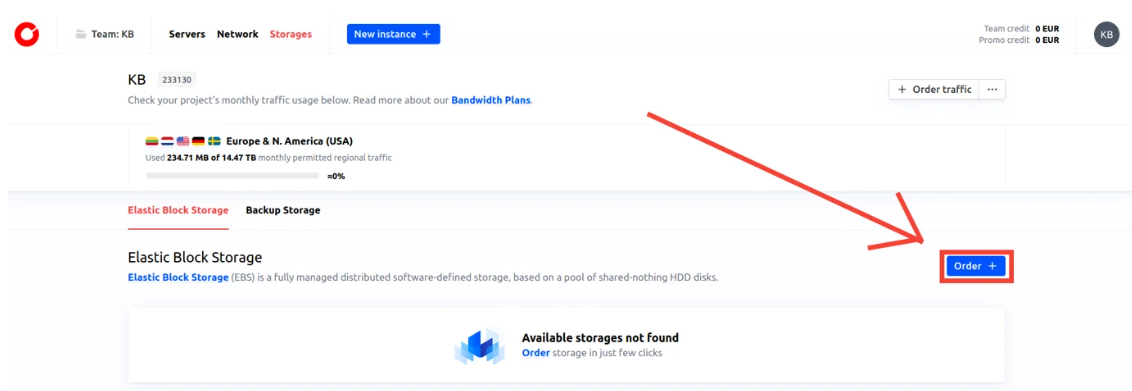
- Click on the Order button to begin the creation process.

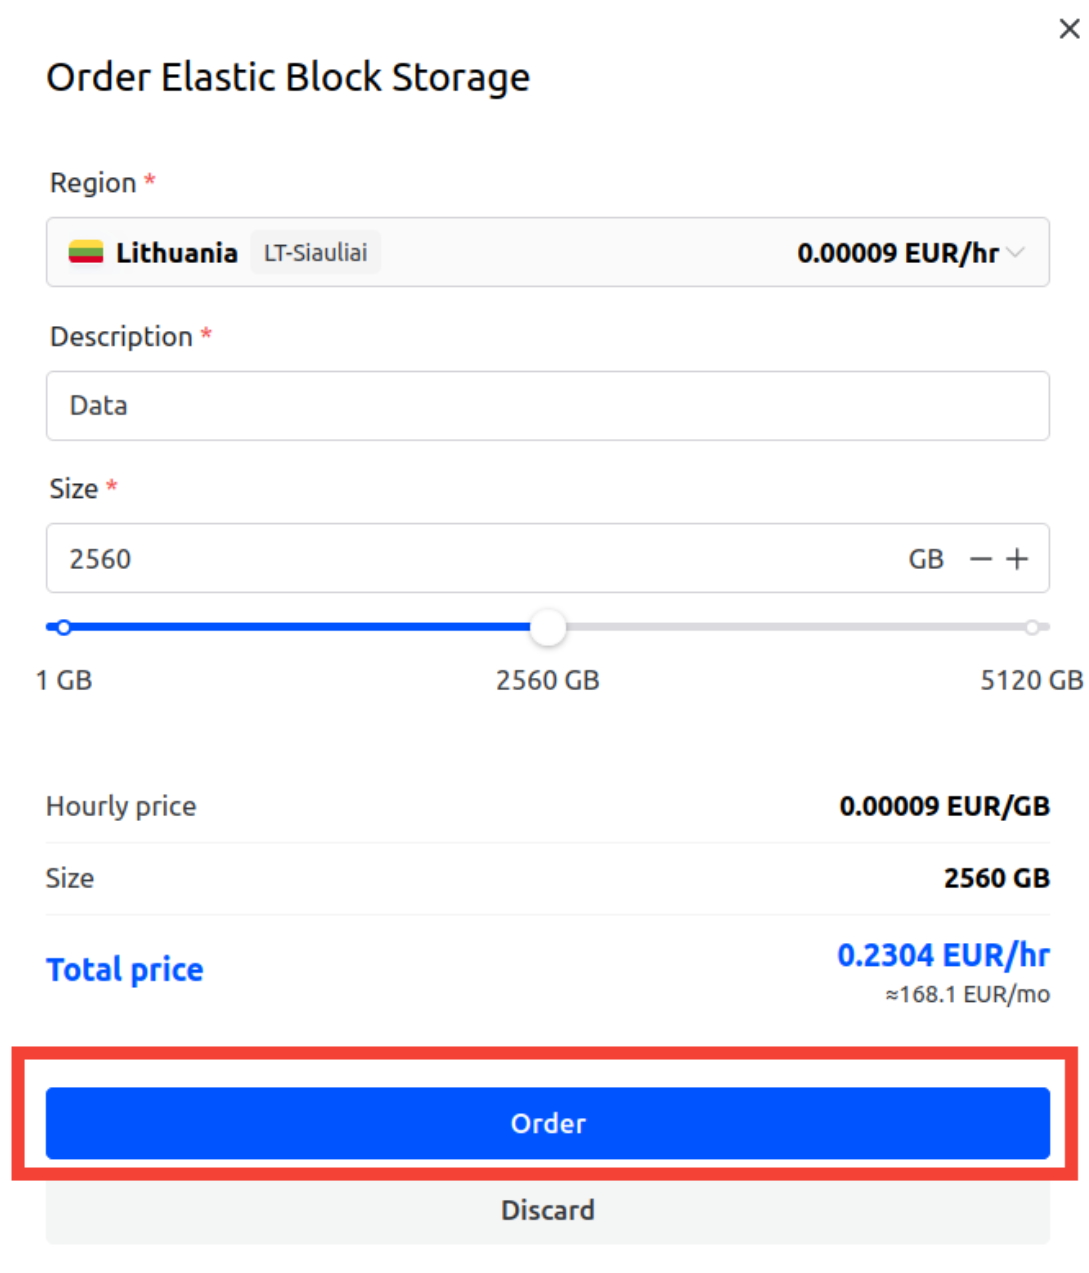
- In the form that appears:
- Select the region where your server is located. At the time of writing, Elastic Block Storage is available only in the LT-Siauliai region.
- Enter a description to help identify your volume. This helps you identify it later, especially when working with multiple storage devices.
- Specify the volume size in gigabytes (GB). You can allocate any size up to 5000GB (5 TB), depending on your project requirements.
Once all fields are filled in, click Order to finalize the creation process.
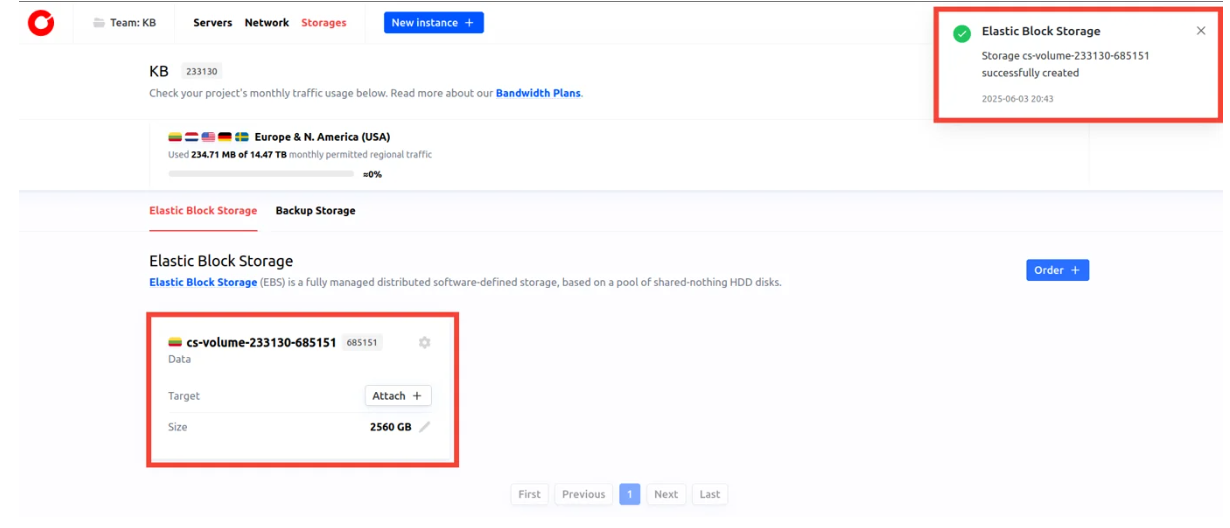
 After a few moments, the volume will appear in your storage list. You are now ready to proceed with attaching the volume to a dedicated server.

#Step 2: Attach the volume to your server
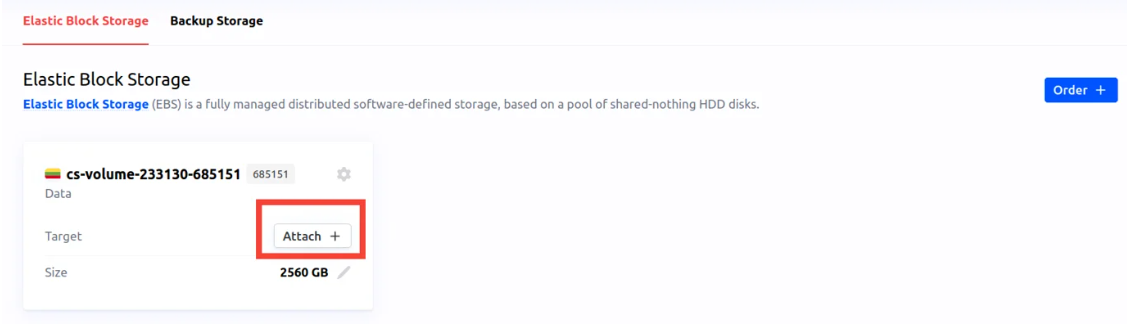
Once your Elastic Block Storage volume has been successfully created, it will appear in the Elastic Block Storage section of your project in the Client Portal. At this point, the volume exists but is not yet associated with any server, so it cannot be used until attached.
- In the volume list, locate your newly created volume. Click the Attach button next to the volume entry to begin the attachment process.
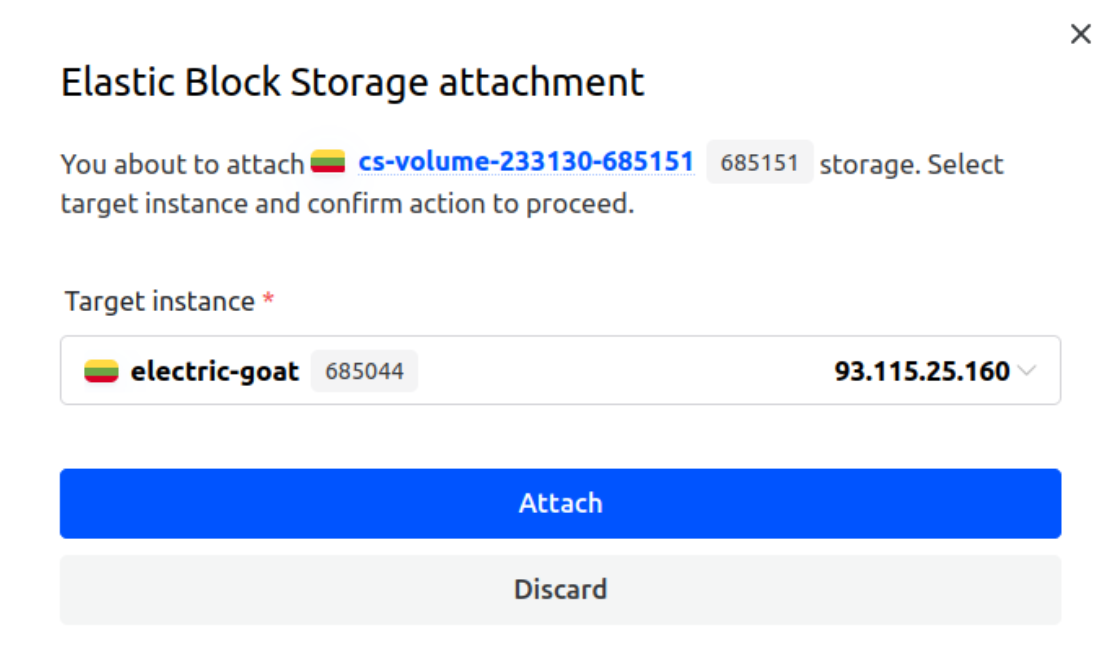
- A dialog window titled Elastic Block Storage attachment will open. This interface allows you to select the server to which the volume should be attached.

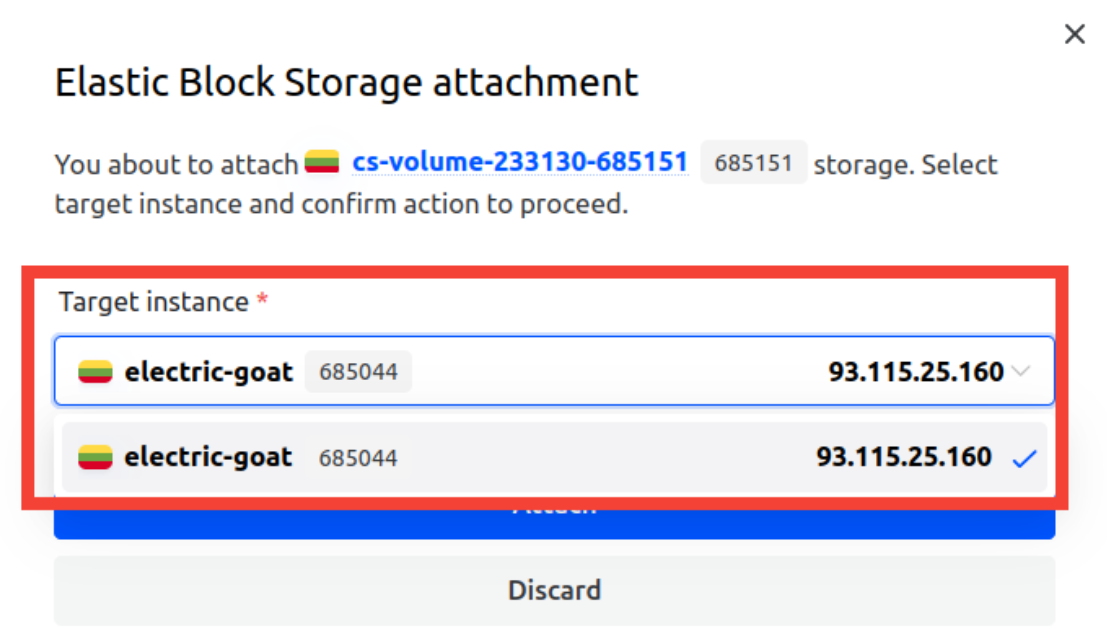
- From the Target instance drop-down menu, select the appropriate dedicated server located in the same region. Only compatible servers will be displayed in the list.

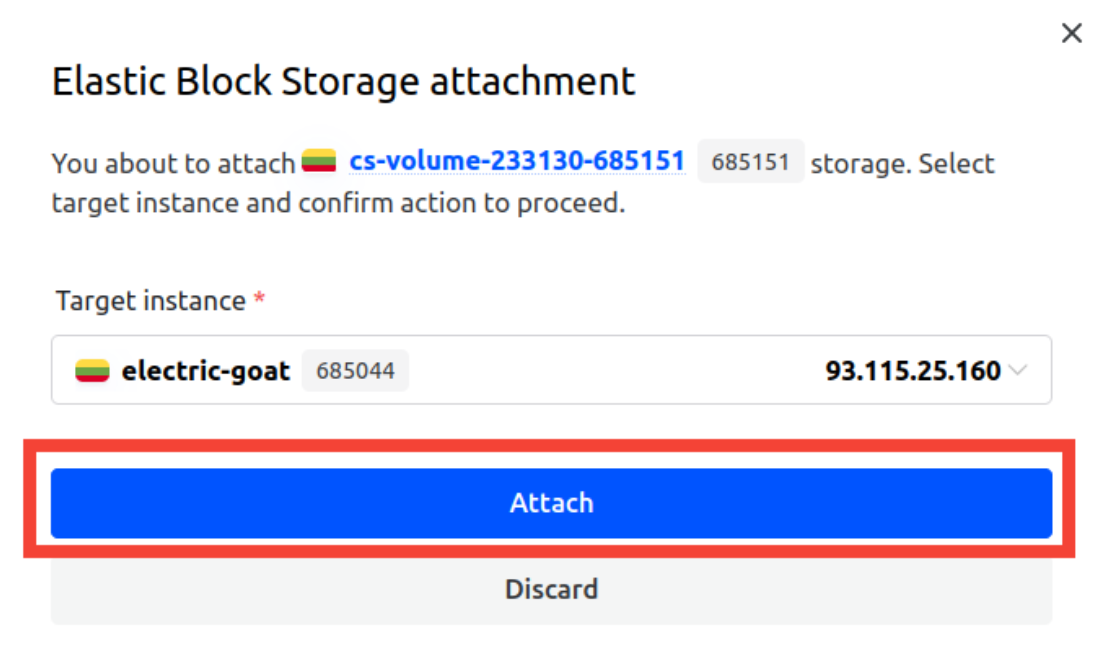
- After confirming your selection, click the blue Attach button to initiate the attachment process.

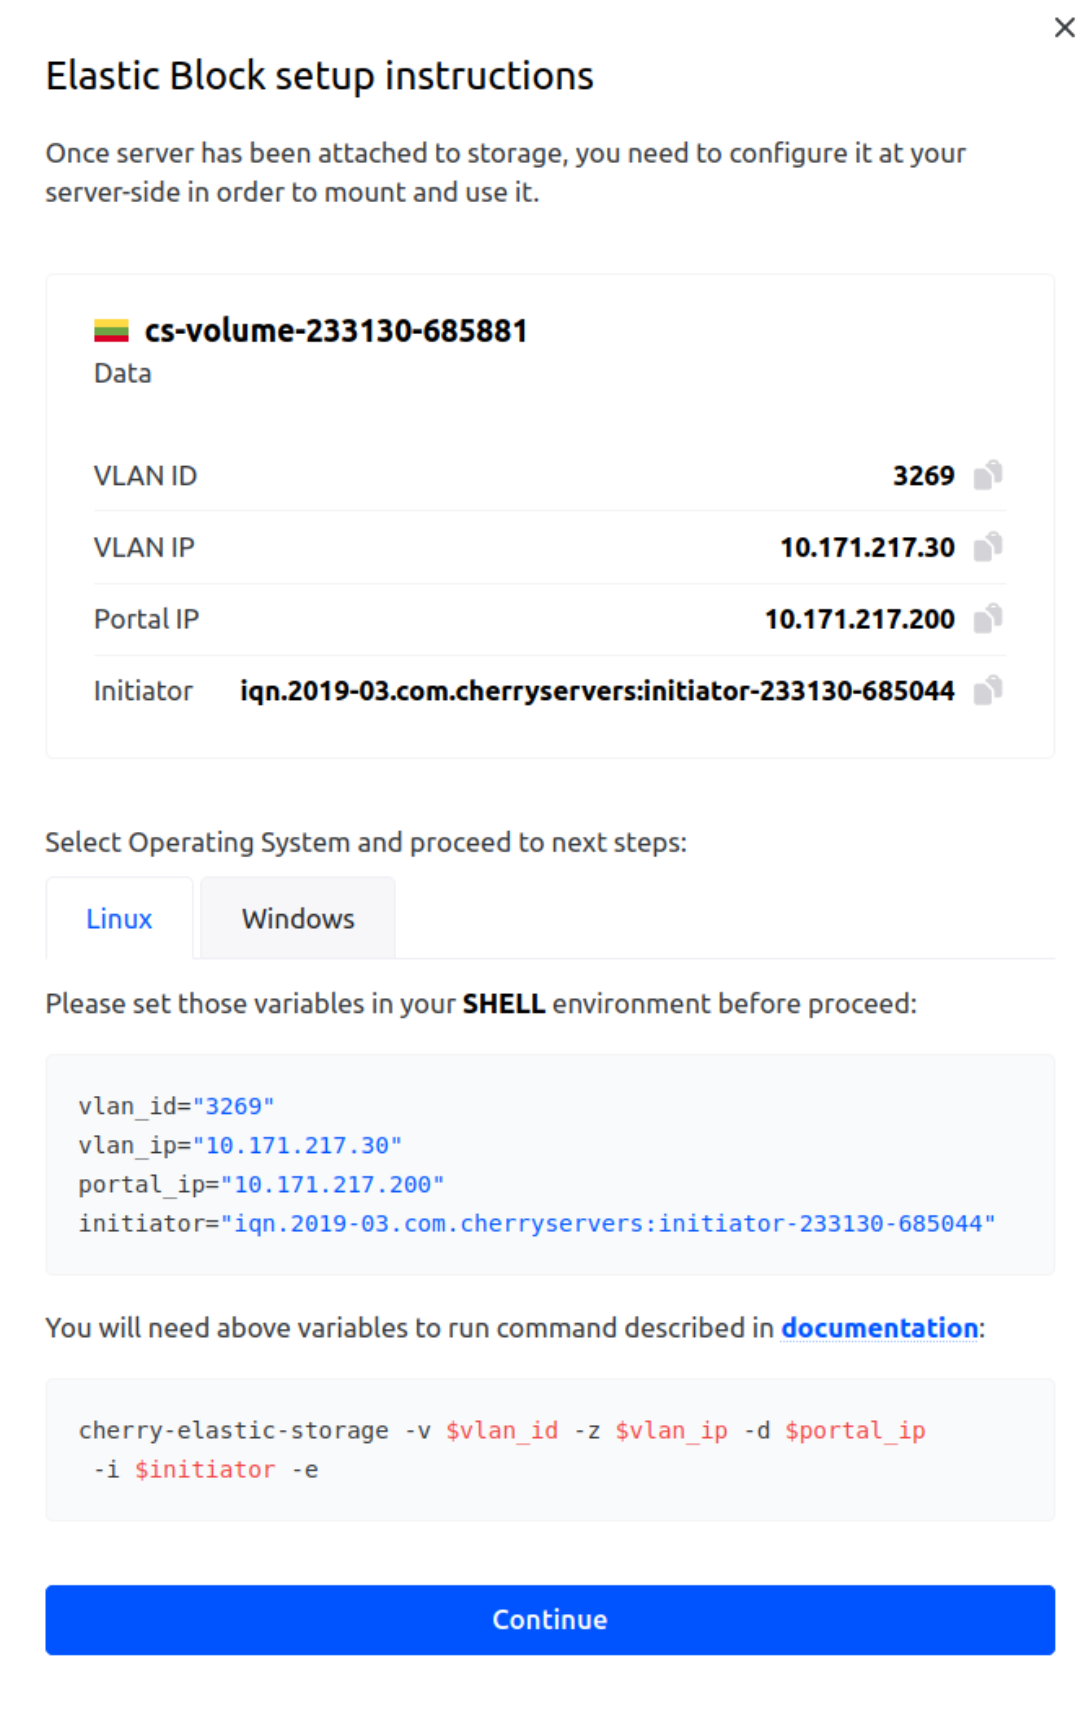
- Once attached, a success notification will be displayed, and a setup instructions popup will automatically appear with configuration details.
 This window displays essential variables such as vlan_id, vlan_ip, portal_ip, and initiator, which are required to set up the volume on your Linux server in the next step. You will use these values when executing the Bash automation script.
#Step 3: Configure the Elastic Block Storage on Your Linux server
After successfully attaching the volume to your server, you must configure the storage within your Linux environment. This is done by running a shell script that handles iSCSI initiator configuration and connects the volume.
-
Connect to your Linux server via SSH.
Log in to your Linux server where the volume was attached. You can use SSH from your terminal or any SSH client of your choice. For further instructions on how to do this, please visit our dedicated how to connect to a Linux server using SSH guide.
-
Download the configuration script.
Run the following command to download the setup script:
wget -O /usr/local/bin/cherry-elastic-storage "https://raw.githubusercontent.com/cherryservers/cherry-elastic-storage/master/cherry-elastic-storage"This will save the script file to /usr/local/bin.
-
Make the script executable.
Run the command below to give execution permissions:
chmod +x /usr/local/bin/cherry-elastic-storage -
Retrieve required configuration variables.
After attaching the volume, the Elastic Block setup instructions popup window appears in the Client Portal. It contains four variables needed by the script:
- vlan_id
- vlan_ip
- portal_ip
- initiator Make sure to note these accurately as they will be required in the next step.
-
Run the script with the variables.
Execute the script with the variables you copied from the portal, replacing “vlan_id”, “vlan_ip”, “portal_ip”, and “initiator” with the variables from the previous step:
cherry-elastic-storage -v $vlan_id -z $vlan_ip -d $portal_ip -i $initiator -eFor example:
cherry-elastic-storage -v 3269 -z 10.171.217.30 -d 10.171.217.200 -i iqn.2019-03.com.cherryservers:initiator-233130-685044 -e -
Wait for the connection to complete.
The script will perform the necessary configuration and, if successful, output the block device name that you will use for formatting in the next step, like this:
Output
........ Discover targets on portal 10.171.217.200: Targets were discovered on 10.171.217.200 Discover targets on portals. Done. ........ Login on portal 10.171.217.200: Logged in to iqn.2019-03.com.cherryservers:cherryservers:cs-volume-233130-685881 on 10.171.217.200 ...... Configure multipath: Configure multipath. Done. Login on portal 10.171.217.200. Done. ........ Discover targets on portal 10.139.217.200: Targets were discovered on 10.139.217.200 Discover targets on portals. Done. ........ Login on portal 10.139.217.200: Logged in to iqn.2019-03.com.cherryservers:cherryservers:cs-volume-233130-685881 on 10.139.217.200 ...... Configure multipath: Configure multipath. Done. Login on portal 10.139.217.200. Done. ........ Clean mpath bindings: Clean mpath bindings. Done. #################### Configuration report: Block device /dev/mapper/cs-volume-233130-685881 is ready. Format, mount and use it. Configuration report: Done ####################Please note that the device name will differ depending on your system. Always use the name returned by the script at the end of execution.
#Step 4: Format and Mount the EBS Volume on Linux
After successfully configuring and discovering the EBS volume, the script will display the device path assigned to your block storage. This path is typically located under /dev/mapper/, such as: /dev/mapper/cs-volume-233130-685881
You must now format this device, mount it to a directory, and ensure it persists after reboot.
-
Create a file system on the block device.
Use the mkfs utility to format the new volume. We recommend using the ext4 file system unless you have specific requirements. Use this command, replacing the device name (cs-volume-233130-685881) with the one shown in your script output from the previous step:
sudo mkfs.ext4 /dev/mapper/cs-volume-233130-685881This should return something a similar output to this:
Output
root@electric-goat:~# sudo mkfs.ext4 /dev/mapper/cs-volume-233130-685881 mke2fs 1.47.0 (5-Feb-2023) Discarding device blocks: done Creating filesystem with 5242880 4k blocks and 1310720 inodes Filesystem UUID: 84bf345c-c4ec-40ae-95e0-17ba30c93745 Superblock backups stored on blocks: 32768, 98304, 163840, 229376, 294912, 819200, 884736, 1605632, 2654208, 4096000 Allocating group tables: done Writing inode tables: done Creating journal (32768 blocks): done Writing superblocks and filesystem accounting information: done -
Create a mount point.
Choose a directory where you want to mount the volume, such as /mnt/ebs-volume, and create it if it does not exist using:
sudo mkdir -p /mnt/ebs-volumeMount the volume.
Mount the formatted device to the mount point using the following command:
sudo mount /dev/mapper/cs-volume-233130-685881 /mnt/ebs-volume -
Verify the mount.
Confirm that the volume is mounted and accessible with command:
df -h | grep ebs-volumeWhich will show:
Output
root@electric-goat:~# df -h | grep ebs-volume /dev/mapper/cs-volume-233130-685881 20G 24K 19G 1% /mnt/ebs-volume -
Make the mount persistent across reboots.
To ensure the EBS volume is automatically mounted after a system reboot, add an entry to the /etc/fstab file. Use the UUID of the device to avoid relying on the device path. First, get the UUID by running the following command, replacing the volume name (cs-volume-233130-685881) with the volume name from the output script in the previous step:
sudo blkid /dev/mapper/cs-volume-233130-685881This should return:
Output
root@electric-goat:~# sudo blkid /dev/mapper/cs-volume-233130-685881 /dev/mapper/cs-volume-233130-685881: UUID="84bf345c-c4ec-40ae-95e0-17ba30c93745" BLOCK_SIZE="4096" TYPE="ext4" -
Edit /etc/fstab.
Open the text file with:
sudo nano /etc/fstabAdd the following line at the bottom, but replace "<UUID>" with your actual UUID):
UUID=<UUID> /mnt/ebs-volume ext4 defaults,_netdev 0 2The _netdev option ensures that the mount is attempted only after network is available, which is essential for iSCSI-based volumes.
Once you’re done, the file should look like this:
Output
# /etc/fstab: static file system information. # # Use 'blkid' to print the universally unique identifier for a # device; this may be used with UUID= as a more robust way to name devices # that works even if disks are added and removed. See fstab(5). # # <file system> <mount point> <type> <options> <dump> <pass> # / was on /dev/md0 during curtin installation /dev/disk/by-id/md-uuid-cd8ffa91:67c2c505:7e3b5fcc:14db0622 / ext4 defaults 0 1 /swap.img none swap sw 0 0 UUID=84bf345c-c4ec-40ae-95e0-17ba30c93745 /mnt/ebs-volume ext4 defaults,_netdev 0 2 -
Test the configuration.
Test the /etc/fstab entry without rebooting by running:
sudo mount -aIf there are no errors, the configuration is valid and will persist across reboots.
#Instructions to Detach an Elastic Block Storage Volume
If you no longer need the EBS volume on the current server or you want to reattach it to another machine, it must first be cleanly detached. This ensures data integrity and prevents system conflicts.
-
Unmount the volume from the filesystem.
Before detaching the volume, you must unmount it from the mount point to ensure that no data is being written. You can do this by using the following command:
sudo umount /mnt/ebs-volumeEnsure that no processes are actively using the mount point. If needed, use lsof | grep ebs-volume to identify any active usage.
-
Remove the persistent mount from /etc/fstab.
To avoid boot-time mount errors after the volume is detached, remove or comment out the corresponding entry in /etc/fstab using:
sudo nano /etc/fstabLocate the line referencing your EBS volume, then either delete it ,or comment it out by adding a “#” at the beginning.
-
Run the detachment script.
Use the same script that was used to configure the EBS volume, but replace the device-specific variables with the ones you used earlier:
sudo cherry-elastic-storage -v $vlan_id -z $vlan_ip -d $portal_ip -i $initiator -qThe -q flag stands for "quit" and is used to safely disconnect the iSCSI session and remove the associated multipath bindings.
-
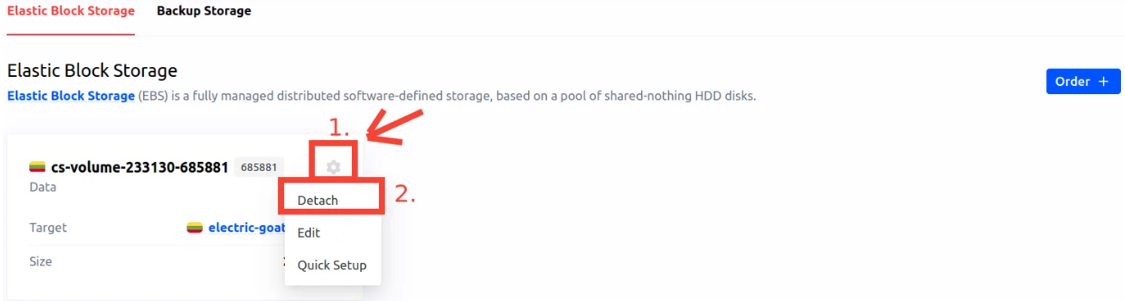
Detach the volume in the Client Portal:
Once the volume has been unmounted and disconnected from the operating system, return to the Cherry Servers Client Portal, locate your volume, open the options menu, and select Detach.
If you encounter any issues during script execution or configuration, please contact our support team at support@cherryservers.com. Detail the issues you are encountering, along with any applicable error messages that arose, and we’ll be more than happy to assist you.