How to Assign a Subnet to a Server with AlmaLinux 8 & 9
While all servers are deployed with a Management IP address by default, which provides a fixed address for each server, assigning a public IP subnet to a server allows for multiple IP addresses to be used on the same server, with specific IPs reserved for essential network functions. Please note that presently subnet services are only available for dedicated bare metal servers.
This guide will explain how to set up and assign a public IP subnet to dedicated servers running AlmaLinux, version 8 and version 9, by creating a new sub-interface and configuring the necessary network settings.
#Instructions to Assign a Public IP Subnet for AlmaLinux
#Step 1: Access the Client Portal
- Log in to your client portal.
- Click on the "Network" button at the top of the menu bar

#Step 2: Verify your subnet allocation and assign IP addresses
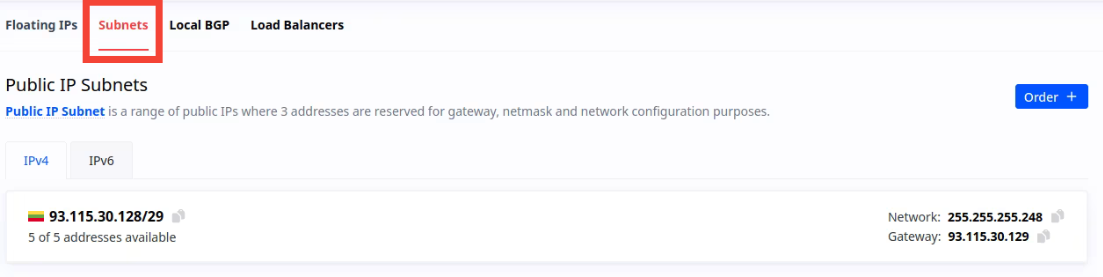
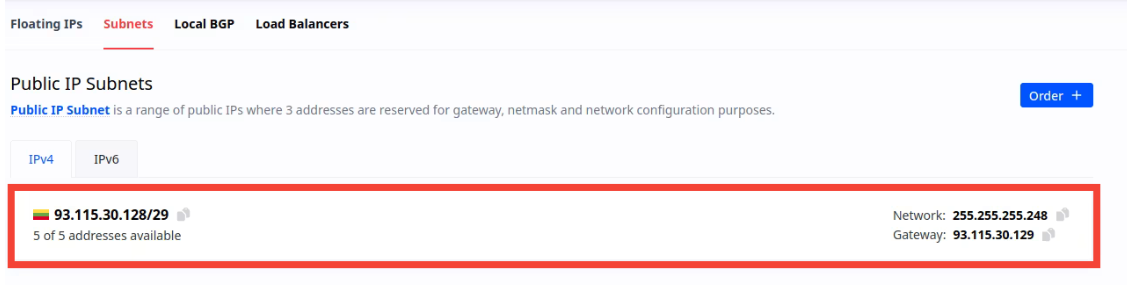
- In the "Network" section of the client portal, navigate to the "Subnets" tab to view all of your available subnets.

- You will now see a list of all available subnets. Locate the subnet you wish to configure.
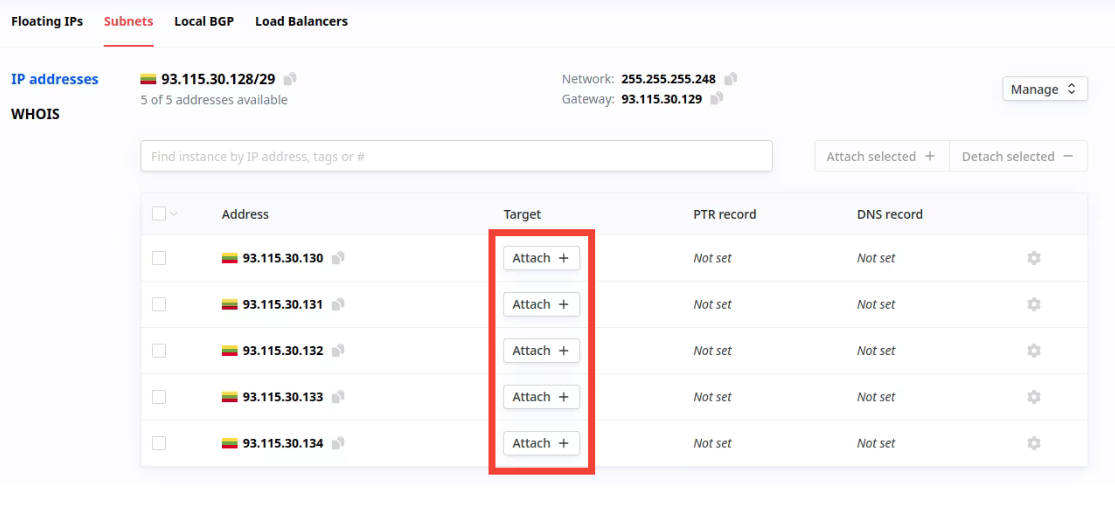
- To assign individual IP addresses from the subnet, click on the subnet in the list. This will display all available IP addresses within that subnet

- To assign individual IP addresses from the subnet, click on the subnet in the list. This will display all available IP addresses within that subnet.

- Once you've identified the IP address you want to assign to your server, click the "Attach +" button next to that IP address. This action lets you associate the selected IP address with your server.
#Step 3: Identify Your Primary Network Interface#
- Use the “ip a” command to identify your primary network interface (e.g., eth0, bond0):
This will return the available network interfaces and their current configurations, like so:
ip aOutput
[root@cherryservers-kb ~]# ip a 1: lo: <LOOPBACK,UP,LOWER_UP> mtu 65536 qdisc noqueue state UNKNOWN group default qlen 1000 link/loopback 00:00:00:00:00:00 brd 00:00:00:00:00:00 inet 127.0.0.1/8 scope host lo valid_lft forever preferred_lft forever inet6 ::1/128 scope host valid_lft forever preferred_lft forever 2: enp65s0f0: <BROADCAST,MULTICAST,SLAVE,UP,LOWER_UP> mtu 1500 qdisc mq master bond0 state UP group default qlen 1000 link/ether 3c:ec:ef:62:cf:6a brd ff:ff:ff:ff:ff:ff 3: enp65s0f1: <BROADCAST,MULTICAST,SLAVE,UP,LOWER_UP> mtu 1500 qdisc mq master bond0 state UP group default qlen 1000 link/ether 3c:ec:ef:62:cf:6a brd ff:ff:ff:ff:ff:ff permaddr ac:1f:6b:3a:ca:7b 4: bond0: <BROADCAST,MULTICAST,MASTER,UP,LOWER_UP> mtu 1500 qdisc noqueue state UP group default qlen 1000 link/ether 3c:ec:ef:62:cf:6a brd ff:ff:ff:ff:ff:ff inet 5.199.170.23/25 brd 5.199.170.127 scope global bond0 valid_lft forever preferred_lft forever inet6 fe80::3eec:efff:fe62:cf6a/64 scope link valid_lft forever preferred_lft forever 5: bond0.2291@bond0: <BROADCAST,MULTICAST,UP,LOWER_UP> mtu 1500 qdisc noqueue state UP group default qlen 1000 link/ether 3c:ec:ef:62:cf:6a brd ff:ff:ff:ff:ff:ff inet 10.168.195.25/24 brd 10.168.195.255 scope global bond0.2291 valid_lft forever preferred_lft forever inet6 fe80::3eec:efff:fe62:cf6a/64 scope link valid_lft forever preferred_lft forever
#Step 4: Create a Sub-Interface for the Subnet
-
Navigate to the network-scripts directory using command:
cd /etc/sysconfig/network-scripts/ -
Create a new sub-interface configuration file for the public subnet. For example, if your main interface is “bond0”, the new file will be named “ifcfg-bond0-range0”. To do this, run:
sudo nano ifcfg-bond0-range0 -
Add the following configuration to the file, replacing “x.x.x.x” with the actual IP range and gateway for your ordered subnet, and adjust the PREFIX entry to match your IP range (e.g., /29 for 8 IP addresses):
CLONENUM_START=10          # Starting position of subnet
GATEWAY=93.115.30.129     # Gateway of ordered subnet
IPADDR_START=93.115.30.130 # First usable IP in subnet
IPADDR_END=93.115.30.134  # Last usable IP in subnet
PREFIX=29                 # Subnet prefix (use the appropriate one for your IP range)
ONBOOT=yes                # Enable the interface on boot
TYPE=Ethernet             # Type of connection
USERCTL=no                # Prevent non-root users from managing this interface
#Step 5: Save and Apply Changes
- Save the configuration and exit the editor. To do this, Press Ctrl + X, then Y, and finally Enter, in nano.
- Restart the network service to apply the changes with command:
sudo systemctl restart NetworkManager -
- If the settings do not apply after restarting, reboot the server to ensure the configuration takes effect by running:
sudo reboot
#Step 6: Verify the Configuration
- Once the server is back online, verify the assigned IP addresses by running the “ip a” command again:
You should now see both the primary IP and the new subnet IP addresses listed under the appropriate interface, as shown in this example:
ip aOutput
[root@cherryservers-kb ~]# ip a 1: lo: <LOOPBACK,UP,LOWER_UP> mtu 65536 qdisc noqueue state UNKNOWN group default qlen 1000 link/loopback 00:00:00:00:00:00 brd 00:00:00:00:00:00 inet 127.0.0.1/8 scope host lo valid_lft forever preferred_lft forever inet6 ::1/128 scope host valid_lft forever preferred_lft forever 2: enp65s0f0: <BROADCAST,MULTICAST,SLAVE,UP,LOWER_UP> mtu 1500 qdisc mq master bond0 state UP group default qlen 1000 link/ether 3c:ec:ef:62:cf:6a brd ff:ff:ff:ff:ff:ff 3: enp65s0f1: <BROADCAST,MULTICAST,SLAVE,UP,LOWER_UP> mtu 1500 qdisc mq master bond0 state UP group default qlen 1000 link/ether 3c:ec:ef:62:cf:6a brd ff:ff:ff:ff:ff:ff permaddr 3c:ec:ef:62:cf:6b 4: bond0: <BROADCAST,MULTICAST,MASTER,UP,LOWER_UP> mtu 1500 qdisc noqueue state UP group default qlen 1000 link/ether 3c:ec:ef:62:cf:6a brd ff:ff:ff:ff:ff:ff inet 5.199.170.23/25 brd 5.199.170.127 scope global bond0 valid_lft forever preferred_lft forever inet 93.115.30.130/29 brd 93.115.30.135 scope global bond0:10 valid_lft forever preferred_lft forever inet 93.115.30.131/29 brd 93.115.30.135 scope global secondary bond0:11 valid_lft forever preferred_lft forever inet 93.115.30.132/29 brd 93.115.30.135 scope global secondary bond0:12 valid_lft forever preferred_lft forever inet 93.115.30.133/29 brd 93.115.30.135 scope global secondary bond0:13 valid_lft forever preferred_lft forever inet 93.115.30.134/29 brd 93.115.30.135 scope global secondary bond0:14 valid_lft forever preferred_lft forever inet6 fe80::3eec:efff:fe62:cf6a/64 scope link valid_lft forever preferred_lft forever 5: bond0.2291@bond0: <BROADCAST,MULTICAST,UP,LOWER_UP> mtu 1500 qdisc noqueue state UP group default qlen 1000 link/ether 3c:ec:ef:62:cf:6a brd ff:ff:ff:ff:ff:ff inet 10.168.195.25/24 brd 10.168.195.255 scope global bond0.2291 valid_lft forever preferred_lft forever inet6 fe80::3eec:efff:fe62:cf6a/64 scope link valid_lft forever preferred_lft forever
#Step 7: Test Connectivity
- Finally, ping the new IP address from the subnet to test the connection by running the following command, and replacing “
” with one of the IPs from the subnet: A successful response indicates that the IP addresses are correctly configured.ping -c 5 <new-ip-address>
This setup enables and configures multiple IP addresses for different services on a single server, enhancing scalability and flexibility for your network configuration.