How to Create and Attach Elastic Block Storage (EBS) Volume to a Windows Server
Elastic Block Storage (EBS) is a high-availability, software-defined block storage solution designed for persistent data workloads. It is ideal for cloud-native applications, private or public cloud environments, and Kubernetes clusters.
Each EBS volume is built on a shared nothing architecture that distributes data blocks across multiple physical nodes. Every block is triplicated for durability and fault tolerance, enabling real-time self-healing and protection against silent data corruption or misplaced writes.
Volumes are managed through the Cherry Servers Client Portal and can be dynamically attached to any dedicated server within the same region. Once attached, Windows users can configure the volume using an automated PowerShell script that sets up iSCSI connectivity. After initialization in Disk Management, the volume becomes available as a local disk.
Please note that EBS is currently only supported on dedicated bare metal servers in the Lithuania data center.
#Instructions to Create and Attach EBS to a Windows Server
#Step 1: Create a new Elastic Block Storage Volume
To begin using Elastic Block Storage on your Windows server, you must first create a New Volume from the Cherry Servers Client Portal. This volume will later be attached to your server and mounted within the Windows environment.
- Log in to your Cherry Servers Client Portal using your account credentials.
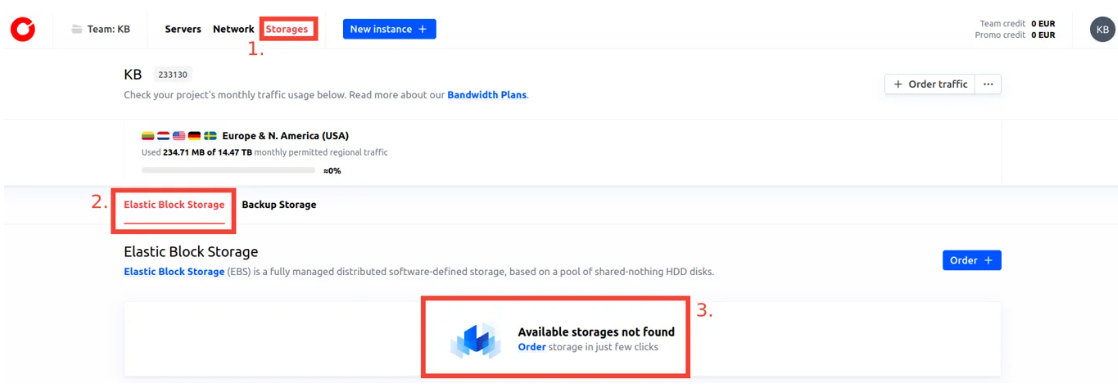
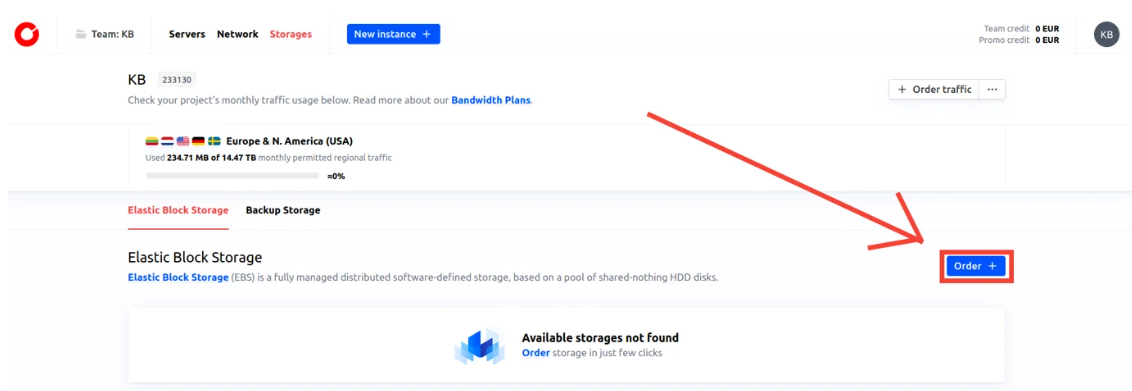
- In the top navigation menu, click on the Storages tab inside your active project. Then navigate to the Elastic Block Storage section. If you have not created any volumes yet, an empty storage view will be shown with an option to order your first volume.

- Click the Order button to begin the creation process.

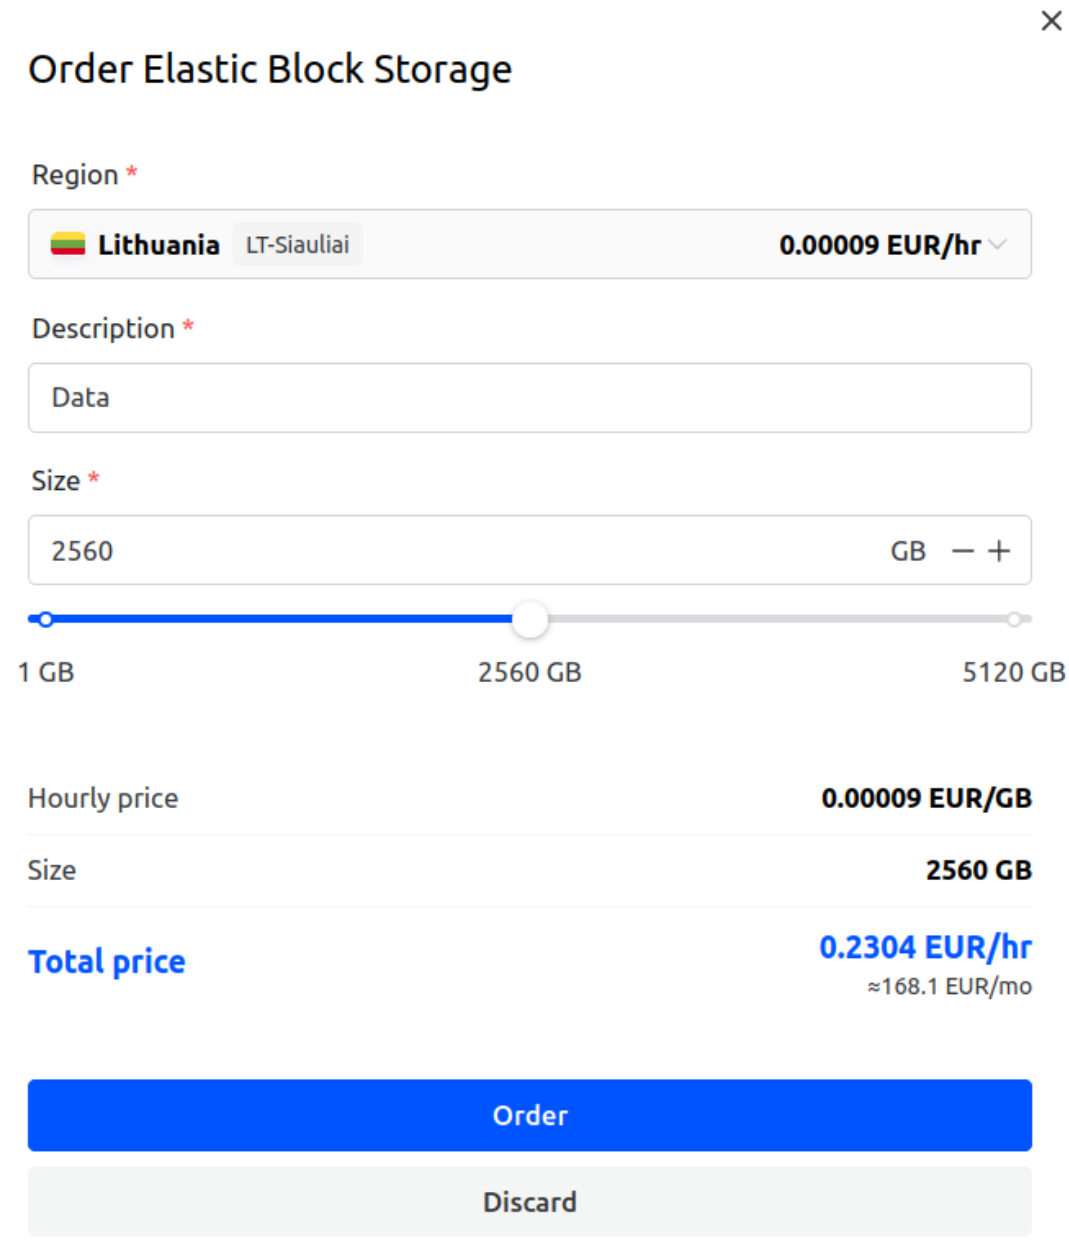
- In the form that appears:
- Select the region where your server is located. At the time of writing, Elastic Block Storage is available only in the LT-Siauliai region.
- Enter a description for your volume. This helps you identify it later, especially when working with multiple storage devices.
- Specify the volume size in gigabytes. You can allocate any size up to 5 TB, depending on your project requirements.

- Once all fields are filled in, click Order to finalize the creation.
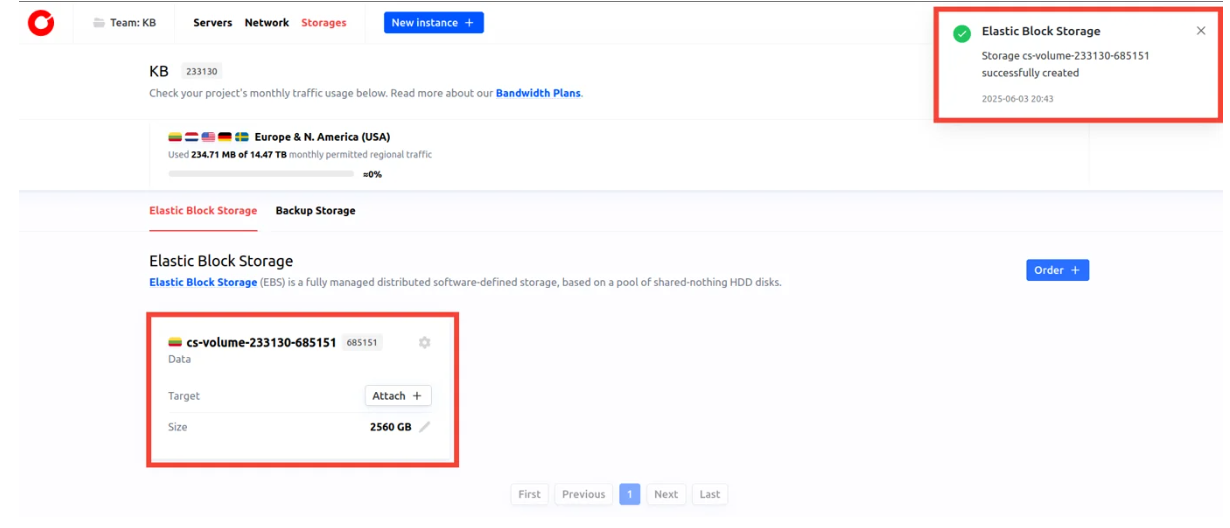
After a few moments, the volume will appear in your storage list. You are now ready to proceed with attaching the volume to a dedicated server.

#Step 2: Attach the volume to your server
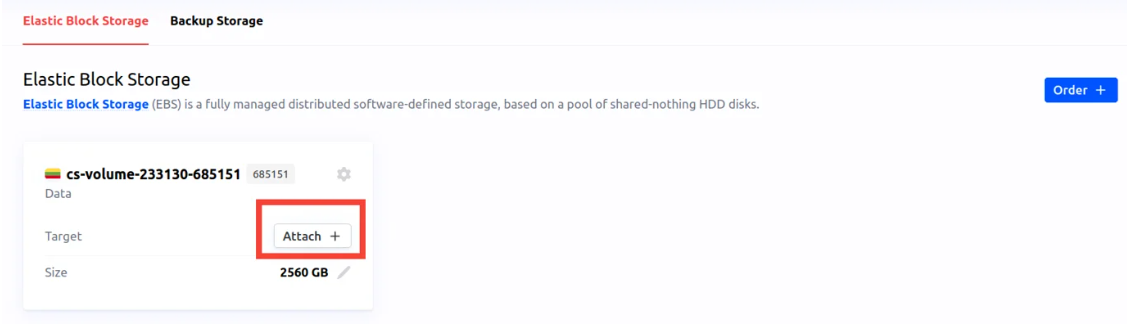
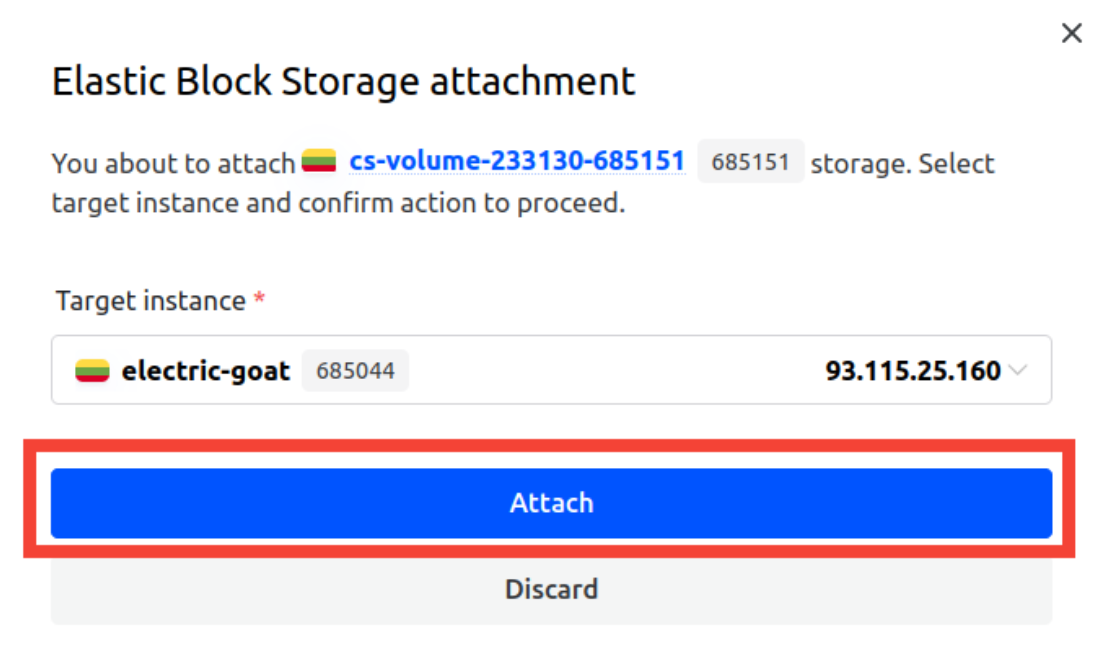
Once your Elastic Block Storage volume has been successfully created, it will appear in the Elastic Block Storage section of your project in the Client Portal (see Fig. 6). At this stage, the volume exists but is not yet associated with any server, so it cannot be used until attached.
- In the volume list, locate your newly created volume. Click the Attach button next to the volume entry to begin the attachment process.
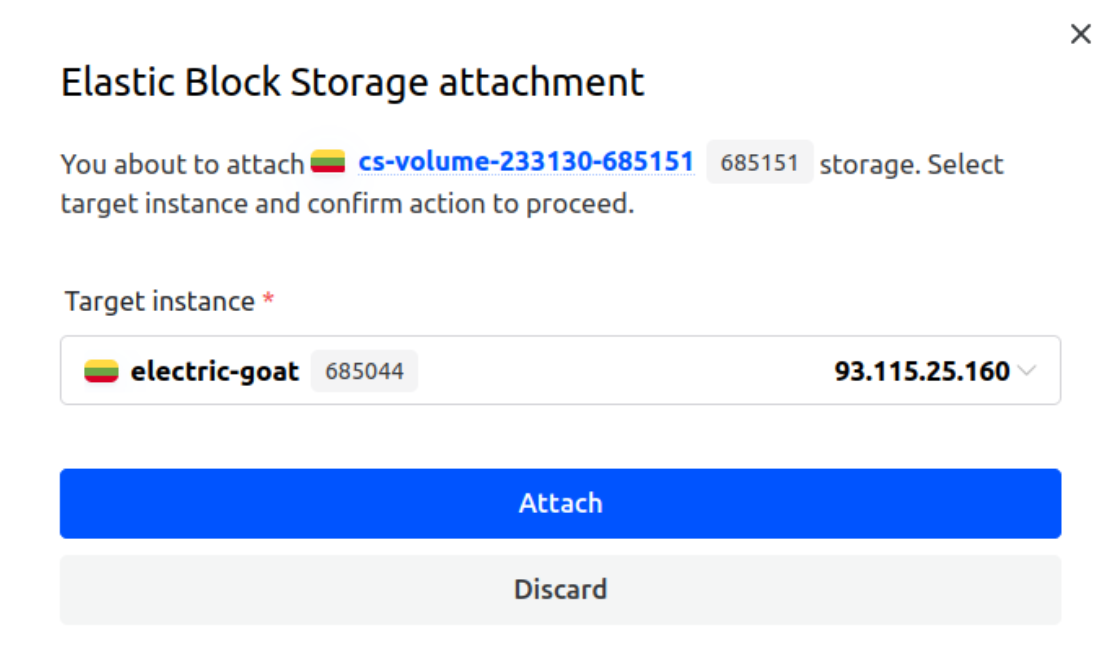
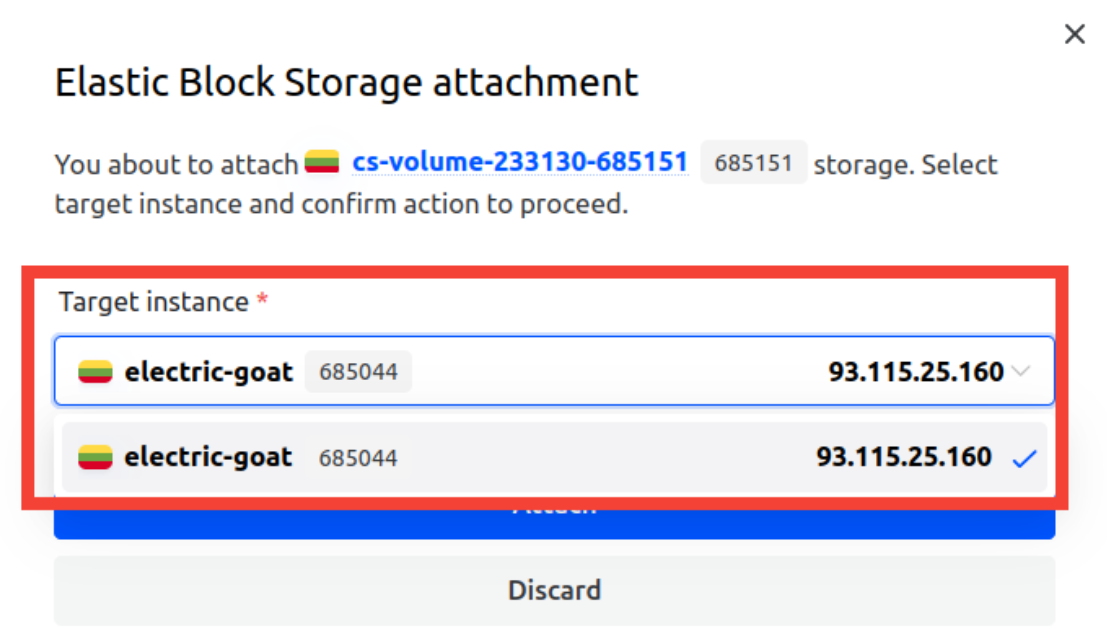
- A dialog window titled Elastic Block Storage attachment will open. This interface allows you to select the server to which the volume should be attached.

- From the Target instance drop-down menu, select the appropriate dedicated server within the same region. Only compatible servers will be listed here.

- After confirming your selection, click the blue Attach button to initiate the attachment process.

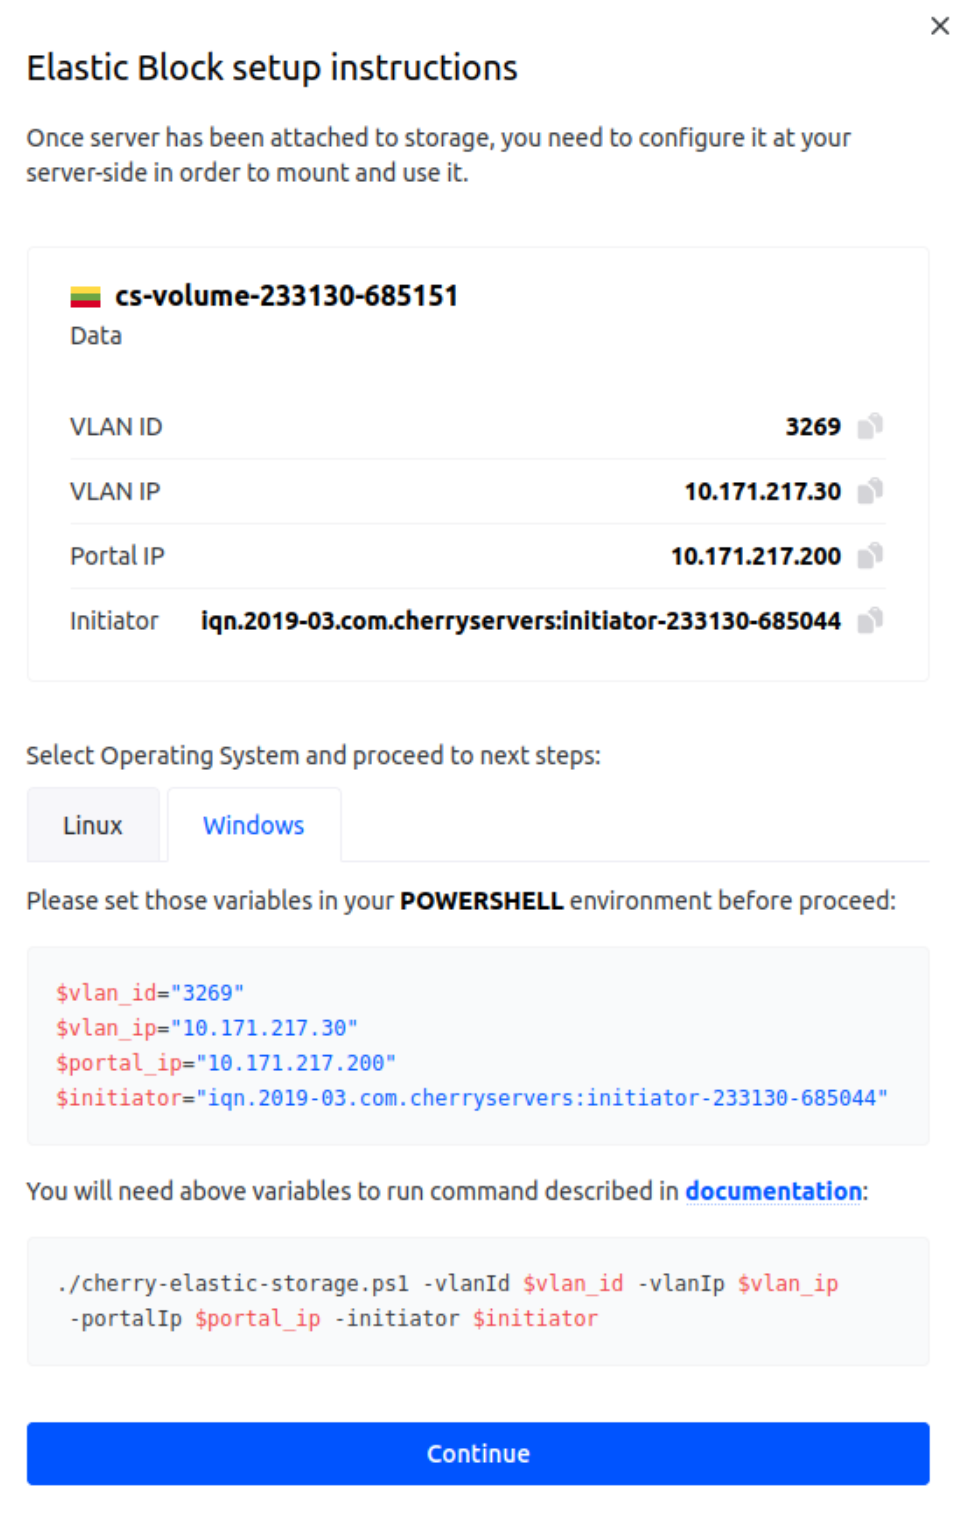
- Once the volume is attached, a success notification will be displayed, and a setup instructions popup will automatically appear with configuration details.
- This window contains essential variables such as vlan_id, vlan_ip, portal_ip, and initiator. Please ensure that you keep these details available as you will need them to configure the volume on your Windows server in the next step by running the PowerShell automation script.

#Step 3: Configure the Elastic Block Storage on Windows Server
After successfully attaching the volume to your server, you now need to configure the storage within your Windows environment by running a PowerShell script, which will handle iSCSI initiator setup and connect the volume.
- Log in to your Windows server where the volume was attached. You can use Remote Desktop Protocol (RDP) or any other remote access tool of your choice. For detailed instructions, please refer to our dedicated guide to access a Windows Server from Windows and Linux.
- Right-click the Start menu and choose Windows PowerShell (Admin). Administrator privileges are required to install features and configure iSCSI settings.

- Run the following command in PowerShell to download the setup script and save cherry-elastic-storage.ps1 to your current working directory:
wget -OutFile cherry-elastic-storage.ps1 https://raw.githubusercontent.com/cherryser - After attaching the volume, the Elastic Block setup instructions popup window appears in the Client Portal. It contains four variables you will need to accurately copy for the script:
- vlan_id
- vlan_ip
- portal_ip
- initiator
- Execute the following script, replacing “vlan_id”, ”vlan_ip”, “portal_ip”, and “initiator” with the variables you copied from the portal:
For example:
./cherry-elastic-storage.ps1 -vlanId <vlan_id> -vlanIp <vlan_ip> -portalIp <portal_ip> -ini./cherry-elastic-storage.ps1 -vlanId 3269 -vlanIp 10.171.217.30 -portalIp 10.171.217.200 - - During execution, the script will ask you to reboot the system. This is required in order to finalize the installation of Windows features.
- After the server reboots, log in again and re-run the same script from step 5 with the same variables. This ensures that the connection to the Elastic Block Storage is successfully completed.
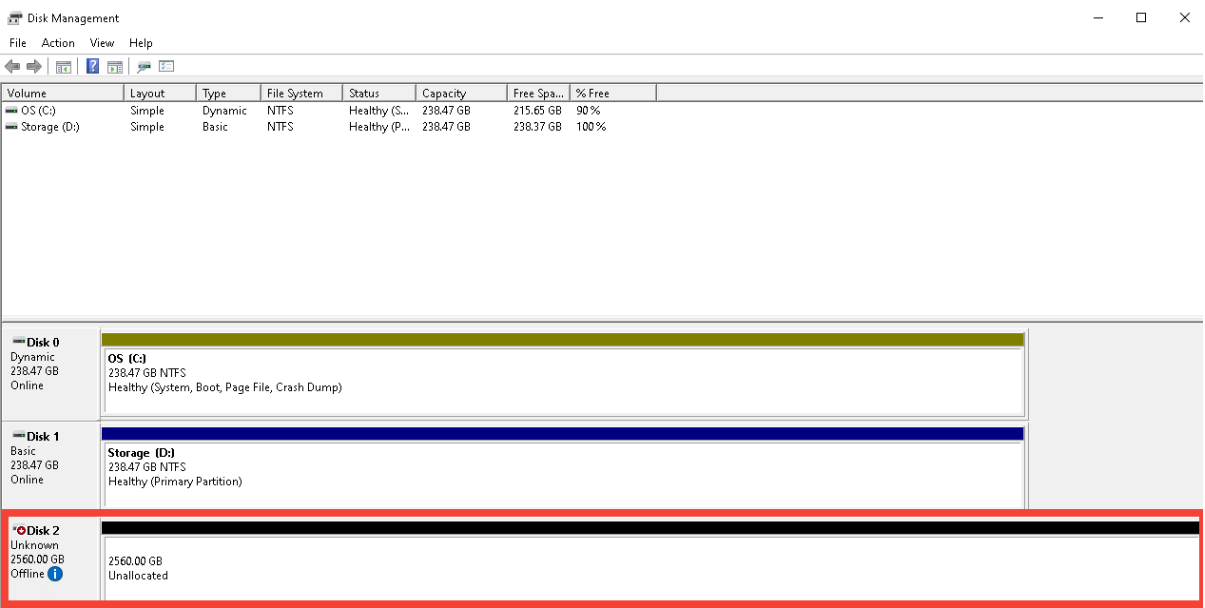
- Once finished, the new disk will appear in Disk Management as an unallocated volume, ready for initialization and formatting in the next step.


#Step 4: Initialize and format the EBS volume in Disk Management
Once the PowerShell script has been executed and the server has been rebooted, the newly attached Elastic Block Storage volume will appear in Disk Management as an unallocated disk. To make it usable, you must bring it online, initialize it with a partition table, and create a file system.
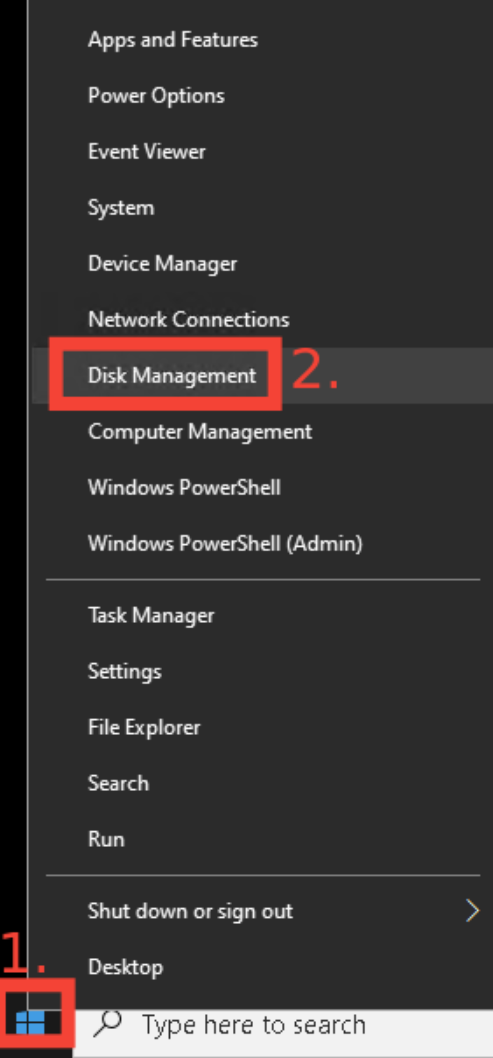
- After logging in to your Windows server, right-click the Start menu and select “Disk Management” from the list. The tool will display all detected physical and virtual storage devices.

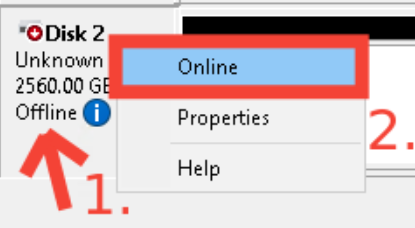
- In the lower section of the Disk Management window, locate the newly attached volume. It will be labeled as a new disk (e.g., “!Disk 2”) and will display the correct capacity (e.g., “2560 GB”). Its status will be listed as “Unknown”,”Offline”, and “Unallocated”.
- Right-click the disk label (e.g., Disk 2) on the left-hand side and choose “Online”. The disk will become visible to Windows, but will still need initialization.

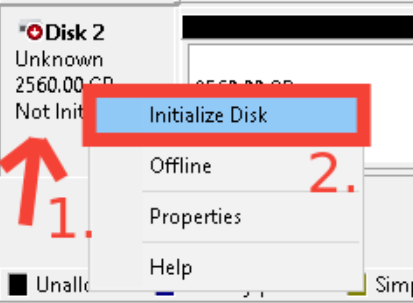
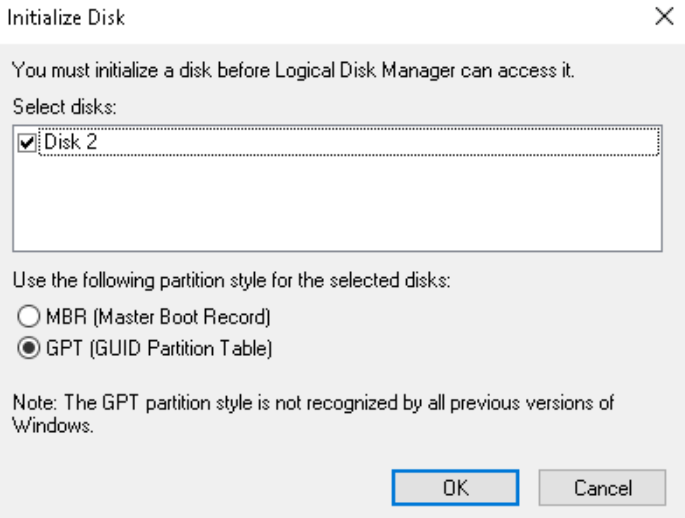
- Right-click the same disk label again, and select “Initialize Disk”. In the popup window that appears, select the appropriate partition style:
- Use GPT (GUID Partition Table) if your disk is larger than 2 TB.
- Use MBR (Master Boot Record) only if required for legacy compatibility or if the disk is smaller than 2 TB.

- After selecting the partition style, click OK to proceed.

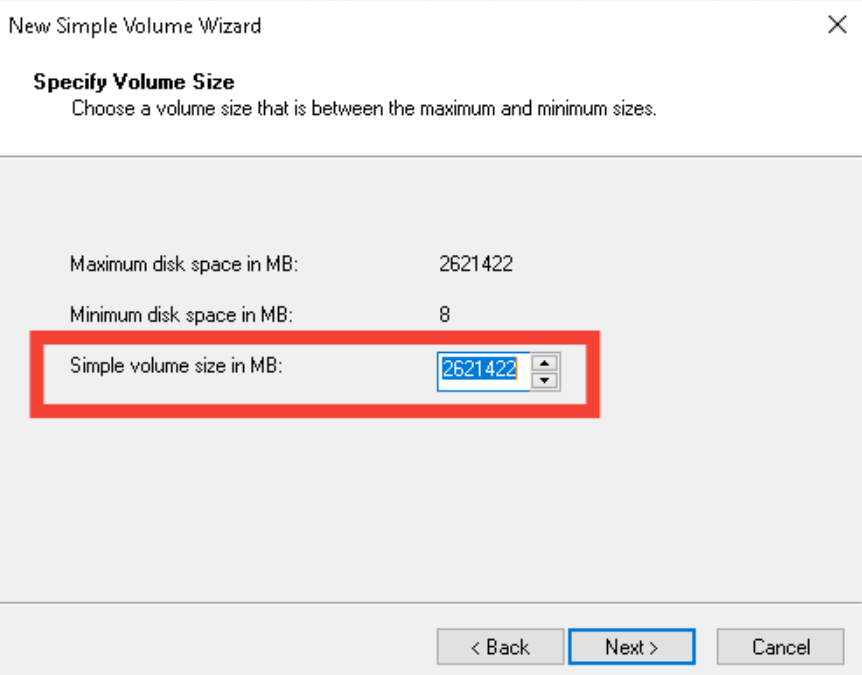
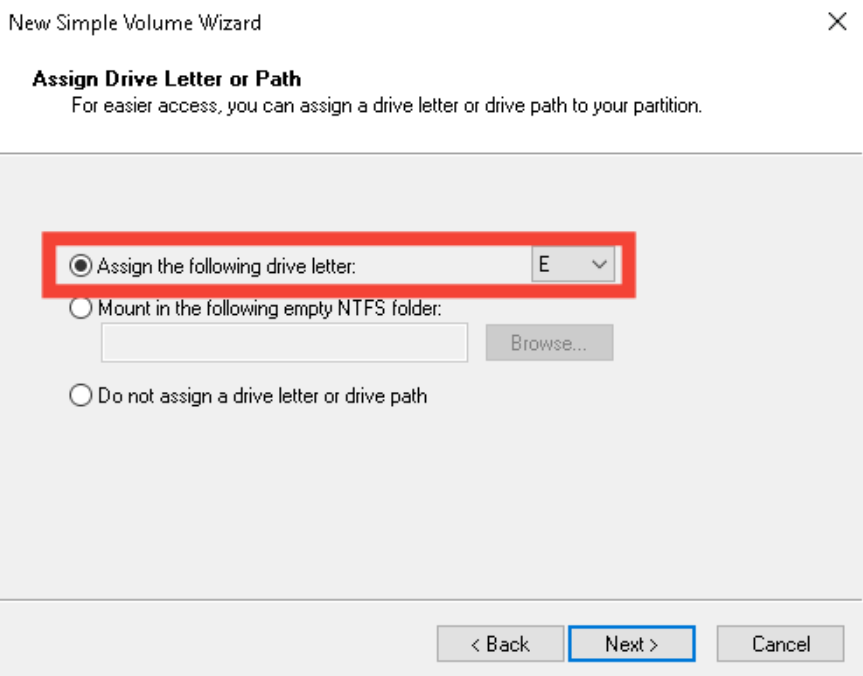
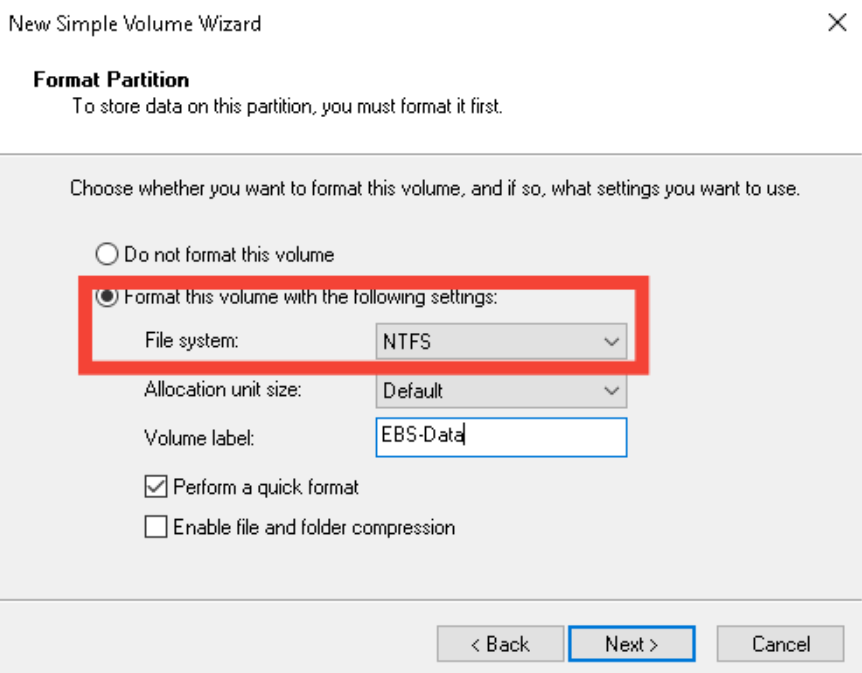
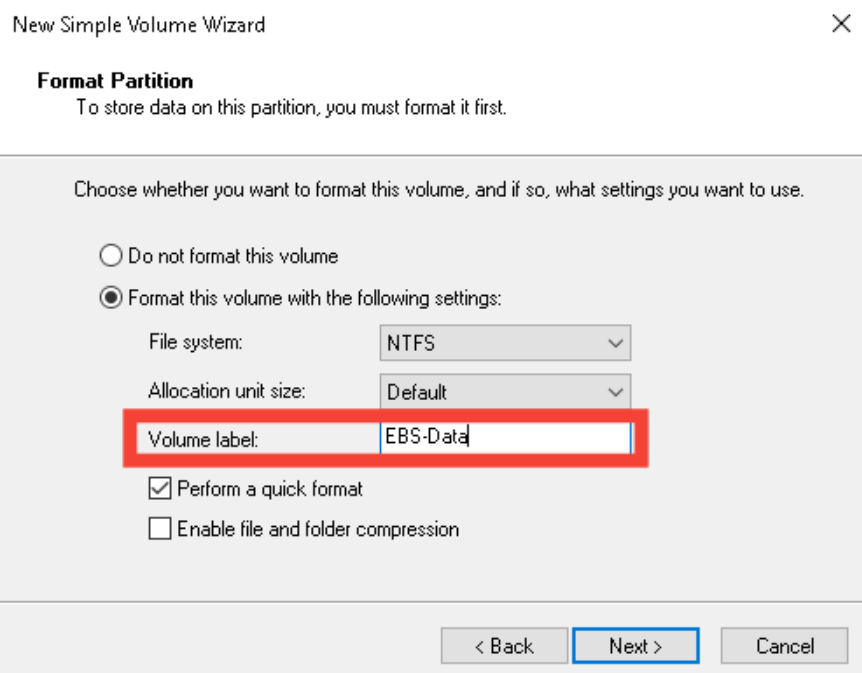
- Once the disk has been initialized, right-click the unallocated space to the right of the disk and choose “New Simple Volume”. Follow the wizard to:
- Allocate the full size of the disk (or specify a custom size if needed).
- Assign a drive letter (e.g., E:).
- Format the volume using the NTFS file system.
- Optionally, set a volume label for easier identification (e.g., EBS-Data).


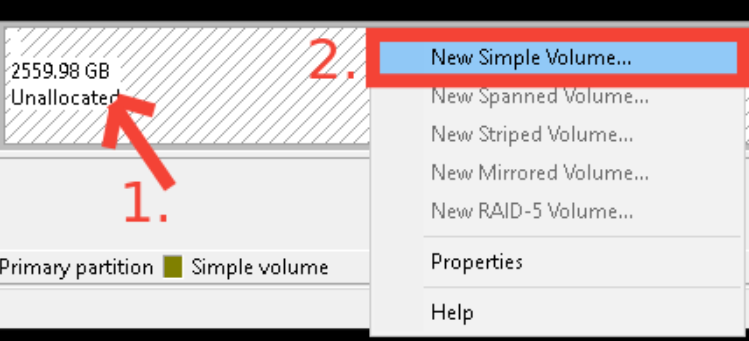
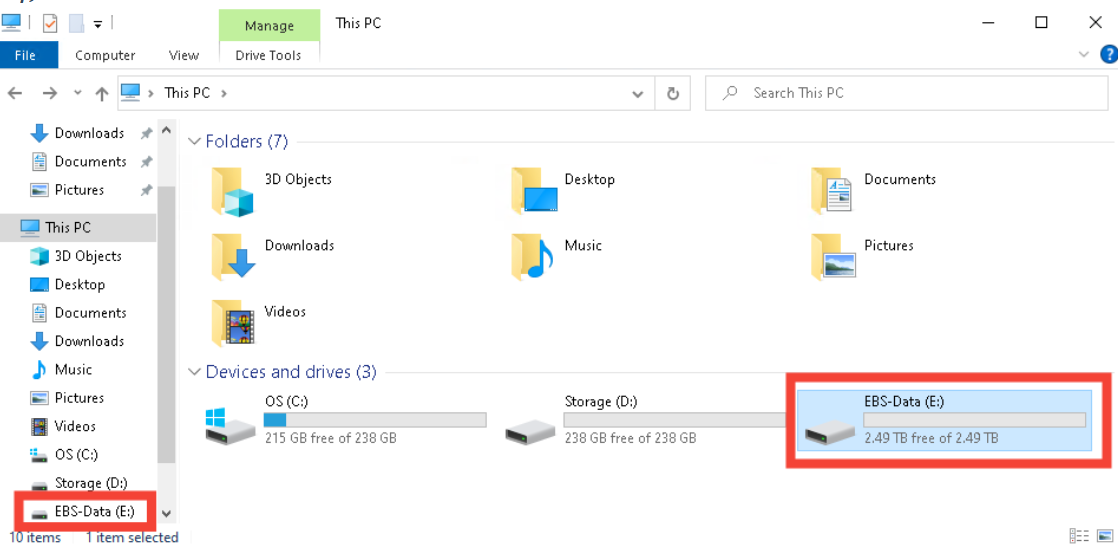
- After completing the wizard, Windows will format the partition and mount it as a local volume. You can now access the new drive from “This PC” as a fully operational disk.
 After these steps are completed, the Elastic Block Storage volume will be ready for use and can be utilized for data storage, backups, or any other workload requiring persistent block storage.