How to Assign a Subnet on Ubuntu 20.04, 22.04 & 24.04
While all servers are deployed with a Management IP address by default, which provides a fixed address for each server, assigning a public IP subnet to a server allows for multiple IP addresses to be used on the same server, with specific IPs reserved for essential network functions. Please note that presently subnet services are only available for dedicated bare metal servers.
This guide will explain how to set up and assign a public IP subnet to dedicated servers running Ubuntu, version 20.04, 22.04, and 2404 using "netplan". After applying changes, the network service will restart, which may temporarily disconnect active connections. Incorrect configuration can therefore result in losing remote access to the server. It’s recommended to keep a backup of the original configuration file before beginning the process.
#Instructions to Assign a Public IP Subnet on Ubuntu
#Step 1: Access the Client Portal
- Log in to your client portal.
- Click on the "Network" button at the top of the menu bar.

#Step 2: Verify Your Subnet Allocation and Assign IP Addresses
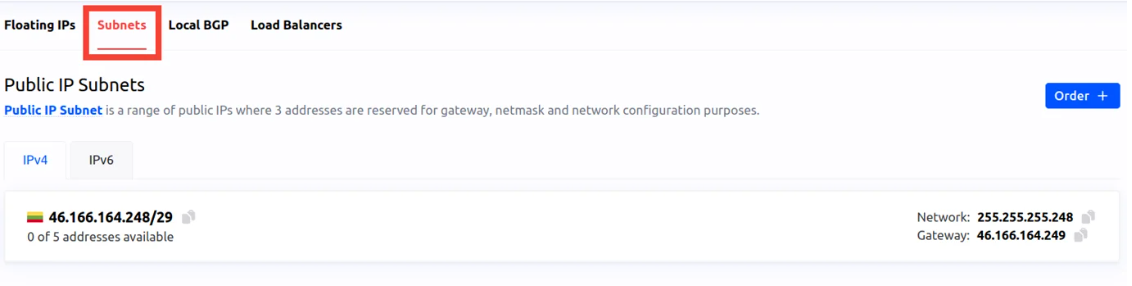
- In the "Network" section of the client portal, navigate to the "Subnets" tab to view all available subnets.

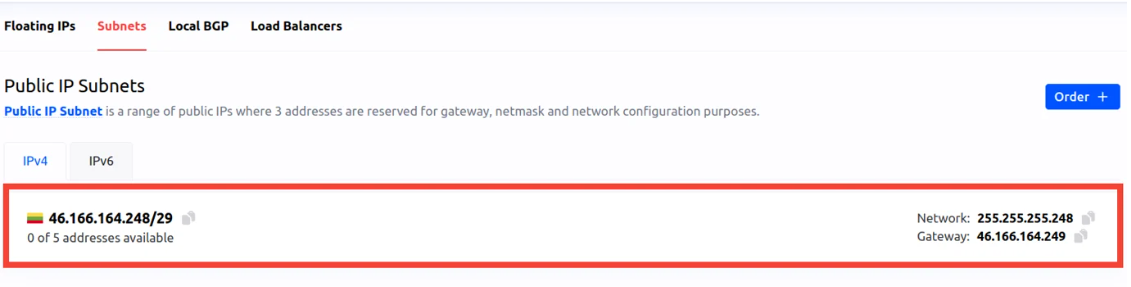
- You will now see a list of all available subnets. Locate the subnet you wish to configure.
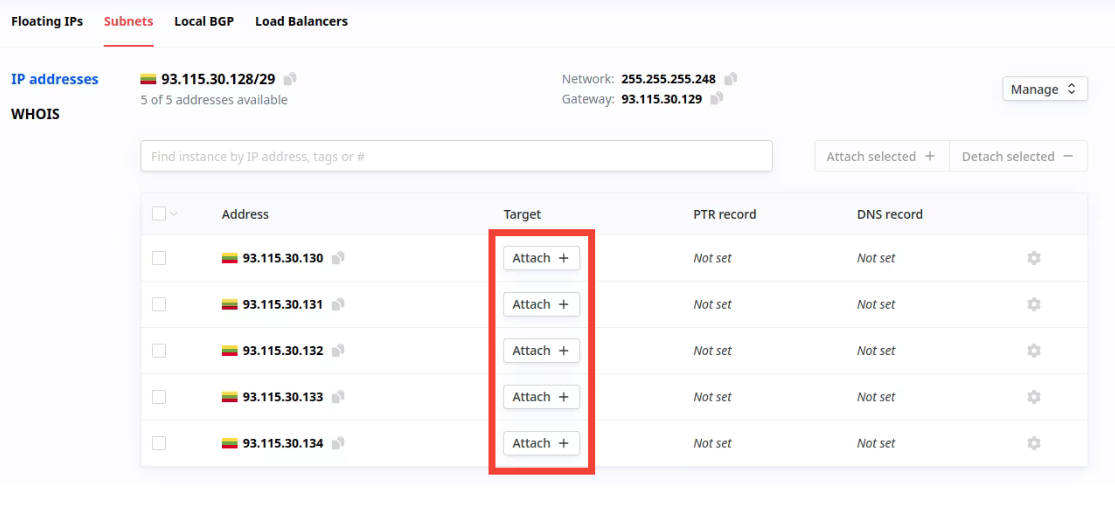
- To assign individual IP addresses from the subnet, click on the subnet in the list. This will display all available IP addresses within that subnet.

- Once you've identified the IP address you want to assign to your server, click the "Attach +" button next to that IP address. This action lets you associate the selected IP address with your server.

#Step 3: Configure the Subnet on Your Ubuntu Server
-
Access the server via SSH.
If you are unsure how to connect to your server, please visit our dedicated guide on how to connect to a Linux server using SSH.
-
Edit the "netplan" configuration.
- Open the "netplan" configuration file using the following command:
sudo nano /etc/netplan/50-cloud-init.yaml- Update the configuration to include your subnet IPs under “bonds” as shown below:
Output
GNU nano 7.2 network: version: 2 ethernets: enp65s0f0: match: macaddress: "ac:1f:6b:3a:ca:7a" set-name: "enp65s0f0" mtu: 1500 enp65s0f1: match: macaddress: "ac:1f:6b:3a:ca:7b" set-name: "enp65s0f1" mtu: 1500 enp65s0f2: match: macaddress: "ac:1f:6b:3a:ca:7c" optional: true set-name: "enp65s0f2" mtu: 1500 enp65s0f3: match: macaddress: "ac:1f:6b:3a:ca:7d" optional: true set-name: "enp65s0f3" mtu: 1500 bonds: bond0: addresses: - "93.115.25.17/25" # Primary IP of the server - "46.166.164.250/29" # First IP from the subnet - "46.166.164.251/29" - "46.166.164.252/29" - "46.166.164.253/29" - "46.166.164.254/29" # Last IP from the subnet nameservers: addresses: - 46.166.166.46 - 5.199.160.160 search: - maas gateway4: 93.115.25.1 macaddress: "ac:1f:6b:3a:ca:7a" mtu: 1500 interfaces: - enp65s0f1 - enp65s0f0 parameters: mode: "802.3ad" mii-monitor-interval: "100" up-delay: "0" down-delay: "0" lacp-rate: "slo- Save the file and exit (CTRL+X, then Y, and ENTER)
-
Apply the new configuration by running:
sudo netplan apply -
Verify the changes.
Check if the new subnet has been successfully assigned by running the “ip a” command:
ip aYou should see the new IP assignment under “bond0”, like in the example below:
Output
root@content-kit:~# ip a 1: lo: <LOOPBACK,UP,LOWER_UP> mtu 65536 qdisc noqueue state UNKNOWN group default qlen 1000 link/loopback 00:00:00:00:00:00 brd 00:00:00:00:00:00 inet 127.0.0.1/8 scope host lo valid_lft forever preferred_lft forever inet6 ::1/128 scope host no_prefixroute valid_lft forever preferred_lft forever 2: enp65s0f0: <BROADCAST,MULTICAST,SLAVE,UP,LOWER_UP> mtu 1500 qdisc mq master bond0 state UP group default qlen 1000 link/ether ac:1f:6b:3a:ca:7a brd ff:ff:ff:ff:ff:ff 3: enp65s0f1: <BROADCAST,MULTICAST,SLAVE,UP,LOWER_UP> mtu 1500 qdisc mq master bond0 state UP group default qlen 1000 link/ether ac:1f:6b:3a:ca:7b brd ff:ff:ff:ff:ff:ff permaddr ac:1f:6b:3a:ca:7b 4: enp65s0f2: <NO-CARRIER,BROADCAST,MULTICAST,UP> mtu 1500 qdisc mq state DOWN group default qlen 1000 link/ether ac:1f:6b:3a:ca:7c brd ff:ff:ff:ff:ff:ff 5: enp65s0f3: <NO-CARRIER,BROADCAST,MULTICAST,UP> mtu 1500 qdisc mq state DOWN group default qlen 1000 link/ether ac:1f:6b:3a:ca:7d brd ff:ff:ff:ff:ff:ff 6: bond0: <BROADCAST,MULTICAST,MASTER,UP,LOWER_UP> mtu 1500 qdisc noqueue state UP group default qlen 1000 link/ether ac:1f:6b:3a:ca:7a brd ff:ff:ff:ff:ff:ff inet 93.115.25.17/25 brd 93.115.25.127 scope global bond0 valid_lft forever preferred_lft forever inet 46.166.164.250/29 brd 46.166.164.255 scope global bond0 valid_lft forever preferred_lft forever inet 46.166.164.251/29 brd 46.166.164.255 scope global secondary bond0 valid_lft forever preferred_lft forever inet 46.166.164.252/29 brd 46.166.164.255 scope global secondary bond0 valid_lft forever preferred_lft forever inet 46.166.164.253/29 brd 46.166.164.255 scope global secondary bond0 valid_lft forever preferred_lft forever inet 46.166.164.254/29 brd 46.166.164.255 scope global secondary bond0 valid_lft forever preferred_lft forever inet6 fe80::aef1:6bff:fe3a:ca7a/64 scope link valid_lft forever preferred_lft forever 7: bond0.2516@bond0: <BROADCAST,MULTICAST,UP,LOWER_UP> mtu 1500 qdisc noqueue state UP group default qlen 1000 link/ether ac:1f:6b:3a:ca:7a brd ff:ff:ff:ff:ff:ff inet 10.175.52.28/24 brd 10.175.52.255 scope global bond0.2516 valid_lft forever preferred_lft forever inet6 fe80::aef1:6bff:fe3a:ca7a/64 scope link valid_lft forever preferred_lft forever -
Test connectivity.
Ping the new IP addresses from the subnet to test the connection by running the following command and replacing “
” with one of the IPs from the subnet. ping -c 5 <new-ip-address>A successful response indicates that the IP addresses has been correctly configured.
#Step 4: Ensure The Configuration Persists Through Reboots
-
To ensure that your changes stick after a reboot you must turn off Cloud-init's network configuration.
To do this, Create the persistence configuration file and add the configuration with:
echo "network: {config: disabled}" | sudo tee /etc/cloud/cloud.cfg.d/99-disable-network-config.cfg
This setup enables and configures multiple IP addresses for different services on a single server, enhancing scalability and flexibility for your network configuration.