#What Is iPXE?
iPXE is an open-source network boot firmware tailored to advanced users that expands on the standard Preboot Execution Environment (PXE) as a remote bootloader using additional protocols beyond TFTP, such as HTTP, HTTPS, and iSCSI for secure, versatile deployments.
With iPXE, clients can self-install any operating system on a Cherry Servers dedicated bare metal server, including from outside those we officially support, using remote images, scripts, or other sources. Using this method, clients gain maximum flexibility and control over the installation process and configuration.
Installation of operating systems on servers deployed with iPXE will not be overseen by Cherry Servers, and we encourage customers to exercise caution throughout the process. Currently iPXE is available for all dedicated bare metal servers, excluding those found in the “Outlet” section.
#How iPXE Works with Cherry Servers
Standard metal as a service (MaaS) infrastructure doesn’t support iPXE over DHCP, so Cherry Servers uses a custom technical scheme for implementation.
During the server’s first boot, the universal iPXE ISO will be automatically connected to the server. The initial server load will be carried out from the ISO, and once the network information is received via DHCP, the iPXE script that was selected or provided by the client will be executed from the link in the ISO.
At this point, the installation of the selected operating system will commence, all instructions will be triggered within the RAM, and the ISO will be automatically disconnected after five minutes.
#Script Templates
Cherry Servers provides templates for iPXE installation instructions of officially supported operating systems, which are fully customizable. Within these templates, which are shown below, we provide various setup variables which will be automatically populated with the server’s information during installation.
set client_ip ${IP_ADDRESS}


set gateway ${GATEWAY}


set netmask ${NETMASK}


set iface ${IFACE}


kernel ${kernel_url} \


    ip=${client_ip}::${gateway}:${netmask}::${iface}:off:${dns1}:${dns2} \


    url=${iso_url} fsck.mode=skip
Clients may also opt to use a custom chain URL for installation. Please note that while iPXE is compiled with HTTPS support, you may encounter issues with certificate recognition. In the event that this occurs, please try using HTTP.
#Netboot.xyz
Cherry Servers supports netboot.xyz for iPXE installation, and we provide template instructions to initiate the tool.
Netboot is an open source project that combines a wide selection of Linux distributions and diagnostic tools into a centralized, easy-to-use iPXE menu that downloads the latest official images in real-time directly from the OS developers.
Netboot supports the following OS distributions:
- AlmaLinux,
- Alpine Linux,
- Arch Linux,
- BlackArch,
- CentOS Stream,
- Debian,
- Devuan,
- Fedora,
- Fedora CoreOS,
- Flatcar Container Linux,
- Gentoo,
- Harvester,
- IPFire,
- k3OS,
- Kairos,
- Kali Linux,
- Mageia,
- NixOS,
- openEuler,
- openSUSE,
- Oracle Linux,
- Proxmox,
- Red Hat Enterprise Linux,
- Rocky Linux,
- Slackware,
- Talos,
- Tiny Core Linux,
- Ubuntu,
- VyOS,
- Zen Installer Arch (Arch Linux Installer).
Netboot also provides diagnostic troubleshooting, file recovery, and system repair tools, which can also be uploaded via honeycomb on running servers. The tools supported through this system are:
- 4MLinux,
- Boot Repair CD,
- CAINE,
- Clonezilla,
- Dasharo Tools Suite,
- GParted,
- Kaspersky Rescue Disk,
- Memtest86+ 7.20,
- RedoRescue,
- Rescatux,
- Rescuezilla,
- ShredOS,
- Super Grub2 Disk,
- System Rescue CD,
- UEFI Shell,
- ZFSBootMenu.
Below, you can find instructions to get started with iPXE.
#How to Use iPXE
iPXE can be used for any dedicated bare metal server, excluding those in the “Outlet” category, during server deployment, or even on live servers by performing a server rebuild. Below are instructions to select iPXE in both cases, followed by an overview of implementing the script.
#During Deployment:
-
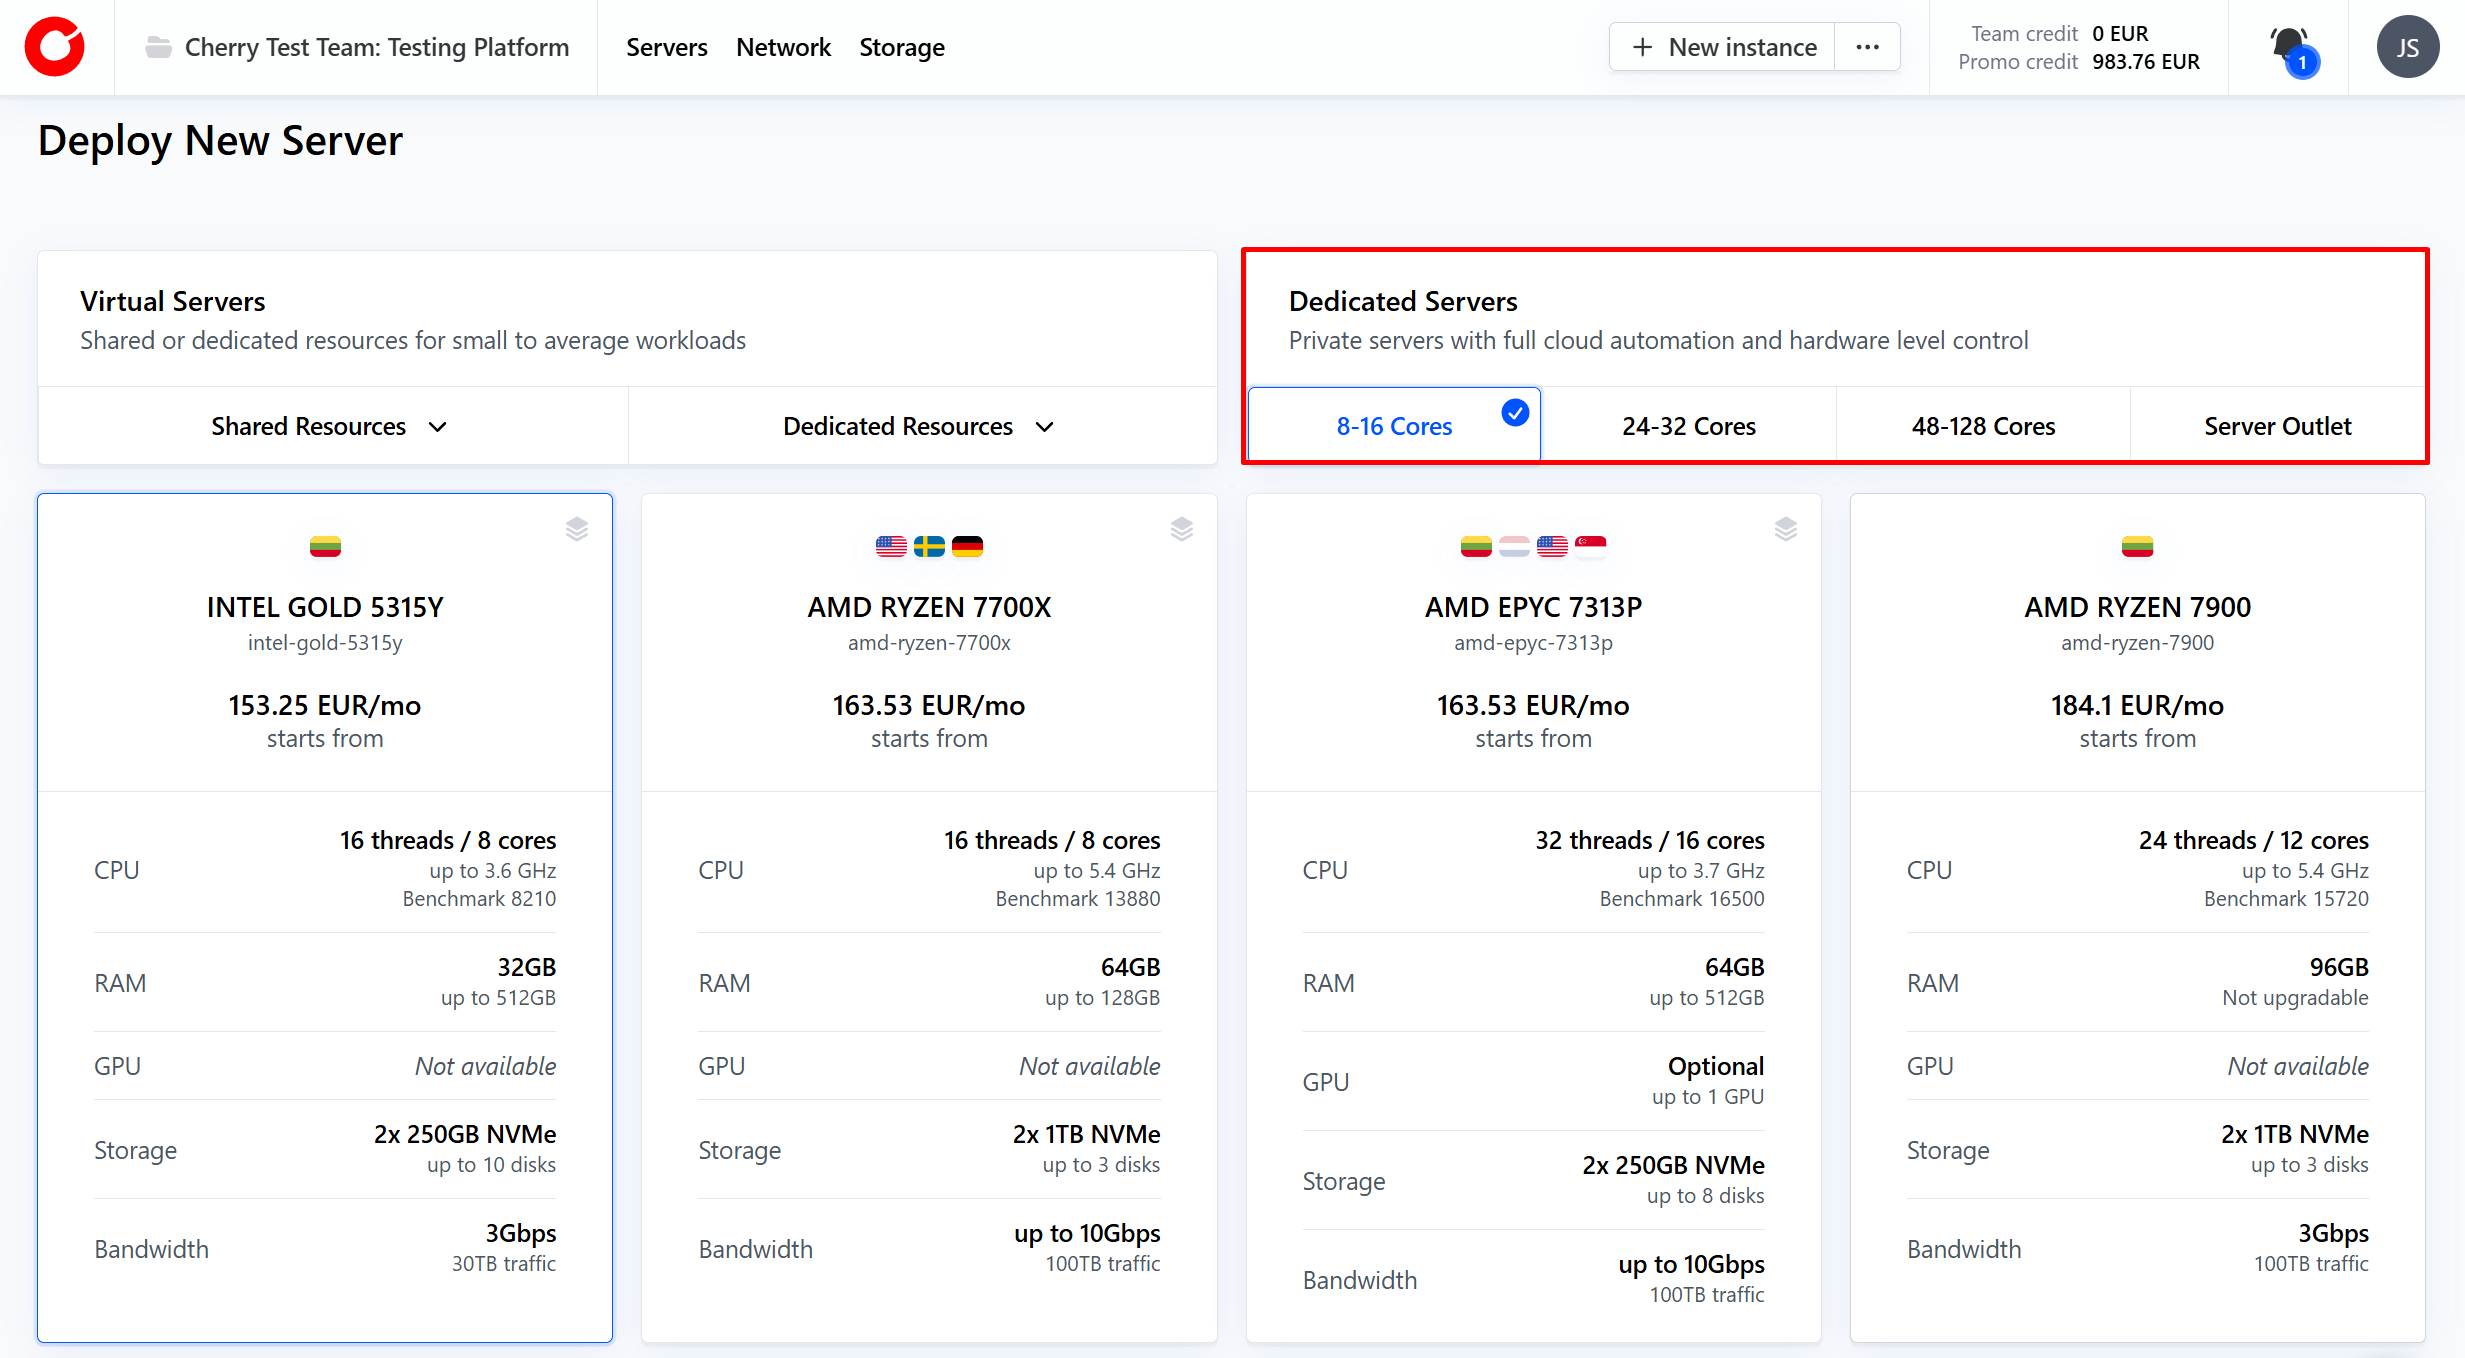
Select the server you would like to deploy.

-
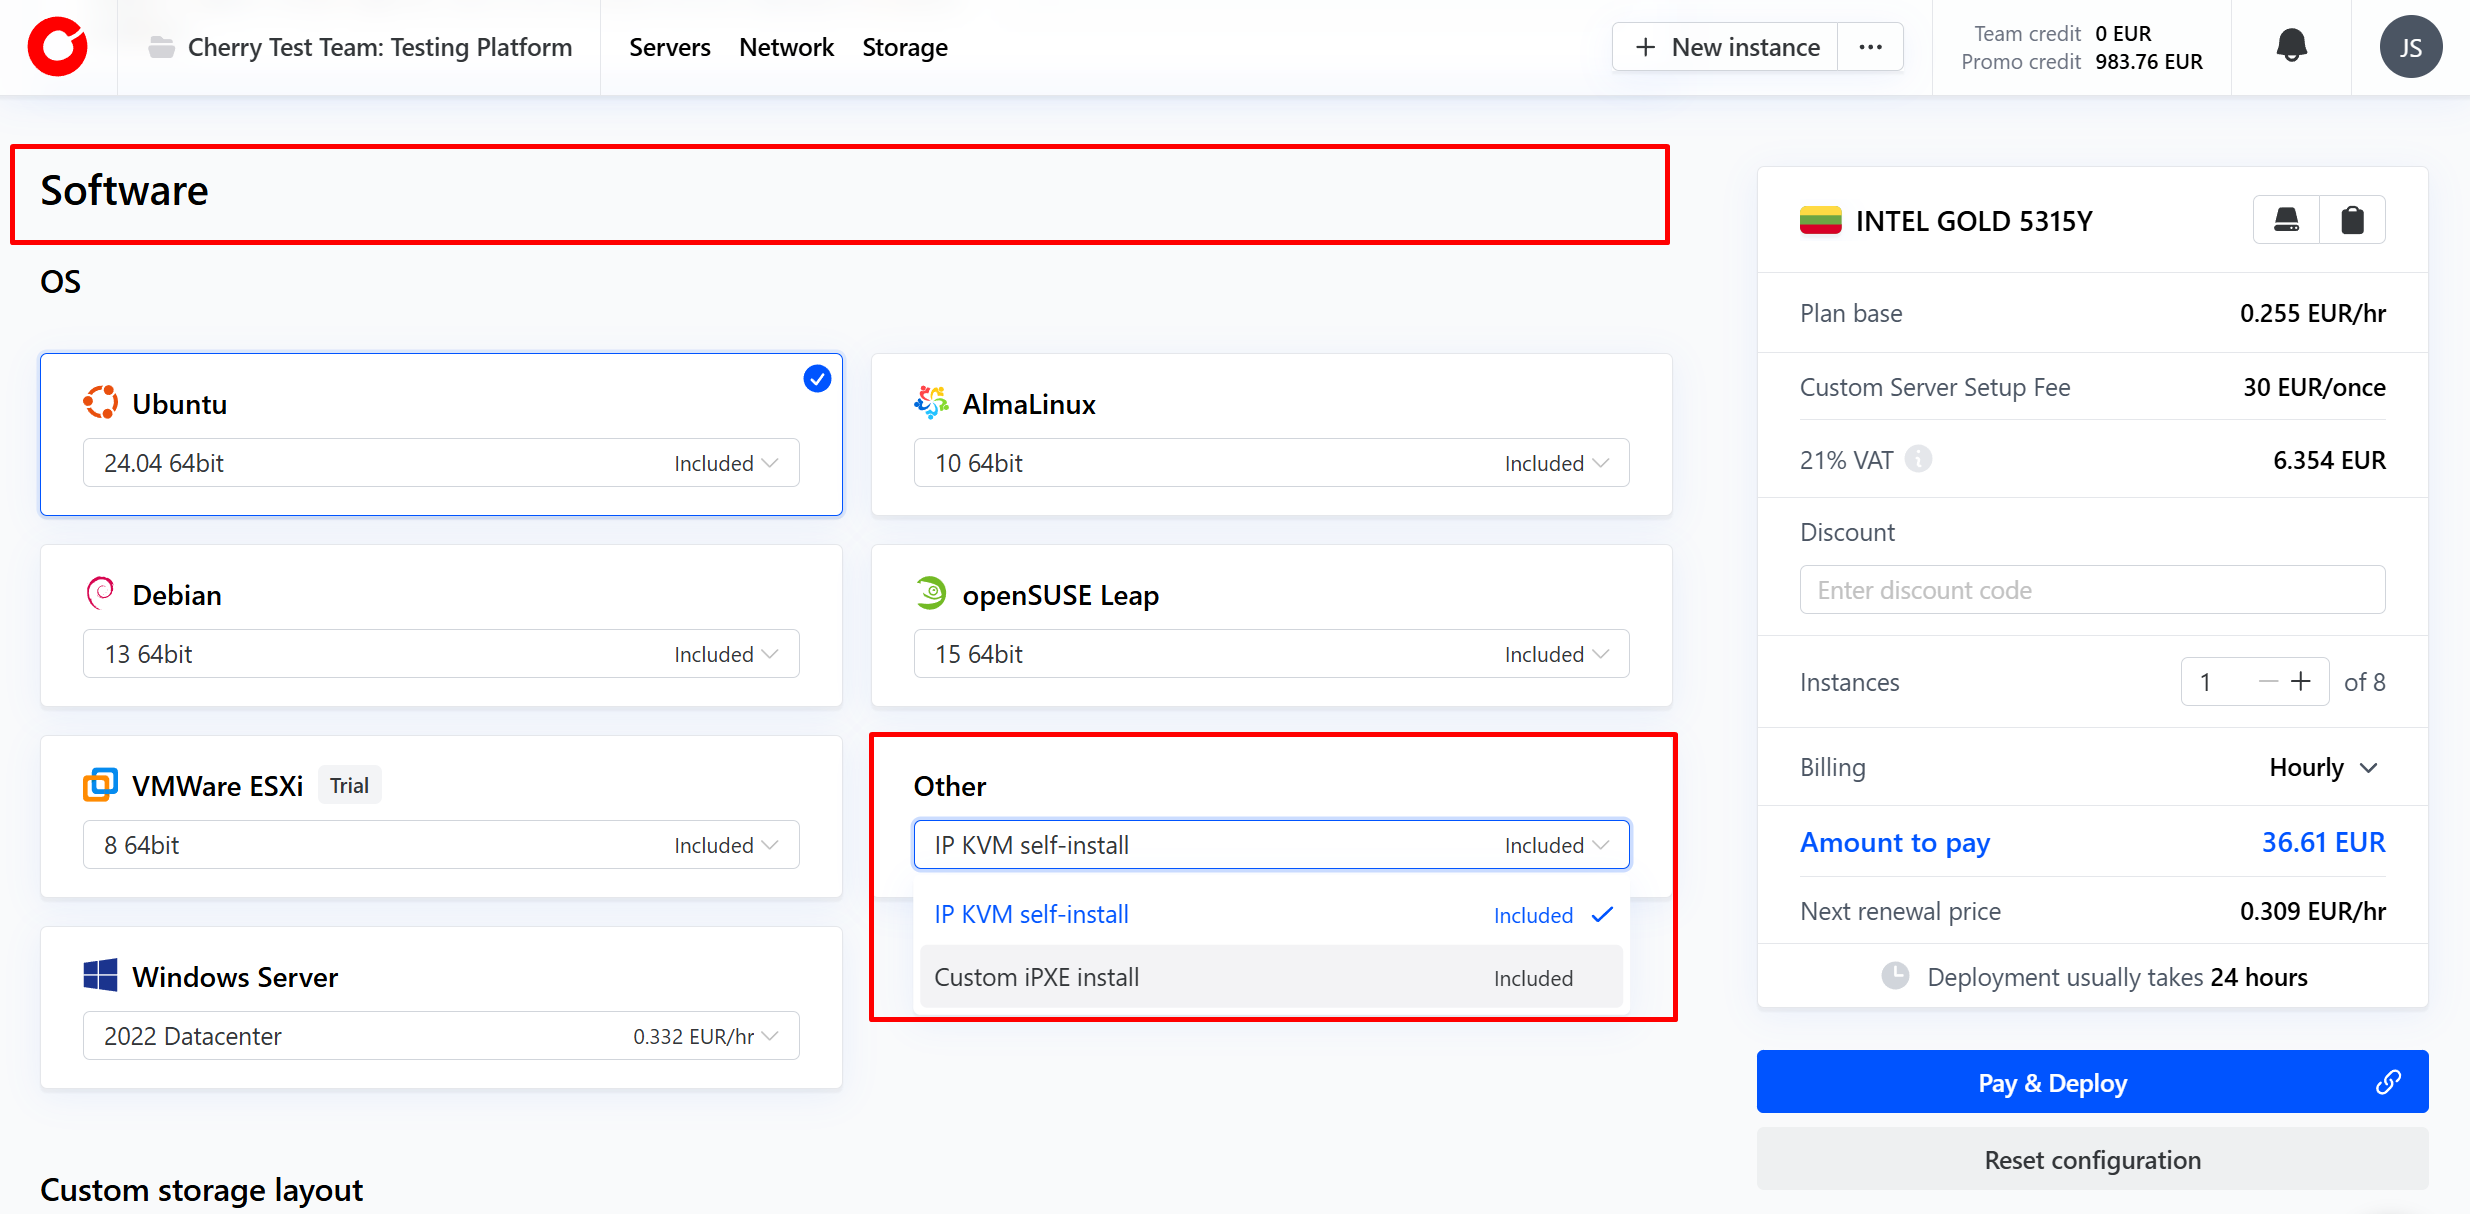
After selecting the server, the page will direct you to configuration settings. Scroll down to the “Software” section and engage the dropdown menu in the “Other” box. Select “Custom iPXE install”.

-
After clicking “Pay and Deploy”, a pop-up window with next steps. Please visit the “iPXE Script” heading below.
#During Server Rebuild
-
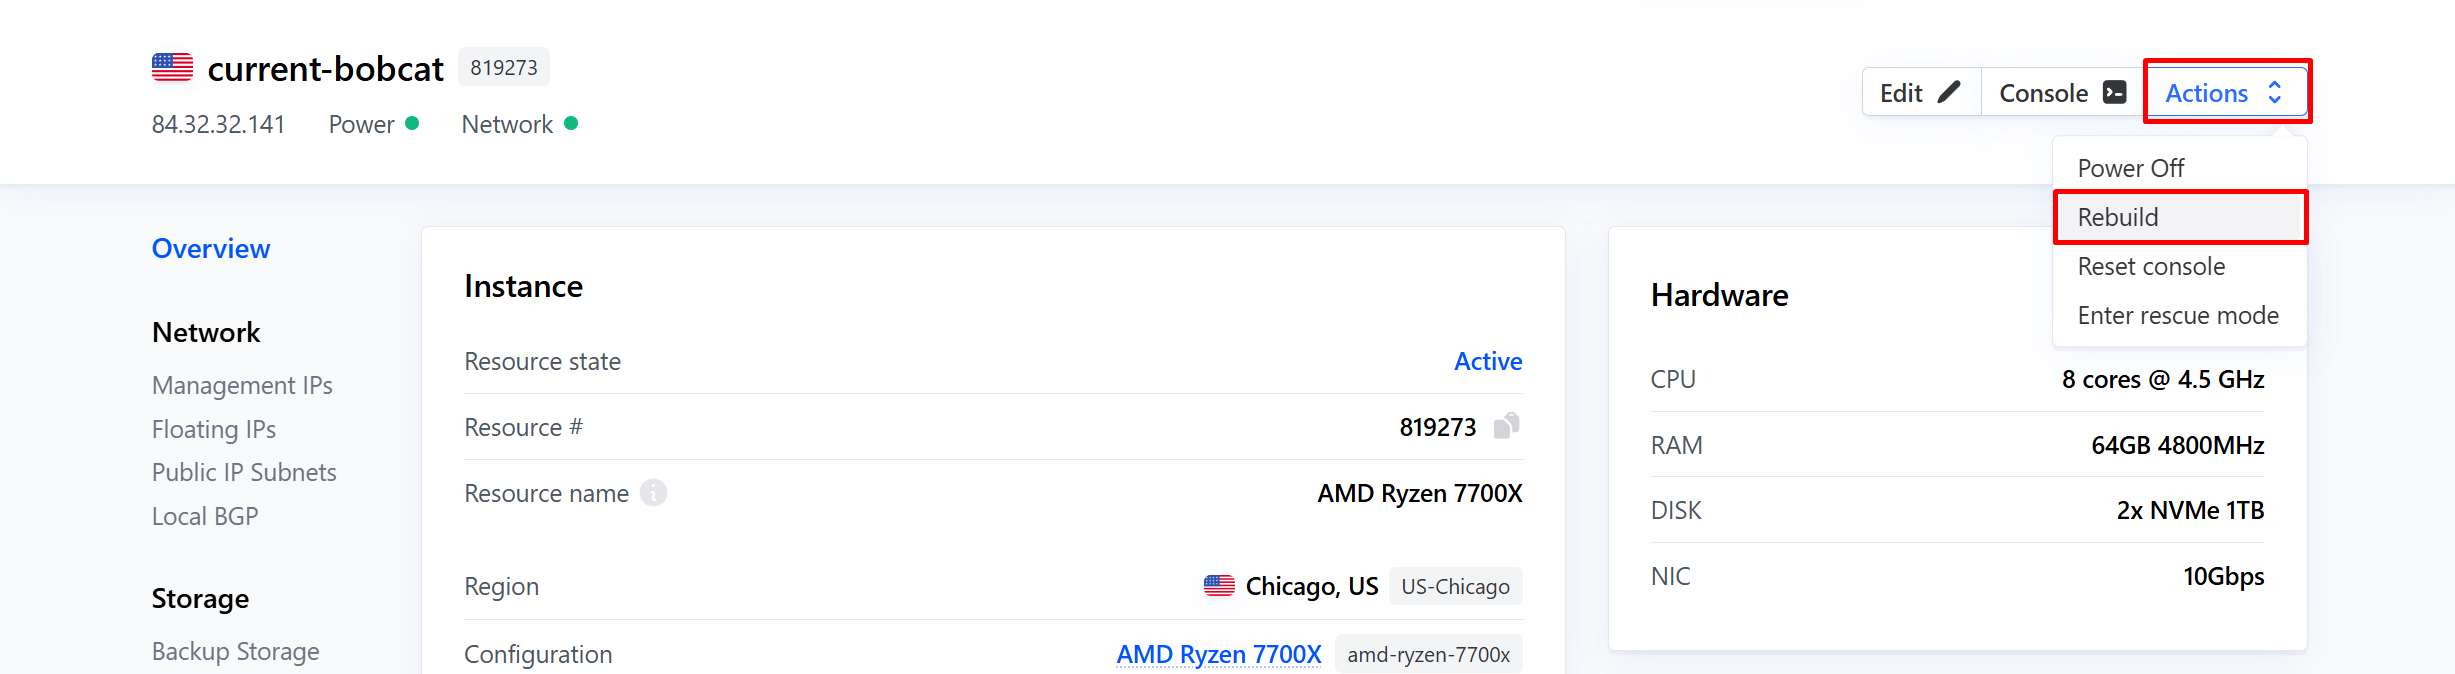
From the client portal, navigate to the server tab and click the server you would like to initiate a rebuild for.

-
On the server dashboard, click the “Actions” button in the top right-hand corner, and select “Rebuild” from the dropdown menu.


#Setting up the iPXE Script
-
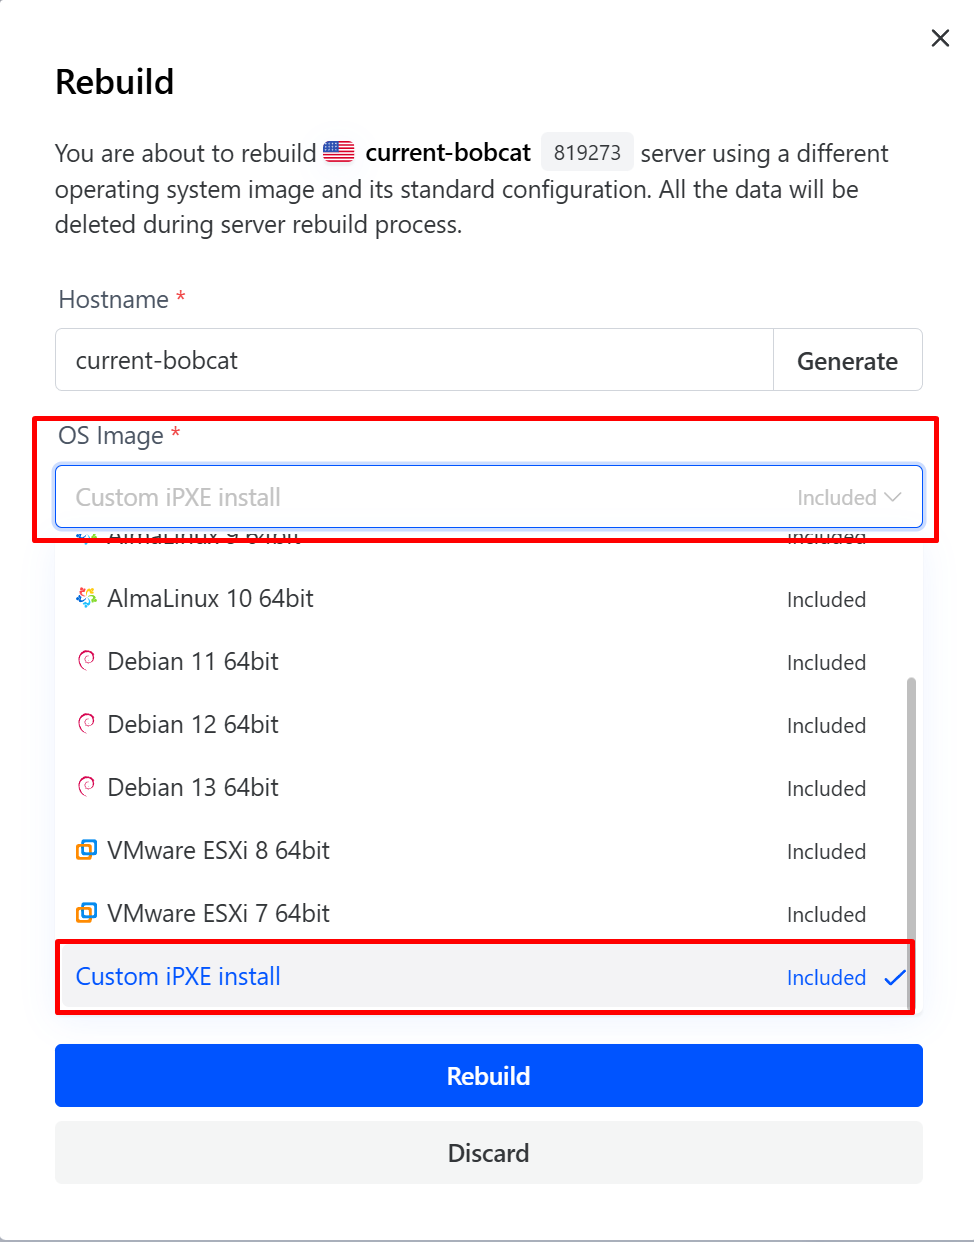
In the pop-up window that appears, engage the dropdown menu under the “OS Image” heading, and select “Custom iPXE install.”

-
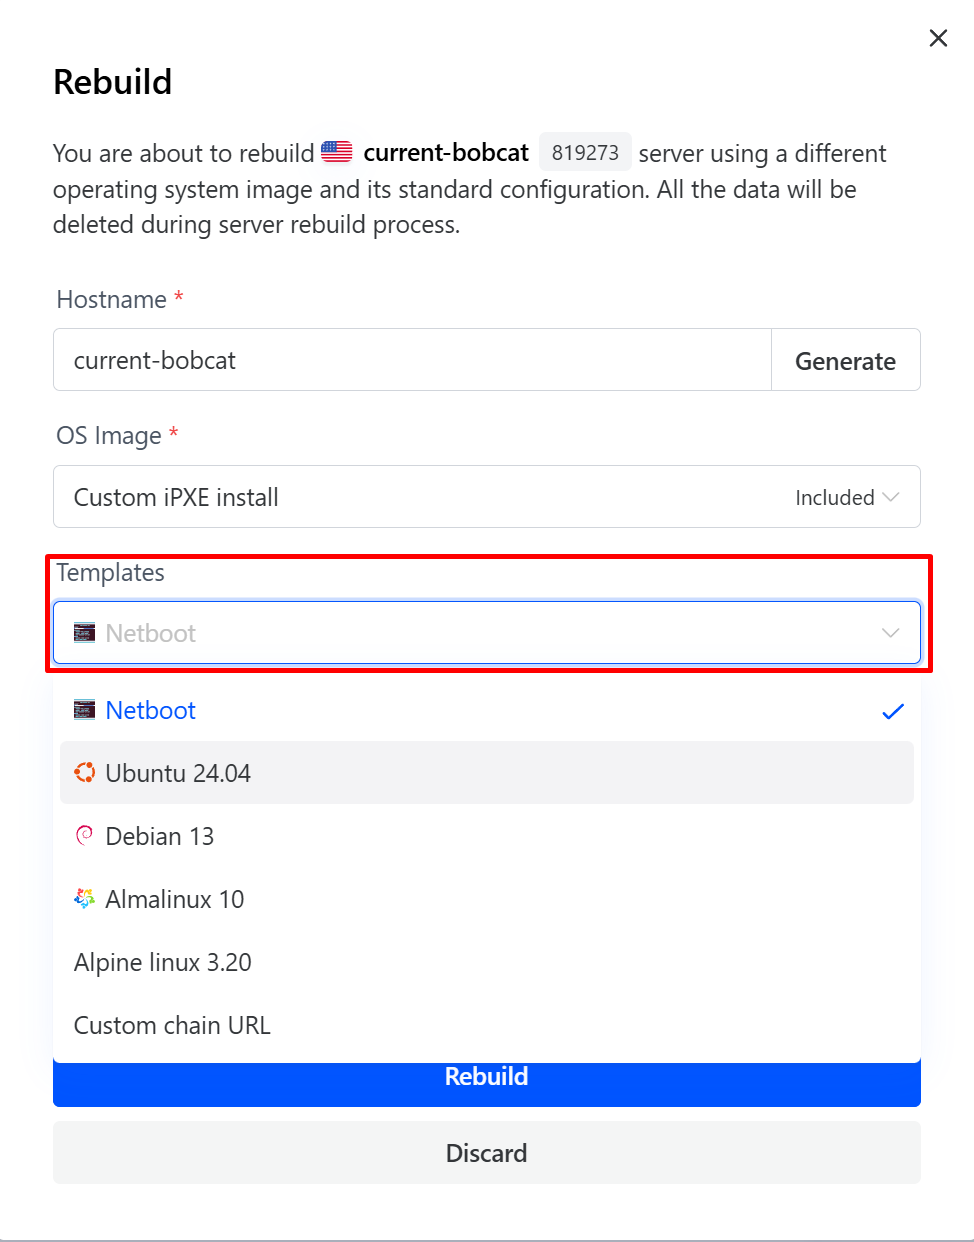
Once Custom iPXE install has been selected, a new box titled “Templates” will appear, along with an “Instructions” box.
From the dropdown menu, you can choose to use one of the prepared templates for an OS that Cherry Servers officially supports, netboot, or opt to use a custom chain URL.

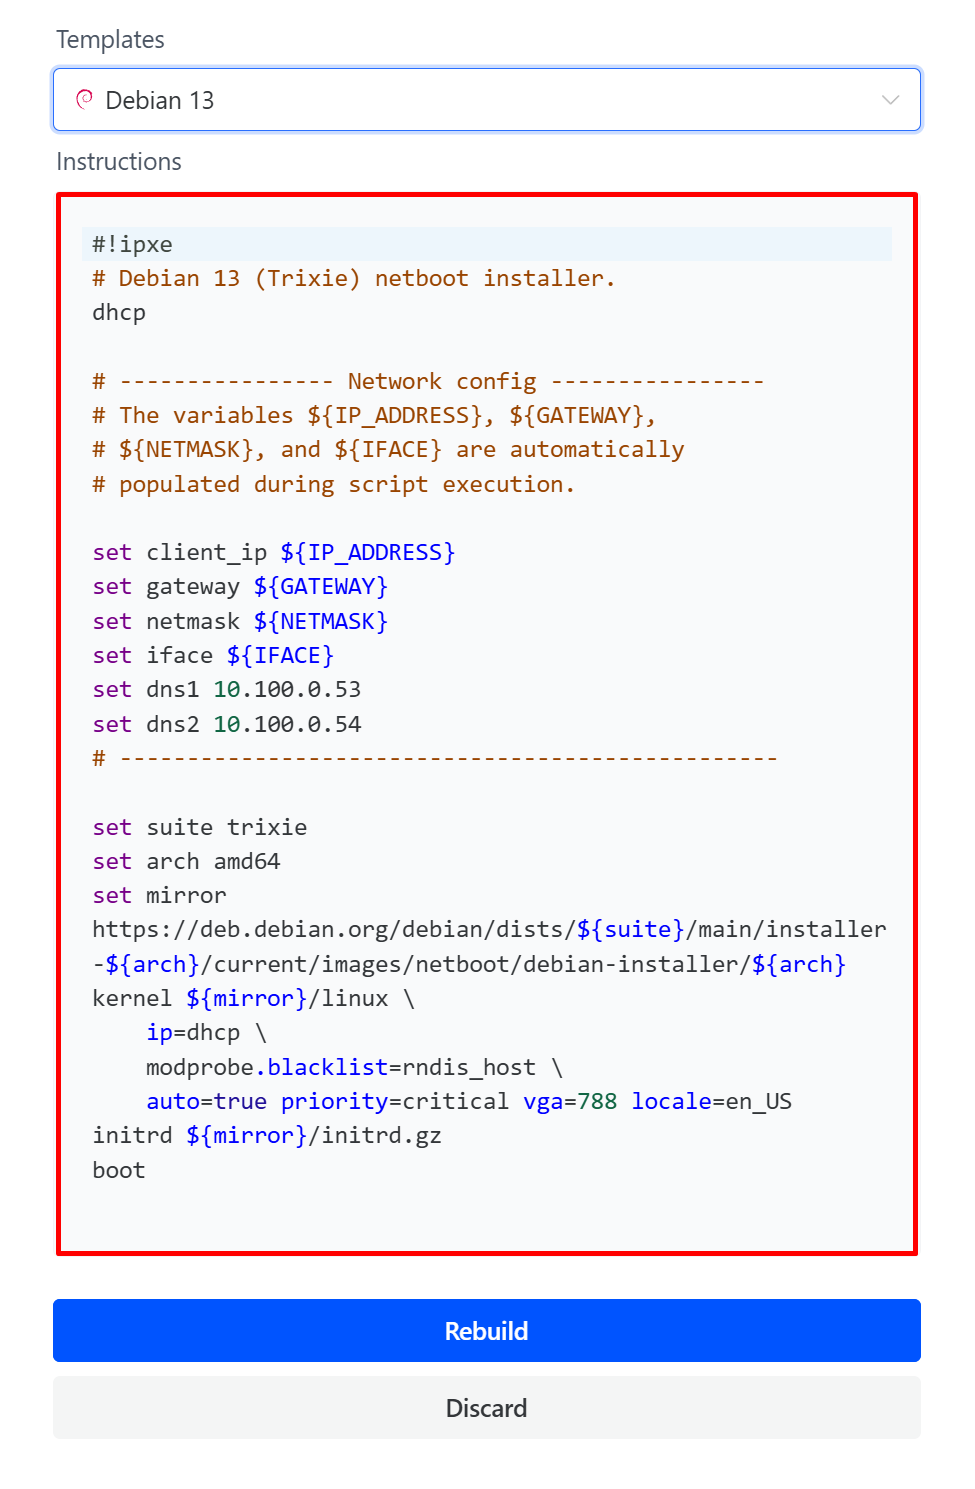
-
After making your selection, the iPXE instructions that the ISO will execute will be shown in the instructions box. These instructions are fully customizable, and will not be managed or altered by Cherry Servers during execution.